How to make pages in word. How to make page numbers in Microsoft Word? Setting up page numbering
Automatic page numbering in Microsoft Word is a very useful feature that can significantly reduce the time it takes to edit a document. It is especially worth noting its usefulness when affixing page numbers in large documents (over 40 sheets). In order to number all the pages in your document you need to:
1. In the menu section " Insert» find the button « Page number».

2. Among the list that opens, you will find the following sections:

- Top of page – page numbers will be placed in the header on all sheets. Simply hover your mouse over this section of the menu and a list of possible variations in styles, sizes, fonts, etc. will appear. for the page number. The same can be applied to all other sections and menus " Page number».

- Bottom of the page – page numbers will be placed in the footer on all sheets. There are many options for aligning numbers relative to the sheet, their style, sizes, etc.

- In the margins of the page – page numbers will be either in the right margin of the sheet or in the left. You also select the required type of number and its location from the list.

- Current situation – the page number will be placed where your mouse cursor is located. That is, the number will be located where you last left the active mouse cursor.

In order to select the beginning of sheet numbering (from which sheet the numbering will begin), you need to go to the “ tab Page Number Format" and in the paragraph " Pagination» check the box opposite « start with:»

As you can see in the image above, I indicated the number “2”, that is, the page numbering in the document will start from the second sheet, and the first sheet will not be numbered. This option is very useful if you are writing an essay or term paper that has a title page.
The need to add a new page in a Microsoft Office Word text document does not arise very often, but when it is still needed, not all users understand how to do it.
The first thing that comes to mind is to place the cursor at the beginning or end of the text, depending on which side you need a blank sheet, and press “Enter” until a new page appears. The solution is, of course, good, but certainly not the most correct, especially if you need to add several pages at once. We will tell you below how to correctly add a new sheet (page) in Word.
MS Word has a special tool with which you can add a blank page. Actually, that's exactly what it's called. To do this, follow the instructions below.
1. Left-click at the beginning or end of the text, depending on where you need to add a new page - before or after the existing text.
2. Go to the tab "Insert", where in the group “Pages” find and click the button “Blank Page”.

3. A new, blank page will be added at the beginning or end of the document, depending on where you needed it.

Adding a New Page Using Inserting a Break
You can also create a new sheet in Word using a page break, especially since this can be done even faster and more conveniently than using the tool “Blank Page”. It’s trite, you will need fewer clicks and keystrokes.
We have already written about how to insert a page break; you can read more about this in the article linked below.
1. Place the mouse cursor at the beginning or end of the text before or after which you want to add a new page.

2. Click “Ctrl+Enter” on the keyboard.
3. A page break will be added before or after the text, which means a new, empty sheet will be inserted.

You can finish here, because now you know how to add a new page in Word. We wish you only positive results in your work and training, as well as success in mastering Microsoft Word.
Microsoft Word or simply Word is one of the most popular programs among users. Thanks to a large number of functions and a simple interface, Microsoft Word has become almost a standard among . Therefore, it is rare to find a computer with the Windows operating system, but without the Word program.
One of the typical tasks that users encounter while working with this program is page numbering. Many users simply cannot find this feature. In this article we will talk about how to enable and configure page numbering in Word.
How to enable page numbers in Word 2007, 2010 or 2013
Since 2007, Word has used a so-called ribbon interface. In this interface, all program functions are distributed over several tabs. The Page Numbering feature is located on the Insert tab.
By clicking on the “Page Numbering” button you will see a drop-down menu in which you can select the arrangement of numbers. For example, page numbers can be placed at the top of the page, at the bottom of the page, or in the margins. To add page numbering in Word, select one of the proposed layout options.
If you want the page numbering to start with another number rather than one, you can specify this in the “Page Number Format” menu.

Open the Page Number drop-down menu and select Page Number Format. In the window that opens, you need to enable the “Start” function and specify the number from which page numbering should begin in Word.

Page numbering in Word 2007, 2010, or 2013 without a cover page
Another possible problem with page numbering is numbering without a title page. Users simply don't know how to disable pagination on the first page of a document.
To set up page numbering without a cover page (first page), you must first number all pages as described above. After a number appears on all pages of your document, you just need to turn off the display of numbering on the first page.
To do this, go to the “Page Layout” tab and click on the small button to the right of the “Page Settings” inscription.

After this, a window called “Page Options” should open in front of you. Here you need to check the box next to the “Mark headers and footers on the first page” function. As a result, the page numbering will disappear from the first page of your document.
Many users often have to work with documents with a large number of pages. It is very difficult to navigate in such a file, since it will take a lot of time to find the desired paragraph or section. In this article, we'll look at how to number pages in Word to make it easier to navigate through the text.
Thanks to this, you can quickly navigate through the document and correctly determine where exactly you are. Moreover, if you plan to print this file in the future, numbering will save you from possible confusion in the sequence of pages.
In order to number a document in the Microsoft Word editor, you must do the following:
- First of all, let's open a file with large contents.

- After that, go to the “Insert” tab and click on the “Header and Footers” button. In the menu that appears, select “Page Number”. You will be asked where exactly to insert this element (when you hover over each item, you will see preliminary options on the right):

- above or below;

- in the fields;

- current position.

- Immediately after this, you will see that a field for entering information will appear at the top or bottom (depending on the selected numbering type). In addition, a new “Designer” tab will open in the top panel. If you click on the “Position” icon, you can adjust the distance from the top and bottom edges. This way you can manually specify indents before the text.

Just don't overdo it. Consider the borders of the sheet. If you overdo it, you can go beyond print.
- In order to save the settings, you need to click on the “Close Header and Footer Window” button.

- Immediately after this, the dotted line will automatically disappear. As a result of this, you will see a neat number located at the bottom of the sheet.

If you don’t like something or it didn’t turn out the way you wanted, you can always resume editing. To do this, just double-click the left mouse button on the element located in the footer.

Options
For more detailed settings, there is a special menu item, which is located on the “Designer” tab.

Let's consider each parameter separately.
By default, the Word editor is configured to automatically number content (starting from the very beginning and with the number 1). But in some situations this is not necessary. For example, if the first page is the title page. Especially if it is an official document and they will put a stamp there.
In order to fix this, you need to check the “Special header for the first page” item in the “Options” menu. Immediately after this, you will see the corresponding inscription at the bottom of the sheet.


If you remove this checkbox, the number will appear on the title page again.

Different headers and footers for even and odd pages
To activate this setting, you need to check the corresponding box. Immediately after this, another inscription will be displayed near the frame. Now you can specify specific text for the header or footer of the top or bottom of an even or odd sheet.

Thanks to this, you can number the pages however you like. The main thing is not to overdo it. Otherwise you may end up with an unreadable document.

Additional items
In addition to numbers, you can add anything to the footer. In addition, you can change the position of the elements. For example, make sure that everything that is there is aligned to the left. To do this, just click on the desired icon on the “Home” tab.

You can also add text. For example, you can start with the combination “Page No.”

In this case the text will be static. and page numbers increase.

You can also insert the current date and time. To do this you need to do the following.
- Go to the "Design" tab. After that, click on the “Date and Time” icon. In the menu that appears, you can select any format. To insert, click on the “OK” button.

- To prevent the date from sticking to the number, you need to place the cursor after this element and press the Tab button on the keyboard.
- Thanks to this, the document will look much more beautiful.

If you want to move to the third block (on the right), you need to press the Tab key again.
Microsoft developers tried to make the headers and footers more rich. In order to insert more information about the file, you need to do the following:
- Double-click on the bottom field to enable editing.
- Open the “Design” tab on the toolbar.
- Then click on the “Document Details” icon.
- Immediately after this you will see possible insert options:
- author's name;
- file name;
- file path;
- title of the document;
- document property:
- author;
- organization address;
- organization email address;
- annotation;
- date of publication;
- keywords;
- Name;
- organization;
- notes;
- supervisor;
- state;
- organization phone number;
- topic;
- organization fax.

You can put in whatever you want, but don't overdo it.
Page number format
In addition, you can customize the display of the appearance of the numbering. To do this, you need to do the following.
- In the menu that appears, click on the “Header and Footer” button.
- Next, select the “Page Number” section.
- Then click on the item that interests us.

- Immediately after this you will see the following window.

If you wish, you can specify which number to start counting from. By default, a new document starts at "1", but you can specify any value. For example, the number "5". To save, click on the “OK” button.

As a result of this, you will see that the countdown has started from the specified parameter.

Sometimes you need to make sure that a set of numbers other than Arabic is used. To do this, just select the desired option.
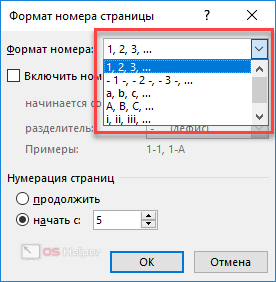
For example, to make Roman numerals, you need to click on the appropriate item. To save, click on the “OK” button.


In addition to everything described above, you can include the document title number in the header and footer. To do this, call up the “Page Number Format” window (how to do this is shown earlier) and check the appropriate box.

To add numbered headings, do the following:
- Click on the title of the section (in our case, this is the title of the verse).
- Then click on the Heading 1 style.
- Immediately after this you will see that the appearance of the text will change. But this is not enough.

- Make the title line active.
- Click on the triangle next to the “Multi-level list” icon.
- Select an option for headings.

- As a result of this you will see the following.

- Try checking the box next to the desired item again.

- This time everything should work out. The chapter number will appear next to the page number.

How to insert content
The convenience of numbering is that thanks to it you can create a table of contents. To do this you need to do the following.
- Go to the beginning or end of the document.

- In order to separate from the main text, you need to press the key combination Ctrl + Enter.

- As a result of this, you will find yourself on a new sheet.
- Then go to the "Links" tab.
- Click on the "Table of Contents" icon.
- After that, select any of the options.

- As a result, you will see the following result.

How to remove numbering
If you don't like what you've done, you can always delete it. To do this you need to take the following steps.
- Go to the "Insert" tab.
- Click on the "Header and Footer" button.
- In the menu that appears, select the “Page Number” section.
- Then click on “Delete numbers”.

- Thanks to this, everything will disappear without a trace.

Conclusion
This article discussed the main points when working with page numbering in the Word editor. If something doesn't work out for you, you may be doing something wrong. Try reading it again. In addition, you can access online help on the Microsoft website.
Video instructions
In addition to the instructions above, you can watch the video for additional comments.
Step-by-step instructions using which you can easily set up page numbering in a Word document. This information applies to all versions of the editor: 2003, 2007 and 2010.
Using numbering makes it easier to find the information you need. This is achieved due to the fact that you can make notes or remember the page number on which the necessary data is indicated. The combined use of a table of contents and numbering allows you to navigate a large document and easily move to its main blocks (chapters, sections, etc.).
: - step by step instructions.Setting up page numbering
If standard numbering is enough for you, then when you hover over the fields “Top of page”, “Bottom of page”, etc. A drop-down menu will be presented from which you should select the room location. As soon as you click on one of the options, your pages will receive serial numbers.
This is the most basic way. Now let's make things a little more complicated.
Numbering from a specific page number
It is not always necessary to do it in such a way that the first page in the document is marked with the number "1". This situation may arise if you are creating a part inside a large workbook. Or title pages, table of contents and other information will be attached to the document after it is created. In any case, you need to understand how to start numbering pages from the desired number.
We return again to the “Insert” ribbon, then “Header and Footers” and click the “Page Number” button. Now click on the button " Page number format".

In the block " Pagination", you need to select the "Start with" item and specify the desired number accordingly. If the numbers have already been set, they will change their value in accordance with this setting. If not, repeat the steps from the previous section.
Please note that here you can also set the desired number format and add the current chapter number.
Headers and footers in Word
If you have already completed the steps described above, you probably noticed that the numbers are inserted in blocks, located at the top and bottom of the page. These blocks are called headers and footers in Word, and are used in all versions of the editor (2003, 2007 and 2010).
As you probably already guessed, we will use headers and footers to mark page numbers. This is far from their only function, but now we are interested in it. Separately, it should be noted that using headers and footers, we can set the desired number for any individual page or group of pages.
So go to the page you want, and double-click the left mouse button on the footer or header (top or bottom area). An editing window will open.
Now use the keyboard to enter the required value. When finished, press the Enter button to complete the operation.
As we have already noted, almost any information can be placed in footers, including hyperlinks and footnotes.
Please note. created in a couple of seconds.