How to burn a USB flash drive using Ultraiso. Record the image on the Ultraiso USB flash drive. Install the program and load ISO file
Ultraiso program is very popular among users and, if necessary, create a boot image most often resorted to it. The thing is that the software is quite functional, while easy to use. It is completely easy to figure it out, and if the reader follows the recommendations described, then there should be no problems in general. So, we offer attention a detailed instruction,.
What the program ultraiso
This is one of the best, and accordingly, popular programs for working with disk images. It allows you to solve many tasks that we will tell below. It should be noted that the software applies to a fee basis, but to appreciate the possibilities, create and write the image, you can use the free 30-day test period. As soon as he expires to the user or have to pay a subscription, or delete the program. Specify the cost and download the distribution for installation on the site developers https://www.ezbsystems.com/ultraiso/index.html..
The program supports various formats of images, and also recognizes multi-volume. When forming an image, the user can add only the necessary files to it without copying the entire system. Also available operations with files inside the image.
To create an image just run the program, click the "New" button, select the type of image and add the desired folders and files to it. If necessary, adjust the finding folders and files directly inside the created object and complete the formation.
How to burn an image on a USB flash drive via Ultraiso: step-by-step algorithm
Now we will understand more about how to record the image of the flash drive. Before proceeding with the intended, preparation should be prepared.
Preparation
It primarily implies downloading and installing the Ultraiso program itself. Where it can be done we wrote above, in addition, there are other sources offering the program on the network. However, we advise you to apply only to proven resources so as not to harm PC. 
Flash drive with a volume of at least 8 GB. Of course, it may take less memory to write small images, but about 8 GB will be needed to create an installation image. The USB flash drive needs to be completely free from any data and preferably format. The format should be selected FAT32, this is exactly how the experienced users are advised. But at the time of recording the disk, problems may arise if it occurs more than 4 GB. In this case, the form on NTFS should be changed, and in the process of working with the program, skip the formatting step and directly go to the record.
As for the image, it can be created independently using the program. If you need an image of the operating system, then you can download it from https://www.microsoft.com. . From there, the User is guaranteed to receive a clean and high-quality version of software, without malicious programs and other problems.
Stage first: launch the program and select the image
This is the first stage. In general, there is nothing complicated in it and it was not necessary to allocate it, but for greater clarity, after all, we will act in stages.

The first stage of the process decisive Completed.
Stage Second: Record Image
This is the most important and responsible stage of the entire process. We need to connect the prepared USB flash drive to the computer, wait until the device and the program correctly recognize it. Then, follow in accordance with the algorithm.

In general, this is the whole answer to the question,. The time that will be required to complete the process depends on the power of the PC and the image volume, on average the process lasts from 5 to 20 minutes.
At the end, the user will see a message that the record is completed. After that, close the program and verify that the image is really present on the outer carrier. As a rule, after a correctly executed and completed recording, the name of the flash drive should be changed to the name of the image.
Depending on which external media will be used, you can write multiple images on it (if memory allows). But if you plan to perform with it, the object on the outer carrier should be only one.
Despite the fact that we described in a detail and voluminously described, in practice it takes no more than two minutes (not counting the record directly). After several experiments using Ultraiso, the skill will firmly, and the owner of the PC will be able to not only any version, but also a favorite game or software.
We hope we as much as possible and clearly answered the question,. If you have any questions - write in discussions, try to figure out and prompt a solution. Share Article on social networks and stay with us, there is still a lot of useful.
Not in all modern laptops have a DVD-drive, silent for ultrabooks, whose manufacturers originally refused to read / write disks in the ultrakom housing. Therefore, reinstall the operating system from the disk, as we all used to do it, no longer succeed and you need to look for another option. That is why we decided to tell you, through Ultraiso - a program that allows you to work with images. Of course, there is a more convenient software, sharpened precisely under the creation of bootable flash drives. In addition, it is paid, and there are a number of analogs distributed free of charge. But if you stayed on the Ultraiso program, we will not challenge your decision and help to deal with its functionality. Well, cook a flash drive, we proceed!
Create a bootable USB flash drive via Ultraiso
So, first of all, we need to get the operating system itself. It may be equally both Windows 7 and a newer "dozen". As a rule, bootable media create not only for installing the OS, but also resuscitation of the computer. However, this is no longer so important - because in this instruction we consider it exactly the creation of the boot version.No wonder in the name of the program, the "ISO" prefix appears, symbolizing the expansion of the image file. Image itself can be downloaded on the Internet, on the official website or take from a friend. This is not so important, the main thing is that it is complete and perfectly worked.
We will need a flash drive, the amount of memory of which is at least eight gigabytes. This is more than abuse. Pre-copy with it important data, because the carrier will be formatted.
Creating a bootable flash drive using Ultraiso
Suppose you have already installed the program. Establish:
Exactly repeating the actions described above, you really record the operating system on the USB flash drive and can be installed.
How to create a loading flash drive from a DVD disk
At the beginning of the article, we said that the image can be taken from where: download it from the official site, with a third-party resource or write from the disk. So let's see the last option as soon as possible.Imagine that you have taken a boot disk from Windows 10 from a friend, but for any reason you do not want to install the OS from it. It is not necessary to create an ISO image through a third-party program, and then make a loading flash drive according to the instructions above - you can go to another way, shorter, writing a loading flash drive directly: 
Well, now you know how to make a flash drive. It's small - learn to restore / install Windows from it. But that is another story…
Surely no one doubts that Ultraiso is one of the best utilities for recording disks. (In terms of recording ISO images, even the legendary Nero can not oppose anything). However, not everyone guess that you can create a boot USB flash drive to install Windows or any other operating system.
Are you still installing windows from an optical disk? - Then we go to you! Unfortunately, many users still believe that from the flash drive to install the system is more complicated and slower ... In fact, the difficulty were previously - now write an image on a flash drive as never just, and if there are such utilities as Ultraiso or Rufus, it even puts doubt on the expediency of the drive DVD Generally (why is it generally needed ... I didn't use it 10 years for sure!)
Not so long ago, I have already published a note about - now I want to tell you more specifically about Ultraiso. Of course, the kneading will write that except Rufus do not need anything ... And, probably, I agree with them. However, do not forget about Ultraiso - this program can not work with Rusuf, but a little later!
To write an ISO image on a USB flash drive through the Ultraiso application we need (oddly enough) Ultraiso utility itself. Softtina paid, but has 30 days of freebies - we are quite enough and a demonstration date - download from the official site (Our language of Russia - the download server does not matter)
With the installation of special problems should not occur. The only recommendation is to remove the checkboxes "associate.iso file with Ultraiso" and "Install an ISO CD / DVD emulator (ISODRIVE)" if you do not plan to use the utility in the future.

The next step will be the launch of Ultraiso (It is very advisable to do this on behalf of the administrator, especially in Windows 10. To do this, right-click on the label and select "Running from the administrator").
Due to the fact that we have a trial version, then when starting in the window "Welcome!" Choose a "trial period ..."

With the launch and installation I think figured out - now we go to the most interesting ...
Record ISO Image to USB Drive
Since you are looking for a way of writing a weatherman - probably he already has ... All misunderstandings in Ultraiso are associated with non-standard thinking.
How I imagine a record? - Open the program, choose to write an image on a USB flash drive, I choose the image and click the record ... In this utility, everything is different!
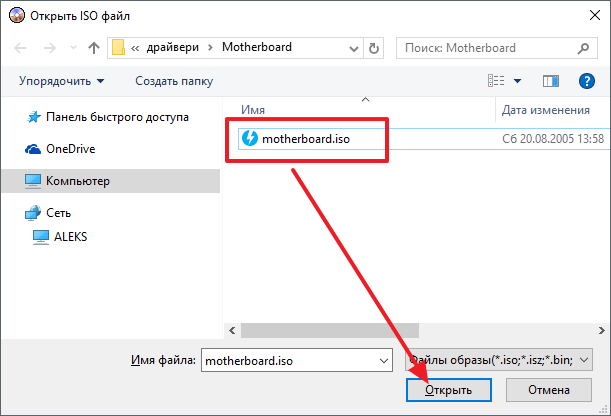
Open Ultraiso utility and on the main screen click "File"\u003e "Open ..."

... Select a previously downloaded ISO file with a distribution of an operating system or any other information ...

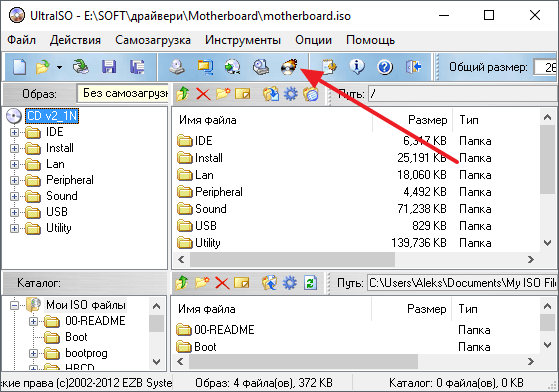
In the program interface in the menu bar, select "Self-loading" and click on the "Write an image of a hard disk ..." to start the recording window on the USB flash drive.
Pay attention to the message of the utility to exceed the maximum image size of the ISO in the demo version. Despite the limitation of 650 megabytes, I did not have any problems with the recording of an image of more than 4 gigabytes

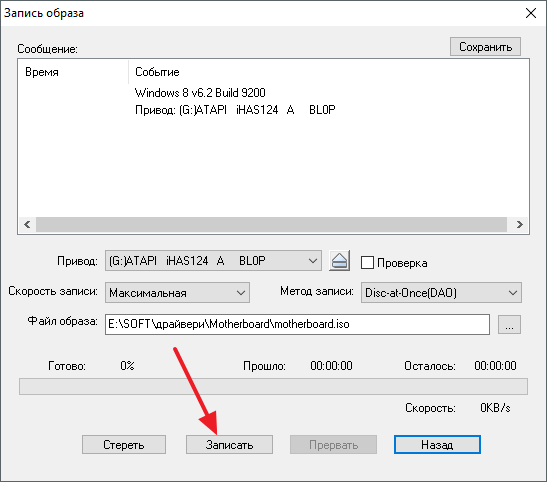
In the Write Disk Image window, select your flash drive, leave the rest of the default and press "write down". You must understand that all data on the flash drive will be asleep (Even if you have free space dofig).
I myself did not come across such a situation, but sometimes they say it is necessary to change the recording method - this is usually an exception and necessary for special images or non-standard computers

Because the recording process can be observed almost infinitely ... But on the USB3 flash drive, it happening much faster!

It will only be left to wait for the end of writing an image to a USB flash drive and our bootable media is ready - everything is extremely simple!
Offtop of Ultraiso Utility
Of course now for writing an ISO image on a flash drive conveniently use RUFUS (I recommend that I recommend it!) ... However, Ultraiso can record an ISO image on an external HDD or SSD - which certainly cannot RUFUS and other similar problems!
Instead of imprisonment
Ultraiso utility is good, however, more advanced and free applications are already present to record the loading flash drives - which makes an overlooked program not so interesting ... But I consider it a pioneer in the records for flash drives and it is deservedly considered one of the best!
The first and most important stage at the beginning of working with a new computer, without which further steps will not be possible to install the operating system. We will work with the Microsoft - Windows operating system. Previously, everything was simply - I bought or independently made a disk with Windows, inserted into the drive and then went. However, over time, discs due to their inconvenience, size and volume, began to move to the background and by 2018 almost completely disappeared from the life of people. Also, slowly from computers began to disappear and the drive, stationary stations it touched less, the main blow was like laptops. Now at least models in which you can find a drive, and most often these are budget decisions. Flash drives came to replace uncomfortable and bulky disks or simply flash drives. They are less, they have more volume, they are more convenient in everything.
Also, like discs before flash drives are now used as a drive when installing the operating system, by creating a "boot flash drive". To create it, you need to use one of several programs. One of them, and, probably, the most popular is Ultraiso.
Creating a loading flash drive from the image
So, consider the first option to create a loading flash drive through
Ultraiso and the image of the operating system. For this, we need:
- Image of the operating system.
- Flash drive.
Requirements for flash drive: the volume from eight gigabytes, it can be enough and four gigabytes, but not in all cases, so once again it is better to restrain and simplify life in the future. The flash drive must be empty, since when Ultraiso is running, all data will be erased in any case. The flash drive must have the NTFC file system, with other Ultraiso will not work.
Having in free access all of the above, you need to start Ultraiso, select the "File" menu and after "open" in the window that appears. After that, you need to specify the location of the "Ourser" image file on the disk and click "Open" again. The screen will show the files within the image of the operating system, but for an ordinary user they still do not mean anything, so you can close the window with a calm soul.
The next step will be the transition to the main menu of the program and select the "Self-loading" option, and after which the user will receive a choice of the "Write a hard disk image" function. There are differences in translating for Russian localization, but the general meaning of the phrase and actions must coincide. Next, you will need to choose a drive that will be turned into a bootable, in our case it is a flash drive. In the same window of it (USB flash drive) can be formatted in advance. The default is the USB-HDD + recording method, and it is necessary to leave it, as it is optimal.
Click on the kopku "Write" ...
When choosing these functions, a warning is displayed on the screen, on full formatting (removing all data) from a given drive, in our case it is a flash drive, even if it has already been formatted in advance. It is for this reason that the flash drive must be empty and not contain important data. After the user's agreement on creating a loading flash drive, come to wait a few more minutes, usually up to ten. And here, after the program expires, you will receive a fully finished flash drive to use and install the operating system to another device.
Creating a loading flash drive using a DVD disk
It often happens that in the hands of the user could remain a disk with a Windows that you need to install on a laptop in which there is no drive. However, there is a stationary PC in which the drive is already there. And again, Ultraiso is in a hurry to help, because using it is possible directly from the disk to create a bootable flash drive. And so to create it using a DVD disk, you need almost the same as for the previous method. Namely:
- DVD disk with the operating system.
- Installed on Ultraiso computer.
- USBA, with requirements similar to the flash drive requirements in the first version.
First of all, you launch the program and select "File" again. But this time the next select the function is not easy to "open", but "open CD / DVD", after which it only needs the path to the drive with the disk containing the operating system inserted into it.
After that, the actions are repeated with the first way one in one. We will again need to choose the "Self-loading" function, after which you need to select "Write a hard disk image". Then again agree with the full formatting of the flash drive and click "write down". After a short time, we get on your hands ready for use USB flash drive.
Creating a bootable flash drive without images
The last way although very rarely used, because of its not typical, but also takes place. Sometimes it happens that the user has no DVD with an operating system or the usual ISO image, but there is a distribution in which there are all the necessary files for installing Windows. In this situation, you need to use Ultraiso again. After all, with the help of her booting flash drive, it is possible from ordinary files. And again you need an empty flash drive from eight gigabytes.
Start Ultraiso, as always, choose a "file" click on the "new". Then I click on the "self-loaded CD / DVD" image and the user will be offered to select the download file. This is the file "bootfix.bin", which is located in the "BOOT" folder (for Windows 7 and above). After that, you need to transfer data from the folder with the distribution of the operating system into the empty field. Sometimes it happens that at this stage the red indicator "New image is filled". In this case, you need to click on it and select a size of 4.7 gigabytes (volume equal to DVD disc). Further actions completely repeat the actions in the first two cases. Having done them will need to wait a few minutes, and the loading flash drive is ready.
On this, the main ways to create a loading flash drive through Ultraiso have been exhausted. There are also other ways, but in usually these should be enough.
Video
CDs are increasingly crowded with flash drives and other information storage devices, but they are still used. Therefore, it is very important to be able to use them. In this material, we will tell about how to burn an image on the disk through Ultraiso.
Step # 1. Open the disk image through the Ultraiso program.
If you want to record an image on a disk through, then the first thing you need to do is run Ultraiso and open the disk image. To do this, click on the Open button, which is on the toolbar.
You can also use the "File - Open" menu.

After that, the standard window will appear to select files. Here you just select the disk image file that you want to write, and click on the Open button.
As a result, the above actions described, the contents of the disk image selected should appear in the Ultraiso program window.

Step number 2. Run the image recording.
You can also start writing an image using the "Tools - Write an Image CD" menu or using the F7 key on the keyboard.

As a result, a window appears for recording the disk image. At this stage, you just need to insert the disk into the drive (if the disc is not yet inserted) and click on the "Record" button.
If you have a disposable or empty disk, then the record will start immediately. If you use a rewritable disk and there is data on it, the program will first ask you to confirm the cleaning of the disk. In order to continue here you need to click on the button "Yes."

After that, the program will start cleaning the disk, and after cleaning it will immediately start recording the image to the disk.

Now you can only wait until the Ultraiso program enters the disk image.
How to burn an image on a flash drive via ultraiso
You need to add that using the Ultraiso program you can also drive. To do this, you need to open the disk image in the Ultraiso program (as this is described in step No. 1), and then open the menu "Self-loading - Write a hard disk image"

As a result, a window will appear for recording the flash drives. In this window, you need to select a USB flash drive that you want to be entered to write and click on the "Record" button.

After that, the Ultraiso program will prevent the removal of old data from the flash drive. In order to continue to click on the "Yes" button.

After that, the process of recording the image of the flash drive will begin.