Description of the stages of mobile application development. Business plan for developing a mobile application. Design sketches and color palettes
I started studying graphic design when I was 13 years old. I learned how to design websites from online courses and played around with Photoshop and Affinity Designer all day long. This experience taught me how to think like a designer.
I have been designing and developing applications for almost a year now. I took part in a program at MIT where I worked on the team behind the Universeaty application. Two months ago, I started working on a new Crypto Price Tracker app that just came out on January 28th.
In this article, I will share the step-by-step design process that I follow when working on applications. This should help those who want to learn or improve their digital design skills. Design is not only about how to use design software and this article will not teach you how to use it. There are hundreds of quality tutorials on the Internet. Design is also about understanding the essence of your product, its functionality, and designing with end users in mind. That's what this article will teach you.
Design process:
- Create a user flow for each screen.
- Create/draw prototypes.
- Choose from design templates and color palettes.
- Create a design.
- Create an animated app prototype and ask people to test it and provide feedback.
- Make final retouching of layouts so that all final screens are ready for development.
Let's start!
Userflow
The first step is to figure out what features you want to see in your application. Once you have ideas, create a user flow. This is a flowchart of how your application works.
Typically, a user flow consists of three types of shapes.
- Rectangles are used to represent screens.
- Diamonds are used for conditions (e.g. press login button, swipe left, zoom in).
- Arrows connect screens and conditions together.
User flows are very useful because they give a good logical idea of how the application will function.
Here is a userflow diagram I drew when I started designing my app.
Userflow for the main interface.
Prototypes
Once you've completed making the user flow for each screen, you'll start working on prototypes of all screens. Prototypes are basically low-detailed sketches of your application. Basically, a sketch or diagram of where images, labels, buttons, etc. will be placed. A rough sketch of how your application will work.
I'm using printable templates from UI Stencils to draw wireframes. This saves time and gives you a good working area for drawing and taking notes.
Here is an example of a prototype.
 Mobile app interface prototype
 After prototyping, you can use an app called Pop and take a snapshot of all your drawings with the app and get a clickable prototype by linking all the screens with buttons.
Design sketches and color palettes
This is my favorite part. It's like window shopping. Lots of design patterns and color palettes to choose from. I'll pick the ones I like and experiment with them.
The best platforms for finding patterns are Mobile Patterns and Pttrns. And to find good color palettes, visit the Color Hunt website.
Design
Finally, you move on to using design software. It's like you logged into your app in the future and took some screenshots. It should look realistic and pretty much like the real thing.
There are design software and design tools. I am using Affinity Designer. The most commonly used iOS design tool is Sketch.
Here is an example of some early designs of my app.
 Transfer image to pixels!
 I experimented more with different color palettes.

I shared the original layouts with my friends for their feedback. A lot of people seem to like the gold-gradient-black scheme.
Get ready to get feedback and experiment with new suggestions! You'll get amazing feedback from your users when you're talking to them, not when you're frantically browsing Dribbble or Behance.
So I redesigned the layout and removed the background graphics because generating them was technically time consuming and reduced readability. What ended up happening:
 The gold gradient with black looks surprisingly good!
 I was happy with the color scheme, tab bar icons, and overall layout. I went ahead and designed the rest of the screens following the same design principles. It was a long, but insanely exciting process!
Once all my screens were ready, I built a prototype in Adobe XD and asked a few friends to experiment and provide feedback.
After the final touches, this is what the final version of my design looks like.
 Final design
 After all the screens were completed, I imported them into Xcode and started developing the app.
That's all! I hope this article helps you get started with app design or help you become a better designer. And if you like my app, you can download it.
I end the article with one of my favorite design quotes.
“Design is not just about how an item looks and feels. Design is how it works"
- Steve Jobs
What is the Android development process like? Let's highlight a few basics:
- In Java files, you describe the program logic - what you want your application to do.
- In XML files, you design layouts - appearance.
- Once the application is written, the build tool must be used to compile all the files and package them together into an .apk file that can be run on Android devices and/or published to Google Play.
- All utilities and files that are used to create an Android application are combined into an integrated development environment (IDE). An IDE is a program that you open to edit your code files and compile and run.
- Previously, Eclipse was the standard IDE for Android development, but now it has been replaced by the more functional Android Studio, a product of Google.
You will of course find deeper processes going on behind the scenes of the above steps. For example, advanced users will want to know the role of the Dalvik virtual machine. At the end of the article, links to useful resources that every Android developer should be familiar with will be listed. The first one is the official documentation from Google.
- Download and install Android Studio.
- Learn about running and testing applications on Android devices and emulators.
- Let's create a simple Android application that displays the inscription "Hello World" on the screen of a mobile device.
At the end of the article, you can find useful recommendations for novice developers from the company.
Installing the Android Studio development environment
It's really tempting to start reading documentation and writing code to find out what the platform is capable of. And we will do it soon! However, to get started with the Android platform, you need to set up a development environment.
For newcomers to Android programming, it is especially important to take your time and follow each step methodically. Even if you follow the steps correctly, you may need to fix a small issue with your environment setup depending on your system configuration or product version. To do this, use the search services. The StackOverflow resource can be especially highlighted.
It is important not to let any pitfalls get in the way of your ultimate goal of learning Android programming. It is known that even professionals sometimes experience certain problems with setting up a working environment. In such cases, knowledge of the command line is important. If you'd like to get more familiar with this tool, there's a link to a good introductory one at the bottom.
Along with syntax training, it's important to train yourself in the mindset of a successful programmer that won't accept a file X not found error message as the final verdict. Such thinking is easily trained by you in cases where you do not give up and look for a solution to a problem that has arisen.
Go to Android Studio developer.android.com/studio/index.html and find the button to download the latest version for your platform.
Click on the download button and you will be asked to read the terms and conditions for using the software product. After careful reading (as you always do) and acceptance, the download begins. It will probably take a few minutes. After that, you can install Android Studio just like any other program. The initial download page contains installation instructions for Mac and Windows.

Now that you've installed Android Studio, let's get it up and running! Launch Android Studio. The program will ask if you want to import your settings. Since you are starting from scratch, just select the second option and continue.

You should see a nice Material Design loading screen.

Upon completion of the download, you will be taken to the welcome screen.

Even if you just downloaded Android Studio, you may not have the latest version. To avoid future version issues, click the "Check for updates now" button and, if necessary, follow all the instructions to get the latest version. Sometimes Studio will automatically inform you that there's an update with a screen like this:

In this case, always select Update and Restart. Fine! We have successfully completed the installation of the development environment.
Creating the first Android project
It's time to create the first project. Let's start simple. It is customary for programmers to call the first program "Hello World". Let's follow this tradition and then make a few small changes to make the app use your name for greeting. At the end, you can download it to your device and show it to your friends. Android Studio has a small step by step tool to help you build your project. Click "New Project" on the start screen:

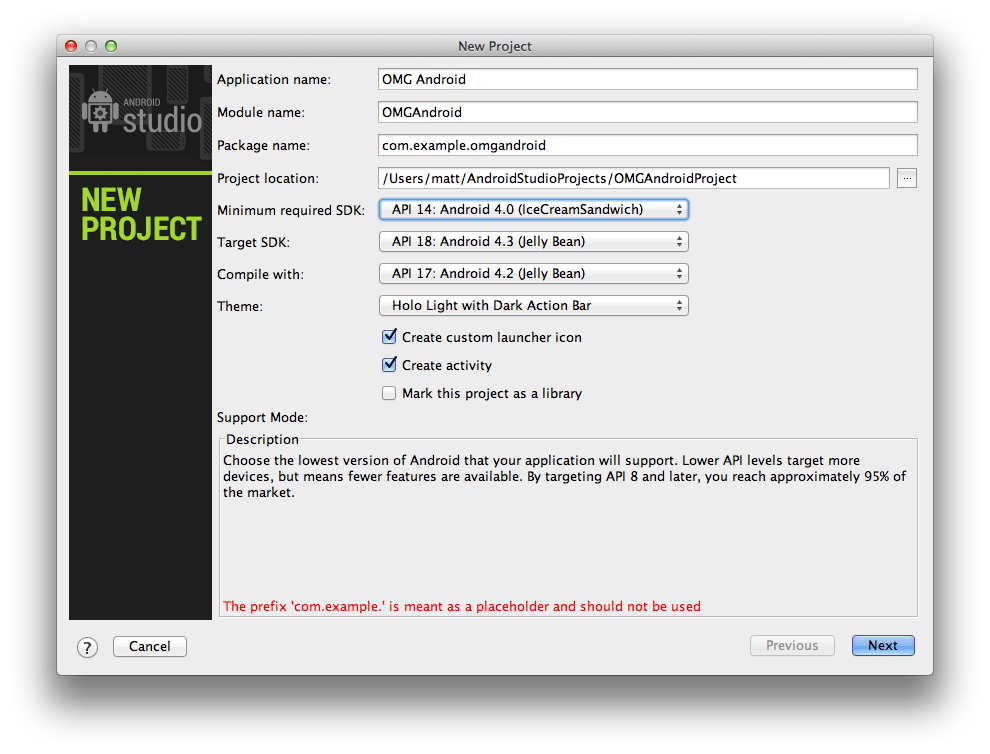
Fill it out like this. Feel free to replace "example" in the package name with something else to remove the warning at the bottom of the screen. You can also set the project location by pointing to any folder on your hard drive
For drop-down SDK versions, note the Description section at the bottom of the dialog box. It explains what each setting is for.
Install the minimum required SDK as shown in the screenshot. This sets the minimum Android version required to run the app. Choosing this value for your own projects is a matter of balancing the SDK features you want with the devices that will be supported.
For more information about API versions and their usage, there is a dedicated Dashboards page on the Android developer site https://developer.android.com/about/dashboards/index.html.

After selecting a version, the start template selection screen appears. You can create an app that already interacts with the google maps api and renders the map. In our test example, select the Empty Activity and click the "Next" button.

And now you are at the last step of the application creation process. Before clicking "Finish", there are a few things to note. Here, for the first time, you come across mentions of the main architectural components of any application.
- - this is the first, but not the last mention of the word Activity. In the context of Android, an Activity is usually thought of as a "screen" in your application. This item is very flexible. When Android Studio creates the MainActivity class, it inherits it from the Android SDK's Activity class. Those who are familiar with object-oriented programming understand this concept, but for beginners, this basically means that your MainActivity will be a custom version of the Activity.

- Layout Name- the layout of what will be shown to the user is defined in a special kind of Android XML. You will soon learn how to read and edit these files.
Click Finish. It will take some time to create and load the project. After a while, Android Studio will complete the build of your project. Of course, the project is still empty, but it has everything you need to run on an Android device or emulator.

After loading the project, you view the XML layout file. Before moving on to Android programming, let's talk about how we can run this application. It's time to say "Hello world!".

Running the application on the emulator
Now it's time to say a few words about the emulator. Android Studio comes with software capable of emulating an Android device for running apps, browsing the web, debugging, and more.
This feature is provided by the Android Virtual Device (AVD) Manager. Optionally, you can set up multiple emulators, set the screen size and platform version for each new emulator. This functionality is very useful because it saves developers from having to buy several devices for testing programs.
Click on the Run button in the form of a green arrow.

You will have to wait a while for the emulator to load and once it is ready you will see something like this:

My congratulations! You have made your first Android app!
And so… Why and how did it work?
To start making changes and adding cool features, you need to have a working knowledge of what's going on behind the scenes. Take a look at the Android Studio project section with files and folders on the left side of the screen. You may need to click the small tab at the edge (see below) if the project explorer is not visible at the moment.

Look through the folder structure for a few minutes and double-click on files to see their contents in the main window. If this all looks cryptic, don't worry!
Android project structure: Team
Every good team is made up of people who fill their assigned roles. Do you want to get the job done right? You need the right team. There are several key elements in Android projects, and each of them has a role to play:
Java: Professional
This is the part of your code that is responsible for the application logic. Your code will be in the src\main\java directory in the main project folder. To learn Java, you can recommend Bruce Eckel's book "Java Philosophy";
Resources: Artist
It's not enough to just make an Android app, it has to be stylish too. Your app will never stand out if it doesn't have crisp icons and images, well-designed layouts, and maybe even smooth animations.
When initialized, the folder contains the following folders:
- drawable, which holds the icons. Now there is only a standard application icon.
- layout with XML files that represent screen designs.
- menu with XML files of lists of items that will be displayed in the action bar.
- values with XML files containing sizes, colors, string constants, and styles.
AndroidManifest.xml: Boss
This XML file informs your system of the application's hardware and software requirements and contains its version name and icon. The manifest also contains information about all the activities in the application. Do you need work done by your application? Talk to your boss first.
Alteration
Go to res/values/strings.xml and double click on the file. When you open the file, you will see two string resources in the XML.
These resources are used in different places, but it's very convenient to have all the text used in your application in one file. If you need to translate it, or if your marketing colleague asks you to remove any redundant links, it will be easy to make all the changes here.
Change the hello_world string that the application displays on the screen. Change its content to something more personal, such as using your own name. You will get something like:
Click Run. The application should restart and you will see a personalized message:

We congratulate you - you have made your first project and learned how to edit the source code. The first step in Android programming is done. We wish you good luck on this difficult, but insanely interesting path! If you need professional Android application development, please contact Infoshell specialists.
Artjoker
The mobile application market shows dynamic growth — this trend is relevant both for Ukraine and for foreign countries. A significant segment is occupied by games, but business apps do not lag behind and show positive dynamics. Already in the next two or three years, it will be possible to state with confidence that each company will be represented on the Internet not only by a website, but will also acquire its own mobile application - all for the sake of traffic and profit. If you don't want to miss the moment and be among the first in the business race, then plan on app development. And act!
What you need?
Even today, when contacting an application development company, you meet a variety of opportunities. A team of professionals will offer you not only to develop a custom app with a set of unique features, but also to choose a creation management methodology.
Instead of the traditional cascade approach, it is proposed to use the energy-intensive and cost-effective SCRUM. When choosing a developer, be guided by expertise, portfolio and work experience in your specifics, the presence of project managers and a QA team with a technopark (application testing takes up most of the development time), as well as legally formalized agreements - the latter will guarantee your security.
After a brief tour of the team, Let's talk about the classification of applications:
- Native - written in programming languages that only target a specific Android or iOS platform. This allows them to quickly install and work easily, fully interact with the technical capabilities of the gadget and not depend on an Internet connection. Creating a native application is expensive and therefore considered a far-sighted strategic move;
- Cross-platform - an application that is created for several mobile platforms at once. Cross-platform development tools do not use HTML5, but third-party programming languages, the code of which is compiled into a native application for each platform. Cross-platform development is suitable for non-custom projects, and can be efficient and less resource intensive.
In addition to technical characteristics, we can talk about type diversity. Applications can be divided into the following groups- rather, your next app is already in one of them:
- Entertainment (games, image processing, audio and video formats);
- Assistants (search for information, weather applications, etc.);
- Social networks;
- I-commerce (the ability to purchase through applications);
- B2B applications in the structure (internal systems of control and organization of processes within the company).
Each has its own advantages and disadvantages, ways to monetize and conversion potential - to make the right choice, first contact a business analyst and technical specialist who will conduct an audit and issue recommendations. From the overall picture, let's move on to the process of creating an application and a team that participates in this.
Stages of mobile application development
We at Artjoker prefer the SCRUM method, which allows you to implement the project not sequentially (stage by stage with lengthy approvals and improvements for a fee), but flexibly - different tasks are performed simultaneously, which allow you to assemble a ready-to-launch product as a Lego constructor quickly and for a predetermined amount. The development is divided into three stages, within which the following works are carried out in parallel:
1Stage 1: Preparatory
- Preparation of technical specifications for the development of the application. For template solutions, this stage passes quickly, but for something unique, it may take time. If you plan to monetize the application in the future, then invite a business analyst to monitor market offers, as well as promotion specialists - the right advertising will quickly and effectively attract attention to the audience.
- UX development (User eXperience - interaction experience) we prescribe user behavior scenarios, application navigation patterns and functionality. A usability specialist will promptly issue recommendations - it is much easier to tell how to do it than to repeatedly redo the structure.
- Development of the "skeleton" of the application: navigation elements, lists, buttons, which will be supplemented by the main code.
- Design development .
Team: project manager, UX specialist, designer
Development timeline: from 60 to 90 days.
Creating an application is a clearly structured process, but system work can only be found with experienced developers.
- On average, it takes about 400 hours to develop an app on iOS, and about 350 hours on Android. 20% of all work goes to QA (verification), the remaining 80% is distributed to the development itself, design, etc.
- If the application implies server support and API integration, then the period increases by an average of a month or two.
Price:
On average in Europe (including the CIS countries), the cost of an application is $80-100 per hour of an experienced specialist (cool developers charge from $150-200 and this is considered an acceptable price, for example, in the UK). Australia is in the same range. On average, for all work with European developers (including in Ukraine) it is $7,000 - $9,000.
The most expensive developers in the US are at least $50 per hour, and the maximum comes to $250-300. For comparison, let's take the Indians, whose maximum price per hour of development is $80. Why such a price gap? It's all about expertise, which is confirmed not only by the number of works, reputation (articles, speeches at conferences), but also by knowledge of English.
Summary
The most important thing in the development of the application is not advertising at all, and not even a unique trading application. The main thing is the team to which you entrust your idea and which will finalize and qualitatively implement the idea. What is needed for that:
- choose a qualified team;
- fill in a detailed brief with all the wishes;
- conduct a business audit of existing applications on the market (your competitors);
- coordinate the TOR with the stages of work, deadlines and budget;
- give feedback regularly.
Choose the best!
The 21st CENTURY is the era of the heyday of mobile technologies. It is difficult now even to imagine a person without a mobile device, and even more so a business person. Mobile technologies are present in almost all areas of business. Mobile ecosystems are changing and evolving daily through constant experimentation. Hundreds of applications are created daily for business, education, entertainment, and more. Each of these apps has a specific visual style and tone, depending on the direction and context of the app.
But what does the process of developing mobile applications consist of?
Of course, this is an IDEA. At the very initial stage, it is necessary to carefully consider the meaning of the future mobile application and what it will be used for. Then you need to decide on which platform it will be used. As a rule, now applications are written for two IOS and Android platforms at the same time, but if this is useless or not in a hurry, then the company's specialists will help you make a choice in favor of one of the platforms after analyzing the demand/supply market and competition.
2. TERMS OF REFERENCE
Before starting development, it is necessary to obtain technical specifications from the customer. If it is not there, then the customer is given a brief to fill out. Particular attention is paid to this stage, since the technical specification directly affects the technical features of the result. At this stage, the following types of work are performed:
- A description of the functionality of the mobile application is drawn up;
- The terms of development are determined and agreed upon;
- Financial costs are calculated and a model of the settlement procedure is developed;
- A contract is drawn up with the customer;
In order to understand how the user will work with the mobile application, a graphical map of the interaction between the various screens of the program is created. At this stage, almost all the functionality of the mobile application is being developed. At the UI design stage, specialists determine the principle of the application, the placement of functions and buttons on each of the screens. At this stage:
- The functionality of the application is being developed;
- Application screen layouts are being developed;
- The connection of application screens and transitions through them is thought out;
The design of all screens of the future application is created and various states are drawn for all usage scenarios. After the design concept is approved, internal buttons and icons are drawn, as well as all other graphic elements. As a rule, mobile application design drawing involves usability research to make sure that the developed design concept is as simple and convenient as possible and will help users solve their tasks as quickly as possible.
5. DEVELOPMENT
The developers are given technical specifications and application design layouts and they begin to “create”. Programmers "transform" a static picture into an interactive working model. The first version of the application is released.
6. TESTING
The mobile application undergoes thorough testing, as a result of which a table of checks is created in which all errors are indicated and described in detail. In the application design process, it is impossible to foresee all the errors of real operation. At this stage, a list of errors, shortcomings and shortcomings of the application is formed and the deadlines for their elimination are determined. Then the application is released with bug fixes and, if necessary, with modified functionality, which is indicated in the tables after trial testing.
7. RE-TEST
The application is installed on test devices and works exactly the same as if it were downloaded from Google Play or the AppStore. Before the application appears in the official software catalog, it is necessary to make sure that users do not encounter development errors during the installation and use of the program. Therefore, at this stage, the logic of the product, the operation of its server part are once again checked, the application is tested in a variety of conditions and on various versions of operating systems.
8. DEVELOPMENT OF BRAND ICONS
An app icon is the “face” of any modern mobile app. A mobile app icon is a stand-alone graphic element. Creating this element is a multi-stage procedure with rendering an image in several sizes, as well as testing it on various device models. After the icon is approved, the mobile application is launched.
9. PLACEMENT OF THE MOBILE APP IN APPSTORE AND GOOGLE.PLAY
The application is submitted to the AppStore and/or Google.Play for publication. Each app is reviewed by Google and Apple teams before being published. Publishing on Google.Play takes no more than a day, which, of course, is much faster than the AppStore, where publishing an application takes at least 7 working days.
How do you start creating an interface? How strongly do you focus on web interfaces? Remember the 5 most important aspects of mobile app UI design.
1. User interaction rules are not overridden
Recall the 4 key rules of interaction design:
- Research
Track user behavior to adjust application performance. Set goals for users and identify obstacles to achieving them.
- Accounting for user habits and anatomical features
The right interface is not a puzzle. Ideally, the user should not think about what needs to be done to get the desired result, and is not forced to guess why this or that element is needed.
Remember that a person has five fingers on two hands, and that from the early html days blue underlined text means nothing more than a link.
- Opportunity to learn
New and unusual in the interface should look and behave friendly. Always leave the option to undo and go back. Then new behaviors can be easily learned and adopted.
- Feedback
Notify the user that their task has been completed: this can be a sound signal, a small modal window, or a pop-up notification.
2. Understanding users
There are a couple of tactics that allow you to understand user behavior and design the interface with it in mind:
- Introduction of characters
The result of a small brainstorm is one or more characters that are classic representatives of your audience. This method was described in great detail by A. Cooper, and even recommended naming these characters and giving them personal characteristics in order to bring them closer to real people.
Accordingly, you are designing an interface only for them, and not for an abstract "user".
- Custom scripts
Writing scripts of behavior will provide an understanding of how a person will act in the application. Start with the goal that the user must achieve and write down all his actions on the way to it point by point. Describe all existing paths, starting with the most obvious ones. So you can cut off the excess or understand how to simplify this path.
- Action map
Think of all possible conditions for each action and the behavior of the elements. This will save you unnecessary or unintended features, as well as help you understand the emotional component of using your product.

3. Flow plan
Just sketch out the course of user actions on paper - from the beginning of the path to the moment the goal is reached. This should give an understanding of the number and complexity of the steps between the first and last action.
Example: banking application. Scenario: setting up a deposit account replenishment.
Automatic deposit replenishment
[Install]
Select replenishment frequency
[Once a month] [Twice a month] [Once every few weeks] [Every week]
Once a month
[Select date]
Confirm
Enter amount
[Enter amount]
[Set automatic recharge]
Sketches and prototypes help you explore one of the most important parts of a good app - content. Here are some tools to help you do it online:

4. Focus on behavioral patterns, habits and unwritten standards. Movement accounting
Behavioral Patterns
The use of mobile gadgets revolves around many nuances that cannot be ignored - for example, the position of the thumb.
For this reason, navigation buttons tend to be at the bottom of the screen:

UXPin's "Mobile UI Patterns" book discusses two kinds of interaction: gestures and animations.
Users have become accustomed to being able to use different gestures for different situations:

Movement accounting
The anatomical factor is a very important design element. Consider the structure of the human body and the statistics of the use of mobile devices when designing. The top left corner is good for important information, while the bottom of the screen is for navigation.

This is how the schemes of the most convenient gestures for a person look like.

94% of the time, users hold their smartphone upright.

Almost half of the time users spend holding the device with their right hand, and using only their thumb to work with the screen.

And most users use smartphones with screen sizes between 4-5.5 inches.
5. Using an iterative approach
Simply put, it is best to start with a small functionality, analyzing its importance, necessity and quality of execution, gradually supplementing it with innovations. This will not only speed up the launch of the project, but also reduce risks. And most importantly - will avoid congestion of the interface.
Bonus: web helpers for the application interface designer
1. How to choose well-matching colors for a mobile application? Use these services:
getuicolors.com
www.coleure.com
bootflat.github.io/color-picker.html
2. Explore ready-made examples of great interfaces to better understand the required level:
www.mobile-patterns.com/
3. Use ready-made mockups:
www.premiumpixels.com/tag-index/
uispace.net/all-psd
dbfreebies.co/mobile
For those who want to develop for mobile devices, we recommend the profession.