Collect the system block from scratch. How to assemble a powerful computer without assistance? List of computer assembly components. Prepare tools set
Before you start the computers assembly yourself, let's look at the drawing below. It presents all the main components of which will be assembling a computer with their own hands (by our hands) :)
When you click on the drawing, it will open in a modal window in improved quality.
Briefly go through the individual components of our "experimental" so that the assembly of the computer does with their own hands seemed to us more holistically. Upon reference below, open a new window with the top image on which the numbers will be launched (from 1 to 10), and on this page below we will give a brief description of each of the components.
- At number "1" with us -
- room "2" - PCI Express Standard
- "3" - cooling system (aluminum radiator and heat dissipation cooler)
- "4" - under the socket itself (connector) LGA 775
- "5" - two DDR2 standard modules
- "6" - IDE loop (for connecting or CD-DVD old standard)
- "7" - DVD-ROM
- "8" - Computer
- "9" - Winchester (Hard Disk) SATA Standard
- "10" - loop (for connecting hard drive or CD-DVD SATA standard)
- "11" - floppy disk (drive) and its data cable
Naturally, all this "economy" must be packaged somewhere. For this we need good.
Computer assembly with your own hands is happening in the following sequence: first we set the motherboard to our case, install the processor and the cooling system in it, and then you already connect and fix the remaining elements to this "foundation".
Another link, which in a separate window schematically shows the sequence to build a computer.
So, at the initial stage of self-assembling of the computer, we need to establish the motherboard in the building. Regarding it may be such recommendations: the hull must be fairly spacious in order for us to freely install all the components you need.
The fee is attached to it with screws that screw in special fastening bushings (metal hexagon). They come with a housing.

The bushings are screwed into special holes on the back wall of the computer (from the inside of its right side wall), on top there is a motherboard on them and attracts screws.
Hexagons are needed in order to form a gap between the most board and the metal surface of the system (in order to eliminate the possibility of electrical contact between the decaying elements from the back of the board and the case). Such contact may well cause the CZ () and remove its electronics. The more bushings you manage to use, the more reliable there will be fixation (see by the number of mounting holes on the housing and the board itself).

Tip 1.: Remember, fasteners For the motherboard should go complete with computer case . If you buy a body, then only with them. This is important because these fasteners are different in height and differ width of the thread at the base. With others, you just can't install the board!
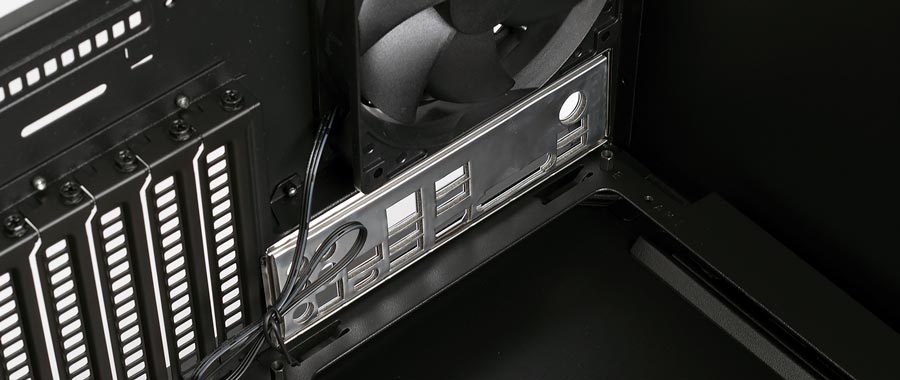
Tip 2.: If you plan to change your motherboard (buy it from your hands or in the store), then be sure to make sure it is complete with her panels with holes for connectors? You will need to install the panel when assembling a computer with your own hands on the rear wall of the system unit. Note the photo below:
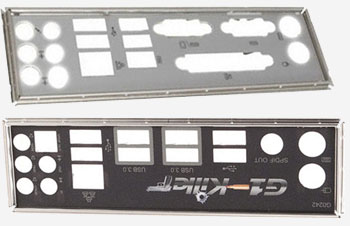
Note that the location of the holes for connectors for each bat circuit is different and if you do not sell the corresponding motherboard panel immediately, it will later be very not just to get it separately.
The panel is installed in the place specifically allotted for it. This needs to be done before the motherboard room in the housing.
Correctly refer it to the main connectors and install, feeling with your fingers. The plug should be tightly "sit down" and fix with a characteristic click.
Below you can watch a video that visually demonstrates the whole process:
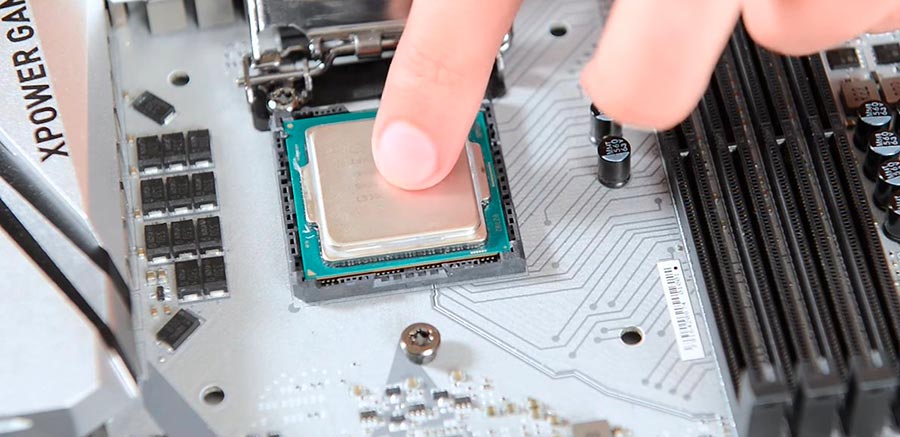
We continue to build a computer with your own hands. After we have secured the motherboard in the case, you need to install a central processor board in the slot (connector). Let's look at the drawing below and comment on some points.

The installation procedure in the slot is as follows: Press the book and reject the clamping latch (designated in the photo above number 2). To do this: leash it from under a special hook (in the photo number 1), raise the metal frame (number 3), which fixes the processor in the connector. After that, we can only install the CPU itself (designated 4).
Attention! Look at the processor and determine which side it has a "key" (specially cut on one side corner or two small grooves on the sides). The socket has the same corner or protrusions in the appropriate places. When installing the processor, they must be combined with each other.
When the installation is complete, we repeat all the actions in the reverse sequence: put the locking cover on the processor (No. 3), omit (already with a certain force) clamping metal rod (No. 2), we take it away at the bottom point and do under a special side hook №1.
About how the processor of the old PGA sample processor is installed (Believe me, you need to know) Watch the video below:
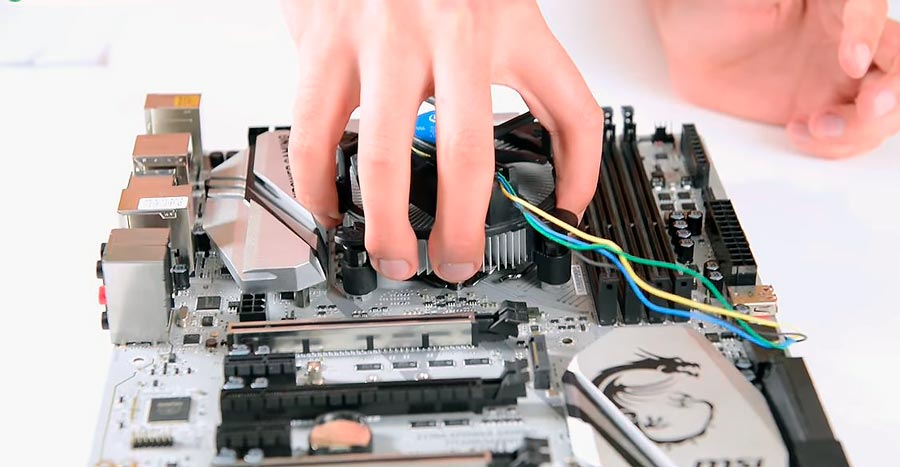
In the process of self-assembly, we need to be able to install the cooling system (the radiator with the fan). It should be noted that now we establish a cooling system for the product from the company "Intel", in the case of AMD, it looks a little different.

In theory, it looks like this: on the four corners from the processor slot there are special holes in the motherboard, it is through them that the entire air cooling system is attached.
Accordingly, there are four special plastic clamps on the radiator, which, when pressing, pressed the radiator to the processor and, in the way, fix the entire design on the motherboard.
Here's how a cooling system looks like a cooling system for our processor, which we have just installed:

And this is one of his locks on the board close-up and we snatch it.

Note the photo below:

See the slits (grooves in the form of grooves) on each of the four plastic locks? The position when the recesses are perpendicular to the ribs of the radiator correspond to the closed state of the latch-closer (in the photo above all the latches are closed). It is in this position that they must all be before installing on a fee! Remember it!
The arrows indicate the direction in which you need to be checked (can make it a screwdriver) the retainer in order to translate it into the open position.
Tip: After placing the clips of the radiator strictly over the holes around the planting slot (it is necessary to achieve the plastic isals for fasteners in them "failed"), you need to smoothly smoothly but strongly press on two clamps located diagonally from each other (until it clicks and securely fix them in the board ). Then we carry out the same procedure for the two remaining clamps. Everything! Cooling system installed!
It is much easierless to show the whole process in a small video than to describe words, so we look at the roller below:
If there is a need to remove the cooling system, then we simply translate all four clamps to the "open" position and pull out the design on yourself (it will take off enough).
Council: Some people are more convenient to install a computer cooling system. before thatHow the motherboard will be fixed in the housing. This is how it is possible to visually see what and where it is snapped, and commend the effect of the accomplished effort to reliably fix items.
The design for fastening the cooling system on processors from the company "AMD" is somewhat different from the one that we can observe from the products from "Intel". It consists of two components: a plastic frame-based frame, reliably locking around a processor socket, and a radiator with a fan that is attached (snapped) on this frame. Here, for example, how it looks for the AM3 processor connector:

As you can see, with this approach, the force pressure of the radiator is transmitted first directly to the plastic base (frame) and is evenly distributed evenly on the textolite of the motherboard itself.
By the way, when removing cooling systems from motherboards under the control of "Intel" processors, it is quite often necessary to observe how the basis of the motherboard (textolite) has a visually noticeable curvature (from constant pressure on it of the cooling system radiator), which is fixed directly to the board itself . It is bad and potentially can lead to micro-cracks at the basis of the motherboard.
Assembling a computer with your own hands, in particular, the installation of the processor and the motherboard is often associated with the reflection on the processor of the cooling system of third-party manufacturers, which may have a lot of pollogram, and even more! In this regard, to prevent the motherboard's deflection at the place of attachment, there is a special metal crossing, which is located on the back of the board (under the processor).

This additional mount is called the word "backplate" (backplate) and it serves as we have already spoken, to remove unnecessary physical exertion from the motherboard. The only nuance of this design is that it should be installed before Fixing the board in the computer case.
Do not forget: the correctly installed cooling system allows you to avoid in the future!
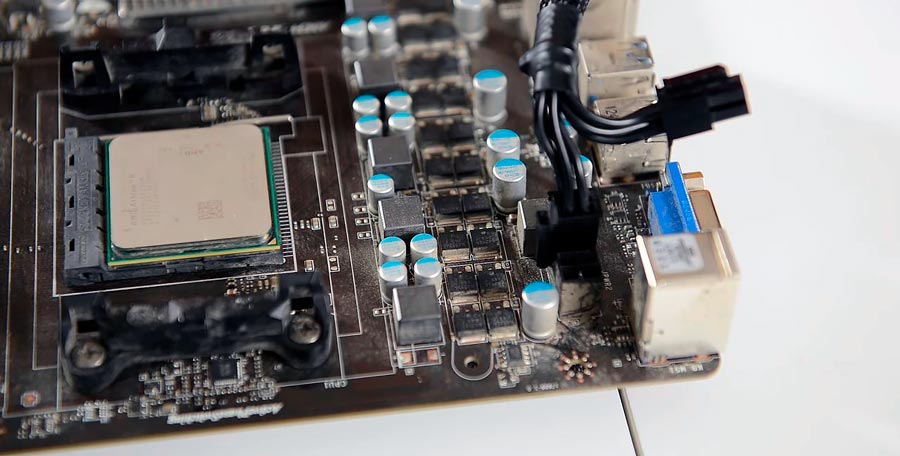
When assembling a computer yourself, we need to not forget to take another thing: from the cooling system fan there is a small (3 or 4 or 4) contact wiring, which serves meals from the motherboard to the fan so that it spins and dispel heat. We need to find the corresponding connector on the board (usually 3-4 pins next to the processor connector) near which there is an inscription "CPU_FAN" and connect our power cord to it.
The most important components and cooling system are installed. Now we need to install all the remaining devices. And since, the assembly of a computer with your own hands is the case is quite responsible and painstaking, then, for the general readability of the text, let's continue our description on the next page.
In conclusion (for better fastening material), you can watch a video on how to install a processor and cooling system for products from the company "Intel":
3dnews has a large and diverse audience. The resource is visited as the mothers enthusiasts, which gathered far from one PC and readers who are just beginning to delve into all the wisdom of computer equipment. The test laboratory is elegant and accelerates them to serious frequencies, to study the durability of drives, in modern games and for the purchase of unusual iron abroad, but at the same time does not forget about inexperienced users. So there was a rubric "", in which various configurations of system units are offered. After acquaintance with comments and personal communication with the readers of the site, it became clear to me that it was time to tell in detail and show beginners, as the components offered in the article to collect in a single whole. That is why this material is devoted.

It is useful and branded by from the manufacturer of the motherboard. All companies are equipped with such applications. And they have similar functionality. For example, in the MSI Command Center program, the functions of processor acceleration and RAM are unlocked. And in the same software, the fan speed is adjusted and the CPU and chipset temperatures are monitored. The "Command Center" supports the installation of a large number of additional modules. For example, with the help of RGB Mystic Light Sync, the backlight of the motherboard is configured. The Live Update mini application automatically downloads and sets the latest drivers, BIOS and other software. The Gaming App utility gives access to an overclocking profile of the video card.
"We drnamed" the system in PRIME95 for several hours, checked the computer in 3DMark, Heaven and did not reveal any overheating, nor artifacts, no departures and hangs, launched several benchmarks and summarized results with other data available on the network - all Now you can be absolutely sure that the computer is fully ready for operation in 24/7 mode.
⇡ Conclusions
Each user can have their own reasons to assemble the system unit. Some do not want to overpay for the work that you can do. Others want to fully control the entire process: from choosing components to assembling and setting up the system. And for someone to "dig" with iron is just a hobby. Whatever the motive, but the most difficult action when assembling the system unit is the choice of components, and this 3DNews team always tries to help its readers. If you picked up completely compatible components, then all other steps on the assembly of PC will not be much difficult. Just come to this lesson as responsibly as possible, when working with iron be careful and neat - you collect for yourself. Then you do not have any problems at the stage of assembly, nor at the installation of software and testing.
It is not difficult to assemble a computer. Computer assembly as a designer - all the details rose only in their places and knowing the theoretical part, in principle, there should be no problems with the assembly. All that is required of you is time and accuracy, since this designer is often expensive, and the errors do not forgive.
In this article, we will consider the most important aspects and questions that may arise when assembling PCs. How to collect a computer and do not break anything?
Before collecting a computer, you must be sure that all components are compatible with each other. Check components for their compatibility is not difficult. If you are not sure yourself, then use special assembly configurators that are with many stores. For example, one of such configurators is www.regard.ru/cfg.
By the way, you can choose the most suitable assembly for you on our channel in Yandex.
CPU
The contact pad on processors for a stationary PC is two types: PGA (in the form of "pins") and LGA, where they are replaced by contact surfaces.

PGA is used in AMD processors and old Intel versions. After a 775 socket (place where the processor is installed) in Intel switched to the LGA connector. It is extremely difficult to hit anything in such a processor, which you can not say about motherboards for this connector. Manufacturers of motherboards under the Intel socket do not just put a special plug.

Under it there are a lot of contacts that are called "legs". It requires accuracy. You have no dust or dirt you will not get enough. The legs are very harp. If you dampen one of the legs, it is quite possible mat. The fee will be not proper. It is also not worth aligning them. If it still happened - it will be wise to contact the service center.
The plug from the socket must be removed immediately before installing the processor. Check if all the legs are intact, whether it is not rumped out and only then proceed to install the processor into the socket.
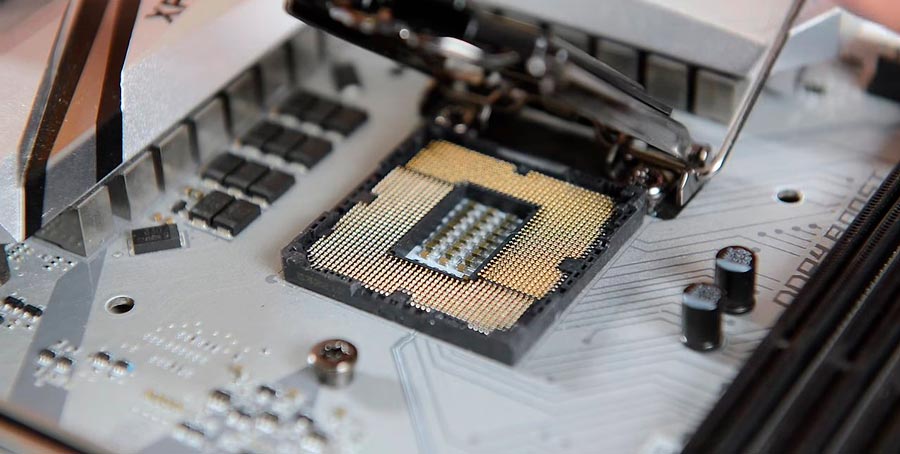
By the way, the plug on the latest versions of motherboards for Intel processors is not removed at all.
The fixation mechanism opens with a special lever. Checkbox on the processor and socket should look in one direction.
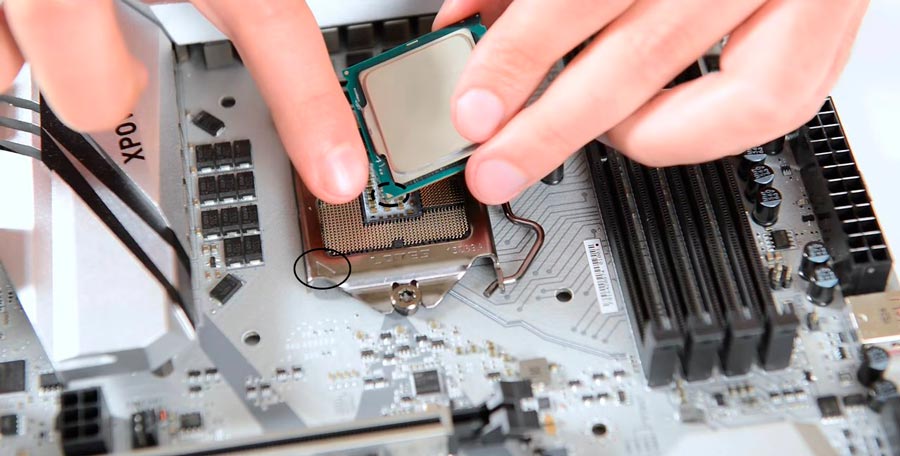
He and a pair of keys on the connector and processor are your main landmarks. Make sure that the processor rode normally on the contacts, and only then close the locking mechanism.
It will resist a little, but do not be afraid. This is normal, just the processor frame is quite tightly pressed the processor to all legs.

The AMD processors are different. They have "legs" are located directly on the processor, and the connector of the motherboard is made in the form of a special niche under these "legs". Make sure that all the legs on the processor in place and nothing is bent, and only then proceed to install the processor in the socket. When installing, again, you should navigate the special markup (check box).

Installing AMD processors is more simple. Carefully open the socket and put the processor. He must completely sit in the connector.

Cooling system
Perhaps the installation of the cooler is a more complex occupation (relative to the installation of other components). Often, the thermal paste is already applied. Do I need to replace it with something more worth? If it is a budget cooler or boxing (kiss) - yes, it is desirable, but not critical. On top cooling systems, it will be superfluous.
Before installing the cooler, wipe the surface of the processor. You can do it with alcohol or degreaser.
Check out the instructions, do not ignore this step. Enter the installation and check that the cooler is fixed and does not hang. You can grab it with your hand and lift with the motherboard.
With cooling for AMD processes, everything is easier, but also be sure to read the instructions. We install the cooler and fix it with a lever.

On a purchased separate cooling system, too, as a rule, the thermal paste is already applied, but the methods of fixation can be others. For the ear coolers, for example, a special substrate under the processor is needed, and in the case of AMD processors, it may be necessary to disassemble the native clamps on the board

Tower coolers are usually attached with screws, the key for mounting most often comes with. The most important thing when installing such a cooler does not overdo it with tightening screws. It must fit tightly to the processor, and not hang out, but it does not mean that the screws need to be twisted as a car wheel.

Do not too dilute. After installing the cooling system, connect it to the motherboard - the CPU FAN connector.
Thermalcaste
It happens that the paste is not applied to the cooler, but lies separately with it in the box. Then it will have to be applied on their own. The paste is applied only on the metal cover of the processor. The thinner the layer, the better.
Pasta is well applied, for example, a plastic card. It is not desirable that the paste fell to the processor substrate. Some thermal paste conduct electricity and it can cause short circuit.

Just apply a little paste to the center of the processor and install the cooler. Under pressure, it is evenly distributed over the cover of the processor. Sometimes the edges remain not blurred, but they do not play a significant role in the process of heat removal. What thermal column is better to choose and how to change it, read.
RAM
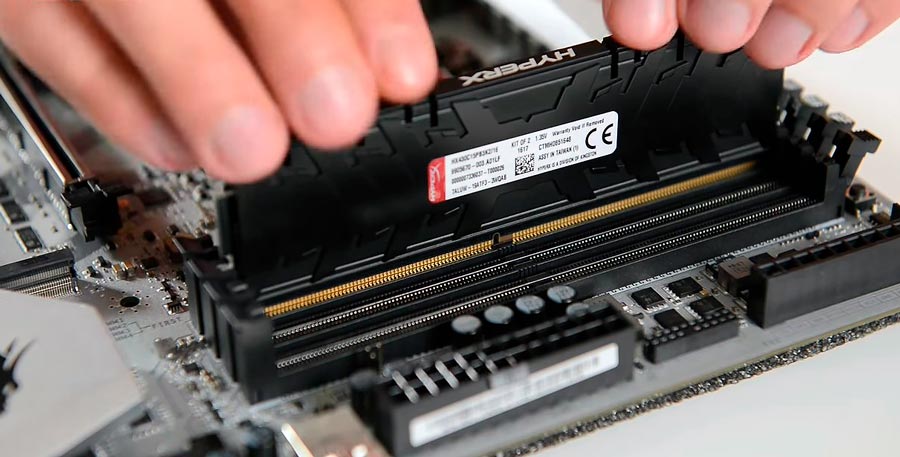
The simplest is the installation of RAM. True, in the slots with one-sided fixation, the memory is inserted more difficult. Sometimes a normal effort is required.
In the socket socket there is a key on the memory card. Open the latch on the slot, insert the model until you stop, close the latch. Make sure that the memory has become smoothly, it usually concerns the slots with one-sided fixation.
It often happens that the module is not fully inserted on the side of the lever. This can lead to the fact that after the PC is turned on, the system will not start.
Usually, before installing the motherboard in the case, I check the performance of the system on an open bench. You may not do this, but perhaps someone will come in handy.
After installing the processor, the cooling, hard disk system and the RAM, I feed the motherboard from the power supply, the processor and connect HDD. Next, closer with a screwdriver connectors to which the power on the case are connected. They are usually located in the lower right of the mat. Boards:


Gigabyte

Checking the performance of the system, and sometimes installing Windows at this stage, turn to the assembly already in the case
Housing
Now it's time to put a motherboard into the case, but it is advisable to install the power supply, otherwise there may be a problem with a neat styling of wires. Place in advance that where it will stand and swipe the corresponding wires there.

Also before installing the motherboard, do not forget to install a special panel under the connectors, which walked with the motherboard on the back of the case. It will start with the inside of the case and is set as if imposing it out.
The fee should stand in the housing on special racks (hemp), they are from 4 to 15. Do not miss this moment! By comparing the motherboard with its approximate location in the case, screw the rack housing into the openings.

They must be the same height. Check all the "hemp" screwed into the housing to the same height (to the end). In cheap buildings it happens and without the help of the tool it is often not to do. The motherboard should not touch the housing, it should evenly lie on the racks.

Racks - part of the housing kit. It happens that holes on the board are more than on the pallet. Not trouble, use everything is not necessary. The main thing is to secure the edges of the board and the middle of the board at least in one place.
Drives
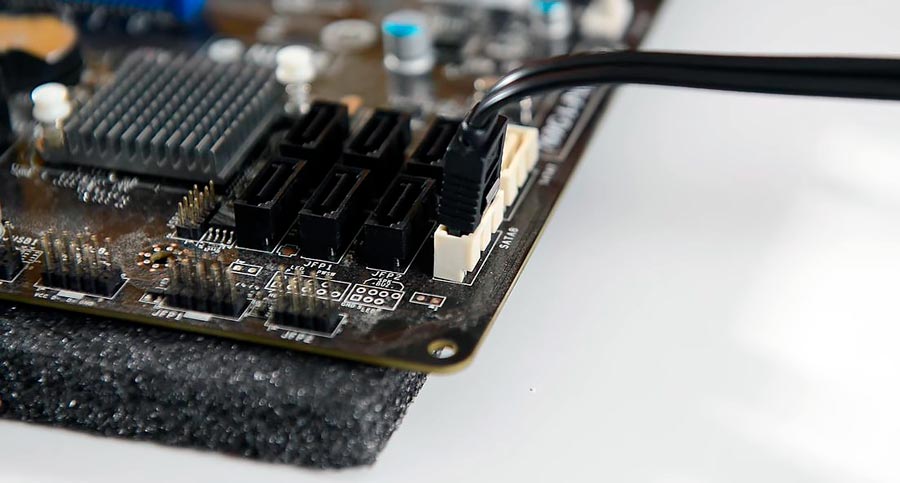
Connect the drive is easier than simple. In the case of a regular SSD (2.5 inches) or hard disk, you will deal with everything with two wires: power supply and data transfer wire (SATA), which comes with a motherboard.

Check the location of the key, does it not interfere with their normal connection. With SATA cord, everything is the same. In most cases, on the cord there is a retainer with a lever at the top of the connector. If you need to get the cable, just clamp it, otherwise you can break the connector on the mat board.

In modern buildings, drives are fixed in special sled. Very convenient and does not require special screws unlike budget buildings.
Laying of wires
Do not allow situations where the power wires or the connector is connected to the device on the break, we are guaranteed to break the block or connector on the device itself, it usually concerns the drives.
You can do not care about accuracy and snap all the wires com. There will be no work to work, but unfortunately. Wires will interfere with normal air circulation in the housing, the system will be faster, and will overheat. Plus there is a possibility that one of the wires can fall into the cavity of the processor fan.
Wire a wire for the back wall and through special eyes fix them with screeds.
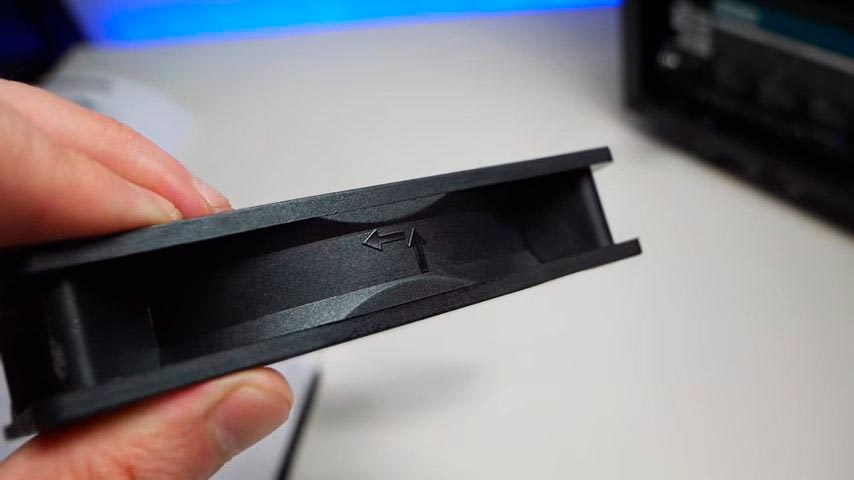
Cabinet fans
They are usually two in front and one on blowing. Mixed to the housing on the self-tapping screw. Before installing in the case, pay attention to the airflow pointers. If this is the rear wall (or the upper part of the case) - an arrow on blowing out of the housing, anterior - the air fence into the case.
The fan can be connected both to the motherboard and the power supply unit (via the adapter). If the fan has 4 pin connector, then it is necessary to connect it to the corresponding connector on the mat. The board, which is indicated as SYS FAN. The advantage of the 4-PIN connector - the ability to automatically control the fan rotation speed depending on the processor loading.
Make sure that there is nothing interferes in the circulation of air. The upper part of the hard disk should be bludging - it will extend his life.
Connecting the power supply
First of all, connect the most important cables. There are two of them - it is 24 PIN (or 20 + 4) Power cable for motherboard and cable for powering CPU 8 PIN processor (or 4 PIN). Insert them to the limit, hear the characteristic click (not always). Do not confuse the power supply of 4 PIN CPU and PCI-E.
Sometimes it happens that the processor power connector on the motherboard has an 8-pin connector, and the power supply cable intended for the CPU is only 4 PIN.
You can connect half and it will work, but it is not desirable to do so. Not the fact that your motherboard will survive it.
By the way, the video cards do not concern this and later we will analyze why. If the CPU 4 + 4Pin power supply is specified in the power supply characteristics - this means that the set-up connector is suitable for both 8 contact connections and 4 contacts.
The same with the board. Power 20 + 4 denotes that your block is suitable for both the Pin Slot and the standard 24-pin.

With the video card, the situation is different. Here, also encounters a set connector by 6 + 2 contacts or only 6. In fact, there is only a 6-pin connector. It can be one, two or three - depends on the twist of your power supply. And it differs from the 8-pin only with a jumper.
Additional 2 contacts do not create the difference in potentials, these are two zero. They serve a marker for the card that your power supply is quite powerful for the card and will provide the right current.

Carefully connect the additional ports of the case. Do not hurry. There is a key on the connector - orient on it, watch the feet of the connector were smooth, do not blame them. This is especially true USB 3.0 connector. No rare cases when, due to inattention, the user turns the leg on the connector or takes off when the connector retrieves the connector. How to connect the front panel of the computer to the motherboard is described in more detail here.
Video adapter
As a rule, the video adapter is installed last. Everything is simple here. Insert the video card into the graphic slot and lock the screw on the expansion card frame. If the card is wide, then it is better to fix two screws.

Do not forget about the retainer on the slot. It is not for beauty. Before installing, it must be opened and only then we insert the video card to the characteristic click. Remove the card only with the lock lever. Click on it, and the map will rise in the slot, after which it can already be extracted.
Static electricity and methods to combat it
Do not collect PCs in synthetic socks standing on a woolen carpet. You can use simple cotton gloves, especially when working with RAM modules without radiators. Perhaps this is the only detail that is afraid of static. Common sense and mandatory reading instructions your best assistants.
If the computer does not start after the assembly - check how you installed components. Starts, but rather stops work - rather a problem with RAM or its incorrect installation. Create computer
If it comes to the BIOS is already good, you can find a possible reason. If the light bulbs light up on the mat, the coolers are spinning, but nothing on the monitor - check the installation of the video card. Can help reset bios or its update.
As you can see, collect the computer from the components itself is not difficult. The main thing is to know theoretical part. We disassemble the main points that can be useful. Naturally, this is not all. How many variations are comprehensive so many possible problems. There should be no mechanical damage on components. Before you decide to collect your computer, carefully check the components for external defects. Good luck in the assembly.
Hello, my dear readers!
During the rapid development of computer technology, it is very difficult to submit your life without a PC. And if you have no laptop, nor a netbook, nor personal computer, then you are thinking about a similar purchase.
What could be easier: go and buy?! But to buy a computer in detail and assemble it from the components yourself much cheaper, besides, you can choose the characteristics at your own request.
Before collecting your computer from scratch, do it yourself, find out how much a standard set of details in the store. Actually, I used the online service with the inspection of the compatibility of the elements of the future PC http://www.edelws.ru/constructor/. It is very convenient, since without special knowledge of the computer, it is very difficult to choose the hardware. In addition, there are cheap components here.
Housing
It is not necessary to choose to choose. This element absolutely does not affect the working process of the device. Buy the housing follows from calculating comfort. It is desirable that it is possible to establish a USB port from the front side of the box, a drive and various panels on the rear wall (TV tuner, etc.).
The material also does not matter.
An important aspect may be dimensions.
There are 2 of the main factors play the role of 2 - this is the number of slots for RAM and cooling planks. If you just want to work at the computer and nothing more, then 2 slots for the slats are quite enough and a particularly important role cooling does not play.
But, if you are an avid gamer, then you need to be accessible option for installing RAM from 8 GB and more, and for this you already need 4 slots. Naturally, for such power there should be a good and reliable cooling cooler. So choosing a motherboard, pay attention to the size of the stock fan. It seems that a trifle, but it is important. 
Power Supply
The most popular option is a 500W power supply. Its power is enough to connect any peripheral device without autonomous power. In addition, this unit is able to withstand voltage jumps without harm to the computer.
Another power supply must be suitable for your chosen body (for reliable fasteners).
All memory modules are divided into 2 types: DDR2 (for stationary computers) and DDR3 (for laptops, netbooks and monoblocks). The number of installed slats directly depends on the motherboard chosen (it was mentioned above). They are installed extremely simple, like a flash drive to the phone: clicking until it clicks.
When buying RAM should pay attention to the cut from copper contacts the bar, since they are all different in their scheme, that is, each motherboard corresponds only to a certain group of memory modules.
Choose this item is very simple: the more volume, the better. 
This is a very important detail for any gamer. It is the graphics memory that will be able to provide a high-quality image. Among the large number of video cards most often use NVIDIA G-Force, AMD ATI Radeon (for video games) and Intel ® Graphics HD (for work and office programs).
Intel ® Graphics HD is not a very powerful video card, but most of the stock laptops are equipped with them. Naturally, the game computer also copes with office work as well, but it is more expensive.
The type of connector for connecting the video adapter is different, so the graphic chipset must be selected under the basic scheme.
Now the choice of such details of the computer is simply incredible, so there will be no problems with the search. Not unavailable for video cards and cooling. On ordinary office adapters there is no kuller, there is only a large aluminum radiator that carries out cooling. More powerful cards are equipped with one or even two fans for more reliable cooling.
There is no point in hiding that the graphic chipset is the most expensive part in the computer, since most PC or laptop features are available thanks to this adapter. Should they say that most of the oldest video games will not work on the spring of the graphics block of memory! If you need a budget working computer, then you should have a discrete video card. 
Processor (CPU)
Most motherboards are already on sale with a processor installed. But, if you know how to install it yourself, then you can take an empty bulk fee and pick up the CPU.
Now the most popular central processors are devices I3, I5, I7. The most expensive, the last, respectively. The first options to buy is absolutely no sense, as they are already considered outdated.
 The above-mentioned Intel processors operate on fiction frequencies, which makes it possible to enjoy the workflow of a computer or video game with great pleasure. But know: Installing CPU is not such a simple process, as it may seem, so if you do not even have the most minimal ideas about the PC hardware, then buy the bulk card already with the CPU installed.
You do not need to choose this detail, all contacts are absolutely the same on any processor.
Hard Disk (HDD, Hard or Winchester)
This detail of the computer also does not have absolutely no value in the device performance plan. Winchester is only responsible for storing files, software and computer. All new generation hard drives have an absolutely identical principle of connection (SATA II), the difference is only in their assignment (PC or laptop).
If you want to store enough large amounts of files, but do not want to throw out large amounts of money, then 500 GB will be quite enough. All knowing people choose Hard from Samsung, since these discs are distinguished by great reliability and good bandwidth. 
Sound card
This is a small board that connects to the motherboard and is displayed on the back of the box. It contains inputs for headphones, an acoustic system and microphone. Even the age of the sound card does not matter: all of them are structurally identical. Choose what is cheaper.
Still a couple of nuances
In the installation of a floppy disk drive or an optical drive, in principle there is no need, since they are already departed in history. External hard drives and flash drives absolutely outstretched them from the world of computer technologies. But, if you are in an old way, you prefer to store information (photos, movies, music, etc.) on DVDs, then take care of the presence of a drive on your PC.
After reading the article you learned how to collect your computer from the components yourself. Thus, it is possible to save up to 10% -15% of the cost per long-awaited computer. If you wish to easily and deeper in the "hardware", I advise you to go learning course " Genius genemist”.
I wish you so that you succeed! Tell your friends and familiar about our intentions on social networks by sharing a reference to this article. Do not forget to subscribe to blog updates - this is an opportunity to get a lot of useful information about your PC. See you!
Yours faithfully! Abdullin Ruslan
📲 Hello, dear readers of my blog! Finally, you have all the preparations are finished, all components and components are purchased, you can start assembling our computer. Assembling a computer, in 2019 this phenomenon becomes less and less common. Everyone already has enough powerful PCs to help all the daily needs, and stop and gaming. In view of this, the excitement on the components for PC sharply decreased, if compared with the mid-2000x. In addition, there are many offers on the market for already ready-made monoblocks, among which there are gaming. Nevertheless, if you want, but do not know how to collect PC with your own hands, this article will have to be just by the way. Assembling a computer in an inexperienced user to seem heavy and incomprehensible occupation, but it is not. After reading this post, you will understand a lot for yourself, and maybe you will decide to do something on your own.
Install the processor.
The assembly is most convenient to start with the installation of the processor and cooler on the motherboard. Iron manufacturers recommend first to set the motherboard into the case. This recommendation is made in order to prevent the system board breaking during the assembly. But, on the other hand, install a processor with a cooler after the motherboard is installed in the body, very uncomfortable. It does not rule out the possibility of damage to the processor and cooler. But we will do everything neatly, right? So, at this point, we will analyze how to install a processor on a system fee.
We will need: a motherboard, processor, thermal chaser, a cooler, a small spatula for smearing the thermal paste (you can cut out of a plastic card) or cotton wand, fairly straight hands, accuracy, attentiveness and just a lot of good mood! Immediately I want to warn: if the mood, well-being is bad, in no case do not touch the internal parts of the computer. I know about yourself - I must have anything with anything.
Remove the motherboard from the package (do not forget: all operations are made with a ground!), Put it on the box, pre-put an anti-static package on the box (there was a motherboard in it). It all needs to be done in order not to scratch the table and not damage the motherboard. Press down on the spring lever, which fixes the frame on the socket, output from the engagement and raise up. Raise the frame and remove the socket protective cover.

Now you can remove the processor from the package. Remember: with the processor you need to contact extremely gently, as with the most precious vase! The slightest awkward movement and it can be damaged. He is very easily laid down legs. Therefore, be extremely careful.
It is necessary to install the processor to the socket according to special marks available on the socket (slice) and the processor itself, aligning them. The processor must fall into the socket itself, no effort is not necessary to apply here. Before you close the frame and fix it with a spring lever, make sure that the processor is in a socket without distortion.
After the processor is installed, the frame is closed and fixed, it's time to apply the thermal chaser to the surface of the processor. To do this, squeeze a little thermal splash from the syringe and smear it on the surface of the processor. The thermal layer should be almost transparent, that is, minimal! The increasing layer of thermal paste leads to a deterioration of heat exchange between the processor and the cooler. The main role of the thermal paste is smoothing the roughness of the surfaces of the processor and the cooler soles, thereby increasing the area of \u200b\u200bcontact.
Applying paste on the processor.

Some coolers are sold in a boxing option. Often it is already applied to the surface of the sole of the thermalcolum. But I usually remove it with a cotton sticks moistened in alcohol. This option does not suit me, as usual, this thermal paste is inflicted poorly. To the sole of the cooler, the thermal paste should be launched with a finger, applying enough effort, in order to close all microscopic irregularities. But as for the processor, - here it is simply a paste smear the minimum layer.

Now you can install the cooler. There are 4 holes near the socket. Here they are intended for fastening the cooler. Depending on the design of the cooler, there are several ways to fasten it on the system board: tightening, locks, fastening with screws through a special bar, which is installed on the back side of the system board. When installing a cooler, expect caution to not damage the texture of the motherboard. After installing the cooler, make sure that it is exactly, without distortion. If you need to reinstall the cooler, then it is necessary to distribute the thermal chaser again along the surfaces of the sole and the processor so that the airbags do not appear and there is no local overheating of the processor. Do not forget to connect the fan wire to the connector on the system board. Near this connector is the inscription "CPU_FAN". Located near the socket.
Installing RAM

After the processor and the cooler are installed on the recommendation, we set the RAM strips to the appropriate slots on the motherboard. After that, you can set a motherboard into the housing.
Stick the memory bar on time will take a few seconds. Despite the simplicity of the operation, still look into the relevant sections of the documentation for the system board does not prevent. The fact is that on the installation of RAM modules in slots there are limitations. Let's try to figure it out in order.
If you are going to establish only one RAM module, it should be installed only in the first slot (we consider it from the processor).
Modern system boards are designed to use a two-channel mode. What is two-channel mode? This is when not one memory module is used, but two. In this case, the bandwidth of RAM is doubled. On system boards with support for two-channel slots mode for RAM modules have different color. For example, a pair of blue slots and a pair of black slots.
Then you need to install modules only in blue slots or only in black. Moreover, the modules itself must be absolutely the same in their structure. Usually they are sold in pairs. If all slots have the same color, then see the documentation for the motherboard. If the slots are four, then the modules are usually installed in the first and third or in the second and fourth.
To set the RAM module into the slot, you need to take to the side of plastic latches, turn the module so that the key (slot) on the module coincided with the protrusion on the slot, put the module into the slot and slightly press. Latches must stand in place and fix the module in the slot. With the correct installation, you will hear a soft click.

I hope you picked up the size of the body to the size of the maternity board, that is, for example, in the body in the Micro ATX form factor does not fit the motherboard with Full ATX formator. Installing MatPlates to the case and connecting the power supply connectors to it is the most time-consuming process in assembling a personal computer.
Now there is very responsible work. We will set the motherboard on the chassis of the case. The work of the entire system unit as a whole depends on the quality of this work. The system or motherboard is afraid of static electricity, so do not forget about grounding!
If your system unit already has a built-in power supply, then this is one. But if it is not, then the power supply will have to arrive, and, this is a separate big topic for conversation. For home PCs, power supplies are suitable for 400 watts, while the gaming power can reach up to 2 kilowatt.
In order not to get to write, be sure to see what power you need your video card so as not to buy a deliberately weak BP. The device is better to take with a stock of +100 watts anyway, and this is not the part of the computer on which you need to save.
Video about the choice of BP.
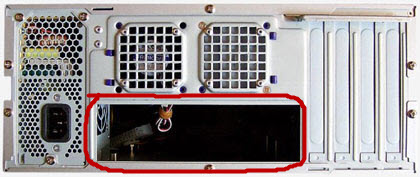
In order to set the board prepare the housing. To do this, remove the two side covers and see whether it is possible to remove the chassis if you can pull out and put on the table. Well, if the chassis is not removed, you will have to put it. We do everything as careful as possible not to damage the motherboard. Even if your case is already equipped with a power supply and the chassis because of it is not removed, then remove the power supply.

Then you need to break the standard bar for the system board connectors, and in the resulting opening, we set the decorative bar, which must be complete with the system board. The bar must be properly oriented with respect to the system board connectors, applied to the impeller and push with your fingers quite strongly so that it is fixed by the walls of the case.
Now let's figure out the fasteners that are sold complete with the housing (sometimes with a motherboard, so always check their availability when purchasing).
In addition to screws in the set there are hexagon bushings, which are screwed into the holes with carvings on the chassis and the motherboard is already attached to them. These bushings are needed so that the motherboard does not touch the chassis to avoid short circuit. If there are special bins with threaded holes for fastening the motherboard, then these bushings are not needed. Also, the set includes special plastic stands intended for installation under the system board in places where the motherboard is not attached to the screws. Stands are needed to provide rigidity of the maintenance of the motherboard so that the fee does not savage. Their location is determined by the experimental way, depends on the construction of the case and the motherboard.
Now you need to attach a motherboard into the housing, aligning the connectors on the rear panel with holes in the decorative bar. We look attentively, in what places you need to install bushings (if necessary), and in what - stand and, naturally, install them and secure the motherboard. Screw the screws carefully, make sure that the screwdriver does not jump and damage the parts on the system board. It is not necessary to delay much to avoid damage to the textolite.
Now the most interesting. Connect the buttons and the front panel indicators to the system board.

Connecting the motherboard (sample of some cables).
On the front panel, there is a power button (Power SW), the hard disk operation indicator (HDD LED), the Power LED indicator and the reset button (Reset SW). To the motherboard, they are connected using special connectors (pins). As a rule, Pins have appropriate inscriptions. If they are not, then you will have to remove the front panel of the case and see where they are soldered. On the motherboard for them there is a special contact block, located in the lower right corner. Announced Front Panel (F-Panel). Pickup (Connection Scheme) is available in the documentation for the system board. But you can also figure it out - all contacts on the contact block are marked. The main thing is not to confuse polarity. On Pins, the colored wire is connected to the "plus", and if white or black - to "minus".
For example, you can see the location and purpose of the connectors on the motherboard (clickable):
On the front panel there may also be additional USB connectors. They are connected to the blocks on the system board, which are indicated by F-USB1 and F-USB2. In the documentation for the system board there are also tips.
The motherboard took its decent place in the system unit housing! It's time to proceed with the installation of the power supply (BP).
As a rule, BP is installed in the upper part of the case. But there are some models of the housings, where the BP is set at the bottom.
Installing the power supply should be made extremely careful, trying not to touch the cooler of the processor. Otherwise, it is possible to damage the crystal and the processor will come into disrepair.
So, the BP is set to the inside of the body, combining the threaded holes of the power supply system with holes in the housing. Then screw the screws. It should not tighten the screws very much, since the metal from which the BP housing is very soft and you can easily thread the thread.
Now, from the entire bundle of cables sticking out of the power supply, choose two with such connectors.
The small 4-pin connector is designed to supply power to the processor, and a large 20-pin - for power supply to the system board. They need to be connected to the appropriate connectors on the system board (1 and 2), orienting the latch. It should be noted that the 4-pin connector on the motherboard is located next to the cooler, and in a very hard-to-reach place, so we do everything very carefully and follow the latches to be fixed.
As another example, I will give a picture with the location of the connector on a typical motherboard (clickable):
The location of the connectors on the system board can be viewed in the documentation for the system board. Any motherboard has pictures with the location and designation of all connectors and a manual for connecting.
Installing a hard disk

The moment came when we install a hard drive and the CD / DVD drive to your computer. Installing a hard disk - the procedure is not complicated, but still there are some nuances that should be observed (and often they are not respected!). In addition, we will look at how to connect a hard disk with an IDE interface to a new system board that does not support this interface. So, about everything in order.
First of all, you need to define a hard disk space in the system unit housing. The hard disk must be installed so that it can cool well, that is, to provide sufficient free space from below and on top of the hard disk. Often there is a need to install two or more hard drives, so cooling should be provided.
It is important to securely secure the hard disk on the chassis. It is necessary to make it four screws (two on each side)! This is due to the fact that during the operation of the hard disk, its records rotate at a very high speed and fixing the hard drive only to two screws on the one hand (as many users happens) can lead to very bad consequences. The same requirement is presented to the drive fastening.

Installing the HDD hard disk to the computer - the difference between SATA and IDE.
If you install a hard disk with an IDE interface, do not forget to install a special jumper on it - jumper.
Here are two main positions: Master (host) and Slave (slave). If the operating system is located on this hard drive, the jumper is installed to the Master. By this, we specify a computer, from which hard drive to load the operating system. In all other cases - to the Slave position.
After fixing the hard disk on the chassis, we connect the power cord (it goes from the Pattern block) and the data transfer cable. Cable data cable Connect the corresponding connectors on the hard drive and the motherboard. These hard drive cables with SATA and IDE interfaces are different.
If you detect the absence of any interface (for example, you need to connect a hard disk with an IDE interface, and on the motherboard there is no corresponding connector), nothing terrible - on sale there are always appropriate adapters (adapters).
The drive is installed in the same way, only before installing, it is necessary to remove the decorative cap from the front panel of the housing. To do this, prescribe a plug from the inside with an effort sufficient to deduce it.
Installation of the video card

Our computer is almost ready, it remains only to install a video card. Installing the video card takes only a few minutes. Depending on the interface, your video card (AGP, PCI-E X1, PCI-E X16) determine which slot on the system board should be installed. This can be done both visually, focusing on inscriptions to the system board slots and the attached documentation for the motherboard.
After removing the plug, gently, we install the video card into the slot. We monitor the latch, located on the right side of the slot to record the video card (only for the AGP and PCI-E X16 slots). After that, you need to fix the video card with screw on the body.

Installing a video card to computer - Check whether additional power is needed.
It should be noted one nuance regarding the attachment of the video card in the system unit. In some models of system blocks, the expansion board (including the video card) are fixed not with screws, but by a special slat, which is fixed by one or two screws to the rear wall of the system unit housing.
PCI-E video cards should also be further supplied from the power supply. If this wire does not leave from your power supply. You will need an adapter. In some cases, there are two such wires, as shown in the figure. Usually adapters are already included with the video card, or in a box with a motherboard, or if you do not have the cheapest power supply, but can lie in it in its box.
Turning on PC
Our computer is ready, the body of the system unit is not necessary to close and now check the performance of the entire equipment and prepare the computer to install the operating system. So, the first load. Why did I bring this topic to a separate post? The thing is that when you first start, sometimes problems arise. Yes, sometimes it happens. You do not need to panic, if it still happened, let's try to disassemble the most common causes.
The first thing we do is connect the monitor to the corresponding connector on the video card. Then connect the keyboard, mouse, speakers, joystick, internet. It is not possible to confuse the connectors here, focus on the color and shape of the connectors.
At the power supply, we carefully look at the voltage switch. It must be set to a position corresponding to the working voltage of your electrical network. If the voltage in the outlet is 220 V., then the switch is set to 230 - 250 V., that is, at least 220 V! The power switch is translated into the "On" position. We connect the cord to the power supply and turn it into a power filter.
Now press the "POWER" button on the system unit. We look at all fans to rotate, the built-in speaker on the motherboard should be twisted 1 time, and text messages should appear on the monitor screen and the message that the operating system must be installed on the computer. I hope that the first download you have passed successfully.
No one appreciated. You can be the first!
I regret that you did not like the article ...
Let me improve the article.
Tell me how can I improve the article?