What is temporary disabling a usb port. Prevent USB devices from being disconnected while Windows is idle. Enable and Disable USB Drives Using Registry Editor
If you encounter a situation where your computer stops responding to commands entered using a connected USB keyboards or mouse, check options USB in settings power plan. Sometimes Windows Maybe turn offUSB devices during downtime, which contributes computer energy saving, but not always justified and convenient in terms of work.
Prevent temporary shutdown USB ports If you are faced with a similar situation, in power plan should be changed power settings. To do this, click the "Start" button and in the "Search programs and files" field, enter the word "Power Options" and press "Enter". The "Power Options" icon will appear, click on it with the left mouse button.
Open power plans You can also from by going to it in a way convenient for you and, if necessary, switching to the “Small Icons” view mode and selecting the “Power Options” item.

The "Select a power plan" window will open, in which, opposite current plan energy saving Click "Set up power plan".

In the next step, click "Change advanced power settings."

In the window that opens, find the item " USB Settings" and first expand it, and then the "Option to temporarily disable the USB port" by clicking on +.

Click Allowed and a drop-down panel will appear with options to choose from. There are only two of them, select “Prohibited”.
In fact, this function has been available since Windows 7 and, by and large, the procedure has not changed since then. Let's look at it using the example of a current Windows versions 10. As a rule, by default, the USB port temporary disabling function is activated at least for the power saving mode. Actually, in order to save battery, the system pauses the operation of USB ports during idle moments, so the corresponding settings can be found in the “Power Options” section System Panel management.
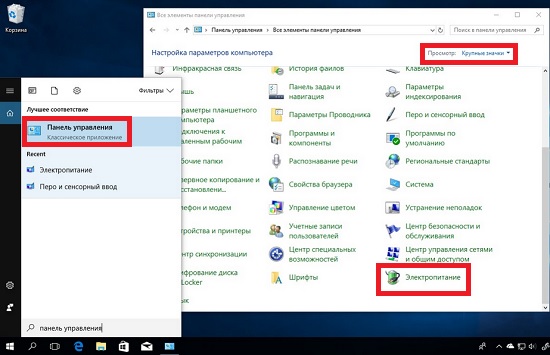
We've already explained how to open the Control Panel in Windows 10 Creators Update, the most convenient way to use search bar on the taskbar, where you just need to type “Control Panel”, in which go to the “Power Options” section (if the category display mode is turned on, then first click on the “Hardware and Sound” item). In the window that opens, go to the settings of the desired power supply scheme.

On the next screen, you need to click on “Change advanced power settings.”

A new window will open with full list additional parameters, in which you need to find the item USB Options > Temporarily Disable USB Port Option and set the value "Forbidden", then click OK to save the changes. The function is turned back on in the same way.

It is worth noting that the above example is not a panacea for all possible problems related to the operation of USB devices, the reasons can be very different, but nevertheless it can help in situations where the problem is related to the operation of this function.
Talk about what function to temporarily disable USB port in Windows 10- this is something super natural, it’s just not worth it, and it’s all because this option itself appeared relatively long ago (back in the edition of Windows 7), but just at that moment, there were rumors about this kind of opportunity there were few programs, and therefore, most PC users learned about the new option only when the “top ten” appeared.
What is the purpose of temporarily disabling the USB port in Windows 10?
- The original purpose of this option was to automatic settings power plan (this is especially true for laptops), so that by disconnecting several USB ports, you can significantly increase the time battery life laptop batteries. It is precisely disabling USB ports that allows your hardware not to constantly waste electricity in order to maintain 100% functioning of USB ports, which are this moment are not used.
- Also, this option in Win 10 can be used to disable the USB port for a while, provided that you are trying to connect some device to it, but when connecting, you see an error.
The process of deactivating a USB port is as follows
Initially, you will have to open the “Control Panel” of your OS; to do this, you need to enter the phrase “Control Panel” in the OS search bar located on the taskbar, and then select the appropriate item. Now, find the “Power Options” icon and click on it to get to the corresponding section of the program.
Please note that if you cannot find the “Power Options” item, then you most likely have the mode displaying categories turned on and, accordingly, you will have to first click on the “Hardware and Sound” item and only after that, on the section in which you need to get in.

In the new window, you won’t have to select anything other than the “Change advanced power settings” item.

And now, the home stretch, because this is where it turns on and off USB port feature in Windows 10. In order to deactivate a USB port, follow the following path: initially select “USB Options” -> then click on “Option to temporarily disable USB port” -> select the item “Prohibited” -> click on the “Ok” button.

In order to enable the USB port, you can make a similar log of actions described above, but only at the end, you must select “Allowed”.
It is worth understanding that this method saving power and turning off the USB port when errors occur related to its operation is not a 100% panacea that will always and everywhere help you, but be that as it may, in some moments of the laptop’s life, this function works 100%.
If you encounter a situation where your computer stops responding to commands entered using a connected USB keyboards or mouse, check options USB in settings power plan. Sometimes Windows Maybe turn offUSB devices during downtime, which contributes computer energy saving, but not always justified and convenient in terms of work.
Prevent temporary shutdown USB ports If you are faced with a similar situation, in power plan should be changed power settings. To do this, click the "Start" button and in the "Search programs and files" field, enter the word "Power Options" and press "Enter". The "Power Options" icon will appear, click on it with the left mouse button.
Open power plans You can also from the control panel by going to it in a way convenient for you and, if necessary, switching to the “Small Icons” view mode and selecting the “Power Options” item.
The "Select a power plan" window will open, in which, opposite current energy saving plan Click "Set up power plan".
In the next step, click "Change advanced power settings."
In the window that opens, find the item “USB Settings” and first expand it, and then “Option to temporarily disable USB port” by clicking on +.
Click Allowed and a drop-down panel will appear with options to choose from. There are only two of them, select “Prohibited”.