View basic information about your Windows computer. View basic information about your Windows Computer Section Parameters in Windows 10
View computer performance On Windows 10, you can enjoy multiple keys. Most of the information is presented in the Task Manager. You just need to know where to see. The remaining part of the data can be extracted from the snap-in parameters.
Today is not the best day to look at the specified goal in the properties of the system, but we will do it too. To read the readers by the full range of knowledge on the specified topic. You will see that you can learn about your PC almost everything without resorting to the services of specialized utilities.
Command line
The command line becomes more likely to do the execute tool. Difference only in a call method:
- Command line via Win + X.
- Run - Win + R.
The other tool can be triggered. Command line from performing via CMD, and run from the command line through C: \\\\ Windows \\\\ System32 \\\\ Rundll32.exe Shell32.dll, # 61. You must understand that the other tool is very similar to each other. We learn the characteristics of the OS:
What did we learn from this screen? A lot of things:
- A professional version of tens is used.
- Anniversary update 1607 is installed.
- Assembly - 14393.693.
But these data are still scarce. Why Billy Gates does not indicate the discharge, remains a mystery. Generally speaking, Microsoft took the course to get rid of 32-bit equipment, so after 5 years no one will have such issues as we have.
Through system properties
Click Win + Break to see a little more complete information.

There are already presented to some iron data. In addition, we see that the system's bit is 64 bits. This is what can be understood from the screen:
- Intel I5 generation processor with a frequency of 3.2 GHz.
- The size of RAM is 16 GB, of which so much is available.
- The name of the PC and his working group became known.
Actually, this is all. In our opinion, it is bad that the number of cores, the type of graphics, placement and employment of the DIMM slots, the speed of referring to memory. On some laptops, this combination does not work (considering the fact that sometimes you have to press Fn). In this case, go through the control panel:

Through parameters

In essence, we see the same as in the properties ...
Task Manager


We left for something to learn about the graphic part of the PC.
Other information via DIRECTX dialogue
- Win + R.
- We type dxdiag.
- ENTER.
Motherboard
Already in the first window, we see the missing information.

After the language in order, the data goes:
- Motherboard manufacturer.
- Name of motherboard.
- BIOS firmware version.
- Switch file size.
- DIRECTX version.
Graphics
The next screen demonstrates the charts.

In order, here are:
- Type of graphics. In this case, it is built into the HD Graphics 530 processor.
- Memory.
- Current screen resolution.
You can see other bookmarks, but information taken from there, a lot will tell only professionals.
What else?
What else can you wish more than we already have? Well, I would like to have a presentation for the following parameters:
- The name of the processor socket.
- The number of connections for graphic accelerators.
- Hard disk interface.
Actually, this is many and limited. That is, we have already received all the information from the system utilities, and now we think where to get so on. Usually resort to AIDA help. Here is an example of CPU data.

The socket type is now known - LGA 1151. With these data, you can look after a new processor. Was it possible to do without this information? Yes of course. Third-party utilities are needed by professionals whose time is money. Simple mortal will help get the system parameters in Windows 10 Billy Gates.
If you trust your computer so that someone else could work on it for a while, it is better to disable the control panel and setting up applications in Windows 10 OS to the PC. Control Panel and Application Settings Two main interfaces where all default settings are located in Windows 10 operating system and they can be changed and they can also confuse them. Thus, it is recommended to disable all settings when you allow any user to work on your PC.
Application settings in Windows 10 actually mean that you have replaced the traditional dependency control panel, and thus most of the default features on the control panel are turned on in the "Settings" application in Windows 10. If you configured the control panel or application settings, as For you more interesting at the same time it will depend on who uses the system.
Therefore, in order to protect your system from such invasions, we could consider a few simple ways so that you know how to disable and enable system settings according to your needs.
Method 1: Enable or disable settings through the registry
Just as group policies, and if you have installed Windows 10 home, the Windows registry can help you enable or disable system settings to call certain changes. But, before editing it, we recommend that you create a backup copy of the registry, as it can be fatal if something goes wrong with the registry modification. The method is described below in simple steps:
Step 1.enter the type regedit.exe in the Start menu / Taskbar Taskbar Search Window to open the registry editor. Press the "Yes" button if the user account confirmation screen appears.

Step 2. After the registry editor opens, go to the next section:
HKEY_CURRENT_USER \\ SOFTWARE \\ Microsoft \\ Windows \\ Currentversion \\ Policies \\ Explorer
Step 3. In case the "Explorer key" is not, then right-click on the "Policy" key. Click the "New" button, and then "key" and enter the name of the new key as a conductor.
Step 4. On the right side of the panel, right-click on an empty place. Select "New" and then "DWORD (32-bit) Value". Rename a new specified value as "NocontrolPanel".

Step 5. After you did it, double-click on "NocontrolPanel" and set the value to 0 to disable the control panel and the application settings as a whole. You can enable them again changing the value from 0 to 1.

Method 2: Enable or disable settings through group policy
The local group policy editor is a function with which you can manage and edit local policies that are stored on your system, and here we wanted to use it to enable and disable parameters in Windows 10. Although it's a little risky if you are not adept and You have difficulties with your system, so be careful when working with the editor of a local group policy. Otherwise, this can lead to fatal changes in your system.
The method is performed like this:
Step 1. You need to enter the gpedit.msc command in the search field and click "Enter" to open the local group policy editor.

Step 2.. Click the User Configuration tab on the left side of the group list.
Step 3. Select "Administrative Templates" from the context menu, and then click on the "Control Panel" button.
Step 4. Now, you can see several names with records on the right side of the panel.
Step 5. Find a policy called "Disable access to the control panel and PC settings".

Step 6. Double-click on "Prohibit access to the control panel and the PC settings" for the input policy and then you will see the Properties dialog box.
Step 7. From the next window "Properties"; Select the option "" Enable Disable Settings in Windows 10.

Step 8. After selecting the option, click on the "Apply" button to save the changes.
So, from now on, no random user will be able to open your settings without your permission, so your system will be safe.
Note: If you want to enable settings again, select the "Disable" option so that the settings appear again.
Method 3: Turning on or off using the control panel
If you do not want to go through the troublesome editing of the registry and group policy to disable or enable the system settings, there are two tricks with the registry that can be used as an alternative to shut down and enable system settings, such as third-party program.

Of the two files, one hack disables access to the control panel, and the other hack will allow you to access. Two registry files will be compressed in a zip file that can be downloaded from the Internet.
Enable or disable Windows Using
Read the instructions below to know how to make them work:
Step 1. Download from the Internet Windows Control Panel Hacks, which is actually a zip file containing two files.
Step 2. Click on the zip file, and there you will see two files, one to turn off the access, and the other to access the control panel.
Select a file according to your needs and your settings will be limited to opening without your permission.
Output:
Most control panel settings and application settings have recently been part of Windows 10 to make user experience more comfortable. Since the usual access control panel is a bit confusing, changing the application settings in Windows 10 shows the settings and built-in functions with a clear difference, and you can easily choose options.
Thus, the methods described in this article will undoubtedly help you disable and enable system settings according to your requirement to ensure security against improper use and operation of the system.
Use the "Parameters" shortcut in the Start menu.
The "Start" menu did not get into Windows 8 and 8.1, but after mass discontent users of Microsoft returned it in Windows 10, although not quite in the form in which we used to see it. It is quite logical that it is the "Start" menu, it provides one of the fastest ways to open the settings menu in Windows 10.
So, open the "Start" and take a look at the left side of the menu - there you will see the gear icon, which allows you to go to "Parameters".
Use Search / Cortana
This method is not as fast as the first, but still deserves to be mentioned. Enter the word "parameters" in the field "Search on the Internet and in Windows", and as soon as the system shows the search results, press ENTER or click the mouse button on the appropriate result.

Use "Quick Actions"
Windows 10 includes a new panel called "Notification Center", the purpose of which is to notify the User about the events taking place on its computer. In addition, this feature has a number of buttons to perform rapid action.
Open the notification panel by pressing the edge on the right icon in the system tray. At the bottom of the panel, click the "All Parameters" button. As a result, the "Parameters" application opens.

Secure the "Parameters" on the taskbar
If you often use the settings menu, simply place it shortcut on the taskbar. To do this, open the "Start" menu, locate the "Parameters" label and right-click on it with the right mouse button (or hold until the context menu appears if you have a touch device). In the menu, select "Advanced" → "Secure on the taskbar".

How to open the parameter menu while in the "Computer" window
In the "This Computer" window in the place where the button for opening the classic control panel was previously located, the "Open options" button is located on topical versions of Windows 10 by clicking on the main page of the system control menu.
 1
1 Opening the parameter menu through the Start button context menu
Link To open the parameters in the Start button context menu, starting with Windows 10 version 1703. To open this menu, right-click on the "Start" button or press the + X hotkeys.
The Windows 10 operating system is trying to do: from installing drivers, before optimizing applications. It turns out that it is good, but if you leave all the important processes on the conscience of the operating system, you can soon find a bunch of incomprehensible applications and services that will periodically start, self-renewing and eat all the resources of your computer. If you want to configure Windows 10 so that your computer does not have to share performance with incomprehensible services, while leaving everything useful what can give you a system, you have to combine automatic installation with manual. It's not so easy to do so, because Windows 10 practically does not tolerate interventions in their processes, but if you precisely follow all the instructions below, you will not have problems with the setting. And if some of the possible errors associated with installing and setting up the system will arise, then we will help you completely eliminate them.
Why set up Windows 10 manually
One of the main pride items of Windows 10 is the full automation of everything that is possible, including the setting and optimization of the operating system itself. The idealized version of the preparation of Windows 10 to use, how does Microsoft sees it, is just simple:
- You install Windows 10.
- The system starts, it downloads all drivers and updates itself, adjusts itself and restarts.
- Windows 10 is ready to work.
In principle, this scheme works at least in most cases. And if you have a relatively good computer and you do not have discomfort after automatic setting up Windows 10, you can leave everything as it is.
And now list the disadvantages of automatic settings:
- microsoft has full-quality programs and games that need to be promoted - some of them will be automatically installed on your computer;
- Microsoft wants you to pay or watched advertising, and better all at once;
- automatic setting up Windows 10 does not take into account obsolete and weak iron;
- Windows 10 is the most spying operating system in the history, and it is collecting information at the expense of the resources of your computer;
- a huge number of minor services that work in the background and eate the RAM;
- automatic system updates that can catch you surprise;
- updates of applications, service updates and updating all, just to eat as many resources and traffic as possible;
- not everything works perfectly and malfunctions are possible, and the system will not serve.
Roughly speaking, without manual configuration, you will use not only you, but also at all the services you do not need, which are fully suitable for the definition of viral.
At the same time, Windows 10 is surprisingly a good and very productive system, which really makes a lot of good in automatic mode. If you want to promote all the imposed garbage and save everything good that you can give you Windows 10 without turning the system in a log, you will have to spend a little time and go to manual setting. It will take this hour two hours, but at the exit you will get the best system of all available, besides for free.
The settings you need to spend after installing the OS
As already mentioned above, the Windows 10 configuration is a time-consuming business and will occur much longer than in the case of previous versions. The main task will limit the amount of the loadable trash, while allowing you to establish everything else, and after to be lost and disable everything that failed to prevent.
The sequence of items is very important, try not to break the order and restart the computer after each stage.
Store Activation and Limit
The main task of this stage is to limit the store through the firewall, the activation of Windows can be performed at the very end of the setting, but better now.
If your computer is already connected to the Internet, soon tear the connection.
After connecting to the Internet, the mass loading of drivers, updates and applications will begin. Take a prevention of downloading unnecessary applications.
- Open the Start menu, find there "Shop" and run it.
Open the Start menu, find there "Shop" and run it
- Press the profile button at the top of the window that opened the window and select "Settings".
Click on the profile button at the top of the window that opened and select "Settings"
- Remove the tick with automatic updating applications.
Uncheck the tick with automatic application updates
- Now find the control panel through the search and open it.
Find the control panel through the search and open it
- Go to the category System and Security.
- Open the "Resolution of interaction with applications via Windows Firewall".
Open "Resolution of interaction with applications via Windows Firewall"
- Click "Change Parameters", find in the "Shop" list and deprive it all checkboxes. After confirm the changes.
Click "Change Parameters", find in the list "Shop" and deprive it all checkboxes
- Now it is advisable to activate Windows. It is best to use KMS activator. If you have not prepared an activator in advance, load it from another device, since the first Internet connection is desirable to carry out with the already activated Windows 10.
To activate Windows 10 it is best to use KMS activator
- Restart the computer.
Restart your computer
Auto-tuning system
Now it is worth writing Windows to customize yourself yourself. This is the key point on which the Internet is included.
- At the previous stage, we limited the Microsoft store, but on some versions of Windows 10 it may not help (very rare cases). Run the store again, click on the user button and open "Downloads and Updates".
Run the store again, click on the user button and open "Downloads and Updates"
- Drag the window down so that it does not bother you. Throughout the current stage, periodically look at the store window. If the download icon appears (marked green on the screenshot), click "Stop everything" and walk through the cross on all applications from the download queue. There are no applications and important updates here.
If the download icon appears (marked with green), click "Stop All" and walk through the cross on all applications from the download queue
- It is now very advisable to connect all devices to your computer: printer, joystick, and so on. If you use multiple screens, connect everything, click the "Win + P" key combination and select the "Expand" mode (it is it, change after reboot).
If you use multiple screens, connect everything, click the "Win + P" key combination and select "Expand"
- It's time to connect to the Internet. Windows 10 should do it without drivers, but if you have any problems, install the driver for the network card or Wi-Fi module (download only from the manufacturer's website). Read more about manual installation of drivers is described in the next step. Now you only need to connect the Internet.
Windows 10 should see the Internet without drivers, but if you have any problems, install the driver for the network card or Wi-Fi module
- Mass download, installation and optimization will now begin. Do not attempt to do something with a computer: the system needs all possible resources. Windows will not notify you about the end of the process - it will have to guess himself. Your guideline will be the time of installation of the driver for the video card: the correct screen resolution will be set. After that, wait another 30 minutes and restart the computer. If permission does not change even after one and a half hours or the system itself will announce the completion, restart the computer.
Installing missing drivers
As mentioned above, Windows 10 auto-tuning can getting up, which is especially important in the case of installing drivers for obsolete iron, which is not taken into account. Even if it seems to you that all the drivers are in place, it is better to check on your own.
- Open the control panel and expand the "Equipment and Sound" category.
Open the control panel and expand the category "Equipment and Sound"
- Go to "Device Manager".
Go to "Device Manager"
- Now you need to find all the devices with a yellow triangle on the icon, they will be visible immediately. If this was found, press it with the right mouse button and select "Update Driver.
You need to find all the devices with a yellow triangle on the icon and update their drivers.
- Choose an automatic search. Then the system will tell everything herself.
Choose an automatic search, then the system will tell everything herself
- If it does not help, which is very likely, press the device with the right button again and go to its properties.
Click on the device right-click and go to its properties.
- In the "General" tab, there will be all the information that the system can learn about this equipment. Focusing on these data, you need to find on the Internet, download and install the missing driver yourself. If the manufacturer will be specified, the first cases go to its site and look for there. Download drivers only from official sites.
Focusing on those opened data, you need to find on the Internet, download and install the missing driver yourself
If you have any problems with the installation of drivers, go through the link below with the article on this topic or see a short video that is dedicated to manual installation of drivers.
Video: how to install the driver manually on windows 10
System Update
There are a lot of Windows 10 variations, sharpened under different iron and bit, but the universal version of the system is installed during the installation to minimize the size of the image. Windows 10 has an update center that automatically updates the system to the current version and changes the Windows variation to the most compatible as possible. Actualization of the version we are not interested in: changes are minimal, completely invisible and not always useful. But optimization is very important.
As in the case of the second launch, this stage can take a long time.

If nothing has been found, then the system has already managed to update independently.
Providing maximum performance
Disable auto updates
You should start with disabling auto updates. Updates for Windows 10 come out very often and nothing useful for ordinary users does not contain. But they can independently run at the most inopportune moment, which presses on the performance of your computer. And after you want to reboot quickly, you will have to suddenly wait for half an hour until the updates are accepted.
You will still be able to update the system as described in the previous step, just now you will control this process.
- Through the search, go to "gpedit.msc".
Through search, go to "gpedit.msc"
- Go through the path "Computer Configuration / Administrative Templates / Windows Components" and click on the Windows Update Center.
Go along the path "Computer Configuration / Administrative Templates / Windows Components" and click on Windows Update Center
- Open the "Automatic Update Setup".
Open the "Automatic Update Setup"
- Mark the "Disable" item and confirm the changes. It is not necessary to reboot.
Mark the "Disable" item and confirm the changes.
General restriction of services
As you probably know, Windows 10 is actively spying for their users. But you do not need to worry about your personal data: they are microsoft are not interesting. It is necessary to worry about the resources of your computer, which are spent on this espionage.
In order not to spend time on digging in the corners of your system, we will use the Destroy Windows Spying program, which will not only protect your computer from espionage, but also deletes all the conjugate threats to the performance of your computer.

Radical restriction of services
The Destroy Windows 10 Spying program kills only the most unpleasant processes, but much remains intact. If you are resolutely configured for sterility, you can produce more subtle cleaning from services using the Shutup10 program.

Installing software
Windows 10 is almost ready to work, it remains only to clean the remaining garbage and heal the registry errors. You can do it now, but better after you install everything you need, as new errors and trash may appear.
Install programs and games, configure the browser and do everything you used. According to the required software, Windows 10 the same requirements as in previous versions, in a small exception.
Here are programs that are already sewn and you do not need to install them:
- archiver;
- emulator images;
- DirectX or update it;
- antivirus (if you are not very well oriented on the Internet, it is better to neglect our advice and still put a third-party antivirus).
If you doubt the set of necessary software, here is an exhaustive list of programs that you may need to be needed:
- third-party browser (best of all Google Chrome or Mozilla Firefox);
- Microsoft Office (Word, Excel and PowerPoint);
- Adobe Acrobat;
- players for music and video (recommend AIMP for music and KMPlayer for video);
- GIF VIEVER or other third-party program for viewing GIF files;
- Skype;
- Steam;
- CCleaner (it will be written below);
- translator (for example, Promt);
- antivirus (its installation on Windows 10 is rarely useful, but this is a very controversial question - if you decide, recommend Avast).
At the end do not forget to restart the computer.
Trash, registry and ccleaner
After installing programs and updates, a decent number of registry errors and temporary files should be copied on your computer, which are also called trash.
- Download, install and run CCleaner. In the "Clearing" tab, in the Windows section, check all the items, except for "Network Passwords", "Labels and in the Start menu", "Labels on the desktop" and the whole group "Other". If you set up a Microsoft Edge and plan to use it, you should not celebrate his group. Do not rush to start cleaning.
In the "Cleaning" tab, in the Windows section, check all the items, except for "Network Passwords", "Labels and in the Start menu", "Labels on the desktop" and the whole group "Other"
- Go to the "Applications" section and remove all the checkboxes there. Now press "Clear".
Go to the "Applications" section and remove all the checkboxes there, after clicking "Clear"
- Open the Registry tab and click Saving Problems.
Open the Registry tab and click Survey
- When the analysis is completed, click "Fix the selected ...".
When the analysis is completed, click "Fix the selected ..."
- Backup copies best save.
- Now press "correct marked".
Now press "correct marked"
- Go to the Tools tab. In the "Delete Programs" section, you can erase all optional applications that managed to slip during the system update. For regular methods, you will not succeed.
In the "Delete Programs" section, you can erase all optional applications that managed to slip during the system update.
- Go to the "Auto-loading" section. On the internal tab, select all the items and click "Turn off".
In the internal tab, select all items and click "Turn off"
- Go to the internal tab "Planned Tasks" and repeat the previous action. After restarting the computer.
Go to the internal tab "Planned Tasks" and repeat the previous action
It is advisable to leave the Cceaner program on the computer and once a few months check the system for registry errors.
Grub recovery
If there is a Linux on your computer in parallel, then after installing Windows 10 you will be waiting for you not very pleasant surprise: when you turn on the computer, you will no longer see the GRUB operating system selection menu - you will immediately start booting Windows. The fact is that Windows 10 uses its own bootloader, which is automatically installed together with the system itself and completely dislike GRUB.
You can still return the GRUB with the standard way using LiveCD, but in the case of Windows 10, everything can be done much easier through the command line.

Video: 4 ways to restore GRUB
Possible problems and their solution
Unfortunately, not always installation of Windows 10 goes smoothly, as a result of which the occurrence of errors, from which no one is insured is. But most of them are treated very simple and eliminate their elimination to even inexperienced users.
General method (solves most problems)
Before moving to a detailed consideration of each problem, we describe the general way to solve the errors provided for by the Windows 10 itself.

Hard disk disappeared
- Open the Start menu and enter "diskmgmt.msc" search.
Open the Start menu and enter "Diskmgmt.msc" search
- If you will see an unidentified disk at the bottom of the window, click on it and select "Initialize Disk".
If you see an unidentified disk at the bottom of the window, click on it and select "Initialize Disk"
- If there is no unidentified disk, but there is a unallocated space, click on it and select "Create a simple volume".
If there is a unallocated space, click on it and select "Create a simple volume"
- Leave the maximum value unchanged and press "Next".
Leave the maximum value unchanged and press "Next"
- Assign this initial letter to that and click "Next".
Assign this initial letter to that and click "Next"
- As a file system, select NTFS.
As a file system, select NTFS
Sound problems
Before proceeding with this instruction, try the general way that is described at the beginning of the chapter.
- Right-click on the sound icon in the taskbar and select "Play Devices".
ravoy to the mouse button on the sound icon in the taskbar and select "Play Devices"
- Right-click on the active device and go to its properties.
Right-click on the active device and go to its properties.
- Open the Advanced tab, set the minimum sound format and apply the changes.
Open the "Advanced" tab, set the minimum sound format and apply the changes.
If you have a laptop and this method does not help you, install the original drivers from the manufacturer.
Blue screen
Usually this problem occurs during the installation of updates, when an attempt is attempted to display the system loading screen. The correct solution will simply wait until the updates are installed (it may take to one hour). But if it did not help, you have no time or you are firmly sure that the system hung up, you can restart the computer: the system will not attempt to install updates and starts immediately. You can do this in two ways:

Black screen
If immediately after turning on the computer shows you a black monitor - you encountered an error of the flying video driver or its compatibility problem. The reason for this is the auto installation of the wrong driver. If you encountered this problem, you need to manually set the video driver from the manufacturer, but it will be a little more difficult to do, as you will not get to the system.
Also, this problem may occur if you installed the X86 driver to the 64-bit system (usually there are no problems with this, but sometimes exceptions occur). If you cannot find the appropriate driver, you will have to reinstall the system to another bit.
In rare cases, this problem may be related to another driver that is not related to the video card.

Slows down or brake computer
The problem lies in persistent attempts to update, which is not always possible. If you encountered this problem, then did not make the actions described in the "Ensuring Maximum Performance" stage - be sure to perform them.
If you have to do with a laptop and he never stopped to warm, try installing official drivers from manufacturers (the driver must be called chipset). If it does not help, it will have to limit the power of the processor (this does not mean that now it will work below the norm: just Windows 10 was wrong and uses the processor in merciless mode).
- Open the control panel and go to the "System and Security" category.
Click "Change Advanced Power Parameters"
- Expand Processor Power Management item, then "Maximum CPU Condition" and set both values \u200b\u200bby 85%. After confirm the changes and restart the computer.
Set both values \u200b\u200bby 85%, confirm the changes and restart the computer.
The choice of OS.
If you do not format the system disk when installing Windows 10, you may have a similar error. The reason is that the previous operating system was not correctly removed and now your computer thinks that there are several systems installed on it.

Shimmering screen
Usually the reason for this problem in the inconsistency of the drivers, but there are exceptions in the form of two conflicting services. So do not hurry to install official drivers and try another way first.
- COMBINATION OF KYY "CTRL + SHIFT + ESC" Call the task manager and click "More details".
Call the task manager and click "More"
- Go to the "Services" tab and click Open Services.
Click "Open Services"
- Find here "Supports the control panel element ...", click on it with right mouse button and select "Properties".

In the start type, select "Disabled" and confirm the changes
- Now find the "Windows error registration service" and repeat the same with it. After restarting the computer.
Find a "Windows error registration service" and repeat the same with it
- If nothing helps, install the driver for the video card from the manufacturer.
No connection to the Internet, the resolution of the monitor or the system does not see the video card
If you came to this section, you need to install the factory drivers that are posted on the manufacturer's website. Especially often with similar problems, the owners of Chinese laptops are facing, which use rare iron or its changed versions. The main reason for the problem is that Windows 10 cannot clearly identify one of the components of your computer (for example, a video card) and tries to install the most appropriate driver that does not fit completely.
If you have a laptop and you cannot find a video card driver, look for a VGA driver.
Battery problems
The problem with the battery for laptops is almost the most common, especially at the Lenovo brand. Most often it is represented as a message: "The battery is connected, but not charging." About this Windows 10 developers are well aware of: if you use the general way to solve the problems that is presented at the very beginning, Windows will analyze your computer independently, will determine all possible causes of malfunction and will tell about the options for eliminating the error.
Through Windows 10 troubleshooting tool, you can correct all the problems with your laptop battery, which only possible
Also try to go to the site of the manufacturer of your laptop and download the chipset driver there - you will not tell you about this version.
When updating to Windows 10, Kaspersky or other program retired
Windows 10 really does not like the invasion of its system processes and everything that threatens them. If you died with an antivirus, CCleaner or another similar program during updating the system, then they were counted the list of potentially dangerous and Windows deleted them as a threat. This cannot be changed, but you can install the lost program again. But if you reinstall Windows and select the "System Update" option, delete everything again.
Manual configuration of Windows 10 - the lesson is quite long, but by doing all these actions, you will get the best and most productive system from all available. Moreover, Windows 10 is very self-sufficient and very rarely needs reinstallation, which means to do all this you will have to be infrequently.
By installing Windows 10, the user may think that this OS is the ideal of the operating system. But there is no limit to perfection. For personal use in Windows 10, you can also turn off the good part of the components to free up more PC resources.
Why manual setting is better and better automatic
Obviously, it is necessary to configure the computer after installing a new system with your own hands, and not one or two single-button programs. All applications are created according to the template, work one scenario with possible small branches.
No program will do what you need specifically. For example, only the user may select the design to its taste, disable unnecessary services, defragment individual sections of the hard disk.
In addition, no program can configure the entire system: the work of some is aimed at cleaning the disk and registry, others - to optimize the services, connecting to the Internet, exemption from "surveillance" and data collection and so on.
Often helping to reinstall the systems and do it regularly on your computer. It has long noticed that programs that conduct optimization into one click are missing many truly important things. Very few applications are disabled service, I have not met any that would turn off the visual effects of the system and so on.
Settings to spend after installing Windows 10
Windows Store Limit in download updates
Windows Store is a platform, which can be purchased and installing paid and free Windows applications. In addition, the "store" constantly updates the installed applications, since when purchasing a program or game you get life service. But in some cases, these updates may violate the operation of the system, to take away some of the resources of the hard drive and RAM, because the autoappite is better to turn off:
- In the search, enter the store and choose the best match. In the search, enter the store and choose the best match.
- In the "store" window, we climb the dot button. Select "Settings".
 In the "Store" window, we click on the dot button and select "Settings"
 - In the "Settings" rearrange the toggle switch in the "Application Update" column in the "Off" state, and after rebooting the computer.
 In the "Settings" we rearrange the toggle switch in the "Application Update" column in the "Off" state
Stop unnecessary services
Services are background processes that provide devices and are intermediaries between the devices and the operating system. However, some services can work even if there is no device with which they interact. For example, fax or bluetooth, which are not on most computers. There is a whole list of services that can be painlessly disable:

List of services that can be harmlessly disabled on Windows 10:
- "Fax";
- NVIDIA STEREOSCOPIC 3D DRIVER SERVICE (for NVIDIA video cards, if you do not use 3D stereo images);
- "Net.tcp General Access Service";
- "Work folders";
- "The Alljoyn router service";
- "Application Certificate";
- "BitLocker disc encryption service;
- "Bluetooth Support Service" (if you do not use Bluetooth);
- Customer License Service (Clipsvc, after disconnection can not work the Windows 10 store application);
- "Computer browser";
- DmwappushService;
- "Geographic State Service";
- "Completion Service as a guest (Hyper-V)";
- "Pulse Service (HYPER-V)";
- "Hyper-V virtual machine sessions;
- "Hyper-V time synchronization service";
- "Data Exchange Service (HYPER-V)";
- "Virtualization Service of the Hyper-V remote desktops";
- "Sensor Observation Service";
- "Sensor data service";
- "Sensor service";
- "Functional features for connected users and telemetry" (this is one of the options to disable "Slotting" Windows 10 for the user);
- "Total Internet access (ICS)" (provided you do not use the internet access functions, for example, for distribution of Wi-Fi from a laptop);
- "Xbox LIVE network service";
- SuperFetch (provided you use SSD);
- "Print Manager" (if you do not use print functions, including built-in in Windows 10 printing in PDF files);
- "Biometric Windows Service";
- "Remote Registry";
- "Telephony";
- "Telephone communications";
- "Secondary entry into the system" (provided you do not use it).
Video: How to disable unnecessary services in Windows 10
Check and install missing drivers
During the installation of Windows, setting standard applications that open only the basic features of the device. For maximum PC performance, current drivers are installed in the system.
- Press the Win + X key combination and select "Device Manager" in the dropping menu.
 Press the Win + X key combination and select "Device Manager" in the dropping menu
 - Open the tab with the device, click PKM and select "Update Driver".
 Open the tab with the device, click the right mouse button and select "Update Driver"
 - Select "Automatic Search for Driver Updates" and expect until the Master finishes its work. Then reboot the computer.
 Select the item "Automatic Search for Driver Updates" and expect until the Master finishes its work
 - We update the drivers of the following devices:
- "System devices";
- "IDE controllers";
- "Video adapters (video cards, video controllers)".
- Reboot your computer.
Video: how to update the driver via "Device Manager"
Check and install system updates
The user needs to contain an operating system up to date. To do this, you need to download updates as much as possible. The components of the updates contain important files for the system, viral databases for the "Defender" and much more.

Disable auto update
If for any reason, for example, a small hard drive is installed in the computer, you do not want Windows stably updated your components, autoappite can be disabled. However, it should be remembered what to do this is not recommended.

Disable spyware
With the Windows output 10, some users started to "beat the alarm" about how much data is transmitted to Windows for analysis. It is worth noting that no one watches personal passwords and credit card numbers. The system simply collects some metadata to improve their work. Disable the collection and sending data is quite simple, you only need to dig a little in the settings of "Parameters" and "Defender":
- We open the "Parameters" and go to the Applet "Privacy".
 Open "Parameters" and go to the Applet "Privacy"
 - In the "General" tab, we translate all the Tumbers to the "Off".
 In the "General" tab, we translate all the Tumbers to the "Off" position.
 - In the section "Speech, handwritten input and text" click on "Disable speech services and input suggestions".
 In the section "Speech, handwritten input and input of text", click on "Disable speech services and input suggestions"
 - In the Diagnostics and Reviews tab, we also translate all the Tumbers to the "Off.".
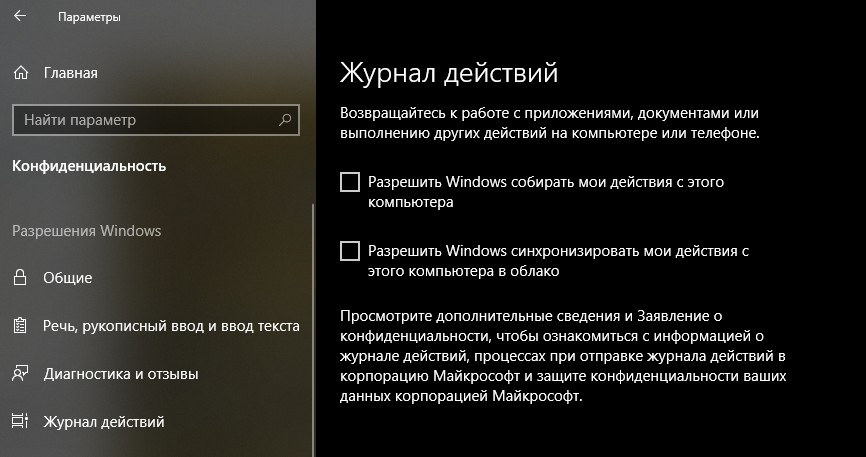 In the "Journal of Action" tab, remove a tick from "Allow Windows ..." items
 - Reboot your computer.
As experience, different versions and assemblies of operating systems track different data, so the "Privacy" applet may contain more or less tracking settings. The role is also played by updating the system for a specific period. The location of the togglers in tabs can differ. It is recommended to view the section "Privacy" Carefully.
Removal of garbage
After installing the garbage operating system in it, as a rule, no. But if the new OS was installed without wiping the old, the Windows command may well appear on the system disk, which cannot be removed in simple ways. This will help the "Cleaning Disk" utility.

Minimization of set of effects
Visual effects (the animation of the taskbar, discarding the shadows from the windows and other) is certainly beautiful and pleased with the eye, but there are too much influence on operational and video memory. It is better to disable them:

Video: How to disable visual effects
Prohibition of work background applications
In Windows 10, there are many standard applications that, as well as services, work in the background. They cannot be accused of excessive use of resources, but these programs are better disabled:

Optimize and make the work of the installed operating system is very important and quite simple. It is enough to disable everything too much, and Windows will be set to maximum performance.