Installing the official firmware on the Samsung Galaxy J7 SM-J700F. Firmware Samsung Galaxy J7 SM-J700 Firmware samsung galaxy j700h service
I bring to your attention a detailed, step-by-step instruction on flashing a Samsung Galaxy J7 SM-J700 smartphone to a new official or custom firmware. Getting Root superuser rights on Samsung Galaxy J7 SM-J700, installing custom TWRP Recovery.
Installing the official firmware on a Samsung Galaxy J7 SM-J700 smartphone using the Samsung Odin service program. In order to install a new firmware on a smartphone, you first need to download several files to your PC:
Download the latest Official Firmware for Samsung Galaxy J7 SM-J700 - Android_6.0.1_J700HXXU2BPF2 or Android_5.1_J700HXXU1APA3
Before flashing your phone, you first need to decrypt it.
To unlock your Samsung Galaxy J7 SM-J700, you need to disable Reactivation Lock. Go to "Settings" - "Lock screen and protection" - "Find phone" and disable "Activation lock" Before and after the firmware update procedure, you must do a general reset of the device to the factory settings in order to avoid all kinds of errors and slowdowns of the interface.
When performing this procedure, all your data and files will be permanently deleted.
Option 1: On the device, open "Settings"> "Back up and reset"> "Accounts"> "Reset data"> "RESET DEVICE" and click "Delete everything"
Option 2: Turn off the device, press and hold the "Volume Up", "Home (Center)" and "Power" buttons and after a few seconds the "Recovery" menu will appear. In the "Recovery" menu, select "Wipe data / factory reset" -> "Yes - delete all user data", all user data will be deleted. After completing the process, select "Reboot system now" and the device will start to reboot.
You can skip this step, but remember! If you do not reset the data, after the update, "lags" and unstable operation of the device as a whole may appear due to the tails of the previous firmware, and more recently, before completely resetting the smartphone, you also need to delete the Google account, otherwise the smartphone may be locked.
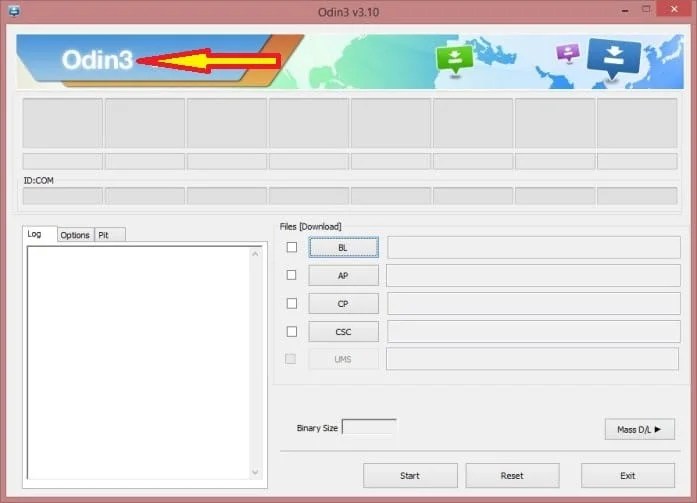
After you have downloaded everything, unpack the archive with the driver for the Samsung Galaxy J7 SM-J700 and install it. Then unpack the Odin archive and firmware.
Run the program for flashing Galaxy J7 Odin as administrator. To do this, hover over Odin and right-click and select "Run as administrator", then click "Yes".
After starting Odin, we arrange the firmware files in the following order:
Insert the BL ……… .tar.md5 file into the "BL" field
The AP file ……… .tar.md5 is inserted into the "AP" field
The CP file ……… .tar.md5 is inserted into the "CP" field
Insert the CSC file …… ..tar.md5 into the "CSC" field

We check that the “ticks” were only in the fields “Auto Reboot” and “F. Reset Time "
We transfer the Samsung Galaxy J7 SM-J700 phone to the firmware mode. To do this, turn off the phone and then press and hold the "Volume Down", "Home" and "Power" buttons and after the menu with a yellow triangle appears, press the "Volume Up"
We connect the smartphone using the supplied USB cable to the PC and in the Odin program, in the upper left corner the inscription “COM” should appear highlighted with a blue background, and then press the “Start” button.
Note: If for some reason your PC does not recognize your device, try reinstalling the driver and / or try other USB ports.
The process of flashing the smartphone has started. After successful flashing, the device will reboot automatically and “Finish” will appear in the Odin program.

Installing custom TWRP Recovery v3.0 on Samsung Galaxy J7 SM-J700

And so let's start installing custom recovery on samsung j7
If you have not yet installed the Samsung drivers on your PC, then download and install. Then connect, using a standard USB cable, your smartphone to the computer. After the PC recognizes the phone automatically, additional drivers and updates are installed.
We need the Odin 3 program, download Odin
Then download the very custom recovery for Samsung J7 SM-J700 TWRP Recovery for firmware J700HXXU2BPF2 (OS 6.0.1)
Turn off your smartphone, and then (on off) press and hold the Down Sound + Power + Home key until the phone boots into Odin mode (Download Mode). You will see a warning, confirm your desire to boot in this mode by pressing the "Volume up" key.
Put the phone into Odin Mode, connect it to the PC using a standard USB cable.
Run the Odin 3 flasher on the PC as administrator
In the AP line, specify the path to the previously downloaded file with custom recovery J7 TWRP Recovery with the extension “.img.tar” and select it
Uncheck the “auto reboot” box and press start (the phone must flash, the firmware time is no more than 30 seconds, the result should be like this (succeed 1 / failed 0);
Until the flashing process is complete, do not touch the Smartphone, usually the flashing lasts no longer than 30 seconds.
Without turning on the gadget in a working state, right from the Download mode, go to the newly installed TWRP Recovery by holding down three buttons (volume up + home + power button, when the Samsung inscription appears, release the buttons).
Everything! We rejoice.
Installing custom firmware on Samsung Galaxy J7 SM-J700
To install custom firmware on a Samsung Galaxy J7 SM-J700 phone, you need a custom TWRP Recovery, if you don't have one, see the paragraph above.
Download to your PC any custom firmware that you like, for example - Notexperience_Rom_For_J7_V2.zip or cm-13.0-20160521-UNOFFICIAL-j7eltexx.zip
Then copy the firmware file to the phone memory. Then he turns off the smartphone and boots into the custom TWRP Recovery (on the switched off phone, press the power buttons + volume up button + HOME)
And through TWRP Recovery, install the firmware file:
Go to the Wipe item and select Advanced Wipe
Check the boxes: "Davlik Cache", "System, Data", "Cache", "Android Secure".
Making “Swipe to Wipe”
Go to Install -> Select the memory where the custom firmware is located, and select Swipe to Confim Flash, the installation will begin
After installation in the recovery, select the Reboot -system item and the device will reboot.
Ready! You have successfully flashed your custom firmware! reboot your smartphone and use it with pleasure (without paying attention to custom firmware bugs)
Samsung Galaxy J7 SM-J700H / DS is a branded smartphone running on Android 5.1. Here you will find out the characteristics, how to root or reset the settings, and you can also download firmware (for Odin, for example) and instructions for Samsung.
Root on Samsung Galaxy J7 SM-J700H / DS
How to get a root for Samsung Galaxy J7 SM-J700H / DS see instructions below.
If the applications did not help, ask in the topic or use the full list of root utilities from the topic header.
Specifications
- Battery capacity: 3000 mAh
- Battery: removable
- Music listening time: 76 h
- Announced date: 2015-06-19
- Type: Smartphone
- Weight: 171g
- Control: mechanical / touch buttons
- Operating system: Android 5.1
- Case type: classic
- Number of SIM-cards: 2
- Mode of operation of multiple SIM-cards: alternate
- Dimensions (WxHxT): 78.6x152.4x7.5 mm
- SIM card type: micro SIM
- Screen type: color AMOLED, 16.78 million colors, touch
- Touchscreen type: multitouch, capacitive
- Diagonal: 5.5 inches.
- Image size: 1280x720
- Pixels Per Inch (PPI): 267
- Automatic screen rotation: yes
- Aperture: f / 1.9
- Camera: 13 million pixels, LED flash (front and rear)
- Video recording: yes
- Max. video resolution: 1920x1080
- Front camera: yes, 5 million pixels.
- Audio: MP3, AAC, WAV, FM radio
- Headphone jack: 3.5mm
- Max. video frame rate: 30 frames / s
- Interfaces: Wi-Fi 802.11n, Wi-Fi Direct, Bluetooth 4.1, USB, ANT +
- Standard: GSM 900/1800/1900, 3G
- Satellite navigation: GPS / GLONASS
- Processor: 1500 MHz
- The number of processor cores: 8
- Built-in memory: 16 GB
- RAM: 1.50 GB
- Slot for memory cards: yes, up to 128 GB
- Control: voice dialing, voice control
- Sensors: proximity
- Flight mode: yes
- A2DP profile: yes
»
Firmware for Samsung Galaxy J7 SM-J700H / DS
Official firmware Android 5.1 [stock ROM file] -
Samsung Custom Firmware -
If a custom or official firmware for Samsung has not yet been added here, then create a topic on the forum, in the section, our specialists will promptly and free of charge help, incl. with backup and manuals. Just do not forget to write a review about your smartphone - this is extremely important. This page will also show the firmware for the Samsung Galaxy J7 SM-J700H / DS. Please note that for this Samsung model, an individual ROM file is required, so you should not try firmware files from other devices.
What custom firmwares are there?
- CM - CyanogenMod
- LineageOS
- Paranoid Android
- OmniROM
- Temasek's
- AICP (Android Ice Cold Project)
- RR (Resurrection Remix)
- MK (MoKee)
- FlymeOS
- Bliss
- crDroid
- Illusion ROMS
- Pacman ROM
Samsung Smartphone Problems and Disadvantages and How to Fix Them?
- If the Galaxy J7 SM-J700H / DS does not turn on, for example, you see a white screen, hangs on the splash screen, or the notification indicator only blinks (possibly after charging).
- If it freezes when updating / freezes when it is turned on (needs a flashing, 100%)
- Doesn't charge (usually iron problems)
- Doesn't see the SIM card (SIM card)
- The camera does not work (mostly hardware problems)
- Sensor does not work (depending on the situation)
Hard Reset for Samsung Galaxy J7 SM-J700H / DS
Instructions on how to Hard Reset on Samsung Galaxy J7 SM-J700H / DS (factory reset). We recommend that you familiarize yourself with the visual guide, which is called on Android. ... 
Reset codes (open the dialer and enter them).
- *2767*3855#
- *#*#7780#*#*
- *#*#7378423#*#*
Hard Reset via Recovery
- Turn off the device-> go to Recovery
- "Wipe data / factory reset"
- "Yes - delete all user data" -> "Reboot System"
How to log into Recovery?
- hold down Vol (-) [volume down], or Vol (+) [volume up] and the power button
- a menu with the Android logo will appear. Everything, you are in Recovery!
Factory Reset on Samsung Galaxy J7 SM-J700H / DS can be done in a very simple way:
- Settings-> Recovery and reset
- Reset settings (at the very bottom)
How to reset your pattern
How to reset your pattern if you have forgotten it and now you cannot unlock your Samsung smartphone. On Galaxy J7 SM-J700H / DS, the key or PIN can be removed in several ways. You can also remove the lock through a factory reset, the lock code will be deleted and disabled.
- Reset graph. blocking -
- Password reset -
Respected Customer!
Welcome to you! Farmwaretoday.com This page has like the say thank you again.
So beautiful advertisement behind must have some pretty well hidden. and that which is hidden gold in every single page. I need to read this you are requested.
Dear Readers!
This is my website every flash file has no virus. and every flash file I upload the test. After we take him out of the people do not speak. So, if this is my flash file or flash file to download any kind of problem, then, to see, please scribble Box in the name of the flash file to sharpen it. I will try to solve the problems fast.
This firmware 100% tested
SAMSUNG GALAXY J7 SM-J700H / DS these your software death phone,
100% recovering done!
SAMSUNG GALAXY J7 SM-J700H / DS firmware it is scan this file for viruses.
SAMSUNG GALAXY J7 SM-J700H / DS firmware 100% work.
CPU Name: MT6589 OR MT6583
Android version-5.1.1
SAMSUNG GALAXY J7 SM-J700H / DS firmware use any update china box & Mtk Cpu
supported tools. and Enjoy !!!

Welcome to Gsm Friends Thanks To
Choice my Website site
This Website very smart & Fast Latest Update
So No Others Way hurry up Download
Warning To Visitor This Flash File / Firmware 1000% Free !!!
1 * Password: site @ 1231
1.DOWNLOAD LINK ……
2 * Password: ANTonym
2.DOWNLOAD Link2 .4Shared
3 * Password: j73g
3.DOWNLOAD LINK UPDATE


How to use Flash file / firmware
1 Step: Download My Firmware SAMSUNG GALAXY J7 SM-J700H / DS firmware & unzipThis Firmware.
2 Step: Download Smartphone Sp flash tool Latest version from website
3 Step: Download Usb Driver Download & Setup This Require Android Usb Vcom Driver.
4 Step: usbOpen Smartphone Sp flash tool & Load Your Targeted Scatter firmware.
5 Step: Select MTk scatter Document file & Click.
6 Step: Press Download / Upgrade Button.
7 Step: Power Off your Phone Press Volume - Or + and InseUSBCable.
Instructions for installing the official single-file firmware on Samsung Galaxy J7 (SM-J700x).
Drivers and programs
Attention!
To install the official stock firmware on the Galaxy J7 and return the phone state ("Settings"> "About device"> "Properties"> "Device status") to "Official" after switching from custom firmware and thereby return the ability to receive updates over the air, it is enough follow the instructions provided.
Installation instructions
Unpack the downloaded archive into the Odin PC folder for convenience. The file in the ".tar" or ".tar.md5" format must be kept and "SS_DL.dll" can be deleted.
Reset device data.
To do this, go to the settings in the section " Back up and factory reset", Select the item" Data reset» > « Reset device", Enter the PIN-code (if one is set) and press the button" Delete everything". The phone will restart.
Run Odin PC as administrator.
Put the device into download mode ( Download Mode).
To do this, you must simultaneously hold down the Volume Down key, the Home button and the Power button. Then wait until the phone restarts and accept the warning by pressing the Volume Up key.
In this state, connect the smartphone to the computer. Odin should light up the inscription “ COM».
Press the button " AP»And select the TAR-archive of the firmware.
Items " Auto reboot" and " F.Reset Time" must be activated, a " Re-Partition", If active - must be disabled.
Press the button " Start". The process of installing the firmware will begin.
At the end of the operation, if everything went well, the message “All threads completed. (succeed 1 / failed 0) ". The phone must be rebooted manually by holding down the power button until the screen turns off. The device may take up to 5 minutes to boot up for the first time.
ATTENTION!
If the device does not boot for a long time or the data has not been reset, it must be performed from the recovery.
To do this, simultaneously hold down the Volume Up key, the Home button and the Power button. After downloading, select the item " Wipe data / Factory reset", and then - " Reboot system now". If after these steps the device also freezes at startup, you need to reflash it again.
So, you have searched and searched just to read up a content that will show you how to flash firmware update on your Samsung Galaxy? Here is precisely what you’re searching for; an intuitive, comprehensive, simplified article that deals with the steps / process involved in flashing an updated firmware to any Samsung Galaxy.
You know, most people see this as a hectic action to do, well; it is hectic indeed if you have never done it before. But, this article from us will simply explain the due processes. Well, what else could you expect from a tech of advanced / expert Android users?
What is a firmware update
This refers to the process of upgrading / flashing the default firmware on your Android device. For example, you install marshmallow update firmware; installing this to your mobile will upgrade its Android version from lollipop 5.0.1 to Marshmallow 6.0.1.
It is great to upgrade your OS version to the latest version so that you’ll enjoy quite a lot of customization features. In some situations, you can also unbrick your mobile when flashing the firmware.
Before running this firmware update, ensure you check out the below information;
Check your device mobile no.
Please ensure your battery percentage is above 50 (if possible, wait until the device is fully charged)
Backup everything you currently saved on the smartphone.
- Don’t try with locked bootloader devices like Verizon, T-Mobile, US Cellular carriers, You have to deal with a specific process that you can find in https://forum.xda-developers.com/
This update is for Samsung Galaxy models only; * don’t try to use this update on other Manufacturer models.
- Before proceeding this, if you want to update automatically to a newer version, try settings >> About >> Software Update.
Steps
Getting started ...
Download Samsung USB driver
Also, download the Odin desktop computer software -
- Updato / Android File Host / Android Infotech Host (Our Profile, We frequently added some firmware, which is rare to find in other servers)
Download the unique firmware for your Samsung Galaxy from a verified source. Here I suggest two sites that provide firmware without download limits and infinite redirects.
- Enter your device model no, and get the recent firmware from the firmware table. If you get confused when selecting firmware, Refer to this post-
Note: again, ensure you downloaded all the tool / apps mentioned above. They are what you need for this action to be successful and effective.
Below are the intuitive, straight-to-the-point clues on how to install Samsung Galaxy firmware.
Install the Samsung USB Driver on your PC
Extract the Odin Files and install it on your PC
Copy the Firmware files to your PC
Now, switch off the device.

Switch to Samsung “ download”Mode by holding down the following buttons at the same time >>> Volume Down + Home + Power Button, If you have Bixby key >>> Volume Down + Bixby + Power Button
When you’re in the “ Download”Mode, you’ll receive a warning message... However, neglect the message and press the “ volume up”Button to continue.
Connect the device mobile to the PC via USB cable
Launch the Odin application on PC. You should receive a message that shows if your device is successfully connected. However, if you do not see / receive such a message, then, repeat the steps above again

If you received the message that your device is successfully connected, then, continue with the steps below. The message shows “ADDED!” on the first command line.

Select the PDA or AP Button then “ browse / search"For the Firmware file. When you see it, select and tick the Auto reboot checkbox; (the auto reboot option is available on the “options” module.
Now, click the Start button and wait for the task (s) to complete. It may enter into Recovery mode to add the SuperSu permissions after which you should Reboot again.
How to check out for the current firmware
You can Check the Firmware Details here -> Settings -> About -> Version
What more?
This update is most relevant for advanced Android users as it allows them to gain absolute control over all aspects of their device. Running a firmware update can be more technical than it seems. Hence, you may have to engage an expert to help you out.
Most importantly, you must have an Uninterrupted Power supply PC / Laptop before you can install a ROM or firmware to any device.
Hey, If you can’t find your firmware, Comment below, We will try our best to provide the firmware in our Host ... :)