How to merge or split audio in Audacity? How to record and edit audio in Audacity How to cut in Audacity
Greetings, dear readers of the blog site!
In this article you will learn how to make an audio recording on your computer, how to trim audio, how to merge audio and how to edit audio.
We will do all this in Audacity. This program is absolutely free, lightweight and very easy to manage.
So let's get started...
Download and install Audacity
To download the Audacity program, go to the official website of the developers.
Next, download the required version. The yellow window contains a link to download the version of the program for the Windows 8/7/Vista/XP operating systems. If you have one of these systems installed, then click on the link and download the program to your computer. If you have a different operating system, then click on the link below.
After the program installer file has been downloaded, run it and follow the prompts of the installation wizard.
Afterwards, a window will appear in which you will be asked to install additional plugins for the Audacity program to work. Install them too.

The program is installed and ready to use.
How to Record Audio in Audacity
To start recording, you need to press the record button (REC) and start speaking into your microphone. When you start broadcasting, a sound wave with a recording of your voice will begin to appear in the program’s working window.
If the recording is long enough, you can click on the “Pause” button and press this button again to resume recording. To end recording, you need to click on the “Stop” button.

How to save an audio recording
After the recording is ready, it needs to be saved. In order to do this, you need to go to the “file” menu item and select the “Export Audio” sub-item.

After this, a window will appear in which you need to select a location on your computer to save the audio file, as well as set a name and select a format.
The most popular format for audio is MP3. Most people on the Internet use it, and therefore it is best to save audio recordings in this format.
After clicking the “Save” button, a window will appear in which you can fill in the metadata of your audio recording. This is done so that audio information is displayed in the file properties. This information will also be displayed in the player when listening to an audio recording.

This step is optional, so we can immediately click OK.
 And another window will open with a warning: “Audacity requires the lame_enc.dll file to record MP3 files.” The fact is that initially, after installation, the Audacity program does not know how to save audio in this format, so you need to download the Lame_enc.dll file to your computer.
Click the “Download” button and a page with instructions for installing the LAME file will open.


Launch the downloaded file. The installation is simple: constantly press the “Next” button, then press the “Install” button and finally click on the “Finish” button. That's it, the LAME file is installed and now we can save our audio recordings in MP3 format.
How to edit an audio recording
After the audio recording is ready, you need to edit it. After all, often when recording there are unfortunate moments that I would like to cut out. Audacity makes this very easy.
In order to cut out an extra, unnecessary moment of recording, you just need to select it with the mouse and press the button with the scissors drawn.

To make it more convenient to edit an audio recording, you can change the scale of the audio track. This is done using two buttons with drawn magnifying glasses and “+” and “-” signs, respectively.
If you did something wrong while editing, deleted, for example, too much of a recording or cut out the wrong piece, you can undo these actions. This is done using two buttons with drawn arrows.

Another important point. We can edit not only the audio that we have recorded, but also any other audio files. For example, you want to cut the ringtone of a mobile phone.
To do this, create a new project: click the “File” menu item and select the “create project” sub-item. Drag the audio file with the selected melody into the window of the newly created project. And then we edit exactly the same way as I described above.
How to save a separate piece of audio recording
Audacity has a great feature: you can save a piece of the audio recording you like. To do this, you need to select the piece you need with the mouse and then click the “File” menu item and select the “Export Selected Audio” sub-item.
How to glue several pieces into one audio file
Let's imagine that we are faced with the task of merging two pieces of audio into one audio file. Let's call them conditionally: “piece 1” and “piece 2”.
Create a new project and drag both pieces into the working program window. We will have two audio tracks, one below the other. Now select track of piece 1 with the mouse, press the key combination CTRL + X (cut out this piece).
Then place the cursor at the end of the audio track of piece 2 and press the key combination CTRL + V (insert the cut piece).
That. We now have one audio track, which we can save into one audio file. It's that easy and simple.
Write in the comments what programs do you use to create and edit audio recordings?
P.S. If something doesn’t work out for you, watch the video at the beginning of the article or ask your questions in the comments below, I will be happy to help you.
In this video I will show you how to trim an audio file using Audacity. I'll show you several ways to select the desired fragment and how to trim the audio. In addition, I will show you how to make a smooth increase in volume and a smooth fade-out at the end of the trimmed file. Link to Audacity program:
Date: 2018-03-10 Igor Goncharov
Rating: 4.0 out of 5
Votes: 1
Comments and reviews: 40
1.ratafi
It took me probably an hour and a half to find a normal person who explains things clearly. Before this, I came across some idiots, either speaking in such a way that I couldn’t understand the words at all, or explaining it as if I’d been using the program for at least a year. Well, for example, according to those people, I performed some actions, they turned out to be incorrect, but for some reason no one explains how to roll back, i.e., if something doesn’t work out, then you need to add the files again , and if there are 15 of them, then it takes a long time.
2.FP Skillet
Hello, Igor! Namesake, by the way!!)
Help...What should I do...I do everything like you, I press the buttons...But they just ignore..."Audio trimming",or the same usual "trimming"... There is zero difference...I press. ..They click, but nothing happens.. No idea what to do!? The program did not freeze.
3. Igor Morgunov
Eh, the devil took me with all my guts! - it turns out that this is called “audio export”... He should have a pole in his mouth...
I almost broke my head, I re-materialized everything and everyone, but I still couldn’t find the “save” option...
Thank you!!!
At least a normal person was found to explain it to the stupid me.
4. Jelena Aleksandrova
please tell me how to use the audacity program to connect music files (I have already learned this) when saving, so that they are saved not as one track, but separately, but sound like one track?
5. Nikolay Nikolayevich
The most important thing is that he didn’t tell you how to put tags?
For example, I listen to a long file, during the process I put notes in certain places, and at the end I delete/cut/glue
6. Eduard Korovyansky
I have a problem. I need to make a perfectly looping track, and when I save the audio file, there is a millisecond of silence. how to get rid of it?
7. Alexey Kirillov
Great review Igor!!! There is not enough link where you can download this free program without side effects, so to speak)))
8. Idel_Kazan Barentsz
Thank you, I haven’t used it for a long time, I forgot how to select a fragment, and at home they ask for new phone calls. Now everything is in order. Like.
9. ElenaMaKand HappyHome
Thank you, your lessons are the most wonderful. Everything is clear. If I forget something, I watch your lesson again and everything becomes clear.
10. EVERYTHING ABOUT EVERYTHING
Igor, hello! Please tell me where I can download Audicity, without viruses, preferably :)
11. Evgeny Melekhin
Hello Igor, if I need to cut the file rather than trim it, what should I do?
12. Rivka Derkach
Dear Igor! Please accept my sincere and sincere gratitude for the wonderful explanation!
13. Zhusup Askarov
I can’t export, there is such a line but it’s not highlighted, what can I do?
14. SIMPLE
Great video! Everything was explained simply and clearly! And the explanations are great!
15. Lyudmila Nikolich
Thank you, Igor. Great lessons, great explanation. Good luck to you
16. Country of Ufologists
I want to clone one piece of a fragment 100 times, how to do this?
17. Karina Aidarkhanova
Thank you very much for your work and prosperity to your channel
18. Fedya Sukhareff Live
How to leave the voice but cut out the music? please help
19. Victor Karvinus
damn I should have chosen different music, this is annoying
20. MixFix
Why is everything gray where I export audio and can’t be clicked?
21. Rr Ppp
and if you need to cut in the middle and leave the rest
Audacity is a free cross-platform program for working with audio. It has extensive functionality; it can be used to record vocals, musical instruments and other sounds, and then combine them into one piece. You can use it to trim audio, and some users use it to create podcasts and mix music. You can download the Audacity utility in Russian on the official website.
What formats does it support?
Supported formats include: Ogg Vorbis, MP3, WAV, AIFF. This is not a complete list. Audacity can work with 16, 24 and 32-bit audio, as well as import MPEG Audio.
Interface overview
The program has a standard interface for sound editors, in top part There are recording control buttons, recording and playback volume, various tools and settings for output devices. IN middle of the screen there is a sound diagram in left side channel mixer. Even lower is the status bar.
How to record sound
Before recording, you need to select the device with which the audio fragment will be recorded, then:

Instruments on the soundtrack
The audio track has a drop-down menu; you can call it by clicking on the arrow next to the name of the downloaded recording. 
Let's get acquainted with its main functions:
- Name– allows you to assign your own name to the selected track.

- Move up– if there are two or more tracks, shifts the selected one up one position:

- Wave– displays the signal as a function of amplitude over time.

- – displays changes over time in sound waves, the frequencies that make up the sound and their intensity.
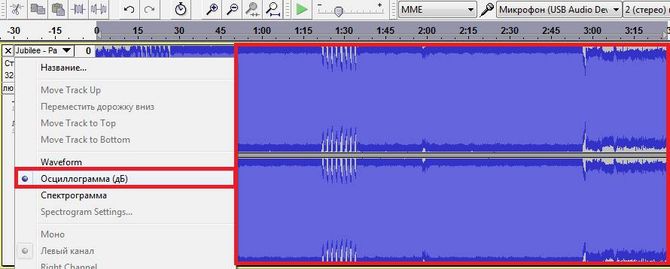
- – shows the frequency distribution spectrum.

- Mono— sets playback on the right or left channel.
- Left channel— sets playback of the left channel.
- — sets playback of the right channel.

- Make it stereo– turns the selected track and the track below it into stereo.
- – creates two mono tracks from one stereo.
- Format(Format) – sets the bit depth of the audio file (16, 24 and 32 bits).
- Rate– sets the project frequency.

- Button "".
- “Solo” – when you press this button, only the selected track will be played.
How to trim a track
To start trimming music in Audacity you need select a fragment audio recording, holding the left mouse button (LMB) at the beginning, drag it until the end of the desired fragment. The following will appear at the top: 
The fragment is highlighted, the next step is pruning. You can trim the track on both sides, leaving only what is selected, or you can cut out this fragment:

Merge sound
To merge you need:

Mixing
The settings on this panel provide control over the input and output parameters of sound cards. Both sliders will be located in the “-” position if audio recording is not supported by the sound card parameters. Sometimes this is due to the fact that on PC no drivers, or the sound device is not very common.
Left slider is responsible for the volume of the output sound, and with the help right The level of the input signal (microphone, line input, etc.) is adjusted. If distortion and noise occur during recording, you need to lower the level of the right slider.
Audacity- one of the simplest and, at the same time, multifunctional audio editors. With its help, you can easily and quickly perform all the basic operations most often used by ordinary users when editing music files, as well as efficiently save ready-made versions in any convenient format.
In this guide, we will talk in detail about such important functions as cutting out certain fragments and trimming individual sections in a music file, which, by the way, are superbly implemented in this program. So let's get started.
To get started, download the latest version of Audacity and install it on your machine. Then, run the program.
Adding Music Files to Audacity
Before you start editing music in any program, you first need to add the original composition to it. IN Audacity it's done like this. Click on the function tab "File"(top left corner), then click "Open", find the desired track on your disk and click on "Open".

Cutting music fragments in Audacity
Once the file you added is loaded into the program, you can start working on it.
Agree. Before you cut something out, you first need to select it! Activate function "Selection" you can by clicking on special. icon on the toolbar. Then, click lv. class mouse on the desired section of the track to mark the beginning of the fragment. When will it appear vertical bar, marking the beginning, move the mouse cursor as close to it as possible so that it changes from a regular icon to " hand with index finger".

After that, hold down lv. class mouse and move it in any direction you need, thereby expanding the boundaries of the selection. When you mark the desired fragment, click on the “scissors” icon (toolbar at the top) to cut it. Also, to delete, you can use a combination of hot buttons Ctrl+X or keyboard key Del(Delete).

Trimming a Music File in Audacity
If you do not want to cut the selected section, but rather trim the unselected section(s) of the track, use another button on the toolbar, clearly shown in the screenshot below. First select the area that you are going to leave, and then use the function of trimming it.

Cutting/trimming music files in Audacity from beginning to end
Undoubtedly, this is also a very useful function that can come in handy more than once. Special buttons will help you accurately move the cursor to the very beginning or to the very end of the track. "J" (put at the beginning) And "K" (move to end). Next, do everything exactly the same as for regular cutting/trimming.
I promised that I would write a short article on working in the Audacity sound editor. Did. This editor is one of the best professional editing tools. The program itself is free and suitable for Windows. I wrote about her, something like a review.
For people who have no idea how to work with Audacity, I am writing this short article. I'll show you how to split and merge audio using Audacity. Let's go!
How to split or merge audio files in Audacity?
If you have a favorite music file that you want to put on a ringtone, then you can split the song using Audacity. Perhaps you are engaged in more professional activities, but in this case the program is suitable.
Splitting audio files
You can download Audacity from the official website. Launch the program and simply drop some music file into the provided window.
Next, select some part of the audio file that you want to split. You can make as many parts as you like. So, you have selected a fragment, to split it you can press the keys Ctrl+I, or go to the tab "Edit", menu "Clip Boundaries" and point "Divide".


Combining audio files
Everything is simple here too. You need to select two audio files and place them on different tracks. Next, you need them to kind of touch, for this you need to use a tool "Time Shift Tool"(Time shift). Do as in the screenshot below. It turns out that the beginning of the first track touches the end of the second. You can do the opposite.

To combine audio files you need to click "File" and select item "Export Selected Audio". Select the desired file type and give it a name.

That's it. I hope this little tutorial has shown that working with Audacity is not that difficult. Now you have learned how to split and merge audio files.