Connecting to postgresql from windows. PostgreSQL database connection. Database management
PostgreSQL is an open source, cross-platform object-relational database management system. This article will show you how to install PostgreSQL in Ubuntu Linux, connect to it and run a couple of simple SQL queries and how to set up a backup.
To install PostgreSQL 9.2 on Ubuntu 12.10, run the following commands:
sudo apt-add-repository ppa: pitti / postgresql
sudo apt-get update
sudo apt-get install postgresql-9.2
Let's try to work with the DBMS through the shell:
sudo -u postgres psql
Let's create a test database and a test user:
CREATE DATABASE test_database;
CREATE USER test_user WITH password "qwerty";
GRANT ALL ON DATABASE test_database TO test_user;
To exit the shell, enter the \ q command.
Now let's try to work with the created database on behalf of test_user:
psql -h localhost test_database test_user
Let's create a new table:
CREATE SEQUENCE user_ids;
CREATE TABLE users (
id INTEGER PRIMARY KEY DEFAULT NEXTVAL ("user_ids"),
login CHAR (64),
password CHAR (64));
Note that, unlike some other DBMSs, PostgreSQL does not have auto_increment columns. Instead, sequences are used in postgres. On this moment it is enough to know that using the nextval function we can get unique numbers for a given sequence:
SELECT NEXTVAL ("user_ids");
By setting the default value for the id field of the users table the value NEXTVAL ("user_ids"), we have achieved the same effect as auto_increment. When adding new records to the table, we can omit the id, because a unique id will be generated automatically. Several tables can use the same sequence. Thus, we can ensure that the values of some fields in these tables do not overlap. In this sense, sequences are more flexible than auto_increment.
The exact same table can be created with just one command:
CREATE TABLE users2 (
id SERIAL PRIMARY KEY,
login CHAR (64),
password CHAR (64));
In this case, the sequence for the id field is automatically generated.
Now, using the \ d command, you can see the list of all available tables and using \ d users to see a description of the users table. If you don't get the information you're interested in, try \ d + instead of \ d. The list of databases can be obtained with the \ l command, and switching to a specific database can be obtained with the \ c dbname command. For command help, say \? ...
It is important to note that PostgreSQL converts table and column names to lowercase by default. If this behavior is undesirable, you can use double quotes:
CREATE TABLE "anotherTable" ("someValue" VARCHAR (64));
Another PostgreSQL feature that can be difficult to get started with is the so-called "schema". A schema is something like a namespace for tables, like a catalog of tables within a database.
Creating a schema:
CREATE SCHEMA bookings;
Switching to the circuit:
SET search_path TO bookings;
You can view a list of existing schemas with the \ dn command. The default is a schema named public. In principle, you can successfully use PostgreSQL without knowing about the existence of schemas. But when working with legacy code, as well as in some edge cases, knowledge of schemas can be very useful.
Otherwise, working with PostgreSQL is not much different from working with any other relational DBMS:
INSERT INTO users (login, password)
VALUES ("afiskon", "123456");
SELECT * FROM users;
If you try to connect to postgres from another machine now, you will fail:
psql -h 192.168.0.1 test_database test_user
Psql: could not connect to server: Connection refused
Is the server running on host "192.168.0.1" and accepting
TCP / IP connections on port 5432?
To fix this, add the line:
listen_addresses = "localhost, 192.168.0.1"
... to the /etc/postgresql/9.2/main/postgresql.conf file as well.
0
I'm stumped. We have a postgres 9.2 database that we have been using for some time now. We now need to be able to connect to it from outside our network.
So, we set up an external IP address and test that we can connect to port 5432 from a remote host via telnet. Thus, this proves that network connection works, firewalls, etc. Everything is fine.
When I try to connect with:
PSQL -h db.host.com -d dbname -p 5432 -U user
i get back Psql: the server closed the connection unexpectedly.
I have verified that
listen_addresses = "*" is set in postgresql.conf
And in pg_hba.conf we have a line that reads (just for testing)
master all all 0.0.0.0/0 md5
And I reloaded the database to check its selected changes.
So this should allow connections from any source.
The psql version on the database server is 9.2.14 and on the client it is 9.2.13.
Any suggestions or ideas?
1 answer
Sorting:
Activity
1
I would like to try a few things to get more information:
tail Postgres to log into the server to see what is happening there when you connect.
Run psql --version to make sure it more or less matches the server version. (I see you've already done this, but I'll leave it here for posterity.)
Run strace psql .... to see how far to fail.
This still sounds like a network problem to me. What is the telnet command you are working with? "External IP" sounds just like you on AWS. Customization remote access to VPC takes many steps. Do you have any other services open to the outside that work?
You can also troubleshoot by shutting down the Postgres server and using nc to listen on 5432. Then connect to telnet and see if you can send data back and forth.
1
Paul, thanks for the suggestions. I did a stretch and checked the versions. And you were right trying to connect from AWS. It turns out that this was the tier I used in the load balancer to only allow access to the IP-2 IP ranges that AWS publishes. When I disabled irule, I could connect immediately. So this must be surreal logic as I checked the public IP of my EC2 instance and it was indeed listed in irule via a CIDR notification. -
Attention : If you work in Windows and have not yet installed PostgreSQL and Debet Plus V12, then you can download the Debit Plus V12 assembly from the download page with a pre-installed PostgreSQL DBMS and a connected database (with a basic configuration for Ukraine). Otherwise, you need to first install the PostgreSQL DBMS and the Debet Plus V12 software package, after which you can configure the connection and import the PostgreSQL database following this instruction.
To connect the PostgreSQL database, you need to do the following:
Launch Debit Plus V12 and add new base (context menu"Add new").
Leave the checkbox "Add existing to the list".


"DBMS" - POSTGRE.
"Database Server" - localhost.
"Database name" - specify the name of the database from the PostgreSQL DBMS in lowercase Latin letters (small letters).
Note: Usually one base is used. For special purposes, the database can be split into several, then you need to check the box next to "Use multiple databases", click the "Next" button and specify the correspondence of the "tags" physical bases... This may be necessary, for example, if the databases of several enterprises will refer to the same directories (counterparties, items, etc.). This case is not discussed further.
"Settings directory" - specify the path to the base settings for PostgreSQL (drive \ DebetPlusV12 \ base \ pgdpbase).
Save your changes by clicking Finish.
Start pgAdmin (PostgreSQL DBMS administrator), add a server (File / Add Server ...) and add a new database (New Database ... menu).

Enter the server name, localhost in the Host field, fill in the rest of the fields as you wish.
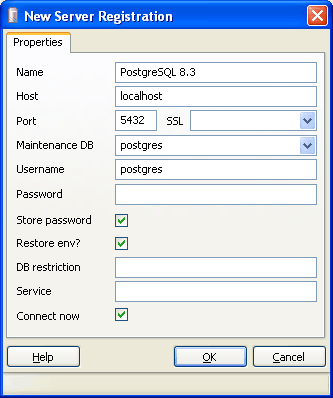
Enter the name of the database in the "Name" field (the same as entered in the "Server" field in the settings for connecting to the "Debet Plus V12" database).

To import the database from the archive, use the "Restore ..." menu.

Specify the path to the dpbase.bakup database archive (drive \ DebetPlusV12 \ base \ pgdpbase).

You can add the dpadmin user, who is the administrator, to Debit Plus V12 by default (no password).
Assign all rights to this user.
Note : You can not add the dpadmin user, then when activating the database, you will need to enter the postgres administrator name.
Refresh the list of bases (menu "Refresh").
Note : If you do not want to assign the "Superuser" rights to the user, then assign the rights to "Tables" and "Views". To do this, select the appropriate object and select the Grant Wizard context menu item.

On the "Selection" tab, click the "Check all" button, and on the "Privileges" tab, check the "ALL" checkbox and click the "Add / Change" button. Save your changes.
Activate the setting of the connection to the database in the Debet Plus V12 software (context menu "Make active").

The system will ask for a password to connect to the database. Click Yes.


Attention! If such a message does not appear, then start updating the database structures by selecting the menu item "Service" / "Updating database structures".

As a result, the following window will appear:

Leave all checkboxes by default (there must be checkboxes in the "Reindex" column for all database tables).
After finishing the modification, you can start working.
Run "Debit Plus V12" and add a new base (context menu "Add new").
Leave the checkbox "Add existing to the list":

In the first field, specify an arbitrary name for the base (the name may be different on each working computer).
"DBMS" - POSTGRE.
Database Server is the name or IP address of the server.
Database server port - specify the port of the database server, by default 5432.
"Database name" - specify the name of the database in Latin letters in lower case.
The "Database Schema Name" is dpbase.
Check the box "Use Debit Plus authorization" only.
"Settings directory" - specify the path to the base settings for PostgreSQL (network path \ DebetPlusV12 \ base \ pgdpbase).
Save the changes made by clicking the "Finish" button, and then make the base active.
Set launch parameters (main menu "Settings" / "Launch parameters")
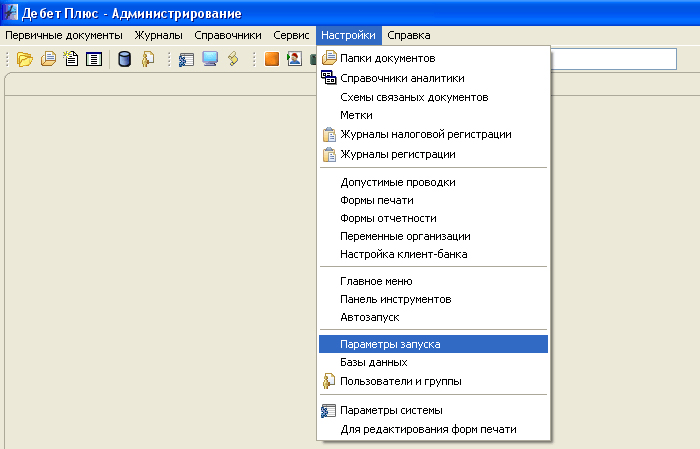
In the window that appears, in the "Password for changing settings" field, enter the password 150301 and click the "Accept" button.

Specify the path to the JDebet folder on the server and click save. Make the base active and you can get to work.
A vulnerability (CVE-2019-18634) has been identified in the sudo utility, which is used to organize the execution of commands on behalf of other users, which allows you to increase your privileges on the system. Problem […]
The release of WordPress 5.3 improves and expands the block editor introduced in WordPress 5.0 with a new block, more intuitive interactions, and improved accessibility. New features in the editor [...]
After nine months of development, the FFmpeg 4.2 multimedia package is available, which includes a set of applications and a collection of libraries for operations on various multimedia formats (recording, converting and [...]
Linux Mint 19.2 is a Long Term Support release that will be supported until 2023. It comes with an updated software and contains improvements and many new [...]
Release submitted Linux distribution Mint 19.2, the second update to the Linux Mint 19.x branch, built on the Ubuntu 18.04 LTS package base and supported until 2023. The distribution is fully compatible [...]
New BIND service releases are available that include bug fixes and feature enhancements. New releases can be downloaded from the downloads page on the developer's site: [...]
Exim is a message transfer agent (MTA) developed at the University of Cambridge for use in Unix systems connected to the Internet. It is freely available in accordance with [...]
After almost two years of development, the release of ZFS on Linux 0.8.0 is presented, the implementation file system ZFS, designed as a module for the Linux kernel. The module has been tested with Linux kernels 2.6.32 to [...]
The Internet Engineering Task Force (IETF), which is engaged in the development of Internet protocols and architecture, has completed the formation of an RFC for the Automatic Certificate Management Environment (ACME) protocol [...]
Let’s Encrypt, a non-profit certification center controlled by the community and providing certificates free of charge to everyone, summed up the results of the past year and spoke about plans for 2019. […]