How to create a backup image of a laptop hard drive. Creating a disk image - instructions Creating a hard disk image
Today I want to tell you how to make a disk image using a very simple and useful program “R-Drive Image”. What exactly is a hard drive image and why do we need to make one? I will provide a link to the program itself at the end of this article.
The answer to the first question may sound something like this: a disk image (in this case, a hard drive) is a file of arbitrary size with the “iso” (or any other) extension, which is an exact copy of the hard disk partition data at the time of creating this image.
When we make a copy of a disk, we are, in fact, creating a backup of it (an exact backup copy of it). Moreover, when copying a system partition, the final image file will include not only user documents, but also such things as desktop settings, computer settings, etc. In a word - a complete copy.
Now - the answer to the question why do we need to make a copy of the disk (create a system image)? Imagine a situation where . In this case, we need to perform many different operations to restore the operating system, and we still don’t know how it will all end? And from a pre-made image of the system, we can restore it in about ten minutes completely in the same state as at the time of its creation! This is a kind of save (preservation) of your operating system and data (like in computer games) and you can return to it at any time.
Moreover, there can be as many such “saves” as you like (you can make them at least every day or before making important changes to the settings of the OS itself), the main thing is that there is enough space. In the same way, the damage caused to the system by computer viruses can be neutralized. We will simply “roll back” it to its previous state, when it was not yet infected! Naturally, all device drivers installed at the time of backup are restored, so there is no need to search for and install them again.
I will use a real example to show how the program works to create an image of a hard drive and transfer it to another (working) one. On one of the computers in our organization it was discovered that it periodically turned off spontaneously. Moreover, the further, the more often. It was decided (out of harm’s way) to make his image and then “deploy” it on another (functional) medium.
That is, literally we need to completely transfer (clone) all programs and settings from the left HD (pictured below) to the right one, and then place the second HD in the source computer:
To do this, we connect the removed hard drive (as an additional one) to the one on which we will make a disk image (English image) and where the “R-Drive Image” program is installed.
We launch it and see the main window:

We will gradually get acquainted with the main capabilities of the program, but now we will be interested in its main function: “Image creation”. Click on this inscription and go to the next window:
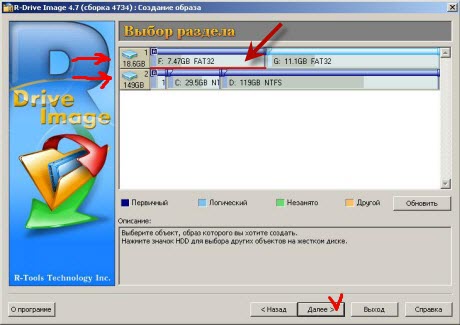
In the photo above (indicated by arrows) we see symbolic images of our disks numbered “1” (20 gigabytes) and “2” (150 gigabytes) connected to the computer. We must select the partition whose image we will create. In our case, this is disk “F” with a capacity of 7.5 GB. To designate it as an object for cloning, we must left-click on it. After that, a red line will appear under it (as shown in the screenshot above), and the “Next” button at the bottom will immediately become active.
Click it and go to the next window called “Image Location”. We must not only make a disk image, but indicate in which folder to save it and give it a name.

I previously created the “Image” folder in the root of the “C” partition and in the “File name” field I specified the file name of the image we were creating as “myimage”. Click the “Next” button.

In the window above, we may be interested in the following possibility: using the slider marked in red, we can select the degree of compression of the final file when creating it. The slider that is closer to the inscription “Faster in speed” will provide us with a faster process for creating the final clone file. If it is located closer to the inscription “Smaller in size,” then the file creation time will increase, but its size will be smaller.
If you have no problems with space for storing files, then you can simply look at the two information signs on the right side of the screen: “Free disk space” (where we will save our image) and - “Approximate size” (of the image file ) and click the “Next” button.
We see the “Backup Options” window:

There's not much we need here. Perhaps the option “Ignore disk read errors (bad sectors)”. We can check the box if there are indeed some problems on the hard drive that are preventing us from making a disk image.

If necessary, we can click the "Back" button and change the previous settings. If everything suits us, then click “Start”. After which the process of creating a disk image starts directly.

We wait for it to finish and in the end we see this inscription:

We have just, in fact, completed the entire section. Let's see what kind of file we got as a result? To do this, go to the folder that we specified at one of the first stages of the “wizard’s” work. I have this: C:image

We see that we have a file there with the extension “ arc"(this is the extension the program works with), slightly larger than one gigabyte. This is our disk image that we made! We'll get back to working with it now, but let's talk a little about another possibility.
Since, as we said earlier, the image is a backup copy of the disk, we can connect it at any time in read mode from our program and copy the files we need from there.
Why do we need this? Imagine a situation (I had a similar one) that the system “saved” by us in this way works successfully, but some important files (or documents) have been deleted and, due to the passage of time, they cannot be detected using standard information recovery tools. And we desperately need them! Shouldn’t we, in fact, restore the entire section from the image for their sake?!
And here a very useful feature will come to our aid, accessible from the main window of the program “Mounting an image as a virtual logical disk”.
![]()
Let's master it in practice. After clicking on the inscription, we will be taken to the window of the corresponding connection “wizard”:

Select the backup we made (the “myimage” file). Click “Next”. In the next window, we will need to mark (left-click) the drive to be connected and select a letter for it (you can select any letter that is not occupied by the system, I chose “ L»).

After the operation is successfully completed, we will see this window:

Now let’s go to “My Computer” and see the “L” drive that appears there:

Naturally, you can go to it and copy any of its files contained there at the time the system image was created.

After using the backup, we must disable the virtual disk. In the main menu of the “R-Drive Image” program the corresponding inscription will become active:
![]()
In the window that appears, check the box for the letter “L” that we want to disable:
And after the procedure is completed we see:

So, we have mastered this procedure. Remember it, it will come in handy :) Let's return to how to make a disk image? More precisely, now - restore it from the “arc” file. For this, as you may have guessed, there is a special function in the main program window:
![]()
Before “unfolding” the image on another disk, we, of course, must first physically connect it to the computer on which the “imprint” we took is located. What am I doing? I turn off the computer, disconnect the secondary hard drive from which we made the “clone” and attach another hard drive in its place, onto which we will “deploy” the image. I boot the computer and after Windows loads, I launch “R-Drive Image”. I think everything is clear here?
So, we get into the “wizard” that we are already familiar with and select the file “myimage.arc” created at the first stage


This is where we need to be very careful (I once “restored” the image to my main working partition “D”, which contained all my data)! It helped that, at one time, I also made a backup copy of them :)
Attentively! At the top we have “Image” (select it with the left mouse click), at the bottom we have “Destination” (in my case, the “F” drive, where we “expand” the backup), and select it so that a red underline appears. We check again that the “object” and “target” for recovery are specified correctly and click “Next”.
In the next window, before restoring the system image, we are asked what to do with the unallocated space remaining after “overlaying” the image on the target disk?

The fact is that the source partition (the first hard drive from which we “removed” the image) and the final partition (partition of hard drive number two) do not match in size. The second one is bigger. The situation is normal, since we do not need to achieve the identity of the “donor” and “receiving” sections, byte by byte. We can always correct this point during the work process.
It is the “Free space after” field that shows us this difference in megabytes. In the schematic diagram at the top of the screenshot it is indicated in green. All we need to do is to “hook” the slider circled in red with the mouse and move it all the way in the direction indicated by the arrow. At the same time, the “Free space after” field will decrease to zero, and the “Partition size” field will increase proportionally.
Also pay attention to the possibility of changing the partition type: “Primary” or “Logical”. The partition from which the operating system is loaded is always marked (flag) “active”.
The last field that may interest us here is “File system for the selected partition”. During the process of “deploying” the image, we can change (convert) the file system at our discretion and as necessary. Click “Next” and in the next window - “Start”.
The process of recreating the system from the ashes will begin, i.e. - from the image :)

At the end of it, we will see a promising inscription:

We can go to our “F” partition and make sure that we were able to not only make a disk image, but also successfully transfer all the files (and the OS itself) to another physical device.

Now we just have to learn how to make a copy of a disk using a bootable CD or DVD created in the R-Drive Image program? Why do we need to know this? The simplest option: imagine that our saved system image file is located on “D”, and the OS installed on “C” has stopped loading. Question: how do we run the program and get to drive “D” with the “arc” file? And what should we do if we don’t have a second computer at hand so that we can connect our hard drive to it to restore the system to it?
This is where a pre-prepared bootable CD (or DVD) of our program comes in handy. To create it, we need to select the appropriate item in the main window:
![]()
And now, as promised, I give “R_Drive Image”.
When replacing a hard drive with a new one, for example, a more capacious or high-speed one, as a rule, there is a need to transfer information from the old drive to it.
If you do it manually - reinstalling the system, programs and copying user files, you can spend the whole day.
It is much more convenient to entrust this to automation - special programs for cloning hard drives. With their help, all files, settings and the system itself will simply “move to a new location” in the form in which they were on the old media.
Hard disk cloning is a procedure for low-level sector-by-sector data transfer from one medium to another. In this case, the clone disk will be an exact copy of the original disk.
Hard drive cloning
Many paid and free programs have been released to create clone disks. Among them there are universal ones, working with any HDD and SSD, and highly specialized ones, designed for drives of a certain brand, for example, only Samsung or only Western Digital.
Let's look at five popular and easiest-to-use programs for cloning hard drives to SSDs or HDDs from any manufacturer.
EASEUS Disk Copy
Farstone RestoreIT Pro is primarily a tool for restoring system and user data after crashes, virus attacks, changes and accidental deletion.
This program does not create disk clones as such, but can create backups of any information on them.
The frequency of backups in RestoreIT Pro can be configured at least hourly. And restoration to a saved copy is done by pressing one button.
RestoreIT Pro features:
- the ability to restore the system even after bootloader damage;
- 2 backup modes - full and cumulative (saving only changed data);
- monitoring the entire disk or only selected partitions;
- storing the entire history of file changes, not just the last saved version.
The disadvantages of the program are the paid license ($24.95) and the lack of a disk cloning function.
In this article, I want to share with you a super simple, extremely fast and completely free workflow that creates a perfect 1 in 1 copy of an HDD (or partition) for backup or for migration to an SSD drive. This method has saved me so many hours, days and maybe weeks of stress, and it's free and done in minutes.
You want to transfer the contents of hard drive A to drive B (maybe an SSD)
There are many backup tools (and sometimes even migration tools) that will backup your entire operating system for you, sometimes copying all the files on a hard drive, sometimes duplicating a full partition. I used them several times and trusted this tool, it only gave me the understanding that the result was completely unusable, simply because these tools do not create a REAL copy of the hard drive.
The built-in Windows backup tools will simply create a compressed image, which is only useful if you have a DVD drive, burned an ISO (disc) with the exact same version of Windows, a lot of time and a lot of luck. Creating a fully working system from these backups very often ends in failure.
Other tools create a complete copy of the entire Windows partition, which looks very very good. Until you actually need that backup and guess what, it turns out to be unbootable because these tools don't copy the tiny (hidden) partitions that contain the bootmanager. Bummer!
Or do you just want to backup your disk at extreme speed?
The instructions are also useful if you just want to make a one-to-one copy of any data disks that contain your files. Manual copying will process each file and each directory and initiate the copy process on a per-item basis, while the one-to-one copy method will simply copy everything as a big block in low-level hardware.
What do you need:
For this I use
Hidden from guests
Before you ask, it's completely free, I'm not getting paid or anything like that for saying this, and there's no affiliate link or anything like that. It's just an awesome tool. I'm writing this in March 2015, and if you're reading this years later and the program is no longer free or available anymore: There are several websites online that contain an archive of earlier versions of almost any program, maybe this will help.
Macrium Reflect can copy individual partitions to any drive, usb or partition, or clone an entire drive (including hidden boot/swap partitions) to any other hard drive, even if the destination drive is smaller or larger. However, to be sure, there should be enough space for the content.
How to clone:
The cloning process is extremely simple. Check the box on the left to completely clone your hard drive. DO NOT uncheck the boxes at the bottom of sections, even if you don't understand what the sections are or where they come from. Because without these hidden partitions, your clone will not have a boot area.
Click “clone disk” and select the destination disk in the next window. Further everything is self-explanatory.
To confirm: Open the command line, type “compmgmt.msc“ there, go to -> “Computer Management” -> “Storage Devices” -> “Disk Management”. There you should see an exact copy, along with a hidden section.
Make sure to disconnect one of the drives so you don't get confused after rebooting.
Good day, dear friends, acquaintances, readers, admirers and other individuals. Today we'll talk about Acronis True Image, as is clear from the title.
Then select the version. For a home user, the standard version is enough, and if you decide to buy the program in the future, you should not overpay for functionality that you may not really need.
Next, you will be asked to indicate your E-mail address (we recommend doing this, because then the account can be used not only for managing licenses, but also for monitoring + the account gives access to other Acronis functionality:
After specifying the address, Acronis True Image will begin downloading. If this does not happen, then click on the button corresponding to the computer’s operating system (in our case it’s Windows).
Then run the downloaded file and begin the download and installation procedure (everything happens without your special participation, just click on the appropriate button once):
After installation, you will be asked to create an account to receive, in fact, a free trial version and (see text above) additional functionality.
Registration and account
After registration, it is better to immediately look at your mailbox.
At the time of writing this material, upon confirmation of your account, you were given a free temporary cloud and other goodies:
The next step is to immediately activate the license (or buy it), where, in our case, we choose a free trial period:
Actually, after this (or a little before) you will be asked to accept the user agreement, after which the program itself will launch, with all its wonderful functionality.
Launching Acronis True Image for the first time and creating a copy
On the left side you will find the program menu, on the right everything else.
Actually, nothing complicated:
The first tab Acronis True Image, traditionally, is responsible for backup. Let's talk about it right away.
Here you can select the current computer (its name is displayed in the second tab), and by clicking the “Add copy” button you can create a new copy, customizing it at your discretion (or you can simply edit the current one.
Actually, in the next tab you can choose whether to copy the entire computer, or some separate part of it (disk, partition, files and folders, or something else), as well as indicate where to store the copy. Both are set by hovering the mouse over the corresponding icon.
Here, for example, are the disks and partitions:
Etc. In general, I think you’ll figure it out here, the interface has been polished and fully supports the Russian language.
The storage location for the copy is selected in the same way.
Setting the copy storage location
This can be an external drive, a cloud from Acronis True Image, or some other location (for example, another drive, a folder on the network, FTP (!), NAS (!!), etc.):
Here you can cheat and if you have a cloud from another manufacturer, then select the same DropBox, OneDrive, Google Drive or any other storage as the storage folder, taking into account that you have the corresponding application installed on your computer.
True, this will add a little inconvenience, in the form of synchronization and a bunch of other nuances.
After you choose what to copy and where to copy, in fact, click on the little blue button “Parameters”, which will allow you to more subtly set the necessary nuances and formalities.
Disk backup options
Let's see what else Acronis True Image can do:
For example, set a schedule for when and how to make a backup copy, i.e. time, frequency of repetition, and whether it should be done when the computer is idle or at any time, whether it is necessary to wake up this same computer, whether to start it immediately after the system starts or after some kind of pause and so on.
Depending on the intensity of use of the device, configure this for yourself.
The second tab allows you to set the backup scheme.
Scheme and method of disk copying
Acronis True Image allows you to set whether it will be incremental, full, or something else, as well as set the number of incremental (and not only) copies, set how many chains of changes to store, and so on.
Let's take a quick look at what's going on here:
- The full version actually makes a full backup, which is logical;
- Incremental, makes, in fact, only the changes that have occurred since the LAST BACKUP OPERATION (convenient, allows you to save space and not lose anything);
- Differential, in fact, makes a full copy of the CREATION OF THE LAST FULL BACKUP COPY, i.e. the difference, I hope, is obvious, because the last operation (may make NOT a FULL copy) and the last FULL backup copy are different things.
Depending on the intensity of computer use (as well as the availability of space for backups), it is recommended to store at least 60 days of chains (i.e. delete older ones), or better yet even more, and also create a full copy after at least 5 incremental (preferably after 3).
The next tab allows you to set notification parameters.
Setting up notifications and additional functionality
If you don’t know what it is, why and how it’s configured, you might want to skip this tab and just check the “ Show a notification when there is not enough free disk space":
On the exceptions tab, “oddly enough,” you can set exceptions by type, path, mask, criteria, and so on. At a minimum, you should leave everything as it is (and add your own if necessary):
Well, on the “Advanced” tab of Acronis True Image, in fact, details are set that can be basic for many.
First, you can create a sector-by-sector mode. This option can be used to create exact copies of entire partitions or , rather than just the sectors containing data.
For example, you may need to do this to back up a partition or disk that contains an operating system that is not supported by Acronis True Image.
Password protection, sector-by-sector mode, etc.
Please note that in this mode the processing time is increased and the image file size is typically larger. Not always recommended for regular users.
Backup protection will allow you to set .
I think that not everyone may need this, but you can set a password for purposes.
You can skip the Pre/Post commands (if you don’t understand what they mean), as well as splitting the backup into parts (either leave the automatic mode, or set the parameter to the desired size, in case you decide to write the copy to a disk of a certain size).
We strongly recommend that you enable the check (especially if you have old hard drives or the storage is located on the Internet), as well as check the copy periodically (it doesn’t take up a lot of resources, but it allows you to be sure of the integrity of the copy).
If you make a copy to external media, you should immediately set the option to write Acronis True Image there, so that you can quickly use the recovery later.
Error handling, image type and other nuances
Actually, it makes sense to leave error handling as is, turn off the computer at your discretion, and set the performance to optimal (or at your discretion, if you are making a copy live and not while idle), and set the image type to “VSS” or “ Acronis Snapshot".
That's basically it, you should check the box at the very bottom, i.e. " Save as default", in case you plan to make several copies and don’t want to set everything up anew each time (but just, say, edit).
At this point, you can begin the copying process and wait for it to complete. Recovery is no more complicated than the copying process. In rare cases, when the system crashes, it is enough to insert a flash drive or disk with the created media, boot from it (by setting the appropriate item in the BIOS) and, following the same simple and intuitive interface, carry out the recovery process, indicating where, where and how to do it.
Additional Acronis tools
Let's see what else he can do. The archive tab, as already mentioned, allows you to archive unused data so that it does not chew up disk space:
Synchronization, of course, allows you to upload data to the cloud, synchronize data between devices (computers, laptops, smartphones, tablets, etc.), as well as a bunch of other useful things:
Well, the tools tab allows you to use the previously mentioned tools, be it creating bootable True Image media:
Clone disks, clean the system, permanently delete data, and even use third-party and community utilities.
At the moment we will not describe them all, fortunately, there is probably nothing more intuitive than them (or, in fact, you can always ask a question in the comments).
The tab with the monitoring panel, as already mentioned, allows you to monitor backups, make copies of photos from Facebook, etc., the tab with the account allows you to manage your account, and the parameters...
They are the same parameters in Africa; in general, there is nothing to change there, except, perhaps, the storage location for backup copies of mobile devices.
And settings for email notifications (which can also be successfully done simply in your account on the Acronis website.
There’s probably nothing more to say about this. And so it turned out quite a lot.
Oh, and, yes, about the license.
Where to buy a license for Acronis True Image
Delivery is carried out within 10 minutes (in the form of a key by email), the key is linked to your Acronis account and works great. You can buy - there are a lot of payment methods.
By the way, if you encounter any problems when purchasing anything from the above-mentioned partners, please contact us.
Afterword
That's how things are. As always, if you have any questions, additions, thoughts, etc., then welcome to comment on this article. So far, perhaps, this is the best paid product on the market. Especially under Windows and without unnecessary movements.
Thank you for being with us.
When storing information on computers, there is always a risk of data loss. There can be many reasons. Starting from basic deletion of necessary data to PC malfunctions.
In order to ensure the safety of important information and not spend too much time installing programs in the event of a failure, cloning is necessary.
This means that in a few simple steps you can regain what you have lost.
This article is intended to help experienced and novice users choose the most convenient program for cloning a hard drive.
comparison table
Read also:How to split a disk into two: Instructions for all operating systems
| Names | Advantages | Flaws |
|---|---|---|
|
Acronis True Image | A large number of options; Russian language; simple interface; selection of operating mode; the presence of a “cloud”. | Paid license |
EASEUS Disk Copy | Multifunctionality; clear interface; completely free; high accuracy when cloning. | Lack of Russian language |
Macrium Reflect | Accessible interface; high speed and compression ratio; choosing a storage location for the image; recording data on optical media; built-in backup scheduler; Free download. | Lack of Russian language |
Paragon Drive Backup | Multifunctionality; tips from the “masters”; support for any Microsoft OS; choosing a storage location; full or partial cloning. | Paid license |
FarStone DriveClone | Free program; work in real time without rebooting the PC; cloning in whole or in part; reliability. | Does not support Windows OS versions higher than 8.1 |
Seagate Disk Wizard | Completely free; Russian-language and accessible interface; OS support Windows 10 / 8.1 / 8 / 7 / Vista / XP 32|64-bit; Two operating modes. | Only for PCs using Seagate and Maxtor hard drives |
AOMEI Backupper | Creating copies without interrupting work; Supports Windows 10, 8.1, 8, 7, Vista, XP; Disk cloning; Full and partial copying; Encryption of copies. | The need to install a localizer. |
Clonezilla | Supports all OS; Free access; Works with most file systems; Possibility of image compression; Record an image remotely and locally. | Lack of Russian language; Run from disk to create images; Backing up individual files and directories is not possible; Only a full backup of a disk or partition. |
| Support Windows 10, 8.1, 8, 7, Vista, XP; High clone accuracy; Supports IDE/ATA/SATA hard drives; Cloning and creation of virtual images. | Multifunctionality and high speed of operation only in armored versions |
Renee Becca | Copying, cloning and restoration; support for Windows 10, 8, 7, Vista, XP, 2000, 2003. | Difficulties in downloading for Windows 10 users; |


Acronis True Image 2018
Read also:Transferring the system to an SSD: Transferring data and operating system

Acronis True Image is one of the most popular backup programs. The program has wide functionality that will help solve many problems with Windows.
More precisely, Acronis True Image is a whole package of various programs. On the official website you can read the instructions and get acquainted with the new products.
The developers are constantly expanding the capabilities of the program and adapting it to the most common user. The presence of the Russian language and a simple interface make the work very easy even for a beginner.
Main functions of the program:
- Protecting your home data. This means that you can not only track all devices (smartphones, tablets, laptops that use one account), but also control them.
- Possibility of data synchronization. This means that a user can have the same data on all computers. In addition, all synchronized data and their versions are stored in Acronis Cloud.
- Disk cloning. A few simple manipulations and the program will create a copy of the disk.
- Ability to backup folders and files. This means you can copy images, videos, audio recordings and other files selectively. That is, there is no need to copy all the partitions that contain these files.
- Possibility of backing up the entire disk. That is, you can make a copy of all the data on the disk.
- Data archiving function. This means that files that are rarely used or large files can be transferred to a removable storage device (external hard drive, USB drive, NAS device) or to the Acronis cloud.
- Ability to create bootable media. That is, you can run the program even on a faulty computer.
- Availability of various tools for connection and protection, security and privacy utilities, management and disk cloning utilities.
Probably the only drawback for the average user will be the presence of a paid license.
Although for such a wide range of functions the fee is 1,700 rubles. not that big.
DownloadVIDEO: An easy way to clone a hard drive or SSD using Acronis True Image
An easy way to clone a hard drive or SSD using Acronis True Image
EASEUS Disk Copy
Read also:TOP 15 Programs for Windows disk defragmentation: choosing the best utility

EASEUS Disk Copy is another fairly “strong” disk cloning program, or rather a set of programs.
The program runs as a boot disk. It is free and has a wide range of features.
- The program is in English.
VIDEO: Cloning Windows from Hard Drive to SSD
How to: Clone Windows 10 Hard Drive to SSD -- EaseUS Disk Copy 3.0
Macrium Reflect
Read also:5 Tips for Configuring the Windows Page File (7/8/10)

Macrium Reflect is another hard drive program.
Main options:
- Does not require a Windows restart (creates a system image on the fly).
- You can choose where to store the created image (optical media, local hard drive, or network drive).
- You can copy data either partially or create a complete disk image.
- High speed.
- High compression ratio.
- Availability of a built-in scheduler for data backup.
- Possibility of recording to CD/DVD.
The utility has a simple and accessible interface, but in English.
DownloadParagon Drive Backup
Read also:The computer does not see the hard drive - what to do?

Paragon Drive Backup is another multifunctional tool that allows you to clone data.
The developers tried to “invest” as many possibilities as possible into the program. Paragon Drive Backup was created to forget about the possibility of losing data.
Main features:
- Availability of a user interface controlled by “masters”. This means that you don’t have to waste time studying instructions, since all actions are accompanied by hints.
- If the system fails, you just need to restore the backup (which will take a few minutes) and you can continue working.
- A context-sensitive help system is provided for all program options.
- Compatible with Microsoft operating systems.
- Compatible with any computer equipment.
- Ability to select data storage location.
- Backing up absolutely all data (including system settings and partition information) with subsequent saving.
- The ability to clone both individual segments and the entire disk.
- Work in real time, without rebooting the system.
- All data can be transferred to any removable media or to another PC hard drive in the form of a compressed archive.
- Ability to clone large disks.

FarStone DriveClone is a free utility that is simple and reliable. The main function of the program is hard drive cloning.
Main options:
FarStone DriveClone does not have multifunctionality, but it performs the main task. But there is a significant drawback: the program does not support Windows older than version 8.1
.It is also worth mentioning the FarStone RestoreIT Pro version of the program.
The program is very simple and easy to understand. But there is one limitation: it is only suitable for PCs that use Seagate and Maxtor hard drives.