Network locations windows 8.1 how to remove. How to fix deleting network locations. The importance and necessity of changing privacy settings
This article will help you quickly answer your questions. Also, you can study the material in full to get a complete understanding of the network setup in Windows 7.
Introduction.
Purchasing an operating system Windows 7, the user must be prepared for the fact that sooner or later he will face the task of setting up the network in the operating system. For some, this task is not difficult. Typically, installing and configuring a network in Windows 7 is the next step immediately after installing Windows 7 ( If you haven't installed Windows 7 yet and aren't quite sure what steps to take, then you should read this section: Installing Windows 7).
The network setup step is required for the following post-installation steps:
- downloading actual distributions of anti-virus programs from the Internet;
- downloading the latest versions of the video player, web browser;
- if necessary, downloading from the network drivers for some devices on your computer (if they were not downloaded and installed automatically, or if there are no installation disks);
- use of the XBOX console;
- document exchange and quick access to shared resources of multiple computers or laptops. In this case, you need to set up a wired or wireless network in order to use the Internet. As a rule, one computer or laptop serves as a kind of Internet distributor for all other pieces of computer equipment..
The same is true for MAC addresses and subnet masks. All these settings remain the same, they are familiar to users for a long time. Some changes have only affected the interface of the Control Panel and its items, with the help of which the network settings are accessed. Everything else without significant changes. This is another undoubted plus of Windows 7. Users who have previously used Windows XP will be able to understand the new operating system quite easily. As a rule, setting up a local network in such popular operating systems as Windows Vista, Windows 7, Windows Server 2008/2008 R2 begins with such a component for configuring network properties as "".
This property configuration tool allows the user to select a network location, set up printer and file sharing, and view a network map. You can also monitor the status of all your network connections. It is very convenient and practical.
How and where to open the Network and Sharing Center component.
Before you can use the full functionality to create network settings, you need to find and open it. One of the following actions of your choice will correctly open the active window " Network and Sharing Center»:
As you can see, if you are careful and read everything, then with the search for the "Network and Sharing Center" component, there should not be any problems. It should be noted that in order to expand the ranges of IP addresses used in Windows 7, in addition to the pre-existing IPv4 protocol, a new one was added - IPv6. True, providers have not yet activated it, and when this will happen is currently unknown. Most likely, the creators of Windows 7 played ahead of the curve.  Figure 1. The illustration shows the Network and Sharing Center window.
What is the network location of the computer.
Understand what is network location”, you need even before you start working with this important component. For all computers, this setting is set automatically the first time they connect to the selected network. This also applies to the firewall and security settings of the network selected for connection. All of them are also configured automatically during the first connection of a computer or laptop to the network.
The Windows 7 operating system supports multiple active profiles at the same time. This allows for the most secure use of multiple network adapters that can be connected to different networks.
By the way, Windows Vista uses the most restrictive firewall profile for all network connections. Perhaps that's why Vista isn't as popular as Windows 7.
There are four main types of network location:
| The first type is the home network. From the very name it becomes clear that this network location is intended for a computer that is used at home. It is also used in networks where all users know each other well. Such computers can not only create, but also join home groups. As a rule, for the convenience of users when using home networks, network discovery is turned on automatically. Home networks provide all computers with quality network access. | |
| The second type is a network of an enterprise or organization. This type of network location also allows you to find the network automatically. The difference from a home network is that in an enterprise network, you cannot join or create a computer to a homegroup. The network is intended exclusively for professional activities in an enterprise, organization or office. This type is called abbreviated (SOHO), that is, it is used in a small office network. | |
| The third type is the public network. Cafes, airports, train stations and other public places - this is where computers use the third type of network location. By default, the ability to join homegroups is disabled in this location. Network discovery is also disabled. Without exaggeration, we can say that this is the most strict arrangement. | |
| The fourth type is a domain network. The domain type of the network location is almost no different from the working network. Except that in the domain type, the network discovery and Windows firewall configuration is determined by group policy. This also applies to the network card. In order for an existing network to automatically receive a network location type of "Domain", the computer only needs to be joined to an Active Directory domain. Only in this case the network can become a domain network. |
 Figure 2. Selecting the network location of the computer.
Network map.
In order to see the location of all devices included in a particular local network, a network map is used. This is a graphical representation of the devices included in the network and the scheme by which they are connected to each other.
You can see the network map all in the same "Network and Sharing Center" window. True, only the local part of the network card is displayed here. Its layout is directly dependent on the available network connections. In the upper left corner, you can see the display of the computer on which the map is being created. On the left you can see the display of the remaining computers included in the subnet.
 Figure 3. An example of a network map.
You can view the network map at any time. True, only for locations such as "Home Network" and "Company Network". If the user is curious to view the maps for the "Domain Network" or "Public Network" locations, they will see a message that the network message has been disabled by default by the administrator. A network administrator can enable mapping through Group Policy.
In Windows 7, not one, but two components are responsible for the operation of the network map. This Link layer(Link Layer Topology Discover Mapper - LLTD Mapper). It is this important component that queries the network for devices to be included in the map.
Network connections.
In the window " Network connections"You can see the entire set of data that the user needs to connect the computer to the Internet, local network or any other computer from the home network.
This data is available for viewing only after installing all the necessary drivers for each network adapter on Windows 7 and after automatically configuring all network connections on a specific local computer or laptop.
There are several simple and affordable ways with which you can easily and quickly open the " Network connections»:
- Opening the window " Network and Sharing Center"and follow the link" Change adapter settings» (see figure 4);
 Network and Sharing Center""." href="/upload/nastroika-windows-7/windows-7-nastroika-seti-img-7.png">
Figure 4. Opening the window " Network connections" across " Network and Sharing Center».
Network and Sharing Center""." href="/upload/nastroika-windows-7/windows-7-nastroika-seti-img-7.png">
Figure 4. Opening the window " Network connections" across " Network and Sharing Center».
- Click the "Start" button and when the menu opens, enter "View Network Connections" in the search field. In the results found, select the application "View Network Connections" ( very convenient way);
- You can also use the classic keyboard shortcut Win+R. This will open the Run dialog. In the "Open" field, which is located in the "Run" dialog box, you must enter the following command: ncpa.cpl or control network connection. Having done this, you need to click the "OK" button.
 Figure 5. Network Connections window
Window " Network and Sharing Center” similar to the Windows XP window. All detailed information about the network connection can be obtained by selecting the "Properties" option for a specific network adapter (see Figure 6). In Windows 7, to configure the network connection in the "Properties" window, you need to select "Internet Protocol Version 4". In the same window, you can also make the necessary settings for gateways, subnet masks, DNS servers, IP addresses, etc. All this information can be obtained from the provider that provides the Internet access service.
 Figure 6. Network connection details.
Rename the network adapter.
The developers of Windows 7 made sure that by default the operating system itself names all network connections "Local Area Connection" or another option - "Wireless Network Connection". If a user's computer has more than one network connection, the system also assigns a number to the connection. There are three ways to rename the name of any of the connections you have created.
- First way. Select a network connection and click on the "Rename connection" button located on the toolbar. After entering a new name, press the key Enter;
- The second way. With key F2: press, enter a new name and save using the same key Enter;
- The third way. To rename the network connection selected from the list, right-click on it, select the “Rename” command from the context menu that appears, rename and save the changes using the already familiar key Enter;
Network status.
In addition to the ability to rename the connection, you can also check the status of the network in this window. Using this window, which is called “Network Status”, at any time you can not only view any data about the connection network, but also find out details such as MAC address, IP address and many other useful and interesting information.
There are providers that allow users to access the Internet using the MAC address of the network card. If for some reason the network card has been changed or the entire computer has been replaced, the MAC address will also change, and Internet access will stop. For a new Internet connection, you must set the required physical address (MAC address).
How to see the MAC address of a network card in windows 7?
To view the current MAC address, as well as complete information about the connection, you need to right-click on the local network connection, and then select the “Status” item in the context menu that opens (see Figure 7). Figure 8. How to change the MAC address of the network card (network adapter).
Network diagnostics.
If you encounter a situation where unexpected errors or failures occur in the operation of your network connection, you can resolve them using connection diagnostics. The diagnostic tool can be found in the Network Connections window.
Select window " Troubleshooting”, which, by analyzing the connection status, offers a choice of possible malfunctions and troubleshooting methods. To start diagnostics, you need to right-click on the network connection and select the "Diagnostics" command in the context menu.
 Figure 9. Opening the Local Area Connection Troubleshooter.
The second way to start checking the network connection parameters is to select the desired network and click on the "Connection Diagnostics" button. The button can be seen on the toolbar.
In the dialog box that opens, to diagnose the connection, just follow the steps of the troubleshooting wizard. Nothing complicated.
Disabling the network device (network adapter).
Sometimes there are situations when network connection problems are not solved using the troubleshooting wizard, but by simply disconnecting the network adapter from the computer. This can easily be done by doing one of the following:
- Select a network connection and click on the "Disconnect network device" button located on the toolbar;
- Right-click on the network connection and select the "Disable" command in the context menu that appears;
Conclusion.
The article details how to configure, connect and diagnose network connections.
If you have any doubts about your own ability to configure and connect the network, then it is better to seek help from specialists, or read the article carefully again.
Why know how to delete a WiFi network in windows 7? Typically, this operation must be performed if the connection configuration has changed. For example, you have set a new password or selected a different encryption method. The system remembers the old configuration, so when you try to connect to the Internet, an error will pop up. The easiest solution is to forget or delete the connection, then re-find it and quietly connect.
Standard delete
In windows 7, everything is quite simple: you can remove unnecessary connections in the special section "Control Panel".

The network profile has been deleted. Now you can start a new search and, when the desired access point is found, connect with the changed parameters.
In windows 8.1, the Wi-Fi removal procedure has undergone minor changes. The "Delete" function in the "Change adapter settings" section for a wireless network is not available, and you will not find the list of access points itself here.
You may encounter a similar situation if you need to delete an unidentified network in windows 7, but in this case everything is much simpler:

The connection you selected will be removed from all available lists.
Using the command line
You can also get rid of unnecessary Wi-Fi networks that were once detected by a computer, but are no longer used, using special commands.
- Press Win+R to launch the Run menu. Type the command "cmd.exe" and press Enter.
- The first prompt on the command line is "netsh wlan show profiles". It allows you to display a list of all available profiles.
- To delete a specific profile, enter a command like "netsh wlan delete profile home", where "home" is the name of the network to be deleted.
If you want to completely clear the list of discovered access points, use the "netsh wlan delete profile *" command. All saved Wi-Fi profiles will be erased from your computer's memory.
Deleting files
If you like unusual ways of managing a computer that are little known and rarely used, then you can try deleting wi fi in windows 7 directly from the folder where the profiles are stored.
All Wi-Fi profiles are stored in the %ProgramData%\Microsoft\Wlansvc\Profiles\Interfaces directory as *.xml files.
You can open such a file using a standard notepad. Identification is made by the line "name", where you can find the name of the access point.
Delete the file - the profile of the same name will disappear in the list of Wi-Fi networks. True, the process of searching for the desired file may be somewhat delayed, so it is better to use the methods described above and delete Wi-Fi networks using the command line or the forget function.
mysettings.ru
Removing an unidentified network in windows 7
 The question of how to remove an unidentified network in windows 7 can confuse even experienced users. If you have found a similar problem on your computer, due to which you have lost access to the Internet, try using our guide.
General information
Let's make a reservation right away: deleting a network connection in windows 7 is much easier. You just need to go to the "Network Control Center", find the extra connection, right-click on it and select "Delete".
As for the unidentified network that prevents you from connecting to the Internet, here you need to perform an order of magnitude more steps. But first, let's look at the possible cause of this problem.
Disabling the Bonjour Service
Most often, the appearance of an unidentified connection is associated with the activity of the Bonjour service, which is automatically installed on the computer along with graphic editors and multimedia applications.
Therefore, the first way to remove an unidentified network is to disable the Bonjour service.

Apply the changes and restart your computer. After starting the system, the Internet connection should be made in normal mode.
Deleting a network
If disabling the service did not work, try setting up the Internet on windows 7 in another way.


Another way to remove an unidentified network:
mysettings.ru
How to remove hidden (old) network connections
How to remove hidden (old) network connectionskolyasegOctober 16, 2012Every time you install drivers for a network card or create a new connection, windows is so strongly attached to them that it cannot part, even if you remove the device or connection in a way that is visible to you from « Device Manager or from the Network and Sharing Center. And when you create a new connection or add a new network card, its internal name is automatically assigned an additional number, which increases by one each time: #2, #3, etc. Let's try to get rid of these phantom devices and connections.Finding environment variables. To do this, Right click on My Computer - Properties - Advanced System Settings - Environment Variables:

In this window, in the "User Environment Variables" or in the "System Variables" add another variable DEVMGR_SHOW_NONPRESENT_DEVICES and assign it a value of 1. This trick adds a new item to the "Device Manager" that allows you to display hidden devices. Go to "Device Manager" - View - Show hidden devices:

Now in the list of devices there will be new ones highlighted in pale font. These are devices and connections that were once installed on the system but are no longer used. windows stubbornly stores entries in the registry and drivers for them, and now you can work with them in the usual way, including deleting them as unnecessary.
Tip: make a backup of the system before manipulating the removal of devices! Everything you do with your computer, you do at your own peril and risk)
kolyaseg.livejournal.com
Delete Wi-Fi network on windows 7
I often get questions about how to delete a wi-fi network on a computer with windows 7 operating system. In this article I will try to answer this question in detail, and show how to delete information about the desired Wi-Fi network in the wireless network settings.
Let's first try to figure out why this is needed at all. In fact, simply by deleting the wireless network on a laptop or desktop computer, you can solve a lot of problems with connecting to a Wi-Fi network on windows 7. And the main problem is when you change the password for Wi-Fi, or the network name in the settings router, and the laptop after that does not want to connect to Wi-Fi. You get the error "windows could not connect to...", or "The network settings stored on this computer do not match the requirements of this network." I will prepare separate articles about these errors, but I can say that they are usually solved by removing the network and reconnecting.
When you connect your computer to Wi-Fi, it remembers the network settings (name, password, etc.). After changing these parameters, he can no longer establish a connection with the router. Therefore, you just need to delete the network information and re-establish the connection. In windows 8, it's even called "Forget Network".
Perhaps deleting a wireless network is still useful in the case when you do not want your computer to automatically establish a connection with some wireless networks.
Delete a wireless network in windows 7
Click the Internet connection status icon on the taskbar and select Network and Sharing Center.

A list of all Wi-Fi networks to which you have connected your computer will open. Find the network you want to delete from the list, right-click on it and select Delete network.

After deleting the network, open the list of available networks and reconnect.

After these steps, problems with connecting to the wireless network should disappear. I plan to write another detailed article for windows 8 and mobile devices.
Windows 10 - all instructions for setting up the Internet and solving problems Setting up a router - instructions for different models and manufacturers Useful programs - for configuring HotSpot, Wi-Fi, 3G / 4G modems.
Subscribe to help-wifi.com
help-wifi.com
How do I delete a wireless network connection and reconnect to Wi-Fi?
Hello friends! Very often, when responding to comments on this site, I have to explain how to remove the wireless network connection on a laptop (netbook), or on a computer with a Wi-Fi adapter. And then reconnect to the wireless network by entering the password to access it.
Why do I need to delete a Wi-Fi network and reconnect to it? Very often, such a procedure is necessary if you have changed the password on the Wi-Fi router, or changed the type of security or encryption. I wrote about how to change the password on the router in the article How to set (change) the password for the Wi-Fi network on the TP-Link TL-WR841N router.
Just after you change the password, or the type of security (encryption), the computer will most likely refuse to connect to Wi-Fi. It may just take a long time to connect, and then some kind of error will appear. It is possible that the error “windows could not connect to ...” appears (by the way, I wrote about this problem here). It is also possible the problem of identification and all sorts of different errors. If you have problems connecting to Wi-Fi, I advise you to delete the connection and reconnect. Now I will tell you how to do it in windows 7.
Go to Control Panel\Network and Internet\Wireless Network Management. You can do this: right-click on the connection status in the notification panel and select "Network and Sharing Center".
On the left, select Manage Wireless Networks.

Right-click on the desired network and click on Delete network.

Everything, the network is deleted. You can reconnect and enter a password (possibly a new one).
Click on the connection status in the tray. And among the networks available for connections, click on your network. Click Connect.

Enter your password and click Ok.

Everything should connect and I hope it works fine :).
Good luck!
Today we will look at an example of how to get rid of unnecessary local and wireless network connections. Many of you have come across the fact that on business trips, traveling, walking around the city, we have new network connections. It is worth going to a cafe, connecting to Wi Fi, and immediately the inscription “Connecting Network 2” appears.
By and large, such connections do not affect the performance of a laptop or computer in any way. You can live with them in peace and not notice. But there are people, like me, who are annoyed by what is not used. It is for such people that this article is written.
The other day, while testing another Wi-Fi modem, the computer happily announced that the “Network 5” connection had been created. And when I started having problems with the game, and I had to install a VPN with a virtual network card, the laptop, with malice and joy, announced that the Network 6 network connection had been created. After that, I decided that it was time to take action, and specifically, to remove all unnecessary connections.
The whole problem is that Windows 10 does not allow you to safely delete unused networks. It just doesn't show them anywhere. There is no way to enter network connections and delete unnecessary networks. Yes, there is one possibility - to delete them immediately after use. Let's say you connected to Wi-Fi in a cafe, used the Internet, and before you left, you selected connections and clicked "Forget this network." The only problem is that there is not always time for this operation. Yes, and we do not remember about it until it is pressed.
The situation is much worse with local connections. You just need to change the modem and you will have a new network. Absolutely any new equipment, and the laptop will warn you about the creation of a new "Network X". And now you can’t get rid of this network so easily. You won't be able to "Forget the network" anymore. And nowhere in the settings for network connections is there such an option. Well, let's get rid of our unnecessary network connections. The fact is that removing unnecessary wireless and local connections is different. Even though you have to use crutches. Therefore, we will first get rid of unnecessary wireless network connections, then we will get to local ones.
Removing unwanted wireless connections
As we have already found out, in Windows 10 there is no way to delete unnecessary network connections through the menu. Therefore, to remove them, we will use the command line.Recruiting cmd to bring up the command line. Now we need to find out what wireless network connections we have. To do this, enter the command - netsh wlan show profiles After the command, we will see all the profiles of wireless networks that we do not have. I wrote the article after cleaning, so I only see one main network. After the first check, several dozen networks were discovered. Now, after we know which networks we have registered, let's remove the unnecessary ones. To do this, we need the command - netsh wlan delete profile name="profile name" Instead of "profile name" we drive in the name of the network we do not need. This way you can get rid of all unnecessary wireless network profiles.
There is another way that we will not consider - editing the configuration file. The fact is that without knowing the basics of xml, you can only spoil the wireless network settings, and not get rid of unnecessary networks. Therefore, it is easier to do everything using the command line.
Removing unnecessary local connections
With local connections, things are much worse. If unnecessary wireless connections do not affect the operation of our device in any way, and do not display annoying inscriptions, then with a large number of unnecessary local connections, problems with DHCP may appear, the inscriptions “Network 2”, “Network 3”, “Network 4”, etc. .d., which is annoying.We will have to remove unnecessary local network connections using the registry editor. To do this, in the search we prescribe regedit. In the registry editor that opens, go to the address - HKEY_LOCAL_MACHINE\SOFTWARE\Microsoft\Windows NT\CurrentVersion\NetworkList\Profiles There we find folders with registry keys. At the very bottom, in paragraph ProfileName we see a value that corresponds to a network connection in " Network Control Center". In field " Category"We see what type of network our connection corresponds to:
0. Public network
1. Private network
2. Domain network
We are looking for networks that we do not need and delete the entire folder with registry keys from this network. Also, if you wish, you can rename the network and change its type by editing the keys " ProfileName" And " Category". After deleting or editing registry keys, restart the computer.
A local network is often used for work purposes, when a user of one PC needs to quickly access a specific file or disk of another device. However, in private use, such a network is also quite useful. For example, if you have two computers or laptops, then you can transfer data via a local network, and not using removable media. It is much easier, faster and more reliable.
How to create and configure a local network in the Windows 10 operating system?
Earlier we wrote about how to create a homegroup on a PC running Windows 10. To create a local network, we need a workgroup, and all the PCs that you are going to connect to the local network must have the same names. You can check the name of the working group in the following way:
- Press "Win + R" and enter "sysdm.cpl".
- The System Properties window opens. Look at the name of the group. If you need to change the name, click on the appropriate button.

After the name of the working group on all PCs is the same, perform the following steps.
- Go to the "Control Panel" and select "Network and Sharing Center" or click on the network icon on the taskbar.

- Select "Change advanced sharing settings" from the left menu.

- For all Win 10 profiles, you need to enable network discovery, file and printer sharing, automatic configuration.

- Password protection can be removed so that PC users can easily connect their device via LAN.

The preparatory phase is over. As a result of the actions taken, all computers must have the same workgroup name, network discovery enabled, file and printer sharing enabled. These actions are aimed at ensuring that computers are connected to the same router. In some cases, it is required to register a static IP address in the subnet in the connection properties.
Now, in order to provide access to disks on a PC over a local network, you should do the following:
- We are looking for a folder that we want to make available to other users and right-click on it and select "Properties".

- Go to the "Access" tab and select "Advanced settings".

- Check the "Share this folder" checkbox. Click the "Extensions" button.

- We set the access parameters to the folder: read, full access or change.

- We return to the properties of the folder. Go to the "Security" tab. Click on the "Edit" button, and in the new window - "Add". Select "All".
- We restart the computer.
- To access this folder, you need to go to "Explorer". Here, in the left menu, select "Network" or your group. Open a shared folder.
How do I change the network type from public to home or vice versa?
To change the network type or network location on Windows 10, you need to follow these steps:
- Click "Start", "Settings" and select "Network and Internet".

- If you are using a wired connection, then go to the "Ethernet" section. If the adapter is disabled, then the tab will be inactive.

- In the next window, if you want to make the network private, then drag the slider to the "Enabled" position. Thus, you will change the type of public network to home.

- In the case when you use a wireless Wi-Fi network, then go to the appropriate section. In the new window, select "Advanced Options".

- In the next window, you need to drag the slider to the "Enabled" position to make the network private or to the "Disabled" position to make the network "Public".

You can also change the network type using the command line. To do this, enter the following commands in PowerShell:
- get-NetConnectionProfile
- Set-NetConnectionProfile -InterfaceIndex interface_number -NetworkCategory Public - a command for a public network, where instead of the interface number we insert “InterfaceIndex X”, which we look at in the results of running the first command.
- Set-NetConnectionProfile -InterfaceIndex interface_number -NetworkCategory Private – private network command.

- After restarting the computer, the network type will be changed.
How to map a network drive in Windows 10?
In order not to climb into a network connection every time, once again open tabs, Win 10 folders can be thrown into a disk and simplify the speed of working with the system. A network drive is designed for this purpose. To connect it to Windows 10, follow these steps:
- In the Start menu or on the Metro tiles, look for the My Computer icon and right-click on it. Select "Map Network Drive".

- Next, in the new window, select the drive letter and specify the folder that you want to make a network drive. To do this, click "Browse" and specify the path to the folder.

- After we click "Finish". The disk is ready to use.
What to do if the PC does not see the network or it disappears?
After upgrading to Win 10, many users have encountered a number of errors related to connecting a computer via LAN. Such errors appear in the fact that the PC does not see the network, or sees computers, but does not give them access. Also, the network may disappear. What to do in this case?
If your network disappears or the PC does not see it at all, perform the following steps:
- Open Notepad.
- Enter the following characters.
Windows Registry Editor Version 5.00
"AllowInsecureGuestAuth"=dword:00000001

- We save the file with the .reg extension.

- After making changes to the registry, we recommend that you restart your PC.
If the PC does not see the network after the registry tweak, check the connection cable, group name. It may also be that the changes made in the "Network and Sharing Center" did not take effect. To do this, you need to restart your device.
If your PC sees the network, but does not allow you to perform any actions, then you should update the network card drivers. We also recommend temporarily disabling the antivirus, as it can block other devices from accessing the local network.
What to do if Dune does not see network folders in Windows 10?
The popularity of the Dune prefix has not fallen over the years. But with the upgrade to Win 10, many users have encountered a problem where Dune sees the computer on the network, but cannot display files and folders. There is a solution to this problem.
- In the Control Panel, namely in the homegroup settings, you need to specify which folders you want to allow for sharing. You may not have specified separate folders for the Dune prefix.
- Install the FTP data transfer protocol on your PC and share folders for Dune.
- Disable the firewall, which can block access to the media player.
- We make the correct connection, namely: connect the LAN connector of the Dune player to the router, turn on the power of the player and wait up to 3 minutes until the media player receives an IP address.
- As soon as the menu appears, select "Pop up menu". Next, select "Create a network folder".
- Enter the parameters of your network drive or look for them in the "Network Browser" item. The network drive should be listed here.
To access folders, files, and drives on a Win 10 PC, enter "ftp://ip_address" or "\\ip_address" in Windows Explorer, where "ip_address" is the player's IP address.
How to fix error 0x80070035 when network path not found in Windows 10?
Error 0x80070035 that Windows 10 users are experiencing indicates that the application that is responsible for accessing the Internet cannot find the network path. That is, the network is not detected and the program crashes.
To set up a local network and get rid of error 0x80070035, you need to find out what type of host is used. To do this, in the Win 10 command line with administrator rights, enter "ipconfig / all".

The following window will appear. Looking for node type.

If you have "Single Peer Node Type", then error 0x80070035 may occur. To fix it, go to the registry editor. To do this, press "Win + R" and enter "regedit".

Next, follow the branch "HKEY_LOKAL_MACHINE\System\CurrentControlSet\Services\NETBT\Parameters". We find and remove parameters such as "NodeTYPE" and "DhcpNodeTYPE". Reboot the PC for the changes to take effect.
Many people who are just starting to master a computer are not familiar with the concept of "network type". When they connect to any point on the Internet, they do not know which one to choose: public or private. What are the characteristics of these types of networks? Which one to stop? Are there any other types? How to change the type if necessary if you have Windows 10?
Network type: what is it
In various versions of Windows, in particular, starting with Vista, users have the right to choose the so-called network profile. This is the network type. Its third name is "network location" - the official term used by Microsoft.
A network profile is a special set of settings for two standard Windows services: Local Security Policy and Firewall. After enabling a particular profile, these services are reconfigured themselves to provide the same level of security that the newly activated network type corresponds to.
Thus, it is necessary to determine the type of network in order to ensure the security of the computer in certain conditions of using the Internet. The network location is selected based on the location where the device is located (home, coffee shop, work, etc.).
What types of networks exist
Windows users can choose from the following types of networks:
- "Private network". This type had a different name before the advent of Windows 8 - "Home Network". OS clients use it mainly at home, where users and devices trust each other. In this regard, the “OS” sets a low level of security: it activates the detection of devices that are at a short distance from each other (that is, they see each other), access to shared network documents and printers is allowed. A computer rarely reminds its users that care must be taken to keep the computer safe. In this profile, it is possible to assemble your own "Homegroup" - the union of several devices under the control of an administrator, who can prohibit some users from accessing certain shared resources, while allowing others, on the contrary. In "Private Network" devices see each other and can exchange data
- "Work Network" or "Enterprise Network". This profile is very similar to the "Home Network", as the level of trust is the same here: users can freely print text and other files on the printer, as well as open shared documents. This network has a system administrator who monitors security. The only difference is that you cannot make a “Homegroup” in the “Work Network”, therefore, if the latter is not necessary, it does not matter which one to choose - home or work.
- “Public Network”, “Public Network”, or “Shared Network”. By name, you can determine the places where this type is used: airports, libraries, cafes, cinemas, etc. This profile protects the computer as much as possible: it becomes invisible to other devices that are nearby, which means it is extremely difficult to access it. Also, the system is effectively configured to repel virus attacks and unauthorized intrusion into the PC memory. Obviously, in this type you can not make a "Homegroup", since it completely excludes the sharing of shared data and devices (for example, printers), as well as file transfer. "Public network" must also be set if you are using a mobile connection.
 The Public Network profile is used in crowded places: cafes, restaurants, airports, libraries, etc.
 - Domain network. It is installed at workplaces in various organizations. This network location provides centralized control and management of computers in a large enterprise. There is always a master PC here - the "Domain Controller", which determines which files this or that slave computer will have access to. In this type of network, the host PC also decides which sites users can visit and which not.
 In the "Domain" network, computers are subordinate to the main device - "Domain Controller"
Since the “Public Network” has the highest security level, when you create a new network on a PC (the first time you connect to it), the system wants to assign it a public type by default. A panel appears on the left side of the PC screen, where the system asks the user if he wants other devices to see his PC.
 Allow or block devices from discovering your PC
 If you click on the "Yes" button, the system will enable the "Private network" profile. When you click on the "No" button, the computer will work in the maximum security level mode, that is, in the "Public Network".
In Windows 10, "Work Network" and "Home Network" have been merged into one - the "Private" profile.
How to change network type on Windows 10
Even in the "seven" users had the opportunity, if necessary, to change the network profile directly in the "Network Control Center" window, which was launched through the "Control Panel". In the "ten" you need to use other methods for this purpose.
Through Windows settings
For beginners, the best way is to change in the Windows settings themselves, in particular in the "Options" window. How to launch it on the screen and in which sections to open it? Let's take a closer look at the instructions:
- We click on the "Start" button, which is located in the lower left corner, to launch the system menu of the same name. In it, click on the gear icon located above the button to turn off the PC.
 Click on the gear in the Start menu to open the Windows Settings window
 - As a result, a large Windows Settings window will appear on the screen. It can be called with a special keyboard shortcut: Win + I. Among all the tiles, select "Network and Internet", which is located in the first row of the fourth.
 Click on the "Network and Internet" tile
 - Switch to the Ethernet block and click on the network you are connected to.
 Click on the current network in the Ethernet tab
 - On the page that opens, choose between "Public" and "Private" depending on what level of security you need to surf the Internet. You do not need to restart the device after making changes: they take effect immediately.
 Choose one of the two options: "Public" or "Private"
Through the "Local Security Policy" window
Changing the network type is also possible in the window where various security policies are available. Let's consider the procedure step by step:
- To launch the window we need, we hold down two keys: Win and R. In the universal window for launching standard Windows panels, we write the secpol.msc code. After that, click on OK or on Enter on the keyboard.
 Paste secpol.msc into the "Open" field
 - If the first launch method does not work, use the second one. Call the "Control Panel" and find the "Administration" object in the list. If the display mode is "Small icons", the section will be the first in the last column.
 Find "Administration" in the list
 - In Windows Explorer, find the item "Local Security Policy" and double-click it.
 Double-click the Local Security Policy window
 - In the window, go to the fourth block called "Network List Manager Policies". In a small list, the last item will be your network. We click on it once with the right mouse button to open a menu with options, in which we select the "Properties" item.
 Select the first item "Properties" in the context menu
 - Here we already switch immediately to the last block "Network location". If you want to set a private network profile, for the first parameter, select the second value "Private": put a round mark to the left of it. For the “User Permissions” item, a third value is required.
 In the "Network Location" tab, select "Private" and "User cannot exclude location"
 - Click on "Apply", and then on OK, so that all the changes made are immediately saved.
- If you, on the contrary, want to make the network public, check the round box next to "General". In the second, put a value with the ability to change the location.
Using the "Registry Editor"
This method is suitable for more advanced PC users, as it involves working in the important Windows service "Registry Editor", on the coordinated work of which the functioning of the device itself depends. Editing entries here must be as careful as possible, clearly following the instructions:
- Again we open the already familiar “Run” window due to the combination of the Win and R keys. This time we print a simpler code to launch the “Registry Editor”: regedit. Now press Enter or OK.
 Write a regedit command in the Run window
 - We allow the editor to make changes on the device by clicking on the "Yes" button.
 Click on the "Yes" button to allow the "Registry Editor" to make changes to your device
 - In the left narrow panel of the window, double-click on the third HKLM branch.
 Open the HKLM branch in the editor window
 - Now you need to carefully open the following blocks in strict sequence: SOFTWARE - Microsoft - Windows NT - CurrentVersion - NetworkList - Profiles.
 The Profiles section will contain one or more folders corresponding to the networks your PC has connected to
 - The last open partition must contain at least one folder. As a rule, there are much more of them in the list. Each of them corresponds to a particular network to which the device was previously connected. The system gives them names in the form (95476…..E08).
- The user's current network usually comes first. To verify this, note the "Value" of the last parameter in this folder called ProfileName. It must match the name of your network.
 Select the desired folder from the available ones using the ProfileName entry
 - When you have found the desired folder in the Profiles block, open it and look for the Category registry entry. She will be at the top of the list. Click on it with the right mouse button or double left mouse button. In the first case, in the small gray context menu, click on "Edit".
 Select the Edit option from the context menu
 - A window will open on top of the editor. In the line "Value" we write one of the following numbers, depending on what type of network you want to install:
- 0 - "Public network";
- 1 - "Private network";
- 2 - "Domain network".
- Click on OK, close the window and restart the device.
 Enter the required number in the "Value" line
Via PowerShell
The standard Windows PowerShell utility is an alternative to the "Command Prompt", with which users can perform a wide variety of actions on a PC: from launching applications to changing system settings. PowerShell allows you to install another network profile using certain codes:
- Launch the panel called "Windows Search" through the magnifying glass icon located to the right of the "Start" button. In the line we print the PowerShell query. The system will immediately display the desired service in the search results.
 Write a PowerShell query in the search bar
 - We click on it with the right mouse button and in the gray menu click on the first option "Run as administrator".
 In the gray menu, select the option "Run as administrator"
 - We allow the editor to make changes on the computer: click on "Yes".
- First we need to know the index of your current network for which you want to change the type. To do this, you need to insert a short get-NetConnectionProfile command.
 In the PowerShell window, paste the command get-NetConnectionProfile
 - The system will display the required data on the screen. We remember the number of the InterfaceIndex parameter.
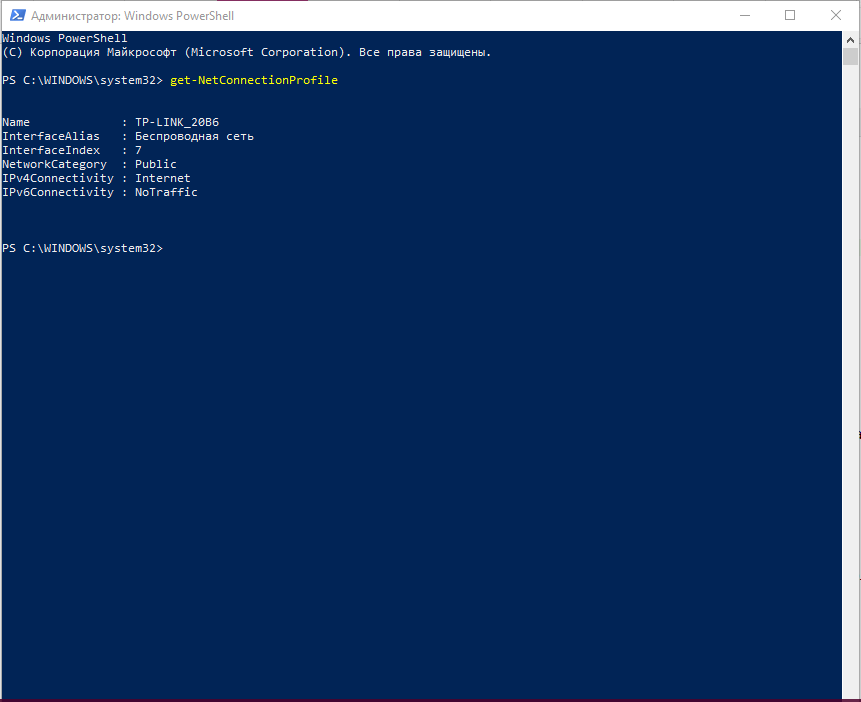 Remember the number in the InterfaceIndex parameter
 - Now it's time to change the network profile. If you want to set "Public Network", copy and paste the following code, which is longer: Set-NetConnectionProfile -InterfaceIndex "Interface Number" -NetworkCategory Public. Instead of a number, you need to write the number that you memorized in the previous step of this instruction.
 Enter the command Set-NetConnectionProfile -InterfaceIndex "Interface Number" -NetworkCategory Public and insert the number corresponding to the InterfaceIndex parameter
 - If, on the contrary, you want to make the network private, instead of Public, type Private at the end of the code. We also insert an individual interface number.
 Change the command from Public to Private to enable "Private Networking"
 - To execute the code, you just need to press Enter on the keyboard. All changes will take effect immediately.
Video: how to install a different network profile in Windows 10 using different methods
How to set the network type for Wi-Fi
You can also set a different type of network connection to a Wi-Fi hotspot in the Windows Settings window. However, here it is necessary to use another section corresponding to wireless networks. The procedure is simple and will not take much time:

Which type of network to install depends on where you are at the moment. The "public network" is the most secure, as public places are the most likely to be subjected to virus attacks and hacking. The "Private" profile can be selected if you are at home or at work. You can change the type at any time in several ways. The easiest and most convenient way is through the Windows Settings window.