How to insert music into a presentation. How to Insert Audio into a PowerPoint Presentation Insert Audio into All Slides in a Presentation
Inserting audio into PowerPoint 2013 presentation slides is easy and simple. To add an audio file to a presentation slide with hard drive you need to do the following:
1. With your presentation open, click the tab Insert.
2. Select the slide to which you want to add an audio file.
3. Click the button Sound in Group Multimedia on the control ribbon. A list will open with possible ways adding sound files:
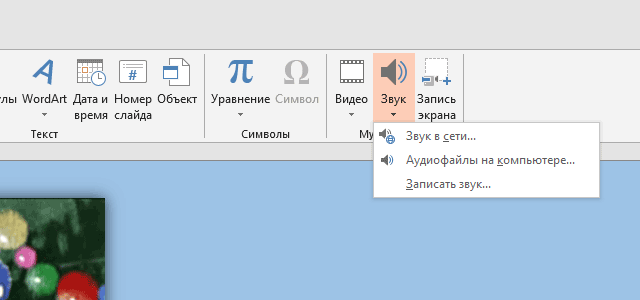
4. Select an item Audio files on your computer to add an audio file from your computer's hard drive. A dialog box will open.

5. Select the desired audio file on your hard drive and click the button Insert. An icon will appear on the presentation slide sound file in the form of a loudspeaker.

6. Click on the audio file icon and hold left button mouse, drag the icon to the desired location on the slide.
7. To listen to the audio file, click the Play/Pause button. To adjust the sound volume, click the mute or mute icon and drag the scroll bar until you reach the desired volume.
It turns out that inserting sound into slides is very simple. Now, when this slide is launched, the audio file we have selected will be played.
If you don't like the sound file, you can quickly delete it. To do this, click on the sound file icon and press the key Delete.
This is not the first time, due to the specifics of my work, different people ask me the same question - “how to add music to a presentation?” And further with variations - either you need it to play only on one slide, or you need it to play the entire presentation without stopping (in the background, so to speak). Well, I’ll try to answer this question :)
So, from the last lesson we already have a presentation template. Let's figure out how to add music to it. Go to the menu Insert->Video and Sound. A window appears in which we select which file we will open:
A speaker icon will be automatically inserted into the previously selected slide, indicating that the track is inserted into the slide and will automatically play when it is demonstrated. Since during demonstration this icon is displayed as a black square, it is advisable to either reduce it and place it in the corner, or move it beyond the visible boundaries of the slide (this will not affect playback).
When you select the speaker icon, the panel below appears additional buttons:
With their help, you can adjust the volume, listen to the track (during the demonstration, it will still be played first), loop its playback, or turn off the sound altogether.
Performs similar functions Media player. To open it, go to the Tools->Media Player menu. A window will appear, very similar in its set of buttons to the panel for working with inserted sound:
Plus, it has an Apply button that allows you to insert sound into a separate slide, similar to the previous option.
However, neither one nor the other approach allows you to control playback directly during demonstration. In order to have this opportunity, we select an element on the slide where music is needed - for example, text or a picture. Let's select it right click mouse, call up the context menu and go to the Effects tab (it is located to the left of the main work area). There, click the Add button, in the window that appears, go to Various effects and select Play:
Now let’s set up this effect: set the Start item to the position With the previous one - this way the music will start immediately after moving to the slide, without unnecessary movements on our part. Click the button... next to the Property item and in the Effect Settings window that opens, change the Sound parameter: Sound->Other sound and, as usual, select the desired track:
It will be applied, however, it will not appear in the Property item - this is normal. Similarly, you can set the music to pause and stop the sound completely. All of the above options only work within one slide.
However, these options are not suitable for those who want play one track throughout the entire presentation. To set this up, go to the Slide Change tab->Change Transition->Sound, select the Other sound item, open the desired track and check the Continuous checkbox (without it we will get an analogue of all the previous options):
This is how we got a single sound background that does not react to changing slides inside the presentation.
In this article, we tried to look at the basic techniques for working with music in LibreOffice Impress. However, if you still have questions, you can ask them below - in the comments or on our forum. We will try to answer them promptly :)
Sound is important for any presentation. There are thousands of nuances, and you can talk about this for hours in separate lectures. Within the framework of the article, we will consider various ways adding and setting up audio files in PowerPoint presentation and ways to get the most out of it.
Here's how you can add an audio file to a slide:


This completes adding audio. However, simply inserting music is half the battle. There must be a purpose for her, and this is precisely what should be done.
Setting the sound for the general background
First, it’s worth considering how sound works as audio accompaniment to a presentation.
When you select added music, two new tabs appear in the top header, combined into a group "Working with sound". We don’t really need the first one; it allows us to change the visual style of the audio image - this very speaker. In professional presentations, the image is not displayed on the slides, so there is little point in customizing it. Although, if necessary, you can dig around here.

We are interested in the tab "Playback". Several areas can be distinguished here.
- "View"- the very first area, which includes only one button. It allows you to play the selected sound.
- "Bookmarks" have two buttons for adding and removing special anchors to the audio playback tape in order to be able to later navigate the melody. During playback, the user will be able to control the sound in presentation viewing mode, switching from one moment to another using a combination of hot keys:
Next bookmark – "Alt" + "End";
Previous – "Alt" + "Home".
- "Editing" allows you to cut individual parts from an audio file without any separate editors. This is useful, for example, in cases where you want the inserted song to play only the verse. This is all configured in a separate window, which is called by the button "Sound Editing". Here you can specify time intervals when the audio will fade out or appear, lowering or increasing the volume accordingly.
- "Sound Options" contains basic parameters for audio: volume, application methods and playback start settings.
- "Sound Design Styles"- that's two separate buttons, which allow you to either leave the sound as it was inserted ( "Don't use style"), or automatically reformat it as background music ( "Play in background").
All changes here are applied and saved automatically.
Depends on the application of the specific audio inserted. If it's just a background melody, then just press the button "Play in background". This is configured manually like this:
- Checkboxes on parameters "For all slides"(the music will not stop when moving to the next slide), "Continuously"(the file will be played again when finished), "Hide when shown" in area "Sound Options".
- There, in the column "Start", choose "Automatically" so that the start of music does not require any special permission from the user, but starts immediately after the start of viewing.

It is important to note that audio with these settings will only play when the view reaches the slide on which it is placed. So, if you need to set music for the entire presentation, then you need to put this sound on the very first slide.
If it is used for other purposes, then you can leave the beginning "On the Click". This is especially useful when you need to synchronize any actions (for example, animation) on a slide with sound.
As for other aspects, it is important to note two main points:

Setting sound for controls
The sound for control buttons is configured completely differently.


It's important to note that this function only works with audio in .WAV format. Although you can choose to display all files there, other audio formats will not work, the system will simply throw an error. So you need to prepare the files in advance.
Finally, I would like to add that inserting audio files also significantly increases the size (volume occupied by the document) of the presentation. It is important to consider this if any limiting factors are present.
PowerPoint's multimedia report creation tool offers wide choose additional functions. One of them is background music for a presentation, which in many cases will be appropriate during a slide show. There are certain rules on how to insert and play it.
How to make music for a presentation
Before you make a presentation with music, you need to choose a suitable melody. It is important to determine the extent to which the background will help to perceive the speaker’s information and not distract attention from it. A good option when music is used for a presentation without words because the song will drown out or disturb the speaker. In order to add sound, you do not need any additional extensions; all actions are performed through the PowerPoint settings panel.
Audio File Format
Sound accompaniment to the presentation is usually used in two formats - wav and mp3. The first can be embedded directly into the report if it does not exceed 100 KB, otherwise the background track is associated with the presentation, but is located in a different folder. If necessary, you can increase the allowed media file size to 50,000 KB, but this will increase the size of the finished report. Other sound formats always stored separately. Once a track is added to the page, a speaker icon should appear to indicate there is sound.
While creating linked file a link to its location on the computer appears in the program; if after this the background is moved, the application will not be able to find it and start playing. Before inserting music into a presentation, it is recommended to move the composition to the same folder where the report itself is located - then even if the location changes, PowerPoint will be able to use the audio track.
Another option to use the associated ringtone if there is a file in the same folder as the report is to use the “Prepare for CD” option. This option allows you to copy all used add-ons to one folder or CD, and updates links to them automatically. To transfer a report with a background from one computer to another, you must copy it with all associated files.

To one slide
- In the top menu, find the “Structure” tab and the “Slides” item, click on it.
- Select which page you want to insert the sound on.
- Click the "Insert" tab, go to the "Media Clips" sub-item and click the arrow under the "Sound" button.
- Next you need to do one of the following:
- click the “Sound from Picture Collection” command, in the “Picture Collection” task area go to the required file and click on it to insert into the report;
- Click “Sound from file”, go to the storage folder, double click on the audio track.
After you have inserted music into the presentation, a window will appear asking you to indicate how the track will start playing. You can select the option by clicking the mouse or automatically. In the second case, the sound will turn on immediately when you switch to a slide with it, provided that there are no other effects (animation, etc.). If they are present, the background will play at the end, after all other multimedia effects. In the first case, there will be a sound image (trigger) on the page, clicking on which will start the track.

How to stretch music across multiple slides
In some cases, it is necessary to insert a media file onto several slides at once, when viewing which it should sound. To do this, do the following:
- Find the Animation tab and select Animation Settings from the list.
- Click the arrow to the right of the sound file you want and click Effect Options.
- In the “Effect” tab, find the “Stop Playback” option and click on the “After” option.
- Specify the number of pages for which the background should play when shown.
