DIY GPS navigator static maps. Selection and use of personal GPS navigators. Additions at the request of commenters
The eTrex Legend navigator disassembly process.
With commentary from the presenter.
Penguin dismantling the Garmin Legend navigator out of boredom in early September.
I apologize in advance for the minimum of useful information, but maybe someone will be interested in taking a look.
It is known that in the summer penguins begin to get sick of the heat and longing for the frosty air and sometimes are drawn to feat. In order not to do anything destructive publicly and in front of the younger generation, I sat down on a dreary September evening with the navigator Legend, who faithfully served for 3 years (may the Almighty extend his days), at work.
The reason for this was some problems with which some bipeds, to whom the navigator was sometimes given for use in the summer, could not peacefully coexist.
In principle, the well-known effect of the elastic band falling off around the perimeter of the device did not bother me. After the navigator was heated by the sun on the can of the boat, the rubber band began to slide, move, and ultimately fell off the adhesive tape, which in turn was located between the body and the rubber band. In general, as it turned out, under the elastic band there was a kind of double-sided tape, and under the tape there was some kind of silicone-like adhesive tape. The tape directly “sealed” the device and the exit points of the buttons.
An attempt to place the elastic on the second glue failed miserably. The rubber band was falling off and there was no good adhesion. You need silicone sealant, rubber glue or double-sided tape.
Even if this summer fishing is not good, in winter the navigator does not heat up.
So, still rarely, but the joystick completely cutting off two or three of its four positions caused for some time very inappropriate statements addressed to the bourgeoisie from Garmin. And the real penguin naturally doesn’t like this situation, “because” (c) nothing overshadows winter holidays more than negative emotions. Well, a year after the “tricks of imperialism” appeared, it was noticed that if you take the navigator by the ends with both hands and remember the forces that arise when trying to squeeze water out of a towel (the navigator was the towel), then the joystick began to work immediately in 90 percent of cases. Probably afraid of the harsh penguins, the navigator understood that they would not stand on ceremony with him. True, putting up with forced pumping of the arm muscles was not part of my plans.
So, what am I talking about... I’m sitting here looking at the devil’s car and thinking, but if someone assembled it, then someone else can take it apart?
Maybe something fell off in the Taiwanese assembly, or the soldering was faulty, we need to help our faithful friend improve his health. Fortunately, my hands allow me to work with tweezers.
Photo 1. We completely tore off the elastic band and the remains of the tape. We do everything sober, carefully, without unnecessary violence and say “I’m calm, I’m calm, if I meet the designer of the Legend then... I’m calm, I’m calm...”
Photo 2. Gently pry up the silicone-shaped ribbon with tweezers, remove it and hang it on the Christmas tree; we will still need it when closing the device.
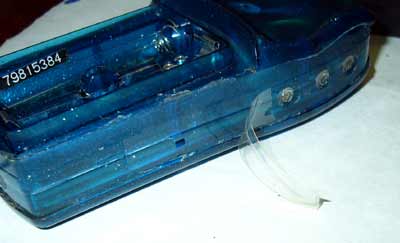
Photo 3. Very carefully, so as not to break it, press the latches (two on the sides and one on the bottom)

Photo 4. Here it turns out that some bad person poured glue into the joint and the case does not want to open. We take a razor and, with a steady hand, saw through the sealed gap. You can, of course, use a scalpel, but the main thing is that the cutting tool does not go inside the case, there are small circuits there...

Photo 4. After 10 minutes of sawing, the device opens after pressing the latches from the sides. Use tweezers to carefully remove the connector.

Photo 5. And the device is open! Interesting to the point of horror. You can see SMD elements, Garmin, AMD, Samsung small circuits, a Japanese battery and some kind of hairy synthetic garbage :-).
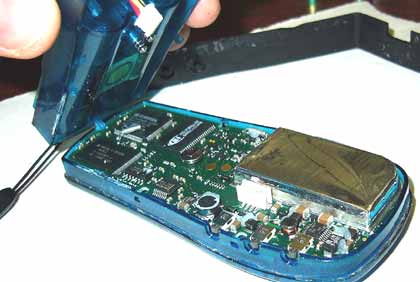
Photo 6. Our goal is the joystick. Turn the scarf over at the ends. And there is a cable on a tiny connector... We don’t touch the elements and tires with our paws. We remember that electronics are afraid of static. The friend of static electricity is dry air and woolen and synthetic clothing. The enemy is the humid St. Petersburg air.

Photo 7. Remembering the rule “if you’re not sure, close it and put it back,” as well as the steady hand of the surgeon, we pick out the black clip on the connector with tweezers.

Photo 8. Unscrew the screws on the joystick and press on the joystick from the side of the rubber button in the case. We get an LCD screen hanging on cables on both sides of the board. You can’t touch the cable, the screen is a fragile thing, why bother with that!?

Inspection showed that everything was soldered well, the joystick seemed to be non-separable. In short, we climbed in vain... We are putting everything back together:-((
Photo 9. An inner voice tells me that it is better to insert the cable before inserting the board into the case... a dumb task, God forbid your hand will come off... in a couple of minutes the cable will be in the connector... the hardest part is over. Naturally, everything happens on a clean, dust-free piece of paper. 
Photo 10. Gently lower the screen board with the joystick into the case. We move the board with the antenna and screw in two screws. 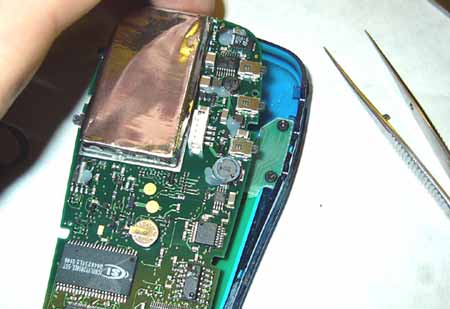
Photo 11. We install the board with the antenna and look at the soldering again. Everything is perfect. But you have to find fault! A detailed inspection of the soldering of one microcircuit reveals three pins without solder on top! Hurray, we sharpen a tiny 6 W soldering iron and happily set out to correct the lack of work of our eastern comrades. It turns out, of course, ugly, but reliable. It would still work...

Photo 13. We collect everything, look for any unnecessary parts on the table and seal it with silicone adhesive tape around the perimeter of the case.
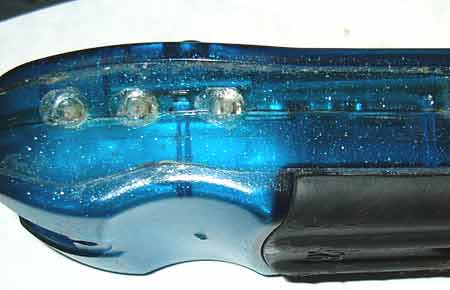
Photo 14. Turn on the device and oh happiness, it works

1. Glitches with the joystick are most likely not related to it, but to the contacts of the cable or inside the multilayer board, and an ordinary “fiddler” cannot cope with this;
2. There is no need to climb there again
3. Analysis of the design leads to a lack of desire to check the “tightness” of the device;
4. Replacing the battery is an unpleasant task, it looks like it is soldered to the holder by contact welding... although maybe I’m wrong;
5. It is better to entrust the replacement of buttons (if they suddenly fail) to experienced people, the specifics of surface mounting...
6. The rubber band must be glued with a soft sealant or double-sided tape in order to be able to disassemble the navigator for gags next summer;-)
A small comment:
Firstly, I don’t recommend anyone to engage in such research “out of boredom.” Try to find yourself a slightly different activity. You can do such things if you are a Rockefeller or his close relative, or if you want to find a reason to change your navigator to a newer one due to the breakdown of the old one. However, if you have a real problem that prevents you from using the navigator and, as a result, poses a threat to your safety, you can try to look inside to make sure that at least the electrical connections inside the navigator are working properly.
The most important thing that you constantly need to remember when disassembling and assembling the navigator is that it is also an EHF (EXTREMELY HIGH FREQUENCY) receiver and a specialized computer in the full sense of the word. The first means that any change in the settings of the receiving path or built-in converters can lead, at best, to a deterioration in the reception of data from satellites, and at worst... If you tell me that everything is sealed there and nothing can be damaged, then I will On the other hand, I can assure you that at such frequencies the tuning can be affected by a simple hair falling in the vicinity of any RF node. I will never forget how I tuned the local oscillator to a frequency of “only” 100 MHz in one of my homemade designs. In the end it turned out that the cause of the frequency fluctuation was my own breathing. Or you can look at homemade designs of satellite television receivers. There, excuse me, there are only bolts. I tightened the bolt here - adjusted the frequency of the first receiving path, tightened the converter there... Moreover, the thread had to be very fine, since the count was in microns.
This concerns the navigator receiver. The second is a computer. A computer is, by definition, a high degree of integration and saturation with components in a very small volume. Therefore, I categorically do not recommend getting into there with a soldering iron. The distance between the legs of the microcircuits is tenths of a millimeter. Therefore, as a result, you can get one large leg filled with solder. And removing solder is always more difficult than putting it on. In this case, overheating of both the microcircuit or cable itself and the surrounding elements, including the PCB itself, is inevitable. And this is the right path to buying a new navigator to replace a broken one. In addition, a tool that accidentally comes off, leaving a barely noticeable scratch on a board or element, will most likely force you to fork out the entire cost of a new navigator.
Now about the joystick. Due to the nature of my work, I often encountered malfunctions of such switches. The malfunction, as a rule, consisted of unclear operation of the contacts. In 80% of cases, it was possible to eliminate or significantly improve the operation of this unit by simply washing it with alcohol. You need to generously moisten the buttons with alcohol so that the alcohol gets inside and actively click the buttons while continuously adding alcohol. The alcohol must be pure and streak-free. This way, all the dirt will be washed out and flow out, and the oxide film will be erased.
In general, most often complaints are heard not about the joystick, but about the violation of the display contacts, which is expressed in the incorrect display of symbols and other images on the screen. As I read on the forums, people correct this problem by simply adding an elastic band so that the pressing force on the display increases slightly. This is often enough to restore contact. In essence, the same thing happens when the body is slightly deformed.
By the way, the battery on the board is not actually such a battery. This is the so-called ionistor - a capacitor of very large capacity. It is with its help that the navigator stores data on the position of satellites and, when turned on, recalculates them according to current time. The clock, by the way, is also powered by an ionistor. Therefore, it is not recommended to leave the navigator without batteries for a long time. In this case it may happen full reset data and next time a cold start may be required. In addition, as with any capacitor, it is better when it works. Remember? Oxide capacitors without operation lose their capacity after 2-3 years, and those that work without any problems last 10-15 years.
One more note. At one time, information spread across the network that a special gas was pumped into the navigator’s body, and that by disassembling it, you lose its protection. In fact, I once saw a military device containing an EHF receiver in a housing filled with gas. This gave the electronics stability due to the absence of oxidation and something else. But if you saw the body of this device - three sealed housings. If you look at the body of the navigator from this point of view, you can assume that any gas is only enough for the duration of its transportation to the seller. So I do not share the opinion about the presence of some kind of gas inside the housing of household navigators.
But tightness during assembly must be ensured. And the point here is not to go diving with it (GPS signals do not travel underwater), but to prevent moisture in any form from getting inside. Most often this occurs from damp air, rather than from raindrops. In this regard, I recommend, if possible, to do the assembly when the air in the room is as dry as possible. Well, that's how it goes. Moreover, the author of the article said everything correctly about statics. In this regard, I recommend that you first touch any screen connected to the common wire of the circuit, and then you can touch everything else. There are plenty of screens in the navigator, so there will be no problems. I recommend doing the same with computer components.
Ordinary car enthusiasts are in awe of the formation of corrosion on the external surfaces of the car. Immediately thoughts arise about the means of restoring the body, repairs, financial costs and measures to prevent similar phenomena in the future.
 Checking the mileage of a car means that it is carried out if it is necessary to replace the dashboard as a result of an accident or traffic accident. But in Lately Another goal is increasingly being pursued, namely, a more profitable sale of a car by reducing its mileage.
 Even the most pleasant car ride can be ruined by a simple tire puncture. The wheels have tubeless tires. How to repair them on the road in order to at least get to the nearest tire repair shop.
  Choosing good summer tires is not simple matter. Every driver has certain expectations, and they depend, to a large extent, on the class of the car. So let's see what tires will be the right choice for small city cars.
 General cleaning should be carried out not only at home, but also in the car. A discharged battery can surprise the driver, both during winter frosts and summer heat. To avoid this situation, it is worth remembering a few procedures that will extend the life of the battery.
 In many modern phones There is GPS, but for the navigator to work it is necessary to download maps via the Internet, which is a problem far from GSM towers. Also big problem- this quickly drains the battery of smartphones, especially in the cold season. At one time, the traveler is left not only without navigation, but also without communication. Having an independent navigation device with you will be very useful. Similar device and will be offered in the article below.
Target of this device is to indicate in which direction to move and show the remaining distance to the point to which you need to come. Before leaving, the traveler needs to save the control point to which he wants to return. After this, the arrow will point to the departure location and the distance will be indicated in numbers. Of course, it is necessary that the satellites are “caught” and the coordinates of the current location are determined.
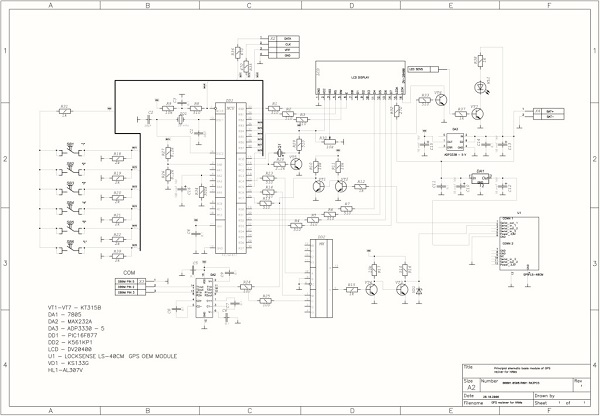
Homemade navigator diagram

The circuit is based on an ATMega64 microcontroller clocked from an external quartz resonator at 11.0592 MHz. NEO-6M from U-blox is responsible for working with GPS; although it is old, it is a very common and inexpensive module with fairly accurate determination of coordinates. Information is displayed on the display of Nokia 3310 (5110). Also present in the diagram magnetometer HMC5883L and accelerometer ADXL335.

HMC5883L A fairly common and inexpensive sensor, a standard I 2 C interface is used to communicate with the microcontroller.
The chip is available in a tiny 16-pin LPCC package measuring 3x3 mm.
Pin designation:
- SCL - I2C bus clock input
- VDD - input for connecting power (this booger is fed with a voltage in the range of 2.16-3.6 volts)
- not used
- S1— extra food for I/O ports. Connects directly to VDDIO pin
- not used
- not used
- not used
- SETP - first input for connection ceramic capacitor at 0.22uF
- GND - ground
- C1 is another input for connecting a capacitor. Electrolytic or tantalum at 4.7uF (the other end of the capacitor is connected to ground)
- GND - ground
- SETC - second input for connecting a 0.22uF ceramic capacitor
- VDDIO - input for connecting the voltage that will be on the input/output ports
- not used
- Interrupt output, when the data is ready, logic 1 appears on this pin
- SDA - I2C interface data line
Navigator circuit board

The circuit and board are designed in the EasyEDA system.


The device is turned on and off by long pressing the S5 button. After turning on and searching for satellites (during a cold start it can take up to 10 minutes or even more), we can view the current coordinates by pressing the S2 button.

The coordinates of the end point can be viewed by pressing the S3 button.

By pressing the S4 button we get to the point saving menu. There are two ways to save a point:
- save current coordinates


2. enter coordinates manually


Enter degrees, minutes and seconds one by one. The selected value to edit blinks.
You can return to the mode of following the point by short pressing the S5 button

Now about using the magnetometer and accelerometer. To calculate the azimuth, data received from the GPS receiver is used, so if it is not possible to calculate the coordinates (for example, if the satellites are not visible or there are few of them), it is impossible to calculate the direction in which you need to move in order to arrive at the point. And my original idea was to use the magnetometer as aid to indicate the course. But I encountered some difficulties.
Firstly. Those who are familiar with the operation of digital magnetometers know that the accuracy of their data depends on the position in which they are located. Therefore, for correct operation in any position, it is necessary to use an accelerometer, which would give a more accurate picture of the projection of the magnetic field on all three axes of the magnetometer. Possible Solution I saw this problem in a magazine. but I have not yet managed to transfer the entire calculation to Bascom (maybe one of the enthusiasts will do it?).
Secondly, the difference in magnetic declination in different parts of the Earth has a noticeable effect. For example, in the Volga region the magnetic declination is 13°, and at the other end of the country the declination is already 11° and in the other direction. But there is also magnetic inclination - when the magnetic field lines enter or exit at an angle to the horizon, and many other factors that influence the readings.
Of course, you can use such non-calibrated data from a magnetometer to roughly indicate the direction, but for now I decided to abandon this idea and made a simple compass, which can also be useful. The compass is turned on by pressing the S1 button. And in order for it to point more or less correctly to the north (more precisely to the north magnetic pole), the device must be held horizontally. To help with this, two lines run along the sides of the screen, which show the tilt in one direction or another.
All that remains is to print a housing for the device on a 3-D printer, but for now let’s talk about the results of street tests. The device turned out to be very interesting and quite helpful in getting to the saved point. But you need to understand that millimeter accuracy should not be expected. An error in determining GPS coordinates of just one second will result in an inaccuracy in determining the position of 20 meters. Also, errors inevitably accumulate when rounding in mathematical calculations. But nevertheless, the device, even in dense urban conditions, made it possible to return to the point with an accuracy of several meters.

This device will become an indispensable assistant for those who like to wander through the forest, mushroom pickers, skiers, tourists and other nature lovers!
Components used in the device (they can be ordered from an online store from China):
- GPS module NEO-6M
- LCD display
- Magnetometer HMC5883
- Accelerometer ADXL335
Housing for guide


P.S. At the request of users, I updated the firmware (there are two firmwares in the link above), excluding the accelerometer and magnetometer from the circuit. Now, by pressing the S1 button, information about the battery voltage, UTC time and date, as well as azimuth will be displayed - the same compass :)
A wide range of GPS devices of different price categories are available in specialized stores. Powerful models with advanced functionality are quite expensive, but the simplest beacons are different at an affordable price. However, many people try to avoid the expense and make their own GPS tracker. How difficult is this task, what will be needed to solve it, and will the effort be worth it?
Using a Smartphone for GPS Tracking
To use your smartphone with GPS function as a GPS tracker or beacon, you need to work a little with the software. Make your own GPS tracker from your phone on Android based, Windows Mobile or iOS is very simple, no intervention in its design is required. If the smartphone is used as a car tracker, you will have to perform simple manipulations to connect it to the vehicle’s electrical network.
There are several applications that allow you to turn your smartphone into a tracker. For Android devices, you can download it from Google Play app Loki, launch it on your smartphone and complete the settings. It is recommended to activate the following functions:
- autostart;
- notifications (optional);
- external power supply(usage alternative settings when connected to external source nutrition);
- full awakening (optional);
- command processing.
For navigation (location determination), it is recommended to set the data update interval once a minute; for sending SMS messages when communication with the server disappears, the time limit is 5 minutes. Make settings in the “Events” section in accordance with your own needs.
After completing the settings, all you have to do is register on the Asgard website and add your device, indicating the identifier defined by the Loki program. If, as a result, a mark of your location appears on the site map, then everything was done correctly, and the smartphone can be used as a tracker, tracking its location through Asgard.
You can also use the GPShome Tracker application for Android, and GpsGate for Windows Mobile Client for Pocket PC When turning a smartphone into a tracker or beacon, it is extremely important to set the time zone correctly.
To determine coordinates through Wi-Fi networks and GSM, the device must have access to unlimited mobile internet, so you need to choose a tariff that allows you to optimize costs. If the phone will be used exclusively as a tracker, it is better to install a SIM card only for accessing the Internet, and not for calls. Using a GPS receiver, which increases the accuracy of determining coordinates, is a very energy-intensive process, so care should be taken to provide power to the homemade tracker. To do this, you need to cut off the lower end of the car plug (cigarette lighter plug) and insert the phone charger cord into the USB connector. To connect the tracker directly to the on-board system you need to buy a step-down converter direct current. And those who know a little about electronics can assemble an analog converter from a pair of capacitors and a stabilizer.
If you plan to use a homemade tracker (beacon) to covertly monitor the movement of a car, you need to think about where to hide it so that it can be easily retrieved if necessary. And don’t forget to activate silent mode if your phone has a card installed for the Internet and calls.
How to make a GPS tracker with your own hands from a regular phone
The simplest model mobile phone Without GPS, you can also turn it into a beacon, but this will require additional equipment and more effort. Required materials and tools:
- mobile phone;
- GPS/GPRS module;
- GPS receiver;
- adapter (you can use an old Charger with working plug);
- knife and soldering iron.
Having cut off the charger from the side of the power supply, you need to strip the wires and solder them to the module board, and insert the plug into the phone's power connector. Then the receiver is turned on and the phone is set up. Using such a device, you can track the location of mobile phones belonging to your family members. Information about their coordinates will be sent to a mobile phone combined with a GPS module in the form of regular text messages.
Some operators cellular communications offer the “Beacon” service, which can be activated on any mobile phone without a GPS module. A list of contacts of subscribers whose location needs to be tracked is compiled. To receive a message with coordinates, you need to send a request in the prescribed form.
Is it possible to make a GPS tracker without a phone?
There is an alternative to using a smartphone or telephone in combination with a GPS module - any device with GPS function (laptop, PDA). The principle is the same as for a smartphone - install the application, settings, register the device on the website.
Is it possible to assemble with your own hands the GPS module and receiver that make up the beacon or tracker? Here are some of the components included in these devices:
- photoresistor, usually short-wave;
- operational amplifier on the base bipolar transistors;
- rectifier;
- capacitor type controller;
- mesh filters;
- pulse trigger.
All these parts can be bought, and the device diagram can be found on the Internet, but not everyone can figure out how to make a GPS tracker with their own hands.
Advantages and disadvantages of a homemade design
If you are using the old one and unnecessary phone(smartphone), then the main advantage of converting it into a tracker is savings. If you purchase a device specifically for this purpose, the savings from making a GPS tracker yourself are almost imperceptible. The design of a mobile phone and a GPS module is quite cumbersome, it is inconvenient for a person to carry it with them, and when installed in a car there is a high risk of wire breakage. It is more convenient to use a smartphone as a tracker or beacon, but only for tracking people. Installing it on a car is not the best solution; the original tracker has a number of advantages over a homemade one:
- runs on battery for up to a year;
- without any tricks it connects to the on-board network, consuming a minimum of energy;
- designed for operation in a wider temperature range than a telephone;
- thanks to the sealed housing, it can be installed outside the car;
- reacts to impacts, rocking of the car;
- can be equipped with a panic button, microphone, and various sensors.
If you use a smartphone as a hidden tracking device, it will no longer be able to perform the functions of a communicator.
It is better to buy a GPS tracker or beacon than to use homemade device based on a smartphone or regular mobile phone. The factory tracker is more reliable and easier to install on vehicle, performs more features. The cost of purchasing a tracker is not that high, and turning a smartphone into a tracking device is justified only if you have an unnecessary device.
Despite the fact that today on the market you can find a huge variety of GPS devices of various price category and functionality, not everyone is ready to immediately buy a ready-made navigation device and prefer to make it themselves. Whether this is necessary is difficult to say, but, without a doubt, it is possible.
You can make your own navigator using two different ways. For the first one you will need the simplest mobile device, GPS transmitter and battery. It’s worth warning right away that there is no point in considering it in detail, since assembling a homemade navigator in this way will require a lot of hassle and time, and most importantly, you need to be well versed in electronics and master the basics system programming– not everyone has such skills. In addition, such a navigator is difficult to use; by sending a message to the satellite, it will receive in response coordinates that will have to be superimposed on the map.
The second method is simpler and can be done by anyone - a GPS navigator made using a laptop. What will you need for this? Firstly, the laptop itself, and secondly, a GPS receiver, for example, built into a modern mobile phone.
The GPS receiver is connected via any of the interfaces (Wi-Fi, Bluetooth or USB) on a laptop PC. Almost everyone has the latter today; besides, even the simplest netbook or tablet will be enough for a navigator.
Before connecting the GPS module, you need to make sure that the appropriate software which will support it. Finding and downloading it from the Internet will not be difficult, since the choice here is unimaginably large. Some programs are suitable for long-distance country trips, some, on the contrary, for trips around the city. If your PC has Internet access, you can also install programs that provide information about traffic jams.
Having connected the navigator to the PC, you need to wait until the system detects it, if necessary additional drivers, they need to be installed. There is no need to search, you can simply ask automatic search in the Internet. The device has been detected - you can start it navigation program and make sure the device is visible to her. If everything is in order, the homemade GPS navigator is ready; if problems arise, you need to dig into the software settings.
Whether it is worth making a navigator with your own hands or whether it is better to buy one is up to everyone to decide at their own discretion. In any case, in both the first and second cases you will have to make a little effort and spend time.