Mac App Store VueScan: the new life of the old scanner. Alternatives to Replace VueScan Activation Video Tutorial
VueScan is software that is designed to work with different scanner models. The program was created in 1998. VueScan supports many flatbed as well as film scanners.
If you are looking for advanced scanning functions or your scanner has no longer support your model, then this program is perfect for you. This utility is compatible with a wide variety of scanners. The latest version of the program supports over 1,500 models.
Password for all archives: 1progs
Activation video tutorial
Documents that have been scanned can be saved in various formats. The program also makes it possible to create multi-page PDFs. In order for users to be able to use the utility without restrictions, VueScan must be activated.

Main features of the program:
- Scanning documents, photos and films.
- Creation of various files - TIFF, PDF, TXT, JPEG.
- Import function support.
- Recognition of graphics and symbols in the document.
- Step-by-step control of file scanning.
- Automatic removal of various defects.
- Batch scanning of documents.
Thanks to the program, you can conveniently scan any file - image, documents, etc. Also, the application has the ability to remove defects in the image, work with color depth, and suppress scanner noise. To use the program without restrictions, you need to download the VueScan key.

Advantages of the program:
- Supports over 1500 scanner models.
- Support for different operating systems.
- Simplified interface for scanning documents.
- There is a standard set of formats for scanning scans.
- Recognition of scanned text.
- Russian language support.
Disadvantages of the program:
- Paid activation is required to use the application without restrictions.
- It happens that your scanner cannot be connected through this application.
The program interface is quite simple. Most importantly, VueScan supports Russian. Everything is clear in the program, so even novice users can figure it out.

Despite some shortcomings, it can be said that VueScan is the right program for the computer. It is much easier to work with multiple scanners. Also, every time you do not have to look for suitable drivers.
Analogs of the program
Look for similar programs in our selection of programs
I don't know about you, but I really love the VueScan scanning program. And all because of one property - the presence of scan profiles. It's no secret that scanner manufacturers simply mock poor users, forcing them to do a bunch of actions every time before the file with the cherished image appears on the computer. In order to keep the number of actions to a minimum, a program like VueScan is needed. The main thing is that your scanner is on the VueScan compatibility list. Unfortunately, not all brands of scanners VueScan can work with, especially not expensive ones.
So what is the effectiveness, in my opinion, of this program? For me it is the ability to create various customized profiles. Not so often a person does something non-standard, basically our activities are routine and monotonous. And in scanning too, constant scanning of the same typical documents, photographs, etc. Of course, from time to time you come across something non-standard, but the frequency of this non-standard is incommensurably small in comparison with a typical stream. Also, customized profiles are very good when the scanner is used by more than one person, but many. The situation is also typical: for example, you have one scanner in your room for several colleagues. To wait every time until each of them configures a dozen settings before scanning is not good, isn't it easier to do two actions: select a profile, press the "scan" button? I'm 100% sure it's easier! J
And in terms of the richness of the settings, VueScan is at its best. In general, you can start to practice.
Since the various versions of VueScan do not contain fundamental differences, I will demonstrate everything using the example of version 9.0.66.
So, everything is in order.
We start the installation. It does not raise any questions, except for one question about the drivers.
If you are not sure, then choose "YES".
After installation, you get the following window: 
Close the "tip of the day" window and click the "Details" button 
A window opens with more detailed information about the settings 
To get full access to the settings, click the "More" button
And here ATTENTION! If your scanner is supported by VueScan, then you will see the item in the settings window "A source:"
in which the brand of the scanner will be written 
if your scanner is not supported, then paragraph "A source:"
you will not have settings in the list. 
It makes no sense to describe all the richness of VueScan settings, instead, I will try to demonstrate working with profiles using an example.
In my day-to-day activities, I often scan this type of documents such as memos.
Since I assume further recognition of service notes and at the same time try to save space, the scanning parameters will be something like this:
- Permission: 400 dpi;
- Image size: A4;
- Color Depth: black and white one-bit image;
- Save format: tiff compressed single bit;
To get such parameters, in running VueScan, go to the first tab "At the entrance"
(usually at startup it is always active) 
configure all parameters as shown in the picture above, i.e .:
- Task: Scan to file;
- Source: (brand of your scanner);
- Mode: Tablet;
- Medium: Text;
- Media size: A4 ...;
- Bit per pixel: 1 bit B / W;
- Sensitivity of black and white negative: approximately 120-145 (higher value increases contrast);
- Viewing Resolution: Auto;
- Scanning Resolution: User Setting;
- Scan resolution (dpi): 400
- Autosave: Scan;
Other parameters on the tab "At the entrance" choose to taste J
Now go to the tab "Cropping"

Here, in fact, one parameter is important to us "Cropping frame size:"
, put it in A4 format.
The next two tabs "Filter" and "Colour" in black and white mode, images are not available, so we skip them and go to the tab "At the exit" .
On a bookmark "At the exit"
parameters are configured: where, in what format the scanned image will be saved. For my case with memos, the view will be something like this: 
- Default folder: here we set the path where the scanned image will be placed;
- Print size: Scan size;
- Magnification (%): 100;
- Autoset file name: Enabled;
- Create TIFF File: Enabled;
- TIFF file name: @ .tif;
- TIFF file type: 1 bit B / W;
- Compression for TIFF: Auto;
- Profile for TIFF: Included;
After setting all the parameters, you can click the button "View"
and look at the scan results in the preview window. If everything is fine, then proceed to the most important thing, to save the settings profile. To do this, press the menu item "File"
—"Save settings"

and set some meaningful file name, for example "Servants 1 bit BW"
push "Save"
.
Everything. This completes the setup. Now you can scan the document by clicking the button "Scan" , and see the results of work in the folder specified on the tab "At the exit" ... As a result of scanning, a file with approximately the same name appeared in the folder "Scan-150427-0001.tif"... As you can see, the file name consists of the "Scan" prefix, the current date and a counter that will automatically increase with each new scan.
And now, in fact, about efficiency. J Subsequent scans of "Memo" documents will be done for THREE pressing:

Now customize the rest of the document types while maintaining the customization profiles. My list looks something like this: 
Over time, you will not need to enter the menu "File" , you will remember under which function key you have which profile, and you will make its choice by pressing on the keyboard. And then you just have to press the button. "Scan" .
And what about your colleagues? They will be happy, too, saving their profiles and saving you time! 
Forgive me that in this article I do not analyze in detail the settings for each type of document. Unfortunately, this topic is very extensive and requires separate large articles. J Stay tuned for updates!
When purchasing a new scanner, the user usually receives a disk with drivers and software along with the device. However, over time, this disc tends to disappear in an unknown direction, and the need to use the supplied drivers disappears, since by this time there are more recent versions that can be downloaded from the manufacturer's website at any time. This is where the idea of alternative designs comes in, with the help of which it would be possible to work with all the functions of the device. But some utilities can do much more than the original utility from disk to scanner!
⇡ VueScan 8.6 - bringing the old scanner back to life
- Developer: Hamrick Software
- Distribution size: 6 MB
- Distribution: shareware
- Russian interface: yes
The scanner is one of those devices that can serve for a dozen years or more. If you don't use it very actively, it can continue to work great as you update your work computers over and over again. However, manufacturers of computer peripherals are not very happy with this state of affairs. Perhaps you will be convinced of this if you want to connect an old scanner to a computer with Windows 7 installed, go to the developer's website and find that there are no drivers for your model, and its support has been discontinued. Leaving users face to face with new versions of OS and old hardware, manufacturers seem to be saying "Buy a new scanner!" But do not rush to open the prices and send the old man to retire - perhaps he will serve for more than one year. And VueScan can make friends with a new computer.
VueScan can act as a generic driver for legacy scanners. Using this utility, you can successfully scan documents, images, films, save the received data in one of the supported formats (PDF, JPEG, TIFF and TXT), or immediately send them to print. VueScan also comes in handy for owners of modern scanners, as it has more customization options than most of the utilities provided by the manufacturers of these devices.
The program can work in one of two modes: "Master" or "Detailed". The first, as the name implies, is organized as a step-by-step assistant. The user is asked to select the final purpose of scanning - saving to a file or sending to a printer, after which he needs to indicate the source of the scan and the folder where the files will be saved, to determine what quality files you want to receive.

Interestingly, in this mode, VueScan does not load the user with concepts such as permission. Instead, you just need to indicate what you plan to do with the received scans: send by mail, store in the archive, send to print, etc. In the next step, VueScan will show you what the document will look like after scanning, and will give you the ability to rotate and crop the image. Then the program will scan.
The "Master" mode is suitable for performing quick scans, but if you are used to being in control of every little detail, it makes sense to switch to the "Detail" mode. For more than ten years of its existence, VueScan has acquired a huge number of possibilities; in the current version, two modes of fine tuning are offered. The first one displays only the most important parameters, while the second one displays all the available options.

By scanning an image from film, VueScan can partially remove grain, restore colors, and sharpen. Also, due to the numerous settings of the program, you can control the color balance, set the auto-crop parameters and much more. Once selected, the settings can be saved as a profile and then used over and over again. This is convenient if you are doing scans of the same type, for example, scanning an entire book.
VueScan integrates Optical Character Recognition (OCR) so that documents scanned with it can be instantly recognized and converted into searchable RTF or PDF files. To be fair, it should be noted that not all documents are recognized by VueScan correctly, but do not forget that this is not the main function of the program. Therefore, it can be considered a very nice addition to the basic toolkit.
The professional version of VueScan differs from the standard version in that it offers support for ICC profiles and color spaces. In addition, it has the ability to calibrate the scanner colors according to the IT8 standard, as well as the ability to scan to RAW files.
⇡ BlindScanner 2.7 - working with a scanner in a local network
- Developer: Masters ITC Software
- Distribution size: 2 MB
- Distribution: shareware
- Russian interface: yes
The number of scanners available to the user is usually less than the number of work computers. This can cause some inconvenience. For example, if you have a couple of desktops and the same number of laptops at home, then you need to decide which of them is most convenient to connect the scanner to, and then deal only with this computer. When a scanner is connected to one of the computers in the office, the user sitting at this computer cannot work normally - his colleagues now and then ask him to scan documents. As a result, the employee's work efficiency is reduced due to the fact that he is constantly distracted.
BlindScanner solves this problem. Using this utility, you can open access to the scanner to any computer on the local network. To do this, on the PC to which the scanner is connected, you need to install the server part of the application, and on each of the computers from which you plan to use the device, the client. The server side can run as an application or as a service.
The BlindScanner client part has a user-friendly interface with which you can fully control the scanning process. First, you need to select a scanner available on the network from the list of devices, and then decide on the location and format for saving the files.

BlindScanner supports saving documents to BMP, GIF, JPG, PDF, PNG, TIFF files. Before scanning, it is possible to set the resolution, as well as the color mode: black and white, grayscale, or full color. If you need to scan a lot of documents, you can use the "Multi-page scanning" group of settings, after which you can specify whether the scanner has an automatic paper feeder, whether you want to scan both sides of the sheet and skip blank pages. In addition, in the multi-page scan mode, BlindScanner can perform auto-scan with a delay. Selected scan settings can be saved as a profile for later use.
BlindScanner also has a Pro version, which is distinguished by the ability to scan directly in the program in which it is supposed to work with scanned documents - Adobe Photoshop, Abbyy Finereader, etc.
It should be borne in mind that the program uses port 8900 to connect to the server, so for it to work correctly, you may need to make sure that it is not blocked by a firewall.
⇡ Scanned Document Distributor 2.0 - upload scans to FTP and send them by mail
- Developer: Nico Cuppen Software
- Distribution: shareware
- Russian interface: no
Most of the "native" applications that come with scanners allow you to save the finished file in one of the popular formats, but this is where their capabilities are exhausted. Imagine a situation where you need to scan a lot of documents and then open them in a certain program. In this case, you have to do a lot of unnecessary actions: save the file to disk, then run the program and open the file from it.
Scanned Document Distributor differs from other scanning applications in that it can perform many different actions on the received files. So, in addition to the usual saving them to disk in PDF, TIFF, JPG, GIF or PNG format, the program can immediately send the file for printing (network printers are supported), send the file by e-mail as an attachment, upload it to an FTP server, and also launch any user-specified application and open a file in it. It is important that several actions can be used within one task. For example, a scanned file can be automatically sent to print and uploaded to an FTP server.

Working with Scanned Document Distributor is organized as follows: first you need to create a profile that includes scanning parameters, as well as a description of the actions that need to be performed. After saving, the profile appears in the main window of the program, and all that is required from the user the next time the program is started is to put the document in the scanner, select the desired profile and click on the button that starts the process.

However, if you use the same profile all the time, you can keep the number of steps to a minimum. Using the Create Shortcut to Profile feature, you can add the Scanned Document Distributor quick launch icon with the selected settings to the desktop, from the Start menu, to the Quick Launch. In the program settings, you can specify an email address to which a notification will be sent every time a scan profile is started.

The program supports scanners with an automatic paper feeder. Depending on the selected settings, when scanning multiple pages automatically, the result can be saved as multi-page TIFF or PDF files.

⇡ Photocopier Pro 3.10 - fast sending scans for printing
- Developer: Nico Cuppen Software
- Distribution size: 1.7 MB
- Distribution: shareware
- Russian interface: no
Unfortunately, not all programs supplied with scanners have the ability to quickly send a scan to print. Nevertheless, this function is very much in demand, because a scanner and a printer connected to a computer can easily replace a copier. You can, of course, scan a document, then open it in the appropriate program and send it to print, but this takes a lot of time. If there are more than one or two documents, it is especially tiresome. Photocopier Pro allows you to send the finished scan to the printer with just one button press.
The program is very easy to use - all its main parameters fit in one small window (although for more fine tuning you will need to open an additional window). By default, before starting scanning, it displays a window in which you can preview the document and, if necessary, crop it, center it, increase or decrease the brightness, change the scale or make other adjustments. You can also specify the required number of copies, enable the scan function on both sides, disable the automatic paper feeder.
- Developer: "RIMAN COMPANY"
- Distribution size: 4.8 MB
- Distribution: shareware
- Russian interface: yes
RiDoc is a multifunctional program that helps you manage a large number of scans. With it, you can save scanned documents to TIFF, BMP, JPEG, PNG files, create PDF files, send documents to print or send by e-mail. In addition, with RiDoc, you can quickly insert a scan into a MS Word document. Unfortunately, the latest version of MS Word 2010 does not have the function of direct insertion of an image from a scanner, which users of earlier versions of the program are used to. This is why having this capability in RiDoc can be very helpful.
Another interesting feature of RiDoc is the imposition of a watermark on scanned documents. This feature can be used to protect content from being recognized. If a document needs to be handed over to other users, but you do not want the text to be recognized, a diamond-shaped watermark overlaid on top of the main content will significantly complicate the task of OCR systems.

Finally, RiDoc can be used to organize your scanned documents. The program implements the function of working with "quick folders", due to which, firstly, it is convenient to select the directory for saving, and secondly, you can quickly find the previously saved files. To work with "quick folders" you need to make a list of them, and then just select the one you need when saving.

⇡ Conclusion
No matter how trivial the task may seem, in most cases you can find original ways to solve it. This also applies to scanning documents. The programs covered in this review allow you to simplify many operations related to receiving and processing scans, and automate some actions. Try to work with these utilities and, perhaps, very soon they will be included in your own list of must-have applications.
VUESCANPRO
License type:
Grunt
Languages:
Windows 8, 8 64-bit, 7, 7 64-bit, Vista, Vista 64-bit, XP, XP 64-bit
Downloaded:
VueScan overview
VueScan is one of the low-cost scanning software with support for almost all film scanners and some flatbed scanners. It comes in versions for Windows, Mac and Linux.
The advantage of this program is the ability to easily and accurately correct the color of color negatives. This is very difficult to do, and with VueScan, the procedure is greatly simplified. Using the program makes it possible to carry out some special functions of the scanner: batch scanning, autofocus, infrared channel, which eliminates dust and scratches, multi-pass scanning, which reduces the noise of darkened areas of the slide, and others. With VueScan, it is possible to perform multi-pass scanning, which has direct interaction with the scanner hardware. There is no TWAIN interface in this program. VueScan outperforms the original scanner software in focus scanning in many cases. Which, however, will not prevent you from returning to the latter at any time.

By choosing the type of negative film, you can correct a specific orange tint, VueScan distinguishes about two hundred types of film. This is actually quite difficult, as any inaccuracy that is made when setting the exposure or processing the film can lead to a shift in colors. VueScan has special tools to solve this problem. Using VueScan is pretty straightforward, and many of the features are automatically enabled for the best color rendering, as this is the default result. The apparent difficulty in using the program can be created by the user himself, digging too deeply into it, VueScan is trustworthy in terms of the default settings in it. The user needs, in fact, to determine in the settings with the scanning mode and, perhaps, the type of film. Otherwise, you can trust the program. If necessary, it is possible to enlarge the pre-view window and the histogram as needed.
You can make adjustments to the brightness, due to the fact that the program in some cases "overdoes" with this parameter. However, the main task of the user is to work with color balance, if this, of course, is required by the content of the image.
White Balance is used to adjust the RGB settings and enhance the naturalness of the image. For example, in the Auto Level mode, the maximum values of the histogram are corrected, which are then displayed in white. Scenes with artificial lighting or orange sunsets are best handled in Neutral. Images that do not contain neutral gray and white colors, for example, photographs with green grass or flowers in the background, most likely do not need white color correction, but other photographs (portraits, landscapes, still lifes) are very dependent on this parameter ... Auto Black and White Points alter the preset total pixel value and preserve the most detail in dark areas, for the most natural reproduction of shadows and half-shadows. It is possible to change these values, that is, to increase the contrast, move the Black slider to the right (however, no more than half a percent). But practice has proven that it is better not to deviate from the default, and leave the contrast correction for later and for Photoshop. These half a percent change in typical scenes is fantastic. But if you abuse the preset changes, you can lose the details of the shaded areas that VueScan saves.
VueScan is not an image editor, Photoshop does this function well. The main task and main advantage of this program is that it can be used to quickly and efficiently correct the color balance. For working with negatives, this means quite a lot. You can download VueScan for Windows x64 and Windows here.
Any technique has a hard fate. First, we look forward to a new product, save money to buy it and, as soon as an opportunity arises, we go to the store. The joy of the new gadget lasts for several weeks, after which love passes and the object of fleeting adoration goes to gather dust on the shelf "on demand".
The other day I had a need for scanning and a small correction of documents (may the lawyers forgive me). Of course, with direct hands all the responsibilities of the scanner can be taken over by the iPhone - an 8-megapixel camera is quite enough, but when quality is at stake, you cannot do without a scanner. It was then that I remembered about the dusty old man scanner Canon CanoScan Lide 30.
I remembered, but it was too late: alas, there was not a single computer in the house based on Windows, OS X flatly refused to be friends with the scanner, and time was running out. The VueScan program came to the rescue, breathing life into a seemingly lifeless device.
Everything would be fine if there was an official driver for the OS X platform under the brainchild of Canon, but between the scanner and mine MacBook Air 10 years difference, but in the digital world it is an eternity. Of course, all problems would have been solved by a banal installation of Windows as a second system, but the lack of a distribution kit and a sane Internet brought all searches to naught. Salvation was found in the program.
The scanner connected to the USB categorically did not react to any gestures, OS X was silent. And lo and behold, the launched VueScan detected the scanner and after a few minutes I received the digital copies I needed in the maximum resolution.
The VueScan app interface, despite very regular updates, froze in the 2000s. Perhaps this is the only drawback of the application, which immediately fades into the background, eclipsed by its multifunctionality and an abundance of all kinds of settings.
The general application menu is displayed in two forms: simplified and detailed. In the latter, you get the ability to control almost any parameters, ranging from resolution and ending with the number of bits per pixel of the image.
VueScan allows not only to revive the scanner without the presence of OS X compatible drivers (according to the developer, the number of supported scanners exceeds 2.5 thousand), but also to use the function keys, assigning the required actions.

The application allows you to see the scanned image in real time and if the result is not satisfactory to you, you can immediately stop scanning. On the Filter tab, the resulting scan can be corrected by correcting the "soapiness" of the image and increasing its sharpness.


The Output tab allows you to select the output format for saving and the directory for saving scanned files.

Curve graphs are also provided for more fine tuning of scanning.

VueScan is a truly feature rich application with a flexible range of settings. Alas, you have to pay for comfort and opportunities. Price tag in $49.95 (and $89.95 for the Pro version) - slightly higher than the average pricing policy of the Mac App Store, but at the same time you no longer need to buy a new scanner and your old digital friend will be able to serve for more than one year. In the trial version, you can take scans, save pictures, but as a result, each copy will be watermarked.
I don't know about you, but I really love the VueScan scanning program. And all because of one property - the presence of scan profiles. It's no secret that scanner manufacturers simply mock poor users, forcing them to do a bunch of actions every time before the file with the cherished image appears on the computer. In order to keep the number of actions to a minimum, a program like VueScan is needed. The main thing is that your scanner is on the VueScan compatibility list. Unfortunately, not all brands of scanners VueScan can work with, especially not expensive ones.
So what is the effectiveness, in my opinion, of this program? For me it is the ability to create various customized profiles. Not so often a person does something non-standard, basically our activities are routine and monotonous. And in scanning too, constant scanning of the same typical documents, photographs, etc. Of course, from time to time you come across something non-standard, but the frequency of this non-standard is incommensurably small in comparison with a typical stream. Also, customized profiles are very good when the scanner is used by more than one person, but many. The situation is also typical: for example, you have one scanner in your room for several colleagues. To wait every time until each of them configures a dozen settings before scanning is not good, isn't it easier to do two actions: select a profile, press the "scan" button? I'm 100% sure it's easier! J
And in terms of the richness of the settings, VueScan is at its best. In general, you can start to practice.
Since the various versions of VueScan do not contain fundamental differences, I will demonstrate everything using the example of version 9.0.66.
So, everything is in order.
We start the installation. It does not raise any questions, except for one question about the drivers.
If you are not sure, then choose "YES".
After installation, you get the following window:

Close the "tip of the day" window and click the "Details" button
A window opens with more detailed information about the settings 
To get full access to the settings, click the "More" button
And here ATTENTION! If your scanner is supported by VueScan, then you will see the item in the settings window "A source:"
in which the brand of the scanner will be written 
if your scanner is not supported, then paragraph "A source:"
you will not have settings in the list. 
It makes no sense to describe all the richness of VueScan settings, instead, I will try to demonstrate working with profiles using an example.
In my day-to-day activities, I often scan this type of documents such as memos.
Since I assume further recognition of service notes and at the same time try to save space, the scanning parameters will be something like this:
- Permission: 400 dpi;
- Image size: A4;
- Color Depth: black and white one-bit image;
- Save format: tiff compressed single bit;
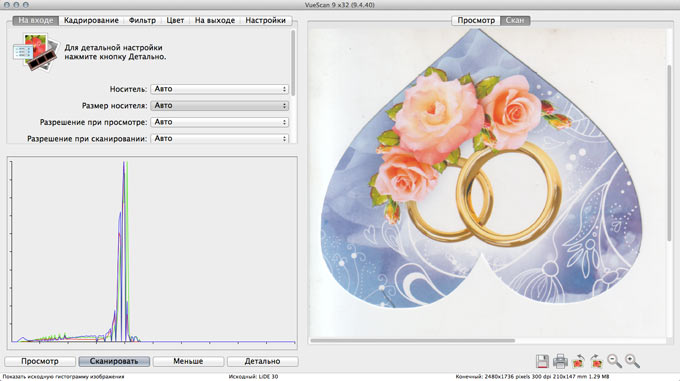
To get such parameters, in running VueScan, go to the first tab "At the entrance"
(usually at startup it is always active) 
configure all parameters as shown in the picture above, i.e .:
- Task: Scan to file;
- Source: (brand of your scanner);
- Mode: Tablet;
- Medium: Text;
- Media size: A4 ...;
- Bit per pixel: 1 bit B / W;
- Sensitivity of black and white negative: approximately 120-145 (higher value increases contrast);
- Viewing Resolution: Auto;
- Scanning Resolution: User Setting;
- Scan resolution (dpi): 400
- Autosave: Scan;
Other parameters on the tab "At the entrance" choose to taste J
Now go to the tab "Cropping"

Here, in fact, one parameter is important to us "Cropping frame size:"
, put it in A4 format.
The next two tabs "Filter" and "Colour" in black and white mode, images are not available, so we skip them and go to the tab "At the exit" .
On a bookmark "At the exit"
parameters are configured: where, in what format the scanned image will be saved. For my case with memos, the view will be something like this: 
- Default folder: here we set the path where the scanned image will be placed;
- Print size: Scan size;
- Magnification (%): 100;
- Autoset file name: Enabled;
- Create TIFF File: Enabled;
- TIFF file name: @ .tif;
- TIFF file type: 1 bit B / W;
- Compression for TIFF: Auto;
- Profile for TIFF: Included;
After setting all the parameters, you can click the button "View"
and look at the scan results in the preview window. If everything is fine, then proceed to the most important thing, to save the settings profile. To do this, press the menu item "File"
-"Save settings"

and set some meaningful file name, for example "Servants 1 bit BW"

push "Save"
.
Everything. This completes the setup. Now you can scan the document by clicking the button "Scan" , and see the results of work in the folder specified on the tab "At the exit" ... As a result of scanning, a file with approximately the same name appeared in the folder "Scan-150427-0001.tif"... As you can see, the file name consists of the "Scan" prefix, the current date and a counter that will automatically increase with each new scan.
And now, in fact, about efficiency. J Subsequent scans of "Memo" documents will be done for THREE pressing:
Now customize the rest of the document types while maintaining the customization profiles. My list looks something like this:
Over time, you will not need to enter the menu "File" , you will remember under which function key you have which profile, and you will make its choice by pressing on the keyboard. And then you just have to press the button. "Scan" .
And what about your colleagues? They will be happy, too, saving their profiles and saving you time! 
Forgive me that in this article I do not analyze in detail the settings for each type of document. Unfortunately, this topic is very extensive and requires separate large articles. J Stay tuned for updates!
Windows XP SP2 is installed on the computer due to its technical characteristics and the presence of a volume license for this OS.
The MFP is connected to the USB port of the computer using a standard length Am-Bm cable.
When installing under Windows XP, the scanning software was not installed on the native disk.
After starting the utility for installing software from the software disc, only Twain drivers were automatically installed.
Twain driver setting has only one device installed: fs-1030mfp / fs-1130mfp (usb). It is marked with a check mark.
But FineReader (7.0) for some reason does not see Köseru among the available scanners.
Actions: Scanning via Fine Reader -> scan -> from a scanner -> scanning in progress -> Message: "Connection failed" -> Message "Abnormal interruption of the RPC connection with the scan manager. Further interaction with it is impossible."
Then we went the second way and installed the WIA USB drivers that came on the disk supplied with the delivery.
When installing the drivers, a message was displayed that the drivers did not pass compatibility testing.
The device was installed through the snap-in: "Control panel" - "Scanners and cameras" - "Add a device".
The device did not appear immediately in the list of devices "Control Panel - Scanners and Cameras".
But after installing the drivers, the Kyocera section appeared in the list of device drivers.
And the scanner was added. The driver was taken from the newly appeared section.
But when I tried to open this device: Start -> Settings -> Control Panel -> scanners and cameras -> kyocera fs-1130mfp wia driver (usb) -> gave a message: "The computer could not detect the scanner or camera. Make sure the device is turned on and connected correctly. "
Device manager -> kyocera fs-1130mfp wia driver (usb) -> "device is working fine"
In the "list of drivers" of the device (opened through the device manager), a number of file providers are missing, or are displayed as pseudo-graphics. Or they belong to cyocera.
Launch "The wizard for working with a scanner and a digital camera" -> "The computer could not detect the scanner or camera. Make sure that the device is turned on and is properly connected to this computer."
In this case, printing to the device is normal. Both from a local computer and from a network computer. (the printer is shared for general use by means of Windows XP).
There was an assumption that the drivers in the boxed delivery are designed only for win7. Once they were not installed by the installation utility.
Therefore, I downloaded the driver for the scanner for Windows XP from the official website. Hence:
http: //cdn.kyostatics.net/dlc/eu/driver/all/scannerdrv_fs-103x.-download ...
In the list of devices, the device killed and put it all over again.
As in the case of installing from a disk, the drivers swore that they were not tested for compatibility with the OS.
This did not solve the problem. The device is visible in the list of devices, but none of the programs is defined as "enabled".
I asked to test it in an authorized service center, where there is another unit from this batch (which did not send a fax) on another machine under XP, in order to eliminate the problem in the curvature of "a particular unit", "computer" and "whoever installs these drivers."
All the same. Miracles didn't happen. The scanner did not work even with a specialist from the service center.
At the same time, when installed on a seven, a similar unit installed not only the drivers, but also the software for scanning. Which works with USB connection.
In this case, the service center assured me, "this defect is not a warranty case."
And I only have a license for XP.
Please tell me how you can solve this problem if you leave the local USB connection. in the office where the unit is located there is no free LAN socket to go through the use of the device "over the network".
User Hardware Information
Equipment set with additional devices
Scanner Option:
Fax Option:
Network / Workstation Connection Method
Standard ways:
Operating system
Standard OS:
Device driver
Driver name:
Kyocera fs-1130mfp WIA driver (USB) from 11/14/2011
Driver version:
Answers
USB scanning or local scanning on XP OS is possible only with the use of third-party programs.
It's strange that with Fine Reader it is not possible to scan. Try any other third-party scanning software.
The setup procedure in XP is quite simple. After installing all the drivers from the disk, you only need through the book. START - KYOCERA-- select the model of your scanner (USB), which you did; that's all.
Next, open any third-party scanning program and control the scanner from the program itself.
On Win 7, WIA works fully and there is a corresponding support in the Windows itself. Therefore, such questions usually do not arise. If WIN 7 is correct.
Documentation and software on the website: kyoceramita.eu