Reinstall Windows 10 without losing data. How to reinstall Windows while maintaining settings and installed programs. Return to original condition
According to Microsoft's official statement, if once there was a dozen installed on the computer, then reactivation would not be required. The installer will find secret information, and there is no need to re-enter the key. Yes, the program will not accept the key from the seven, but it is easily activated if the user previously bothered to update Windows 8 and did everything as expected. The system communicates with the server on its own. Thus, Microsoft is trying to wean us from the fear and from the thought of how to reinstall Windows 10, if after July 29, 2016 the update is no longer possible.
The activated instance is deleted without losing the license. Even if a clean reinstallation of Windows 10 is planned, the truth is not said anything about the case when we want to add the seven or the eighth version to our disk. Will this erase the license? Will it be possible to remove old software and install new software after a while without loss? We believe the easiest way to find out about this is from Microsoft technical support.
Established funds
The first thing that comes to mind is the regular menu. From which you can reinstall the system, saving your data or overwriting everything to the last bit. Both are at the discretion of the user. To do this, go to the settings and select Update and security. There is a Recovery tab here, which Microsoft claims will help you quickly and easily get rid of system problems. The exact algorithm is unknown, but we believe that the process involves two stages:
- Registry check.
- Catalog and overwrite all system files.
It turns out to be a pristine system, but all user data can be saved.
A system reset, as it was written, can be done with the removal or preservation of your files. But apart from that, Microsoft provides us with a real shredder. For a certain amount of time, it will carefully overwrite all the data in case a virus is registered somewhere. Frankly, it’s hard to believe that malware creators are so naive as to hide it so badly, but it’s possible. Let us explain that the shredder wipes the entire available disk area by byte or by byte (or by another algorithm).

We believe that further instructions are not needed, since everything is already extremely clear. The only problem can arise with updates. Usually Windows tries to save them in a hidden folder, but some users delete it to free up free space. In this case, you will have to download packages from the server and install a little. The good news is that there aren't many updates on Windows 10, there were many more on Windows 7. Please note that the shredder does not overwrite the license. Microsoft emphasizes that after July 29, 2016, there will be no problems with a clean installation on a machine with an activated copy of the product (if this happened once). However, a complete system replacement will, of course, erase all user data.
Bootable media
Generally speaking, on its website, Microsoft offers to immediately update any version of the dozen, but for younger generations this no longer works, as we mentioned above. After July 29, 2016, the company's policy changed dramatically. Now you can reinstall Windows 10 without losing data only through bootable media:
- Flash drive.
- DVD disc.
We do not exclude that other exotic options are possible, but we will not consider them as unnecessary. The media is created by the Microsoft Media Creation Tool. This is a truly versatile tool that will allow you to perform at least three tasks (to choose from):
- create a bootable image of any version of Windows 10;
- burn a DVD disc using the created .ISO file;
- create a bootable USB drive.
This is the full range of tasks that can arise during the process. You can download the Media Creation Tool at microsoft.com/en-us/software-download/windows10. The location may change periodically, so check this point through the search engine.
Reinstallation process
Let's say we have a distribution DVD. From a flash drive, everything is installed in the same way. We put the drive in the first place in the list of boot devices. Here is an example of BIOS settings for a typical PC. We remind you that you can enter SETUP by pressing one of two keys, which one depends on the version of the motherboard:
This is an important point, because (especially on laptops) the images change so quickly that there is no way to detect the inscription at the bottom of the screen. There is a chance that you will have to try both keys. Patiently click them at a rate of 2-3 times per second until the settings window appears.

Moving devices up and down is carried out by pressing the "plus" and "minus" keys on the keyboard. These are standard combinations. Put the drive in the very first place. After that, you need to exit, saving the settings: F10 → Enter (select Yes when exiting).
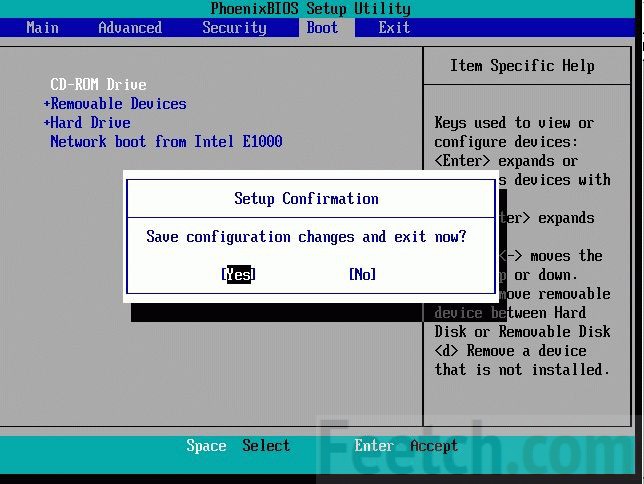
At the time of reboot, carefully read the labels. As a rule, the Windows installer during this period requires you to press "any key" on the keyboard. This is given about 5 seconds, the points that appear serve as the reference. Don't miss the moment! It is recommended to create a combined (multiboot) media for 32 and 64 bit processors. Next, you need to patiently wait for the distribution kit to unpack the interactive interface and start polling us for the desired options. Along the way, the windows will have the System Restore option, skip it, we have other plans, click install. After a while, a window will appear prompting you to enter the key, read it carefully, it says something just for our case.
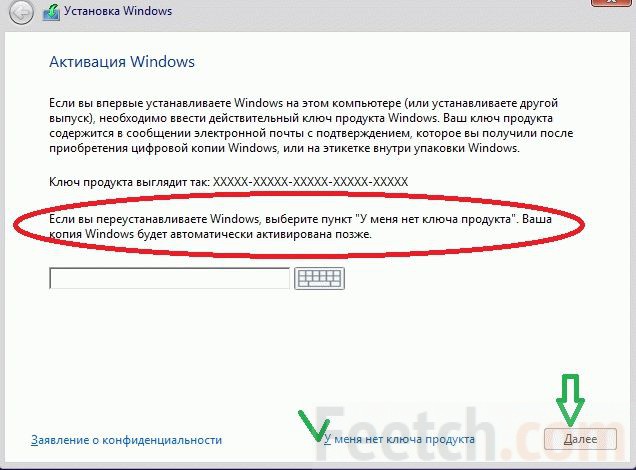
Click. I don't have a key, because that's what the corporation advises. Next, a list of dozen versions will appear. Carefully select the one that is already there. Because otherwise you will be taken back to the very beginning. Nobody needs it. The next step is to accept the terms of the license agreement.

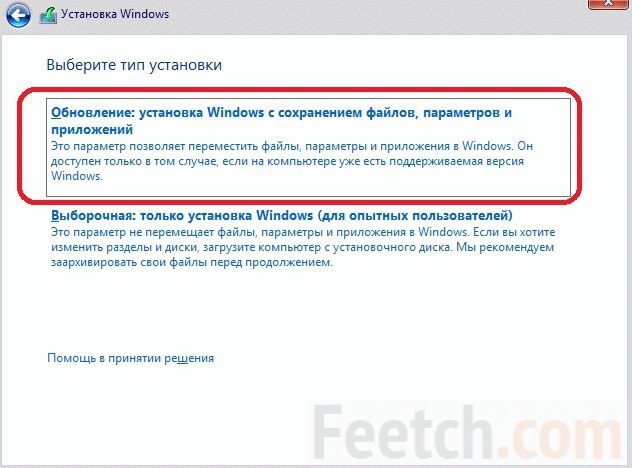
Reinstalling Windows 10 requires selecting the appropriate option. It's called Renewal. Just like what we discussed at the beginning. This will reinstall Windows 10 while preserving all user programs. In principle, a selective type allows you to do the same, but you need to be at least a little aware of what is being done. Otherwise, you can easily demolish your operating system along with files, program settings.
From under the running operating system
We have seen that it is possible to reinstall Windows 10 without a disk. But if you wish, the installer can be easily launched directly from under a running operating system. From this practically nothing changes. At least in cases where you need to reinstall Windows 10 on a laptop or desktop computer system unit.
If the system does not boot
There is another option when the system does not boot at all. We do everything in the same way as described above, until the window with the Install button appears. It is here that there is an inscription System Restore in the lower left corner. This is where you need to click with the mouse.

Are you having or having problems with your Windows 10 PC / laptop? Or do you want to repair your Windows 10 installation but don't want to lose apps and data? This is how you can restore Windows 10 without losing programs and files. Windows 10 Settings prompts you to reset Windows 10 installation while preserving personal files. But, in the process, the reset removes installed applications, including classic desktop programs.
If you have dozens of programs installed on your Windows 10 computer and tons of data, there is no point in resetting Windows 10, as it does not allow you to keep installed applications. If you are having problems on your Windows 10 computer and you want to repair the installation and solve all the issues without losing the installed programs and data, then you need to use this guide to repair your Windows 10 installation without losing data and applications. To proceed to this guide, you will need either Windows 10 to ISO, a bootable USB for Windows 10, or Windows 10 bootable DVD.
Important: As stated above, this method will help you save all your applications and data. But, just in case, we still recommend that you create a backup copy of all data in a safe place if something goes wrong or wrong during the repair.
Repair Windows 10 installation without losing data and apps
Step 1: You can skip this step if you already have an ISO image or bootable media with Windows 10. Also, you need to be sure to download the latest version of Windows 10 from Microsoft which uses the media creation tool in Windows 10. You can refer to our sources to download Windows 10 from Microsoft for further step-by-step directions.
Remember that you do not need to download Windows 10 ISO if you have a bootable DVD or bootable USB for Windows 10. It is also important to note that the ISO image or bootable media must be the same version of Windows 10 that is currently installed on your PC.
Step 2: find the folder that contains the ISO image, right-click on the ISO file and click the Mount button - option to mount the ISO image. Open This PC to see New Disk. On a PC, you need to right-click on the new drive and then click the open in a new window button to open it.
If you already have a bootable DVD or a bootable USB flash drive with Windows 10, you will need to connect them to your computer, then in This computer you need to right-click on the USB drive, and then click the open button in a new window to open a bootable USB drive or DVD drive.
Step 3: in the root folder of the ISO / DVD / USB, you will see the settings file (.exe). Double click on the setup file to start the Windows 10 setup.

Click Yes if you see a User Account Control message on the screen.

Step 4: You will receive the message “Getting important updates” on the screen. Select not now, and then check or uncheck I want to help make your Windows installation a better option.

Click the next button. You will see “We are getting a few things ready” on the screen for a few seconds.

Step 5: next, you will receive a license agreement on the screen. I agree with the terms in the license agreement, select the I accept the terms in the license agreement check box, and then click the following button. The installation will now check that your computer has sufficient space and meets the minimum system requirements.

Step 6: in a few minutes you will receive the message “Ready to install” on the screen. This is the most important step in the procedure. On this screen, make sure Windows 10 Home and Pro is installed and keep personal files and apps selected. If not, click Change to save the link, and then select Keep personal files and apps, an option to repair your Windows 10 installation without losing data and installed apps.


Finally, click the Install button to begin repairing your Windows 10 installation. It can take up to an hour to complete the repair or install Windows 10.


After that, you will see the lock screen in Windows 10. Press the Enter key, and then enter the password for the user account. Windows 10 will display an animation sign for a few seconds before letting you into the desktop.
That's all! You have successfully repaired Windows 10 installations without losing any apps or data.
You might also want to know how easy it is to execute from a problematic PC.
Often inexperienced users, purchasing new equipment, begin to experiment with it. There is no other way of hands-on learning - reading articles is no substitute for hands-on experience. But this learning method also has a downside - a complete system failure or system failures. What to do in this case? I need to know how to reinstall Windows 10 and the problem will be solved.
How to reinstall Windows 10 on Windows 10
If the system boots, then you can try to simply restore it. What is good about the 10-ka - it is provided, as on the phone. And if it loads, then you can take advantage of this.
So, reinstalling Windows 10 to Windows 10 will be completed successfully.
Clean reinstallation of Windows 10
With the previous method, not a complete reinstallation occurs, but a rollback of the system. If you want to reinstall Windows completely - read below.
Create bootable media. We will tell you how to do this from the Microsoft website, but you must have a key in order to activate the license in the future. Go to the site https://www.microsoft.com/en-us/software-download/Windows10 and carefully read the instructions. Start downloading.


This is a boot device creation program. Click. After a short wait, the program will ask for consent to launch - we answer "Yes". We accept the terms.

Selecting media creation.

Created for this PC, leave a check mark - the program knows the parameters. If you create it for another, uncheck the box and specify it manually.

We decide - a flash drive or a disk.


At this point, an important action should be taken. Double-click "This PC" on your desktop. And write down the capacities of the hard disk partitions. When installing, no letters - there will be no names. In order not to be mistaken by installing the system on the wrong disk, you need to know which one is the system one.

After finishing, you need to install a boot device in the BIOS. Reboot and enter it. On most PCs, when booting, it is written with which button you can do this - F12, F8, DEL. On laptops, it's a little more complicated. For example, Lenovo has a special button for restarting the BIOS. Search.
We went into the menu, find Boot and navigate to it with the keyboard arrows.

We set the required parameter - flash drive or CD / DVD-disk.

We save with the F10 button and the reboot starts again. But already from a new carrier. At this point, the installation will begin.


You will be prompted for a key. If it is, enter it. If not, click "I don't have a product key."
Select a version. There is also a nuance here. You cannot install PRO on top of the home one. And vice versa.

The only exception is the purchase of a license for the corresponding assembly.
select an installation option. Since we need to reinstall everything again, we click on the second parameter.

Now the information about the capacities of the hard drive partitions will come in handy. Select the one you want, click "format" and then "Next".

Copying files starts.

Then again a request to enter the key, if it was not specified or the system did not find it. Click Do It Later.
They will offer to connect to wi-fi if the network is found within range or there is a wifi modem on the PC. You can connect or skip this step.

There was a proposal to select the location (not geographic) of the computer - select the second item - home PC.

Enter your username and password with confirmation.


This is where the process ends. You managed to reinstall Windows 10 to Windows 10.
Overall, reinstalling Windows 10 completely isn't that difficult. You have to be careful and careful, and the system will do everything on its own.
Correctly reinstall Windows 10 on laptop
On laptops, everything is done in the same way. There is a nuance for the keys stitched into the BIOS. If you are reinstalling from Windows 8.1 purchased from the store with the device, then you probably had the key. And it is sewn into BIOS.
So, during installation, no keys are needed and the system will be activated automatically. This is a great gift for owners of licensed 8's and 7's. After all, a dozen costs about 8,000 rubles. It turns out a little expensive.
Reinstall Windows 10 on Windows 7
With Windows 8, everything is clear - the unsuccessful brainchild and automatic update to Windows 10 is a kind of excuse for its bugs.
7 users are wondering - is it possible to reinstall Windows 10 on Windows 7? Of course. If you had a key, use it. When installing, enter your credentials with Microsoft and the new OS will be activated automatically.
If you are a staunch supporter of free software, use activators.
Reinstallation of Windows 10 on Windows 7 is carried out in the same way as described above - using the MediaCreationTool application.
Good day.
On July 29, one significant event took place - the new Windows 10 OS was released (note: before that, Windows 10 was distributed in the so-called test mode - Technical Preview).
Actually, when a little time appeared, I decided to upgrade my Windows 8.1 to Windows 10 on my home laptop. Everything turned out quite simply and quickly (1 hour in total), and without losing any data, settings and applications. I made a dozen screenshots, which may be useful for those who also want to update their OS.
Windows Upgrade Instructions (to Windows 10)
What OS can be upgraded to Windows 10?
You can upgrade to 10-ki the following versions of Windows: 7, 8, 8.1 (Vista -?). Windows XP cannot be upgraded to Windows 10 (you must perform a complete reinstallation of the OS).
What are the minimum system requirements to install Windows 10?
1 GHz processor (or faster) with PAE, NX and SSE2 support;
- 2 GB of RAM;
- 20 GB of free hard disk space;
- Video card with support for DirectX 9.
Where to download Windows 10?
Official website: https://www.microsoft.com/ru-ru/software-download/windows10
Starting update / installation
Actually, to start updating (installing) you need an ISO image with Windows 10. You can download it on the official website (or on various torrent trackers).
1) Despite the fact that you can update Windows in various ways, I will describe the one that I used myself. First you need to unpack the ISO image (like a regular archive). Any popular archiver can easily cope with this task: for example, 7-zip (official site: http://www.7-zip.org/).
To unpack the archive in 7-zip - just right-click on the ISO file and select "unzip here ..." in the context menu.
2) After the installation starts, Windows 10 will prompt you to receive important updates (in my opinion, this can be done later). Therefore, I recommend that you select the "not now" option and continue with the installation (see Fig. 1).

Rice. 1. Start installing Windows 10

Rice. 2. Checking system requirements
3) When everything is ready for installation, you will see a window as in fig. 3. Make sure the box next to "Save Windows settings, personal files and applications" is checked and click Install.
4) The process has started ... Usually copying files to disk (window as in Fig. 5) does not take much time: 5-10 minutes. After that, your computer will restart.
Rice. 5. Installing Windows 10 ...
5) Installation process
The longest part - on my laptop, the installation process (copying files, installing drivers and components, configuring applications, etc.) took about 30-40 minutes. At this time, it is better not to touch the laptop (computer) and not interfere with the installation process (the picture on the monitor will be approximately the same as in Fig. 6).
By the way, the computer will be rebooted 3-4 times automatically. It is possible that for 1-2 minutes nothing will be displayed on your screen (just a black screen) - do not turn off the power and do not press RESET!
Rice. 6. Windows update process
6) When the installation process comes to an end, Windows 10 will prompt you to configure the system. I recommend to select the item "Use standard parameters" see fig. 7.
Rice. 7. New notification - increase the speed of work
7) Windows 10 notifies us during the installation process about new improvements: photos, music, new EDGE browser, movies and TV shows. In general, you can immediately click next.
Rice. 8. New apps for the new Windows 10
8) Upgrade to Windows 10 completed successfully! It remains to press only the button enter ...
Below in the article are some screenshots of the installed system.
Rice. 9.Welcome back Alex ...
Installing Drivers
After updating Windows 8.1 to Windows 10, almost everything worked, with the exception of one - there was no video driver and because of this it was impossible to adjust the brightness of the monitor (it was at the maximum by default, as for me it hurts my eyes a little).
In my case, interestingly, the laptop manufacturer's website already had a whole set of drivers for Windows 10 (dated July 31). After installing the video driver, everything began to work as expected!
Impressions...
In general, there are not so many changes (the transition from Windows 8.1 to Windows 10 does not provide anything in terms of functionality). The changes are mostly "cosmetic" (new icons, START menu, picture editor, etc.) ...
Probably, someone will find it convenient to view pictures and photos in a new "viewer". By the way, it allows you to easily and quickly make easy editing: remove red eyes, lighten or darken the image, rotate, crop edges, apply various filters (see Fig. 10).
Rice. 10. Viewing pictures in Windows 10
At the same time, these capabilities will not be enough to solve more advanced tasks. Those. in any case, even with such a photo viewer, you need to have a more functional picture editor ...
The viewing of video files on a PC is quite well implemented: it is convenient to open the folder with films and immediately see all the episodes, titles, previews for them. By the way, the viewing itself is quite high-quality, the picture quality of the video is clear, bright, not inferior to the best players.
I can't say anything concrete about the Microsoft Edge browser yet. The browser is like a browser - it works quite fast, it opens pages as quickly as Chrome. The only drawback that I noticed is the distortion of some sites (apparently they are not yet optimized for it).
START menu it has become much more convenient! First, it combines both the tile (introduced in Windows 8) and the classic list of programs available on the system. Secondly, now if you right-click on the START menu, you can open almost any manager and change any settings in the system (see Fig. 12).
Of the minuses
I can single out one thing for now - the computer started to boot longer. Perhaps this is somehow related to my specific system, but the difference is 20-30 seconds. visible to the naked eye. Interestingly, it turns off as quickly as in Windows 8 ...