How to connect an old hard drive to a new computer. How do I connect an IDE hard drive to a new motherboard? When do you have to connect hard drives
should not be accompanied by you with any difficulties. At the request of a visitor to our site, let's go through all the stages connecting a SATA hard drive from placing in the system unit to defining it in the BIOS. We will install a Western digital disk drive (465 GB, IDE) of the Serial ATA II standard.
Note: You may also find useful articles on this topic: How to install in the system unit, and!
to the Asus P5K SE motherboard with four SATA connectors on board

an Optiarc DVD RW drive is already connected to one connector and it is rumored to work, well, now we will check everything, we start working with the computer turned off.
First of all, we insert our hard drive into a special basket of our system unit, there is no need to remove any video card, it is located above and we put the hard disk just below it, it fits perfectly into the place offered to it

You can see that there is enough space under it for ventilation, then we fix it with four screws. There are special rubber washers between the basket and the case of the hard disk, a feature of this case is 6AR1.
And here are our four SATA controller connectors on the motherboard, connector number three is occupied by a floppy drive, and the other three are free, let's choose one of them, for example, connector number one

We will not connect the information SATA cable for now, it will interfere with us when we connect the power cable to our hard drive, so we connect our hard drive and the power supply.
There is a free cable from the power supply, we connect it to the power connector on the hard disk, connect

if your power supply does not have a SATA cable, you will need an adapter like this

Now it's the turn of the information cable, with absolutely identical L-shaped plugs at the ends

connect one end of the cable to the motherboard and the other to the hard drive


now close the side cover of the system unit and turn on the computer.
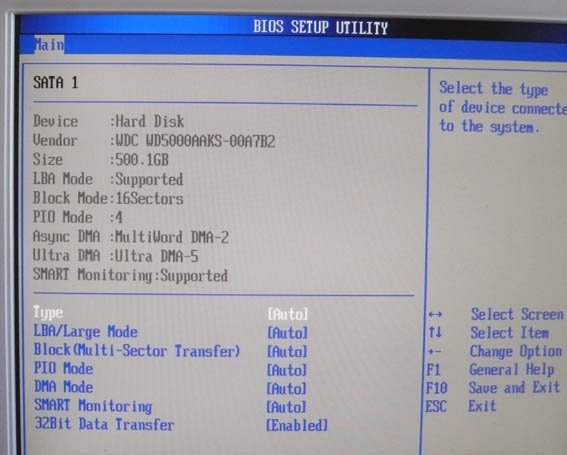
We immediately go to the BIOS and see if we are correct connected a SATA hard drive... On the initial Main tab, you can see that our Western digital hard drive is defined on the first SATA controller, and our Optiarc DVD RW drive is on the third.

All information about our hard drive
To install the operating system, we need to change the boot priority from the hard disk to the floppy drive on the Boot tab, go to this tab and change

We insert the distribution kit with Windows into the drive, reboot and install the operating system.
And sometimes friends are such a seemingly simple act as connecting a SATA hard drive to the motherboard, turns into a whole adventure. Our reader Alexander is faced with such a problem. The SATA connectors on his motherboard were inconveniently located next to the PCI Express connector on the video card. So it was almost impossible to connect this very video card, if the hard drive was already connected to the SATA connectors, the video card simply rested on the SATA interface cables and was not completely inserted into its PCI Express slot. Alexander got out of the situation like this: he bought two SATA interface cables, with a connector in the form of a corner, and he even cut one off like this and then connected everything.

Have you bought a brand new hard drive for your computer and do not know how to connect it ?! In this article I will try to talk about this in detail and in an accessible way.
First, it should be noted that the hard drive is connected to the motherboard either through the IDE interface, or through the SATA interface. The IDE interface is currently considered outdated, as it was popular back in the 90s of the last century, and new hard drives are no longer equipped with it. The SATA interface is found in all computers that have been produced since about 2009. We will consider connecting a hard drive with both that and that interface.
Connecting a hard drive via SATA interface
Disconnect the system unit from the network and remove the side panel. There are compartments for devices in the front of the system unit. The upper bays are usually installed optical drives CD / DVD, Blu-Ray, and the lower ones are intended for installing hard drives. If your system unit does not have bays as shown in the figure, you can install a hard drive in the upper bay.
We install the hard drive in a free slot so that the connectors look inside the system unit, and fasten it to the case with screws: two screws on one side and two on the other.

This completes the installation of the hard drive, check that it does not dangle in the cell.
Now you can connect the hard drive to the motherboard.
If you purchased a hard drive with a SATA interface, then the drive itself has two connectors: the shorter one is responsible for transferring data from the motherboard, the longer one is for power supply. Additionally, there may be one more connector on the hard disk; it is useful for supplying power through the IDE interface.

The data cable has the same connectors at both ends.

We connect one end of the ribbon cable to the SATA data connector on the hard drive.

The data loop plug can be either straight or L-shaped. You do not have to be afraid for the correct connection, you simply will not be able to plug the cable into the wrong connector or the wrong side.

We connect the other end of the cable to a connector on the motherboard, usually they are bright in color.

If the motherboard does not have a SATA connector, you need to buy a SATA controller. It looks like a board and is installed in the system unit in the PCI slot.
We finished connecting the data cable. Now we plug the power cable into the corresponding connector on the hard drive.

If your power supply does not have connectors for SATA devices, and the hard disk does not have an additional power connector for the IDE interface, use an IDE / SATA power adapter. Connect the IDE plug to the power supply, the SATA plug to the hard drive.

That's all, we connected a hard drive with a SATA interface.
Connecting a hard drive via IDE interface
Install the hard drive in the system unit in the same way as described in the paragraph above.
Now you need to set the hard disk operating mode: Master or Slave. If you are installing one hard disk, select the Master mode. To do this, you must put the jumper in the desired position.

The IDE connectors on the motherboard are as follows. Each of them has a designation: either IDE 0 - primary, or IDE 1 - secondary. Since we are connecting one hard drive, we will use the primary connector.

On this all the hard drive is now connected.
I think now, using the information from this article, you can NS Connect the hard drive to your computer.
And also watch the video
I recently received a question in the mail:
Hello Maxim. Your subscriber writes to you with a proposal - a request. Tell us how to connect the 2nd hard drive and 2 DVD burners correctly. I think that many ordinary PC users are interested in this.
The fact is that it is impossible to describe all connection methods and options in one note, due to the variety of connection interfaces and their combinations on motherboards from different manufacturers.
On the one hand, now the most common are only two interfaces for connecting hard drives and optical drives: IDE (IDE) and SATA (SATA), and it seems that connecting everything is simple.
On the other hand, motherboard manufacturers have made a very large number of motherboards with very different configurations of these interfaces: from 2/4 IDE and 1 SATA at the time of the SATA interface on the market before 1 IDE and 6/8 SATA at the moment (hereinafter, the number in front of the interface means the maximum possible number of devices that can be connected via the interface to the motherboard).
At the same time, there are such motherboards in which the simultaneous operation of all interfaces is impossible, i.e. for example, when connecting one disk by SATA disconnected 3rd and 4th IDE.
With a gradual transition to the interface SATA everything will become easier - one device - one connector.
This means that each device is connected to its own connector, and the user does not need to additionally configure the device and think about which side of the cable to connect to the motherboard, and which side to the device. And in case of problems, it is better to tell in detail about the option where the problems arose.
On my home PC (motherboard GigaByte GA-P35-DS3L) I have two SATA hard drives, one SATA DVD-RW and one IDE DVD. How they are connected, I will show in the following picture:
The figure shows about 1/6 of the motherboard. Green- this is a connector for IDE devices, I have an IDE DVD connected to it. Yellow- these are connectors for SATA devices, I have two SATA hard drives and one DVD-RV SATA connected to them.
The southbridge heatsink and PCI-Express slot retainer are shown for quicker location of the connectors. In most motherboards, the IDE and SATA connectors are located next to the south bridge.
The following figures show the cables for connecting IDE devices. These cables have 80 cores and can be designated as "IDE-100/133 cable" or "ATA-100/133 cable"... There are also options for 40 cores, but they are practically not used anymore.


The following figure shows the cables for connecting SATA devices. The manufacturer GIGABYTE makes not simple cables for connection SATA, but "with conveniences".
The first is a metal clip at both ends of the cable. This latch prevents the cable from unplugging itself, for example, when you insert or remove the video card from the system unit and accidentally touch the cable.
The second is an angled connector at one end of the cable. It is convenient to use such a cable for short enclosures, in the case when the cable must be led directly down from the DVD or hard drive. I recommend using these cables.
At the moment, other manufacturers have begun to complete their motherboards with cables with such "options". You can also try purchasing them separately.

If you have purchased a new hard disk or DVD with a SATA connector, and your PC is not older than 2 years, then connecting via SATA is very simple.
First- install the device in the case. DVD - as you like, and the hard drive - preferably so that there is a small empty space above and below it for better ventilation.
Second- connect the information connector of the device and a free connector on the motherboard.
Third - connect power to the device. The device may have a new type of power connector (for SATA), it may be an old type (Molex), or both.
The following picture shows as an example the rear side of the hard drive and the connectors are labeled: SATA power, SATA information, Molex power.

If there is only one connector, then plug it in.
With the advent of SATA devices, power supply manufacturers began to equip their units with special power connectors for connecting such devices.
Most new devices are already shipping without a Molex connector. If there are no connectors for SATA in your PC's power supply or they are already occupied, then you can use a special power adapter, which is shown in the next picture.

The white 4-pin connector is the connector Molex... The two black flat connectors are for SATA devices.
If the power connector two, then you need to connect any one of them, but not both at once! I recommend using the power connector for SATA devices.
After that, you can turn on the PC, go to the BIOS and check that the device is visible. If it is not visible, all SATA connectors must be switched to AUTO mode. Then you need to save the changes in BIOS and exit. After that, you can work with the device
If you are not sure how to properly connect the device or you have problems with the connection, then watch the video tutorial below or go through our step-by-step video course "Assembling a computer from A to Z".
The article uses materials from the site www.nix.ru

The ability to connect additional hard drives will be very useful to you if there is a lack of free disk space on the already installed ones. You can connect the HDD to a personal computer:
- Installed in the system unit using standard SATA connectors on the motherboard.
- Installed in the system unit using the SAS connectors of the RAID controller.
- Using a USB-SATA adapter adapter.
It is interesting! PredecessorSATA was the interfaceATA (another name -IDE). The difference lies in the method of data transmission - serial transmission fromSATA parallelATA. It is generally accepted that sequential transmission is faster, however, for the average user, the difference is invisible.
SATA
Step 1. Remove the case cover of your system unit.
Step 2. Connect the data cable to the connector on the motherboard.
On a note! The slot number is not important. The definition of a bootable hard disk is based on the software installed on it.

Step 3. Connect the data cable to the connector on the hard drive.

Step 4. Connect the power cable to the hard drive connector.

Important! When connecting the cable, the power of the computer must be turned off. When connecting a ribbon cable with voltage applied to it, there is a high risk of damage to the hard disk controller, or controllerSATA motherboard! In the event that your power supply has power connectors only for hard drivesIDE, use a special adapter.

Step 5. Fasten the hard drive to the chassis with the screws.

Important! Make sure that the cables do not come into contact with the fan blades of the system unit.
In the event that you are using a 2.5-inch drive, use special sleds to secure the hard drive more tightly inside the system unit.

Connecting the hard drive inside the case to the connectorsSAS
These connectors are backward compatible, that is, SATA can be connected to SAS, but SAS to SATA cannot.
Step 1. Install the hard drive into a special frame (sled) of the appropriate size.
On a note! Constructs are designed for certain form factors, that is, you will not be able to insert a 2.5-inch disk into the controller basket of 3.5-inch hard drives.

Step 2. Insert the slide into the controller basket and slide until the slide handle locks into position.

Important! Remember to check the cable connectionRAID to the motherboard and change the settings of your controller.

Connecting a 3.5-inch hard drive using an external powered adapter
Step 1. Attach the adapter to the hard drive.

Step 2. Connect the adapter and the desired port on your computer with a USB cable.

Step 3. Connect the power cable to the adapter.

Step 4. Apply power to the adapter by switching the toggle switch to the working position.

Step 5. Install drivers for the connected equipment, if necessary.
Connecting a 2.5-inch hard drive using a 3.5-inch adapter
2.5-inch drives are commonly used in laptops. The connectors are no different from 3.5 drive connectors, but the laptop's hard drive is attached to the case using a special basket (sled).

Step 1. Remove the skids or other constructs from your hard drive.

Step 2. Follow the instructions to connect the 3.5 hard drive using the adapter.
Connecting a 2.5-inch hard drive using an appropriate adapter
When using a special adapter for 2.5 hard drives, you do not need to remove the slide. As a rule, such adapters do not have external power supply, and receive voltage from the USB port of the computer.

Step 1. Connect the adapter to the hard drive.

Step 2. Connect both ends of the USB adapter cable to the ports on your computer.
Important! Two ends of the cable are needed because information is transmitted through one of them, and the adapter power is transmitted through the other.
Video - How to connect a hard drive
Conclusion
We examined three different ways to connect hard drives with SATA connectors to a personal computer. Each of them requires the purchase of additional equipment, at least - loops. In the event that you decide to use a SATA drive as an external one (connected via a USB adapter), it is recommended to purchase a reliable protective case for the drive. When working with the device, the cover should be removed to avoid overheating. Some parameters of hard drives working with different technologies are presented in the summary table.
| Name | Data transfer rate, Mb / s | Number of devices per port |
|---|---|---|
| IDE (ATA) | 133,5 | 2 |
| SATA R.1 | 150 | 1 |
| SATA R.2 | 300 | Up to 15 |
| SATA R.3 | 600 | Up to 16 |
| SAS R.150 | 150 | Up to 4 |
| SAS R.300 | 300 | Up to 4 |
| SAS R.600 | 600 | Up to 4 |
Hello! I got an old laptop, I decided to give it a new life. What came out of this, what "nuances" arose.
My comrades gave me an old laptop Acer Travelmate 290 for spare parts. “The old one does not work anyway.” The “breakdown” was that someone had already reached the “spare parts” - there was no hard disk and RAM. Threw in others, borrowed for a while - it works. Somehow it was a pity to let the old man go for scrap.
I understood that the idea of restoring an old laptop on a Pentium M is a matter that does not make sense. But, somehow the hand did not rise, and the laptop outwardly looks like it just stood there and the dust was blown off. I was very surprised by the ideal state.
So, it's decided, I'll do it! I didn’t have an IDE disk, I looked at the prices from local hucksters for details. Yeah ... - 20 euros for a used 60Gb, this is the cheapest thing I found for a used disk 10 years old (minimum). I decided to look at the adapters, the Chinese comrades have everything for everything, it has long been known. Found. I paid. By the way, it came quickly - in 10 days. They threw it right into the box. Yellow envelope. Inside - 
I planned to "fasten" it to a laptop with a Kingdian 60Gb SSD. I inserted it on the removed board. Nothing appeared in the BIOS ... But, while I was waiting, I studied the topic a little.
So, nuance number 1 - there is a jumper on the adapter board 
Initially, it stands. We shoot, turn on - yes, everything is ok, even the name and volume are displayed correctly.
Began to collect - nuance number 2 
This is also what I expected, which is why the SSD was chosen. It can be parsed, and 

Everything fit, and there is still a place left :-)
The canon Windows XP system was originally installed. There were no problems with its installation. The BIOS was flashed with the latest existing version. And then it became possible to install Windows 7. Before the firmware, it did not work - at the final stage there was a black screen, but this is a computer problem ... On XP, the disk gave out such speeds - 
It is clear that everything here rests on the IDE, and there is no way for the SSD to open up here, but I expected the worst result.
In general, I am satisfied. Well, for the future, if someone asks me to replace the IDE disk on the laptop (and there are a lot of such stuff on hand), I will know what to do.
Yes, I almost forgot - if anyone buys such adapters, you should know that they are of 2 types - they differ in the location of the IDE connector - like mine, and "inverted" - this must be taken into account, otherwise the disk may not stand up. Well, consider the dimensions - they match the dimensions on the product page (69mm x 14mm). It's just that the HDD may not fit into some laptops, you have to be smart with the case.
Here he is - alive and working 
I also installed 2 * 512 RAM. Currently running Linux Mint 13 Xfce. Everything works.
Why did I need it? I don't know, I felt sorry for him. Or maybe I'm getting old, drawn to antiques? :-) Seriously, one idea has been ripening for a long time, in which a computer with a full-fledged LPT port will be needed, here it will be useful to me, perhaps.
Thanks to everyone who read it! All health!