What is an RSS feed and how to set it up quickly and efficiently? RSS feed. What is it, how to set it up? Brief description of RSS technology
You probably know that the WordPress RSS feed (channel) is different from the website, and you can create as many different RSS channels as you like for one website. Do not know? Read on.
WordPress RSS Feed
An RSS feed (channel, feed) is a dynamic XML file linked to the site domain, generated according to certain rules. When new material is published, the RSS feed of this type of material is supplemented and updated.
If we open the site’s RSS feed file in a browser, we will not see visually understandable information. It looks like this:
To make the RSS feed readable, there are so-called RSS aggregators.
Important! The RSS aggregator will create a separate RSS feed from an unreadable feed home page site. Often such feeds are called “RSS news feeds”.
Since there are many aggregators, you can create as many RSS feeds as you want on the main page of the site. Each feed will have its own address on the network. In addition, you can create an RSS feed not only for the main page of the site, but for various sections and new comments.
For example, you have an online store on WordPress and you reflect all the appearance of new products in a separate “New Items” section. Using the feed address of this section, you can create an RSS news feed for the “New Items” section. This feed will be needed to create a store newsletter.
Another example. You have informational WordPress blog and you publish all new articles on the main page. In this case, it is enough to create an RSS feed on the main page of the blog, which will be updated with material when a new article is released or news is published on the main page of the blog.
WordPress RSS Feed Addresses
CMS WordPress by default creates several RSS feeds for the site. Of these, the two main ones are important (relative URLs are indicated).
WordPress RSS feed in RSS2 format
- Feed of latest posts /feed/
- Feed latest comments /comments/feed/
- Feed of latest posts /feed/rss/
- Feed of recent comments /comments/feed/rss/
- Feed of latest posts /feed/rss2/
- Feed of recent comments /comments/feed/rss2/
In Atom format
- Feed of latest posts /atom/
- Feed of recent comments /comments/atom/
In RDF format
- Feed of latest posts /rdf/
- Feed of recent comments /comments/rdf/
The core of the system contains files that output each of the listed feeds. All are in the wp-includes directory.
For records:
- feed-atom.php (feed in atom format)
- feed-rdf.php (feed in rdf format)
- feed-rss.php (RSS feed) is deprecated
- feed-rss.php (rss2 feed format)
- feed.php ( feed feed functions)
Note: The feed.php file is the RSS container for the bloginfo function. Using the get_bloginfo() function, you can get converted information stripped of tags and symbols for use in site feeds.
Comments
- feed-atom-comments.php (comment feed in atom format)
- feed-rss2-comments.php (comment feed in rss2 format)
Feed icon on the website
IN latest versions WordPress, this widget has been removed from the boxed version. Now this widget can be found on the JetPack system plugin under the name “RSS JetPack links”.

You can and should configure what to show in the WordPress site feed in the console on the “Writing” tab, points:
- Display the latest in RSS feeds...
- Show in feed..., announcement or full content.

Conclusion 1
- There are two main RSS channels (also known as feeds or feeds) of the site: the main page and the latest comments;
- WordPress RSS feed has four formats: rss (obsolete), atom, rss2, rdf;
- Using RSS aggregators, you can create as many RSS news feeds for your site as you like.
Practice applying knowledge about WordPress feeds
For practical use site feed, you will need the URL of the main feed (/feed/) or the URL of the news section, which I talked about at the beginning of the article (/category/name-category/feed/). feed can be changed to the desired format. The category prefix in the URL is used in the default settings.
Feed check
To check the site feed, you need to enter the full URL of the feed into the address bar of the browser and check how the WordPress RSS feed is reflected in the browser.
If desired or necessary, you can check the validity of the feed feed on the service: http://validator.w3.org/feed/

Using RSS Feed
Having the site feed address, you can:
- Show site news on another WordPress site using the “RSS” widget, entries from any RSS or Atom feed;
- Create a newsletter on the FeedBurner service. A beautiful newsletter with its own subscription form;
- Show site news in news directories, for example, LiveRSS: http://liverss.ru/ ;
- Create a newsletter for your subscribers on any third-party email service, such as MailChimp. Multifunctional newsletter, interface in English, with its own customizable subscription form. Integrates perfectly with WordPress.
Any other alternative to FeedBurner and MailChimp can be Post service: SmartResponder (died 01-11-2016), UniSender (Russian), Aweber, as well as Constant Contact, Campaign Monitor, GetResponse, ActiveCampaign, MyEmma, Mad Mimi, Infusionsoft, Feedblitz, HubSpot, MyNewsletterBuilder, Inbox First, Sailthru, Klaviyo , Vero, Pardot, Zapier, Ontraport, ExactTarget, Vertical Response, Drip, MailerLite, WhatCounts, ConvertKit, MailJet, Maropost.
Hello dear friends!
Today’s article is a continuation of the course on “”, we will set up, embed and add an RSS channel to the blog, namely the Feedberner RSS channel, and we will analyze absolutely everything connected with it. In short, today you will learn - “How to install RSS on a website.”
Let's set up the broadcast of our feed itself and make an offer to our readers to subscribe to the news feed, that is, the person who subscribes will receive new articles from the blog (see an example of my subscription via E-MAIL in the sidebar). Let's put the Feedbarner counter code, this counter will display our subscribers.
Today it’s hard to find a site or blog that doesn’t have an RSS feed! But why are such resources difficult to find and why do they add an RSS feed to blogs and websites?
WHY INSTALL RSS ON YOUR SITE
Well, first of all, installing RSS on a site is a convenient tool for attracting readers, now I’ll explain why.
Imagine that you have finished reading this article “How to install RSS on a website and configure RSS feed"and added an RSS channel to your blog, after which a visitor came to your resource and subscribed to updates, that is, to the RSS channel. You publish a new article in due time, and it comes to your subscribed reader by E-MAIL.
He sees the announcement of your article and is eager to read it further, so he clicks on the title of the post and goes to your blog.
If he had not received a letter from the Feadbarner service, which broadcasts the RSS feed of your blog, he might not have visited your resource again. And if there are about hundreds or thousands of such subscribers, then what kind of traffic would you have when publishing a new article? Moreover, if your resource is under search queries, can you imagine?
Secondly, you will know how many people you have as subscribers and approximately how many people should come to you and read your new post or posts.
ADVANTAGES OF INSTALLING RSS ON YOUR SITE
The Feedburner counter will tell you how successful your blog or website is, that is, advanced in search engines and how well people know it.
If you have a desire to make money on a blog, and I think that you undoubtedly have it! Is not it? Add a Feedburner counter to your blog or website without delay. We will install RSS on the site in this article, but the counter is at your discretion, because this should be done only when you already have a certain number of people as subscribers, at least so as not to embarrass yourself.
Checking how many people you have as subscribers is very simple - write the request in your browser: rss, press ENTER and in the search select - RSS - FeedBurner, after which the feedburner website will open where it will indicate how many subscribers you have, but you can do this below .
Another big advantage of subscribing to your blog’s news feed in the feedburner system is the ability to subscribe to your channel by simply indicating your E-MAIL and confirming your subscription by going to your email.
Don’t ignore this opportunity, because not every one of your visitors knows how to handle readers, and as for mail, everyone can handle it. By creating a subscription to your blog's news feed, you increase the potential to gain larger number readers or subscribers (call it as you like best). By the way, if you don’t need RSS, you can easily use this service: e-mail-rassylka.
And that's not it! Feedburner has many more great advantages, these are the same advantages this service receives from Google. I will show all the settings of this service, it will be below, so read carefully...
You probably know that feedburner belongs to search engine Google. Therefore, if you want to install RSS on your site, you will have to register with Google, that is, create an account for yourself at this address. There is nothing complicated about this, follow the link above. Press big button to come in:

And click on the link - create an account, then fill out everything required fields in the shape of. How to create an account on Google? I want to write about this in the next article, because there will be a lot of text there, subscribe to blog updates so as not to miss it. If you have any problems creating an account in Google, write about it in the comments, I will help you accordingly.
Now go to feedburner at this address, enter your username and password to log in Google account, unless of course your browser saves logins and passwords.
Although today most users use modern browsers that can save not only pages, but site logins and passwords, social networks, mail, chat, etc. What browser do you use?
HOW TO INSTALL RSS
So, you went to feedbarner and you probably have English language, in the right corner there is a Languages tab, click on it and select your language there.
In the “Light up” feed form right now, insert the address of your blog and write feed using a slash (/), I installed RSS on a test blog and I got the following address. Then click Next, and you will be taken to a page where you need to write the name of your feed, for example, the name of your blog, and in the feed address field add the ending in Latin letters, something will be automatically inserted there, but I recommend adding it. The ending that you add will be added to the address https://feeds.feedburner.com/.

After all this, click the Next button. You will be taken to a page where there will be congratulations, like: “Congratulations! Your FeedBurner feed has come to life. Would you like to dress him up a little?” and below is the link to the RSS of your feed, copy and save it on a flash drive or somewhere else.

Now let's move on to setting up RSS for the site. Click Next and check all the boxes, click Next again.

This completes the creation of RSS for the site. Now you know how to install RSS. You can distribute the copied Feedburner link to your friends and acquaintances and attach it anywhere on the site, but that’s for now, in another RSS article. We will create a cool form for you to subscribe to your feed.
Next we will configure and insert it into your web resource, but this will be in another article, subscribe to updates so as not to miss it. How do you like the article?
Best regards, Alexey Kobzarev
Sooner or later, every blogger is faced with the need to create an RSS feed. This article was created specifically to prepare you as much as possible for this meeting and teach you how to do everything correctly.
What is RSS feed and why is it needed?
But the analytics is merciless - many, if they log in a second time, do so very irregularly. An RSS feed and a subscription form to this feed will help you not only create a community of caring readers around your blog, who, among other things, will be much more supportive of any of your suggestions.
This is where we understand the incredible potential of such a subscriber base for your business, which a blog can eventually become, but also automate the attraction targeted traffic to the site with the regularity that you need. Let's figure it out!
In a nutshell, an RSS feed is an XML file containing a list of your articles with a description and a link to them, which bloggers send to their subscribers approximately once a week. Often sending such mailings is harmful, first of all, for you.
Great for visual learners video.
The guys will tell you in a very clear way what RSS is and why it is needed. By the way, a great idea for a video format that everyone can afford.
What's in a name.
You can come across different terms on the Internet: Rss channel, RSS feed, mailing list, feed (from the English “feed” - feed, feed, feed). The word “feed” generally refers to any structured list of something that you send out or “feed”. In affiliate programs, a feed is a feed of goods and services that your partner will regularly send to you for synchronization.
How to create an RSS feed?
The first method will be universal. To bring it to life, all you need is a notepad and faith in yourself. It is applicable for any CSS and even if your site is made from scratch. The load on the site is minimal.
2. Now we create the treasured file. Let's start with the head, the "header" that is. Add the following code into it:
Here we will enter the name of our feed, here we will place a link to our website. We will describe our newsletter in just a few sentences, here we will enter a list of your articles from the next paragraph.
3. Now we enter each article in order according to the template.
Title of your article link to articleUnique ID for each article. Once again copy the link to the article We enter the publication date in this format - Tue, 28 Nov 2013 17:17:17 Description of the article
If necessary, for more in-depth information, you can refer here for example - http://web-master.pp.ru/info/09.shtml.
If the code is difficult, here is a little cheat sheet for you:
- ...
— the entire news block is contained between these tags;... — here we write the title of the article;
... — summary of the article;
... — date of publication on the website;
4. When all articles have been added, you need to close the tags
5. Save the file. Manually change the extension to “. XML”, select the extension type “All files”. The file name must match the name of your tape (albeit in Latin). As usual, there are no spaces in file names, words are separated by dashes.
6. Considering that we wrote the code ourselves, it would not be superfluous to check yourself using one of the checkers, for example, here - FEED Validator. This resource will scan your code and provide a report.
7. Now the file can be copied to the main folder of your site via ftp.
That's it, your RSS feed is ready. Now the promotion process begins. More on this below.
Since the feed is created manually, when adding a new article to the site, you will need to manually delete old articles (a feed that is too large will eventually cease to perform its functions) and add new ones according to the template.
If you have a blog on WordPress, the creation and updating of the feed can be automated. Let's get started.
1. Go to the service http://feedburner.google.com. This is one of the highest quality free options, and from Google. But there are a lot of other options online for different tastes and colors. Choose.

The service immediately goes to my gmail and welcomes you like family!
2. Enter the URL of your site in the required field. Personally, for me, he categorically refused to accept just the page URL, wrote all sorts of errors and said that my feed was incorrect. The issue was resolved simply by adding a more complete name to the feed: http://howtobeawesome.com.ua/feed

3. Hurray! Everything worked! Let's start to light up. First, let's choose a more beautiful name for our feed and its URL (a random set of Latin letters does not look very attractive). In the end we ended up with something like:

4. Without hesitation, the service invited us to subscribe to our feed ourselves, which we did - we need to check everything.

5. As the last step in creating your feed, the service offers a lot of useful add-ons for monitoring your feed, checking traffic, and more. Most services are free, but it is possible to fork out a little for additional features.
6. Now we install the plugin to work with our feed. The choice is great and again falls on your shoulders. The Feedburner service offers the following options - http://wordpress.org/plugins/search.php?q=feedburner. For myself, I took the simplest one so as not to clutter the site.
7. In the feed details, copy the address of your feed and enter it into the appropriate field in the new plugin. Save.

Now let's configure it a little.
Go to the “Optimization” tab.
We were connected to the “BrowserFriendly” service earlier. It opens the reader to many subscription options. He will definitely appreciate such care. I only advise you to change the language of this function - the very first option.
The “FeedFlare” function will be added under each post additional buttons, which will allow readers to share content with friends across different networks. The system allows you to add new buttons if you are missing something. It’s worth making your feed unique.

For the same purpose, we add a picture or logo to our newsletter. All this will activate the “Feed Image Burner” function, just indicate that you want to use your personal image, enter its address (it must first be uploaded to your website). The remaining fields are the name and link to the site. There will be no problems with them.

Additionally, in the “Title/Description Burner” tab, you can enter the title and description of your site. Extra advertising won't hurt.
Now you have to do everything possible so that the reader can easily subscribe to your newsletter. You should definitely make sure that the link to your RSS feed flashes before the visitor’s eyes from time to time.
Let's go to the "Publish" tab.
"Subscriptions by e-mail" This is a mandatory function, for the sake of which everything was started. Setting up a subscription form will allow your readers to quickly and easily subscribe to your newsletter, and you will be able to collect email addresses to form a database and increase traffic to your blog.
Select the Russian language and after the codes change, you can copy them for yourself.
The first will allow you to create a small field for entering your email address if the reader wants to subscribe.
The second one is simply a link to subscribe with a beautiful anchor. I immediately placed it under the button in the site header. In the future, you will be able to place this link in the texts of your articles, inviting readers to subscribe to your newsletter.
In the “Communocation preferences” tab you can specify the texts of the messages that your future subscriber will see during the registration process. It’s logical - every word here should come from you personally.

In the “Email branding” tab you can configure appearance your letters. Please note that here you can also specify the address for your logo. Now every email you send looks great.
In the last sub-item you can set up a mailing schedule. It would seem a trifle. But sometimes a lot can depend on such little things. Who will read your newsletter at 3 am? And by 9:00, your letter will no longer be the first in the queue to be read, so the chances that it will be viewed at all will be less.
For myself, I also enabled the “Ping shot” feature, which notifies popular mailing services of your new posts. It clearly doesn't work correctly. But this is temporary, so let’s check the box.
Subscription.
Experienced bloggers advise placing a subscription form for your newsletter at least once on the main page of the site. Often this is done using a widget on the sidebar.
We'll look at a simple placement example.
We take the Russian-language code of the subscription form from the Feedburner service and simply paste it into the text widget, and the widget into sidebar we place. The code itself is quite simple and can be quickly modified to suit your blog's settings.
I ended up with this widget:

And this is how it looks on the website:

The last point will always be to check that the form is working correctly. Make sure everything is set up exactly the way you wanted.
RSS Promotion.
There are dozens of good RSS aggregators where you can send your feed. If you do everything correctly and you manage to interest potential subscribers, an excellent increase in traffic is guaranteed.
No one forbids sharing a link to your RSS feed on social media. networks, articles, forums, just like you share a link to your blog - only you will be sure that the person who subscribes to your mailing list is definitely interested in what you write.
What are the options?
In fact, there are many options now. One way or another, they all allow you to keep your finger on the pulse, monitor what is happening on the network and receive the latest information. The question is rather in the approach, the form of presentation, additional opportunities.
Social networks can replace full-fledged news feeds, as they are more convenient to manage and multifunctional. But the content that is poured on you will have to be filtered. And it’s inconvenient for a blogger to use such a list of contacts to send out their offers. It seems to me that then a certain amount of personal communication is lost.
One of the brightest representatives of modern RSS mailings/readers is bloglovin.com. It may be English-language, but it works great with Russian-language blogs. All you need is to register and choose interesting topics from a huge library. The service itself will offer blog options that may be of interest to you, and will offer new ones regularly. Which is very convenient.
This is what it looks like:

Thus, a whole bouquet of subscriptions you need in one place. The only disadvantage of this approach, which I found for myself, is that over time, so many subscriptions accumulate that it is simply impossible to view them all, let alone read them. It’s incredibly disappointing to miss such volumes of useful information.
Registering your website on the service will not be difficult. The result is that the community develops and grows, and you can grow with it.
It can serve as a kind of replacement for regular mailings. Google service Alerts. It allows you to set up sending you any new mentions of your key queries. Thus, on the one hand, you receive information that is most relevant to your needs (it works well for promoting a blog, I must admit), on the other hand, you are limited by these requests.
The Aweber service is very popular among English-speaking bloggers for working with a subscriber base. It allows you not only to create automated newsletters, but also to set up the distribution of something useful for a subscription. Yes, they really give away their most interesting e-books as a gift to all subscribers.
In any case, you should not stop at standard methods. It’s not for nothing that foreign professionals spend so much time polishing every little detail related to the formation of a list of subscribers. After all, these people are your most devoted fans, they will be the first to buy your information products, participate in your competitions, and so on.
It is difficult to overestimate the importance of loyal subscribers for the development of the site, and therefore the importance of high-quality RSS newsletters. And I ask you very much - do not spam in your letters. It is very difficult to collect such a database, and you can lose it literally in one day.
In the previous article in this section, we talked about how this can be useful for webmasters and ordinary users. Now all that remains is to figure out how to add a news feed to your website under Joomla control, WordPress, SMF.
It is this news channel, passed through Feedburner, that we will subsequently add to, and it is also this URL that will be used on the site to subscribe to our news feed newsletter.
How to add and configure RSS feed in Joomla
But first things first. First, let's figure out how to do this for sites on different engines. You can find out the RSS feed address for any site by clicking on the corresponding icon in the right area of the address bar of browsers (for example, Opera or Firefox).
As a result, a list of new materials that have recently appeared on this resource will open, and you can see the URL of this feed in the address bar of your browser. If your project is on Joomla, then for the main page, as well as various categories and sections, it will be possible to create your own news channels.
In this engine, you can add a subscription for each menu item to receive new materials. Of course, it makes sense to create a feed only for those items that display the contents of categories or sections on the pages of your project, because the rest will be meaningless. Well, it’s also possible for the main page (if, for example, you have all articles displayed on the main page in the form of a blog).
But how do you enable or disable adding news for different menu items? At first this question puzzled me, but everything turned out to be quite simple and, oddly enough, logical. The option to enable or disable RSS for a specific menu item must be found in its settings.
To do this, you will need to go to the Joomla admin panel, select “All menus” - “Name of the menu you need” from the top menu. On the page that opens, click on the name of the item for which you want to enable feed creation. On the settings page that opens, you will need to open the “Settings - Advanced” tab on the right side of the window:
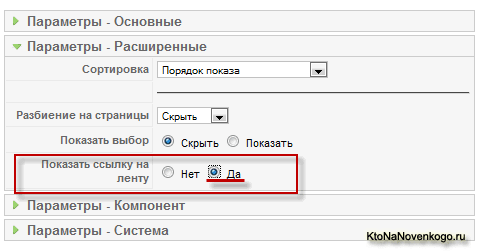
In the “Show feed link” field, move the checkbox to “Yes”. Save your changes using the “Save” or “Apply” buttons at the top of the page. If you have caching enabled (described in the link and why it is needed), then reset the cache by selecting “Tools” - “Clear cache” from the top menu of the admin panel. On the page that opens, check the boxes next to all the lines and click on the “Delete” button located at the top of the page.
Now you can go to your site and open the menu item for which you enabled the addition of RCC news. Look at the address bar of your browser and you will see a corresponding icon on the right side, clicking on which will give you a choice between two display format options.

Select the RSS 2.0 format and click on this option, as a result of which, in your browser window, a page with the contents of the feed for your menu item will open. You can copy its URL in the address bar of your browser, and then broadcast it through Feedburner (the link is given at the beginning of this article).
Ninja RSS Syndicator - component for managing subscriptions
If you want more flexible settings for your feed, you will need to disable feed creation standard means Joomla. Those. You will need to go to the settings of all menu items for which PCC syndication is enabled and disable it using the method described above. After that, you can download one great component - Ninja RSS Syndicator.
It is free and fully compatible with version 1.5. The component is installed in the same way as any other.
I will not dwell on the issue of creating and customizing feeds using Ninja Syndicator, because this is a topic for a whole article. I hope you can figure it out for yourself. I’ll just point out some of the possibilities that can be implemented with it:
- You can send both full and short versions of articles to the feed
- It is possible to organize a channel of only the main page, as is implemented in the standard version of the engine
- You can configure caching of created news feeds
- Articles can be processed with special plugins before being sent to the feed.
- You can select individual sections and categories that can be included or, conversely, excluded from the channel
- You can exclude individual articles from the generated feed
- You can sort articles in the feed by date, by the order of sections or categories, and also by the order of articles
Http://www.site.com/index.php?option=com_ninjarsssyndicator&feed_id=56.
You can broadcast this URL through Feedburner and then paste it onto your website using the method described below.
Using the Ninja Syndicator plugin to create a news feed, in my opinion, is very convenient, but there are also other extensions that have similar functionality.
Of the free ones, I can recommend RSS Feed Manager, although you can use it for Joomla 1.5 only in Legacy mode(compatibility). To activate this mode, you must go to the admin panel in “Extensions” - “Plugin Manager”, find the plugin called “System - Legacy” and activate it by clicking on the red cross next to its name.
Using Feed Manager, you can make it possible to subscribe to new materials from several categories at once, even those not included in one section.
How to add an icon to subscribe to news in Joomla
After you customize the content of your feed and add its address to Feedburner, you will receive a new URL for it, as well as an address for subscribing by e-mail. You can place this link on the corresponding icon on your website, for example, using a module with arbitrary HTML code.
To create such a module, you will need to select “Extensions” - “Module Manager” from the top menu in the admin panel, click the “Create” button in the upper right corner of the window and select “Custom HTML code” from the list that opens. At the bottom of the window that opens, you can paste the RSS subscription URL you received on Feedburner and add the necessary icons to it.
As we discussed above, in almost all browsers the news channel icon for the page open in it is shown in the address bar.
In order for this icon to be displayed for news feeds created using Joomla extensions (for example, using Ninja Syndicator), you will need to open the file index.php from the folder with - /templates/folder_name_with_template/ for editing. Find the opening tag at the beginning of this file
and paste the following code right after it:
Adding and setting up an RSS feed subscription in WordPress
You can get the URL of a news feed in WordPress by adding the word FEED to your blog address, for example, like this:
https://site/feed
It’s only later, after broadcasting it through Feedburnet, that the URL feed will look like this:
Http://feeds.feedburner.com/Ktonanovenkogoru
Why you need to run your feed address through this service, you can read at the link given at the beginning of the article.
WordPress allows you to configure the number of posts that will be sent to the news channel. To do this, you will need to go to the WP admin area (in my case it is https://site/wp-admin) and select “Reading” from the left menu in the “Settings” section. On the page that opens, in the “Display the latest in RSS feeds” area, enter the required number of posts that will be sent to it.

In order for your channel to go through Feedburner, you must change its address to a new one issued to you by this service. This can be done by installing and configuring the plugin accordingly. FeedBurner FeedSmith.
This plugin is considered officially recommended by Google, but on the page of their service, where it was available for download, there is now an error message. To install FeedSmith on WordPress, you will need to unpack the archive and copy the resulting file to the directory:
wp-content/plugins
located on your blog's server, which can be accessed using the FileZilla program (there is a review of it). Then in the admin panel you select the “Plugins” item in the left menu, and then the “Inactive” item. Search for FeedSmith and click on “Activate”.
Now you need to go to the settings of this plugin by selecting “Settings” - “Feedburner” in the left menu of the WordPress admin panel. In the window that opens, in the “Once you have created your...” field, you will need to add the URL of the news channel passed through Feedburner (for me this address looks like http://feeds.feedburner.com/Ktonanovenkogoru).
After this, all users of your blog who want to subscribe to the feed and click on the corresponding icon will be automatically redirected to your newsletter, passed through Feedburner and allowing users to subscribe. But there is one “BUT”.
How to count old news channel subscribers in WordPress
Let's look at a way to improve your newsletter experience in WordPress. If your blog already has people who subscribed to your channel before you set up its broadcast through Feedburner, then they will not be taken into account in the subscriber counter of this system, which is insulting and annoying, especially if your newsletter had a lot of such subscribers. But there is a way out.
To solve this problem, you need to register a redirect in the .htaccess file, which is located in the root folder of your blog. To edit it, you will need to connect to the server via FTP and find it there.
If you don’t see it there, then if you use FileZilla, you will need to go to the top menu of the program and select the “Server” item, and from the drop-down list select the “Force display hidden files" If after this you still don’t see this file, then you need to create it on your computer in any text editor(I recommend downloading Notepad++), and then upload it to the root of your resource. Please note that it does not have an extension and the first dot in the name is a dot.
You will need to register in HTACCESS redirect from the address of the news feed in WordPress to the address of the newsletter sent through Feedburner. To do this you will have to add the following to the HTACCESS code already there:
Redirect 301 /feed/ http://feeds.feedburner.com/Ktonanovenkogoru Redirect 301 /feed http://feeds.feedburner.com/Ktonanovenkogoru Redirect 301 /feed/atom/ http://feeds.feedburner.com/Ktonanovenkogoru
But instead of Ktonanovenkogoru, write your URL of the feed passed through the Google service. Now even old newsletter subscribers will be automatically redirected to Feedburnet, thereby they will be counted in the subscriber counter of this system. Plus, you no longer need the FeedSmith plugin. But this is not enough yet.
If your feed address in WordPress looked like this:
Http://vash_sait.ru/feed
and you added it when registering with the Google service, then you need to go to the settings of this service again and in the “Edit Feed Details” tab change this address to:
Http://vash_sait.ru/index.php?feed=feed
Replacing the RSS feed address in a WordPress theme
By the way, if you do not often change the theme in WordPress (their structure is described) and set up broadcasting of your feed immediately after opening a WP blog, then you can not use the above FeedSmith plugin or redirect at all, but simply change the address of the news feed in your theme template .
To do this, you need to connect to the server via FTP and go to your theme folder:
Wp-content/themes/name_of_your_theme
open the header.php file for editing. At the beginning of this file, look for a line similar to this:
RSS Feed" href="" />
You will only need to replace the codeto the URL transmitted via Feedburner. All. Now save the theme file and make sure that when you click on the small newsletter icon in the address bar of Opera or Firefox browsers, it will open the page for subscribing to news from the Google service, and not the RCC feed provided by default in WordPress.
If your theme has an icon for subscribing to the newsletter located somewhere in your blog window, then you need to determine in which theme file it is displayed and change the code there in the same wayto the one broadcast via Feedburner.
In my case, this matter is set in the sidebar.php file in the line:
 /images/rss2.png" alt="" class="rssfeed" />
In your case, the code will be different, but the section will remain unchanged. Therefore, you can open several files of your theme sequentially and, using the built-in search in the NotePad plus plus editor, find the desired section of code. After replacing and saving the file, do not forget to check the functionality of the RSS subscription icon.
Setting up a feed for the SMF forum
Adding a news channel for a forum on SMF is not difficult. You can set up a subscription to the newsletter for each section separately. To do this, you will need to install one of the modifications for working with the feed in SMF: RSS Feed Icon for boards or New RSS Button Mod. To install modifications on the forum, you will first need to download them from the links indicated above (the download link is in the “Download this mod” area).
Then go to the admin panel of your forum, select “Modification packages” from the left menu, and then, on the page that opens, select “Install packages” from the top menu. In the “Download package” area, using the “Browse” button, find the downloaded mod archive on your computer and click “Download”. Then follow the instructions of the installation wizard. I think you can figure out the rest of the tinctures yourself.
Good luck to you! See you soon on the pages of the blog site
You might be interested
RSS for Yandex Zen - plugin for creating RSS feeds according to the Yandex Zen standard  RSS catalogs and aggregators for adding your news, as well as subscription via Yandex Feed and Google Reader
  What is RSS, where to download icons and which reader is the best?
  Better Feed for WordPress - how not to send full texts of posts to RSS and protect yourself from content theft through a news channel
Makes it possible to quickly broadcast news and updates to readers. This format is somewhat outdated, but the audience of users is still large. The ability to organize RSS feeds is included in many popular engines, such as WordPress, Joomla, Drupal and many others. In some places this feature is standard, in others it is implemented using plugins. It doesn’t make much sense to consider the process of installing plugins, so we’ll try to figure out how to organize an RSS feed on our own, without using plugins.
RSS feed for a static site on html
To begin with, we will look at a manual method that allows you to implement news broadcasting on any website, even a static one built on bare html pages. We will create this functionality using simple code, which is placed in the rss.xml file at the root of the site:
- this line indicates the encoding<span>News from Site.ru</span> - indicate the name of the news feed http://site.ru/rss.xml- indicate the address of the feedNews feed from Site.ru - enter a description of our feedFri, 03 Jul 2015 17:51:00 +0300 - date last update tapes- indicate the news title http://site.ru/news1.html- indicate the address of the page with the full news - enter a brief summary of the news
If necessary, in this code you can specify the language of the feed, which is necessary when registering it in some RSS feed directories, as well as add additional elements.
The provided code is updated in manual mode. That is, to make changes you need to open the rss.xml file and enter new data into it. Need some news? Then the edited file with the tape should contain several structures of the following form:
<span>Opened on our website <a href="https://neonkaraoke.ru/en/mts-bank/predstavil-datalife-engine-versiya-dlya-pechati-datalife-engine-v-12-1-press-reliz/">new section</a> </span> http://site.ru/news1.htmlA new section has opened on our website, we invite everyone to familiarize themselves with the new information
Each such construction is a separate piece of news, which is located between the item tags. As news is added, old entries can be deleted. The number of entries can be any, but register more than 10 latest news It’s not worth it - it’s unlikely that anyone will need outdated records.
We automate the creation of RSS feeds
Let's assume that our website was created on a custom CMS, or on a CMS that does not have an RSS feed. In this case, you need to understand the structure of the MySql database used to store data and find out how data about page titles, their addresses and the contents of news pages is stored. Having understood the structure of the database, it is necessary to slightly modernize the file with the RSS feed. First, let's give it another extension so that it can execute the PHP code necessary to work with MySql database. Otherwise, our RSS feed will not work. The internal contents of the file also need to be reworked:
- We implement a connection to the database;
- We select the required data, setting a limit on the last 10 records;
- We display the contents of the received variables in a loop;
Everything is clear with the first point - we need to connect to the database to retrieve information from there. The second point is also clear - we need to get 10 dates, 10 id links to news pages, 10 news headlines and 10 news bodies. In the third text, we sequentially display everything that we published between the item tags in the manual format of our RSS feed. Thus, having understood the structure of the database, we can organize an RSS feed for any resource. This approach is good because we do not touch the CMS source code and do not create additional loads on the hosting - this is the problem with some plugins that load sites with kilometers of unnecessary code. In addition, our technique will allow you to get rid of possible errors in the functionality of the existing website at the stage of implementing an RSS feed. The maximum that can happen is that you receive the wrong data that is needed to create a feed on our website.
Now let's look at the code itself:
"; ?> News from Site.ru http://site.ru/rss.phpNews feed from Site.ru "; $result=MYSQL_QUERY("SELECT id, title, text, date, FROM article ORDER BY date DESC LIMIT 10"); while ($row=MYSQL_FETCH_ARRAY($result)) ( $id=$row["id"] ; $title=$row["title"]; $text=$row["text"]; $date=$row["date"];- "; ) echo "
$title link to article indicating id$text $date
The first lines of this code are similar to the manual code described above and contain general information about our news feed - the title, description and full address of the feed. There is no date for the last update of the tape, but it can be implemented by upgrading source. Next, the necessary data is selected from the MySql database and the RSS feed generation cycle is started.
Everything is clear with the date of the news, its text and title - they are derived from the variables $title , $text and $date . As for the link to the full news, its id is taken here, after which we can generate a full link, based on the structure of link formation on our website. For example, links may look like http://site.ru/news.php?id=48. Here we only describe general principle link formation, so when practical implementation The above code needs to be modified accordingly.
As soon as the generation of the rss.php file is ready, we can upload it to the hosting and start testing.
Useful tips
When visiting some sites, we can see in the address bar of the browser a direct link to the RSS feed of these sites. In order to keep up with fashion, we will carry out another modernization of our site and add just one line of code to it: