How to make a phone mount. DIY smartphone stand for your car dashboard or how to make a car phone holder for your car. Unusual coasters made from simple things
The winter ice fishing season has already begun in most regions of the country. And for fans of catching predatory fish, in this article we will share an interesting idea on how to make your own winter girder for pike.
Many fishermen know that it is girders that are the most effective fishing option throughout the winter, including in the dead of winter. The production of the following girder is as cheap as possible, and in terms of quality it is in no way inferior to the girders from manufacturers. Experienced fishermen can do everything, from making catchy gear to building a bathhouse, where you can have a great rest after returning from fishing.
This is the kind of girder we will make
So, you will need the following
Materials:
- A piece of plywood, approximately 5 mm thick;
- Polypropylene pipe;
- Fishing Reel;
- Roulette;
- A piece of brightly colored material, most often red;
- Wooden block;
- Several self-tapping screws.
Manufacturing process
Stage 1
First of all, using an electric jigsaw, a circle with a diameter of 20 cm is cut out of plywood. Next, you need to drill a hole in it exactly in the center, the diameter of which is 2 cm. After the workpiece is ready, it must be sanded to prevent damage to the fishing line when fishing.

Stage 2
Now in a small block measuring 4x4 cm you need to make 3 holes. One exactly in the center with a diameter of 2 cm (under the tube), and two on the sides (under the screws). Then the block needs to be screwed to the circle, as seen in the photo.

Stage 2. Holes in the block

Stage 2. Block screwed to the circle


Stage 3. This is what it should look like
Stage 4
After this, you need to cut a piece from the metal ruler, the length of which should be within 25-30 cm. You need to make a series of small holes at one end. They are necessary for securing a piece of fabric with threads so that it cannot fall off the ruler. A piece of fabric is a flag - a bite alarm.

Stage 4. We make holes in the metal ruler
Stage 5
All that remains is to secure the flag to the girder, again using a self-tapping screw. Plywood parts should be coated with colorless varnish so that the vent will last as long as possible.

Stage 5. Attach the flag

Stage 5. All that remains is to equip the girders
All that remains is to equip the vents - and off to the next winter trophies!
There are the following types of homemade girders:
- Changeling. Consists of a plastic tube, thick wire and electrical tape. A hook with bait is attached to the wire and placed above the hole. The end of the tube with bright electrical tape shows whether there is a bite or not.
- On a leg. To use such a girder, you will need more materials. Here you need to have:
- plastic tube;
- bright flag;
- fishing line reel;
- nuts and washers;
- base;
- hose bushing.
It works this way: the leg is placed on the snow and frozen. A fishing line with a hook and bait passed through a reel will signal a bite.
- On the platform. The design is considered the most complex, as it requires drawing and fitting of all elements. They are mounted on one platform, which is often cut out of wood or plastic. To prepare it take:
- reel;
- checkbox;
- plywood;
- staples;
- fishing line;
- hook.
When there is a bite, the line comes out from under the clamp brackets, the flag rises up and signals the appearance of fish.
- From a bottle. The easiest way to make winter lanterns, as a regular plastic bottle will do. For large fish, you should take not a half-liter bottle, but at least a three-liter one. The only thing that will depend on the fisherman is whether the fish will fall on this girder. The main thing is to be careful.
- Under the ice. They leave the fisherman more free time. It is better to leave such supplies overnight. If you place the structure on ice, then you need to place a signaling device there. This option does not contribute to freezing of the hole.
There is a great deal of information about various girders in the specialized literature, but they have one thing in common - you can actually catch fish on them.
The ice fishing rig consists of the following components:
- signaling device;
- bracket together with the coil;
- rack;
- equipment
The stand is made of a plastic tube, and the bracket is made of a metal knitting needle, and their corners should remain even. The coil is made of polystyrene foam, and the alarm is made of steel wire.
When assembling the winter girder, you need to perform the following steps:
- Fix the wire to the stand at one end and attach the other with a flag.
- attach the equipment to the reel.
- Using the example of an American jig with a rubber shock absorber, we recommend that you also use this feature so that the pike does not break the tackle and when fishing, the rubber smoothes out sharp jerks of the fish.
- A great way to mount racks is to use a tripod. Unlike the platform version, this one will be securely fixed in the ice and dusted with snow, which guarantees its immobility.
- Closer to the bait, use fluorocarbon up to 0.4 mm so that the pike does not notice the fishing line. However, you will still have to use a metal leash.
- The wooden structure of the vent can be replaced with propylene (PVC) tubes.
- A flagless vent is another option for improving your design. Use electronic signaling device bites, or even better, a pager to transmit a signal about a bite at a distance.
Classic version
This design consists of several elements:
- signaling device;
- bracket with coil;
- rack;
- equipment
It's not difficult to make.
- Take a metal tube that will serve as a stand.
- The bracket can be made of metal knitting needles.
- The coil is made of polystyrene foam.
- The signaling device is made from a piece of wire.
- Attach equipment to the reel.
- At the moment when the fish swallows the bait, a bright flag rises up.
Modernized classic version
This design includes the following components:
- base;
- signaling device;
- bracket with coil;
- equipment
Cooking process:
- The base is prepared from hard foam or plywood with such a diameter that it matches the hole;
- The coil is made of polystyrene foam and is mounted on a bracket;
- The alarm is screwed to the base;
- A fishing line is threaded into the base and secured to the reel;
- During fishing, the signaling device goes behind the reel, and at the moment of a bite, it begins to rotate, causing the flag to rise up.
Reel "Spatel"

Comprises:
- polystyrene;
- racks;
- hinge;
- signaling device.
Since the alarm is similar to a spatula, it is equipped with a wooden handle and then secured with an elastic band. The handle itself should be painted or covered with electrical tape so that it remains bright and noticeable. When a pike bites, the alarm stands straight and the line begins to unwind.
Wood frame construction
The simplest model:
- Find a wooden flyer from a branched knot (preferably an elastic one).
- Cut a fork with a handle 15 centimeters long and 10 millimeters thick.
- At the end of the flyer, make a rim to secure the loop.
- It is better to have a fishing line with a reserve of up to 7 meters and a diameter of 0.6 mm.
- Attach a metal leash to the free end of the fishing line.
- Attach a treble hook size No. 4-5 through the ring from the leash.
- Place a sinker on the fishing line (several of them can be installed).
- Secure the sinker at the bottom with a swivel.
Subglacial vent
Similar girders are different simple production and various objects are suitable for them that will correspond to the hole made. To prepare an ice trap you will need:
- object corresponding to the hole;
- a plastic tube approximately 40-50 cm, which is attached to any selected item;
- the fishing line is inserted into the sawn hole of the plastic tube.
Another way to make a structure for fishing from under the ice can be made from a duralumin strip using metal wire. The method of self-cooking consists of the following points:
- A strip of duralumin 1x50x200 millimeters or more with curved ends in one direction (this is also the base);
- Drill a small hole in the center of the plate where the coil will be placed;
- Make another hole near the reel for the fishing line.
- Attach a signaling device wrapped or painted with bright colors to the spring;
- Attach the spring to the end of the base and secure with a pin.
Another option for fishing from under the ice. To make it you will need:
- a couple of pieces of hose about 10 centimeters;
- make a hole on one piece of hose to attach a loop;
- on another section, cut a hole where the rope will be attached;
- instead of a reel, they use a plastic tube into which 10 meters of cord are wound;
- secure the first end of the cord with a loop, and insert the second into the slot at the end of the hose;
- Attach a sinker and a leash made of fishing line about 40 cm to the free end of the rope;
- connect the leash with another metal leash and hook.
For catching pike, perch, pike perch and other predatory fish in the summer, a girder that will float on the surface of the water is perfect. This type of tackle is called a circle.
To make a summer girder (mug) you will need:
- slingshot;
- fishing line;
- sinker;
- triple hook (single hook is also possible);
- wooden stake to secure it to the shore.
Instructions:
- tie the fishing line to the slingshot and wrap it around;
- the sinker, leash and float are assembled;
- put live bait on the hook;
- Attach the tackle on the shore to the branches of bushes that are located next to the reservoir.

With the onset of the summer season, many reservoirs are overgrown with vegetation, and in order to build a good trap for pike, you need to take into account the hard-to-reach places where this fish lives. For example, someone who is used to catching pike in winter can easily convert a winter fishing rod into a summer one.
The main thing is to find the necessary elements to make a fishing line on which you can wind the fishing line. Mainly used:
- plastic circle;
- plastic bottle;
- piece of wood
It’s not difficult to make a zherlitsa from a plastic bottle with your own hands. To make the design you will need:
- tape or tape;
- scissors or sharp knife;
- rubber;
- thin spring;
- nylon cord or fishing line 3-3.5 m long;
- plastic bottle with a lid with a volume of 1-1.5 l;
- hook;
- a piece of tarpaulin;
- sinker.
The process of making the girder:
- Remove the bright label from the plastic bottle. Wind a fishing line or cord into the middle, tying it with a strong knot at the neck. Under the lid, attach a rubber ring, which additionally secures the fishing line.
- Attach a treble hook to the end of the cord. The sinker can be attached to the fishing line directly in front of the hook or 30-40 cm above.
- Using tape or tape, attach the spring to the side of the bottle. Attach a bright tarpaulin flag to its end. Bend the spring to the bottle and secure the position by threading the fishing line under the elastic band.
Place the live bait on the hook and lower the bait into the pond. When the fish swallows the bait, the line will unwind, releasing the spring with the flag. Take out your catch and attach a new baitfish.
Using a thread, the girder can be attached to a wooden or iron stick, polystyrene foam or board. This will make it easier to remove gear and catch from the water.
To prevent the bottle from getting lost in the algae, paint the bottom red, pink or red. Bright shades will help you find the zherlitsa among coastal bushes and snags.
Water should not leak into the bottle. Fill the place where the lid is screwed with waterproof glue or screw a piece of bandage onto the thread. Check your equipment every 60-80 minutes; in case of even minimal leakage, the vent will completely go under water.
Those who are familiar with the design of a winter girder can, of course, easily convert it into a summer version. Although there are different designs and many fishermen do not know how to attach them to a pond or large rivers with moderate currents.

Among the classic options for girders, you can make simple designs with your own hands from scrap materials: a flyer, a tube, a flag or an ordinary plastic bottle.
Pike rigs can be made from any available materials, and most of them will work quite effectively. The main thing is to immediately estimate what size fish are found in a particular body of water, which will allow you to make such tackle more competently.
In recent years, some craftsmen have begun to make girders by analogy with pipe structures. Due to the fact that much less material is needed and not too much time is spent, they produce ten to fifteen of these products at once and place them along the shore.
The fact is that here, instead of a fairly long piece of pipe about 70 cm long, a small piece is used, the length of which is a maximum of 10 cm. Otherwise, the technology is exactly the same.
This ring is hung on a strong branch of a tree growing on the shore and left until the bite occurs, which usually happens quite quickly. Having walked in this way about two hundred to two hundred and fifty meters along the coast of the reservoir, you can install 10-12 girders in the area, each of which with a high degree of probability will attract pike or perch.
Do-it-yourself summer zherlitsa from a bottle
There are times when a person unexpectedly finds himself on a body of water; there is nothing suitable at hand, such as a spinning rod or similar equipment, but he really wants to fish. In principle, making tackle from scrap materials is quite easy, but for this you will need to use a plastic bottle, the volume of which should be about half a liter.
Equipment
All important elements:
- Fishing line. Because it is less exploited, the company should not worry. Its diameter will depend on the size of the fish. Usually take up to 0.6 mm.
- Coil. 20 meters of fishing line are wound on it - maybe a little more.
- Leash. Metal so that predatory fish cannot bite it.
- Sinker. Its mass should have a ratio to fish of 1:2. On the river, the load is chosen depending on the speed of the current (it is important that the live bait is kept in one place).
- Signaling device.
- Bright flag.
Tubular vents
Tubular vents have become popular with the advent of various materials on the construction market. Fishermen have come up with a new variety - tubular, consisting of a polymer pipe with a diameter of up to 35 mm and a length of up to 70 mm.
Design
The design of the girder is easy to manufacture:
- two holes are drilled at the top of the tube;
- a length of up to 20 meters and a thickness of no more than 0 5 mm is wound onto a tube;
- a sliding sinker weighing up to 15 g is suspended from the girder;
- is stopped by a rubber damper;
- a swivel with a clasp is tied to the end of the thread;
- a section from a bicycle tube up to 2 cm wide is pulled onto the tube in order to fix the girder in the working position.
Zherlitsy with a flag

Making your own flag is a reliable option, especially if it consists of different colors. A small red flag is barely visible in the reeds, and at a long distance it turns into black. Orange is clearly visible in the bushes, but is invisible at a decent distance.
A multi-colored flag will allow the angler to immediately see the bite. It is also recommended to stick stripes of reflective material on the flag (at night, under the light of a flashlight, they will be clearly visible).
Manufacturing is not difficult:
- take a rail 50x50 mm and 40 centimeters long;
- check the box on the elastic material;
- secure the flag rod at the end of the workpiece using electrical tape;
- attach an inertial reel, which is present on the float rod, to the rail; it is attached in such a way that during scrolling the rod with the flag straightens;
- wind up to 20 meters of fishing line on the reel;
- attach a sinker to the fishing line ring;
- attach a swivel to the fishing line;
- attach a metal leash with a hook to the swivel;
- secure the vent to the shore with a peg.
This is a common tackle among anglers used in winter. For fishing in the summer, it is enough to modify it a little.
The material you need to select is:
- stick up to 40-45cm long;
- checkbox;
- inertial coil;
- monofilament line up to 0.5 mm in diameter, length up to 20 m;
- carabiner;
- sinker;
- leash;
- hooks

To assemble the structure you need:
- attach a flag and an inertial coil to the vent (reel);
- equip the reel with monofilament line up to 20 m in length;
- attach a sliding sinker when fishing for pike;
- equip the girder with a metal leash;
- attach the hooks and you can throw them into the pond.
To install the gear, you will need to drive a stake on the shore and tie the pole to the post with a rope. The leash allows you to make fish bites more pronounced, and the flag will tell you when the fish has swum to the bait. It will begin to rise above the water, signaling the start of a bite.
Bite activator.
Attracts fish in cold and warm water with the help of pheromones included in the composition and stimulates its appetite. It is a pity that Rosprirodnadzor wants to impose a ban on its sale. More sensitive gear.
Reviews and instructions for other types of gear can be found on the pages of my website. Lures using pheromones.
You can get the rest of the secrets of successful fishing for free by reading my other materials on the site.
But you can’t rush into hooking. You need to wait a few minutes for the fish to properly swallow the bait. From the beginning of the rotation of the reel, you need to prepare to hook the fish.
The flag will be clearly visible even from a distance if you first paint it in brighter, more noticeable colors.
As a rule, a flag pole is used in the winter and only for ice fishing, but many fishermen use it in the summer months. To do this, you just need to modify it a little.
Design of the vent
How to catch more fish? I have been active fishing for quite some time and have found many ways to improve the bite. And here are the most effective:
Bite activator.
Attracts fish to cold, warm water with the help of pheromones included in the composition and stimulates its appetite. It’s a pity that Rosprirodnadzor wants to ban its sale.
More sensitive gear. Reviews and instructions for other types of gear can be found on the pages of my website.
Lures using pheromones.
You can get the rest of the secrets of successful fishing for free by reading my other materials on the site.
- A stick, the length of which should be about 40 cm;
- Checkbox;
- Small inertial coil;
- Monofilament line with a diameter of about 0.5 mm and a length of approximately 20 m;
- Sinker;
- Carbine;
- Leash;
- Hook.
A reel along with a flag is attached to the stick, and this must be done in such a way that the flag begins to straighten when it rotates. Now you should wind the fishing line on the reel and attach a sinker to it. A carabiner is attached to the end of the fishing line, through which a metal leash is fastened.

Let us remind you that not only pike bite on girders, but also burbot, pike perch, perch, and rotan. Nevertheless, pike is the most popular fishing object. Finally, we will give 8 important recommendations.
- If fishing allows you to use several leashes, you can attach different live baits.
- The bite will depend on the gear. If it is thin, then the bite will be bad.
- If there is a strong current, then it is better to take a heavier sinker.
- Mask the items at night. The hole can be filled with snow.
- Do not stand over the tackle or run from one to the other. Choose a place to wait and watch the warning lights carefully.
- Observe the correct installation of the girder.
- The bite will depend on the fishing location.
- It would be useful to prepare for knowledge in the field of fish behavior in the dead of winter.
A modern person never parts with a smartphone anywhere, even in a car, when all attention should be focused on the road. To increase the safety of each of us and improve comfort, devices such as car holders were invented.
They perform several functions at once: they provide reliable fastening of the smartphone in a certain place so that it does not slip on different surfaces in the car and is not lost in the back seat; they make controlling the car and the smartphone much easier and more convenient, especially if you use Hands Free. And if you want to use your smartphone as a navigator, then you simply cannot do without such a holder. If you are starting to think about purchasing a much-needed gadget, then before the purchase itself it would be good to clearly understand what the most convenient holder should be for you.There are smartphone holders designed for specific model. They are usually equipped with charging and several other special functions, which makes it easier to use the gadget while driving. But such devices are also more expensive than universal ones. Purchasing them is justified only if you are not going to change smartphones often, but stay with the chosen model for at least a couple of years.
That is why, in most cases, it will be more practical to buy a universal holder, which can then be converted in a matter of seconds to use a completely different gadget. The phone can be attached to them in different ways:
- using magnets, but this is not the most The best way fastening, since a smartphone can fall every now and then, although this method of fastening a smartphone is now the most popular;
- using a cone clamp. Such devices are more reliable, but you will need to immediately check how easy it is to get the phone;
- using polyurethane legs that expand to suit the specific size of the smartphone. Such holders still have the same problem: sometimes the phone is fixed in them so tightly that it cannot be easily taken out.
The holders differ not only in the way the smartphone is attached to them, but also in the way they are attached to the car panel. This is their main difference and the selection criterion for most motorists.
Suction cup holders are one of the most popular: they are easy to install and do not require damage to parts of the car interior. Most often they are attached to the windshield, but for this the surface must be perfectly smooth, clean and even, so if the glass has a significant slope, you may have to attach the holder to its upper part, which is inconvenient. The disadvantages of such fastening also include the fact that over time the holder begins to peel off and disappear, and if the suction cup is made of rough rubber, then at low temperatures it loses its elasticity and. Naturally, it falls off.
Adhesive-based holders can be attached to any surface, but after dismantling, a noticeable mark may remain. In addition, a smartphone that is too heavy may break the mount after a while. But for not very large compact gadgets, this is a good option.
The holder with fastening will definitely never fall off, but they are most often attached to ventilation deflectors. Here there are obvious disadvantages: possible noise when driving on uneven roads, broken deflector shutters, closed air nozzle, etc. Compared to all other fastenings, this is the least convenient and practical. It would be better if such a holder would be attached to a mirror, but there are very few such models.
An alternative to all holders is an anti-slip mat. It does not provide the same convenience of using a smartphone as a holder, but it can be easily removed and replaced.
1. Suction cup holder.
Holds your phone on the front panel or windshield.


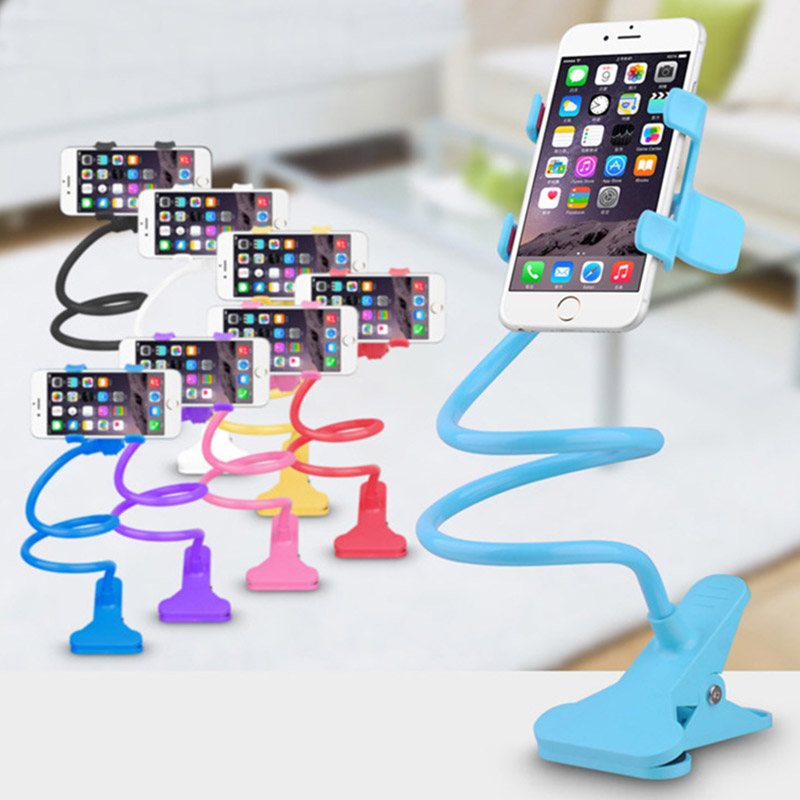
2. Universal clip with flexible cord.
Allows you to rotate the gadget 360 degrees.


3. Mount on the steering wheel.


4. Width-adjustable bracket.
Installed on the fan grille.


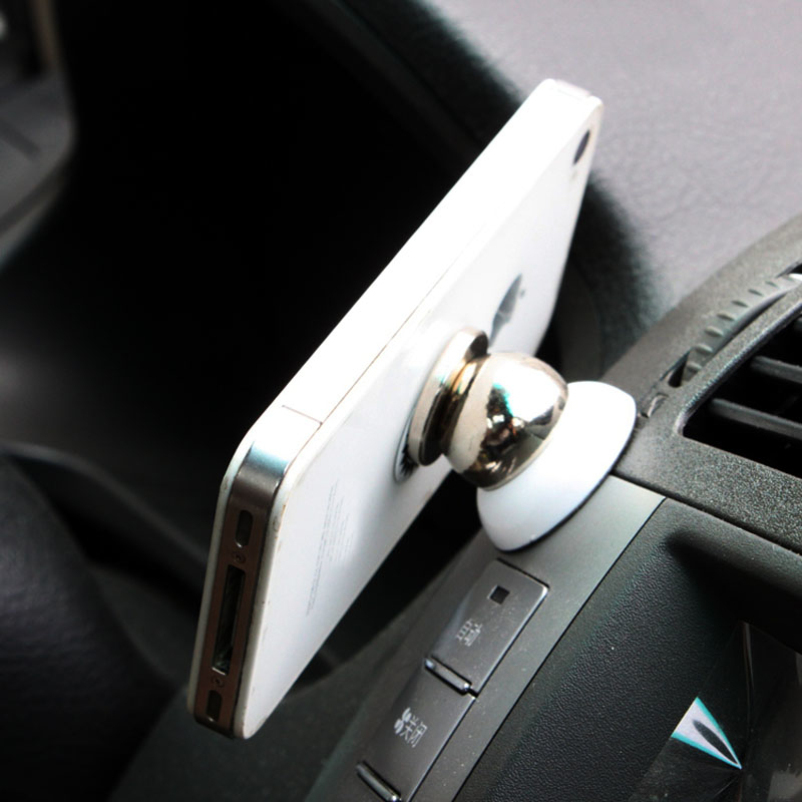
5. Magnetic ball holder.


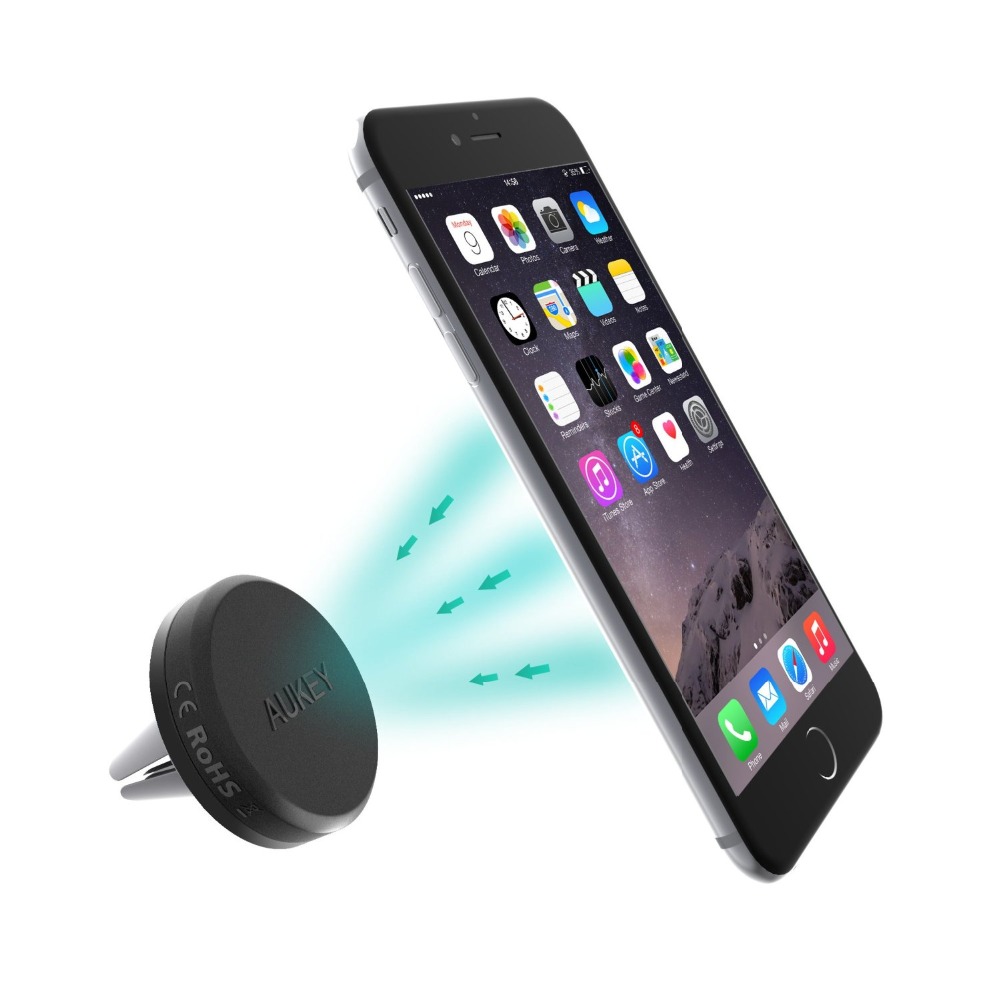
6. Universal magnetic holder.


7. Mobile phone panel with USB cable.
Flexible panel with anti-slip coating for a wide range of surfaces.

Proposed for design, a phone stand for a car will be extremely useful for drivers who often use the phone. It will solve problems with finding your phone while traveling. Thanks to its simple and reliable design, work will not take much time.
Step 1. Tools.
To create a stand you will need:
1. Aluminum tube with a diameter of 47 mm "f. 4";
2. Connecting angled tubes at 45° and 90° (aluminum or copper). They are cheap and sold at any hardware store.


3. Hard wooden sticks (you can take ice cream sticks);
4. Epoxy glue or any other glue with similar qualities;
5. Phone case or case;
6. Cable ties (they will be needed to secure the case);
7. Hacksaw;
8. Ruler;
9. Knife.
Step 2. Frame assembly.
Before starting work, you should decide on the installation location of the telephone stand. It should not interfere with using the audio system, recharging, or other daily activities in the car. Only after this can you start taking measurements.

The aluminum tube needs to be cut into 3 parts. The shortest part is attached to the 45° angle tube. The horizontal part (about 5 cm) connects the 90° and 45° corner tubes “f.2.1 – 2.2”. A vertical pipe (approximately 10-13 cm) will hold the stand itself. All tube connections must be lubricated with glue so that nothing falls off during movement.


Step 3. Attaching the cover.
WITH reverse side cover we make 3 pairs of cuts (the depth of the cut should correspond to the tips of the ties). The cuts are parallel to the tube, which will subsequently be attached to the cover. We thread the ties through the holes and tighten them a little (the main thing is not to overdo it). We tighten the long frame tube with ties as shown in the photo. Cut off the ends if they are too long.


Next you need to cut the wooden sticks in half, insert them between the case and the aluminum tube and coat them with glue.
When I travel, I use my smartphone as a navigator. I've had several factory made car phone holders and there was always something that didn't work for me. Over time, they become loose, or installing a phone in them becomes problematic.


Show 5 more images


The last car phone holder I purchased was a sticky silicone mat with slots in which you could mount your smartphone upright on its side. But my friend could not install her smartphone in a leather book case into it; she had to remove the case. I decided to bring to life an old idea. Life hackers must act, let the rest whine!
You will need:
- a piece of wood, approximately 300x100x8 mm (I had a piece of black fiberboard)
- mini loop
- spring
- a few screws, glue
- engraver with attachments or hand router
- mounting platform (I used the notorious silicone mat)
Note: This holder mounts to a rough surface on the dashboard, and if you want to place your phone on the windshield, this is definitely not your option.
I will show simplest option assembling a phone stand for a car. In the end I used sealant after I assembled the holder, but that was because I remembered it too late.
Files
Step 1: Cutting out the parts


From a piece of fiberboard I cut three parts of the following sizes:
- Top cover 150x90x8 mm
- Bottom cover 130x90x8mm
- Roller 9x90x8 mm
The roller needs to be glued to the top cover at a distance of 5 mm from the edge; this indentation will allow you to use the holder with one hand. When the glue has dried, secure the roller with two additional small countersunk screws. This part will protect the top edge of your smartphone.
Step 2: Making the Slots


Using a linear milling compass or a milling bit (or a hand router), make a slot in the bottom cover, slightly wider than the smartphone in the case. The smartphone should not sit tightly in the slot; I will return to this point later. The slot will protect the bottom edge of your smartphone.
If the piece of wood from which you are making your smartphone holder for your car is too thin, you can glue two beads on the bottom cover to create a slot for your smartphone.
Cut a cutout for the spring on the top cover, on the side with the bolster. The cutout should not be blocked by the loop and should be slightly longer than the spring. The picture shows that this cutout turned out very sloppy. My engraver seems to live his own life, moving wherever he pleases.
When you're done with the slot and cutout, sand until you're happy with it and remove any dust.
Step 3: Apply sealant


Place masking tape around the areas where you will apply the sealant. Once you have applied the sealant, wet your finger in soapy water and smooth the surface of the sealant with it. Pay special attention to the edges to ensure there are no loose pieces of caulk sticking out.
When you are finished applying the sealant, carefully remove the tape so that the edges of the sealant are even and leave the parts to dry overnight.
Step 4: Attach metal parts and assemble the structure


Attach the loop very carefully. If it is slightly tilted, the lids will not be parallel to each other when opened. Depending on the material you used for the lids, the hinge and spring can be screwed directly onto the wood. I didn't have the right size screws, so I used bolts and nuts. I made recesses for the nuts so that they hardly stand out above the surface of the covers.
First we fix the mini loop on one of the covers, then we fix the spring on both covers. After this, we attach the loop to the second lid. This makes it much easier to secure the loop correctly.
Step 5: Decorate the holder


I had an unnecessary piece of leather, using percussive letter stamps (by first wetting the leather) I made an inscription. The options to highlight the uniqueness of your holder are truly endless.
My Skoda Yeti has a wonderful flat area on the dashboard. Our holder must be mounted on an almost flat surface. If the surface of your dashboard not flat, you will have to secure the holder to something else or somehow level the surface. I already mentioned that I had a sticky silicone mat. Using scissors, I cut off all the protrusions that hold the smartphone in a vertical position until I just got a flat silicone mat. You can buy these on eBay or most hardware stores. I attached it to the smartphone holder with some paper clips.
In general, you can simply drill a hole in the dashboard and secure the holder with a screw.
Well, you have made a universal smartphone holder that fits almost all market smartphone models. It can be used for smartphones without a case, with a case, or with a flip case. It is easy to use with one hand, and when the holder is not needed, it barely rises above the dashboard.
If the evolution of smartphone displays goes the way of larger ones, you can make the holder “jaws”, so that such a holder can also be used with tablets. Enjoy.