Available 2 GB from 4 windows 7. Not all RAM is available: how to use its full amount? OS edition restrictions on the maximum amount of RAM
If you decide to upgrade your computer by adding some RAM to it, it may happen that after installing it, the system will display the amount of memory that you installed, but not all of it will be available, and this despite the fact that a 64-bit operating system is installed. system.
Just recently, I had to face a similar situation. In general, on a computer in which 2GB of RAM was installed, it was necessary to add another bar with the same amount of memory.
As a result, after installation, the system saw all 4GB of RAM, but at the same time it was indicated in parentheses that only 3GB was available. But, the most surprising thing was that Windows 7 x64 was installed on the computer, so no restrictions on RAM should be imposed, as is usually the case on x32.
Having started to figure it out, over time I still found a solution that helped me return my memory to its place and will gladly share it with you. Below in the article I will show what can be done if you only see 3 GB instead of 4, 8 or 16 GB of RAM on Windows x64.
On a 64-bit system, instead of 4, only 3 GB of memory is available, what should I do?
Of course, first of all I thought that it was all about the system, maybe some kind of curve assembly was installed, but after reinstall Windows nothing has changed from the licensed image and only 3 GB of memory was available as before.
Based on this, we can assume that the problem is in the hardware or in the BIOS settings.
Once in BIOS, I started looking in the settings for any parameters that are somehow related to RAM.
After spending about 15 minutes on turning on and off various parameters, as well as checking the results, I still found something that helped me.
This is a parameter named " Memory Remap Feature", Exactly after I changed its value from" Disable" on " Enable", In the properties of the system, the memory began to be displayed normally, that is, all four gigabytes of RAM were now available.
How to find this parameter? Below I will show an illustrative example of where I managed to find this function. Of course, I understand that today there are quite a few different motherboards that have appearance is different. But, for now, I will dwell on my example, and then, if possible, I will add something new. I can recommend looking for it in the chipset settings, most often this is where it is located.
So, we reboot or turn on the computer and go to BIOS, let me remind you that the standard keys for entering the BIOS “ Del and F2"If nothing suits you.
Go to the tab " Advanced"And using the navigation arrows we go down to the section" Chipset" or maybe " Chipset Configurations».

The next step is to go to the section " North Bridge Configuration". By the way, many may not have this point, if so, it's okay, we skip this step and move on.

Having reached the desired place, select the parameter " Memory Remap Feature"By pressing" Enter ", set the value" Enable».

After that, we confirm the selected value and restart the computer with saving all the changes made by pressing the F10 key.
If earlier on a 64-bit system you saw only 3 GB of RAM instead of 4, now everything should change and after booting the computer, it will be shown in the system properties that all 4 (or more) gigs are being used.
At least it helped me, so the advice has been tested in practice and that is why I recommend using it in the first place.
What else can be done if only three gigabytes of memory are available instead of four
With the "Memory Remap" function, everything is clear, but what to do for those who do not have it. Yes, there may be something that you will not find this item, especially for laptop owners.
The fact is that this function can be sewn into the BIOS, even if there is no such parameter. In such cases, of course, the latest version is recommended. And only after that "Memory Remap" will begin to perform its functions.
Also in BIOS you can search for the parameter " Memory hole"Its value should be set to" Disabled».
HPET Mode one more parameter, which is recommended to be checked and set to “ 64-bit».
We open through the window " Execute».

We move to the tab ""And click on" ".

And here we uncheck the "" parameter.

We apply the new settings and restart the computer.
Also, some amount of RAM can be used by the embedded video. For example, if your monitor cable connects next to USB ports, which means you are using embedded video, therefore, for its full operation, a certain part is taken from the total amount of RAM and transmitted GPU and that is why instead of 4 GB you can see that there is a little less memory available, for example 3.5 GB. Here you will have to measure up or purchase a discrete video card.
There is also information that even with a separately installed video card, the processor continues to take RAM for the needs of the integrated video. In this case, you need to change the value of the processor graphics to the minimum or turn it off completely by setting the value for the integrated graphics in BIOS to Disable (PCI or Auto). After a reboot, all the missing RAM should be returned to its place and displayed in full.
And of course, there is a possibility that instead of the installed amount of memory, you see much less due to the fact that your motherboard simply does not support, for example, more than 3 or 4 GB, but usually this is found on pretty old motherboards ...
As you understand, there can be a lot of reasons for displaying 4 GB of memory instead of 3 GB, and each solution may be different. In this manual, I showed you what really helped me and what else you can try to get out of this situation. If anything, I, as always, await your comments, and together we will look for an answer to your question.
On Windows 7 x64, instead of 4 GB of RAM, only 3 GB is available, how do I get the memory back?
Everyone can face the problem of availability of all RAM. At one point, when you decide to add one or more strips of RAM to your computer, the following situation occurs. The system properties say that 4GB is installed, but only 2GB is available. Or 4GB is available instead of 8GB.
In this article we will tell you how to fix this problem and force windows to use all the RAM.
How do I make available all installed RAM?
The first step is to decide on a couple of things. First - . If you have 32 (x86) bit Windows, then it will not see more than 3.2 GB of RAM! The only option in this case is to install a 64-bit OS.
Also, if used, it will consume some amount of your RAM. Usually no more than 700MB. This can only be fixed by installing a discrete (stand-alone) video card with its own video memory.
If you have 64-bit Windows and a discrete graphics card, but not all RAM is available, then you need to do the following.
First, open system unit, remove all RAM modules and wipe the contacts on them with an alcohol wipe / simple eraser and install back, preferably swapping places. This helps a lot.
One of the possible reasons is poor contact of RAM
The next step is to activate (enabled) the function in BIOS settings... It is usually found under Advanced -> North Bridge Configuration.

Enabling Memory Remap Feature in BIOS
You also need to enter the system configurator by pressing the "Windows" + "R" buttons on the keyboard and entering the "msconfig" command in the window that opens.

The combination of buttons "Win" + "R" on the keyboard

Open the system configurator with the msconfig command
In the window that opens, go to the "Download" tab -> "Advanced options".

People often ask the question: why, out of four (six or eight) gigabytes of RAM installed in a computer, only 2.23 (3.25 or 2.87, etc.) are available? Listed below possible reasons incomplete definition of RAM.
Why the computer does not see part of the RAM
1. A 32-bit operating system is installed.
Any 32-bit OS will "see" no more than 4 GB of RAM. More often - from 3.15 to 3.5 GB. And here it is not so important whether it is XP or "eight". This is due to the specifics of the allocation of the memory address space. Accordingly, in order not to get into such a situation, you need use 64-bit Windows.
2. The computer uses an integrated video adapter
Part of the RAM for its own needs can be "cut off" by an integrated (or "built-in") video card. This is very common in laptops. This situation is normal. And if the amount of remaining RAM is not enough for you, there is only one advice: increase its volume by adding or replacing modules.
It is also important to understand here that:
- different integrated video adapters take different amounts of RAM;
- the same video card is capable of taking up different amounts of memory, depending on the amount of RAM installed in the computer. Let's say, when there was 2 GB of RAM, the video card took 512MB. And when they installed 4GB, the graphics began to cut off 1GB.
- there are hybrid video adapters that have their own memory, but are also able to expand it by borrowing memory from RAM.
Due to these two reasons, it is sometimes difficult to understand why exactly this amount of RAM is available. After all, it may turn out that out of 6 installed gigabytes, 32-bit Windows “saw” 3.25 GB, and the video card “cut off” another 512MB from this volume. As a result, 6GB will be written in the system properties (2.73 available). The solution to this combined problem is again replacing the operating system with a 64-bit one and, if necessary, increasing the RAM.
3. OS edition restrictions on the maximum amount of RAM
Younger editions of Windows 7 and Vista have limitations on the use of RAM. For example, Windows 7 Starter only works with 2GB of RAM, Home Basic x64 with 8GB, and Home Extended x64 with 16GB. Naturally, in this case, the only way out will be to install another edition of the operating system (for example, Pro).
4. Some of the memory modules are faulty or there is no contact
Turn off your computer. Unplug the power cord from the desktop PC, or remove the battery from the laptop. Press the power button several times to drain the charge from the capacitors.
Remove all memory modules, clean their contacts with an eraser, then clean them with alcohol. Reinstall the planks and check if they are all detected by the system. It is convenient to do this in free program CPU-Z. Go to the SPD tab. On the left side of the window there is a drop-down list that displays information about the installed RAM bars in each slot:

If when you select a certain slot, empty fields, then it either does not have a module, or it does not work.
5. Modules are installed incorrectly
In some models of motherboards, some of the slots may not work until the priority slots are occupied. Therefore, such nuances should be clarified in the manual for the motherboard (on the manufacturer's website or in the brochure).
6. The problem of compatibility of RAM modules
Test the bars separately using Memtest86 + ().
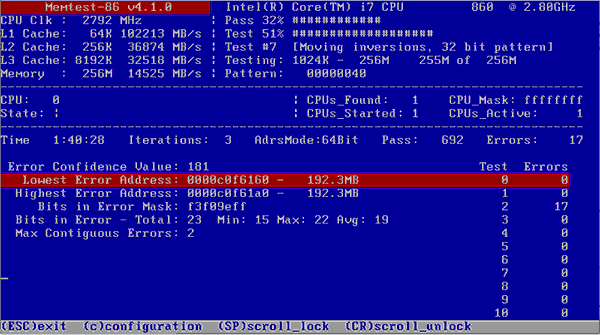
If each module independently works correctly (it is determined in the system, its volume is displayed correctly, there are no errors in the tests), and when installing several together one is not detected, then there is a problem of the compatibility of the strips with each other. To avoid this, try to install exactly the same modules ().
conclusions
Once again about the most important. In order for the operating system to use the RAM to the maximum, it is recommended to install 64-bit Windows OS editions such as Professional. When it comes about modern OS (Windows 7, 8.1 and 10), there is no problem installing the 64-bit version. And if you have a choice, feel free to choose just this option.
But XP x86 and XP x64 are actually different systems with different versions kernels. And Windows XP 64 bit edition is considered quite unstable. Therefore, it is recommended to either install Windows 7 / 8.1 / 10 (if the computer is designed to work with one of them), or leave XP 32 bit.
Familiar to many users. When the system properties window is called, the full amount is displayed, but after it, for some reason, it is indicated that the available memory is slightly less. It is even worse when the user knows exactly how much RAM is installed, and 50 percent or less is available. Why this happens, and how to use the maximum amount of RAM, then we will consider. But first, let's briefly dwell on the main reasons for this phenomenon.
Why isn't all RAM available?
So, what is operating Windows systems sometimes they give out indicators, the values of which are obviously less than the total amount of installed RAM, can be associated with a number of reasons, among which the most significant are the following:
- a 32-bit system is installed that does not support more than 4 GB of memory;
- maximum not supported motherboard;
- in the system parameters there is a limitation on the maximum used amount of RAM;
- BIOS settings for memory reallocation are set incorrectly;
- memory is partially reserved for built-in video adapters;
- Too many active processes are running;
- the installed strips are damaged, their performance is impaired, or they are connected incorrectly;
- memory usage is blocked by viruses.
It should be said right away that issues related to viral exposure will not be considered in detail. Here you can advise just to be on the safe side, to perform a check using portable antiviruses or similar programs with bootloaders at their disposal.
How to use all the installed memory in the simplest ways?
Much more important issues, when not all of the RAM is available, are problems with connecting memory sticks or their incorrect work... First, make sure that the motherboard is designed for the installed volume, and also check the tightness of the insertion of the brackets into the corresponding slots. It will also be useful to perform a memory test, for which you can use your own Windows tool(mdsched) or third party programs like Memtest86 / 86 +.
If no problems are found at this stage, pay attention to the bitness of the installed Windows modification. In the case of a 32-bit version that cannot work with more than 4 GB of RAM (unless you use special means), no matter how much memory you set in excess of this limit, the system will still not recognize it.
The optimal solution the installation will become 64-bit Windows versions... But in this case, the previously installed programs may not work, and important files will have to be copied to another logical partition or to removable media.
Sometimes it also happens that not all of the RAM is available due to incorrectly set memory usage options in (msconfig).

In the configurator, on the boot tab, click the advanced options button and check if the checkbox for the maximum memory is checked. If it is, remove it, save the installed options and reboot the system.
As it is already clear, part of the memory can be "eaten up" by a huge number of active background processes and services that are not visible to the user. First, disable all unnecessary components at startup (in Windows 7 and below, this is done using the corresponding tab in the configuration settings, in the versions above - "Task Manager").

Just in case, review active ingredients systems in the programs and components section and disable unused ones (Hyper-V module, Internet Explorer if you are using a different browser, a print service if there is no printer, etc.). Similarly, you can set the disabled startup type for some other services (services.msc), but in this case you need to know exactly what can be deactivated and what cannot.
Low RAM available: what settings can I change in BIOS?
If the problem persists after applying the above solutions, go to the settings of the primary BIOS / UEFI systems and check the memory settings, in which there should be an item containing the words Remapping or Remap.

If you have 64-bit Windows and more than 4GB of memory, set it to Disabled. Otherwise, it needs to be activated.
If the RAM is not all available due to the reservation of additional volume for the video card built into motherboard, set this item to a value corresponding to the adapter memory size (you can find it out on the monitor tab when invoking the DirectX - dxdiag dialog). This is done by changing automatic detection(Auto) to one of available options(32, 64 or 128 MB).
Patching 32-bit systems
Finally, you can use all memory over 4 GB in 32-bit systems using the ReadyFor4GB utility. First, the executable EXE file of the same name is launched from the application folder, and then the Check and Apply buttons are pressed. After that, similar actions are performed for the ntkrnlpa.exe object. The AddBootMenu.cmd file is then run and the command is confirmed. After rebooting, if a menu with a bootloader appears, Windows is selected.
Note: all actions are performed exclusively with the launch of files on behalf of the administrator at your own peril and risk, since the performance of the system after applying this method is not fully guaranteed.
The other day my friend asked for help to sort out his problem: Windows 7 on his Samsung laptop The R525 reported that it sees 3GB of installed memory, with only 764MB available. The laptop, of course, ran slower than we would like. You can check how much memory Windows sees by right-clicking on "My Computer" and selecting "Properties". The picture will be something like this (the screenshot shows what was achieved as a result of solving the problem):
A search for the phrases “3 GB installed, 1 GB available” and “windows shows more memory installed than available” showed that the problem is widely known, but it can be caused by many reasons.
What was tested first:
2 DIMM PC-133 are installed, one - 1 GB, the second - 2 GB BIOS sees all these 3 GB, the system also sees them;
rearranging the DIMMs does not change anything;
Windows 7 is 64-bit, so it should definitely see more than 3 GB of memory;
Windows 7 Home Basic supports up to 8 GB of memory, so there should be no problems because of the version of the system;
the "Resource Monitor" program (press the "Start" button and in the line "Find programs and files" directly write - Resource Monitor ") * says that more than 2 GB is reserved for some devices;
in the program msconfig.exe on the Load-> Additional tab the "Maximum memory" checkbox is NOT checked; this is as it should be - to use the maximum amount of memory, the checkbox must be unchecked.

The problem could lie in the settings of the video card driver. The fact is that modern video cards often either do not have their own memory at all, using the system memory for their own purposes, or have a minimum of memory on board, and system memory is also used to display a picture with high resolution or with a large number of colors. Laptop BIOS allowed to "bite off" system memory no more than 512 MB, so the additional 1.5 GB reservation could be attributed to the driver.
In this model, Samsung uses an integrated graphics card with the motherboard. ATI Radeon 4250. I had to download new driver of this video card, but its installation did not help either: the driver of this video card has no settings indicating how much system memory the driver can "eat off". In principle, some video cards are able to share memory with the system, marking it as reserved, and the resource monitor understands this, displaying such memory as a gray bar. An example of a display is shown in the figure below, but for a different system, just to understand what it looks like.

The system can use the memory shared between the video card and the system as long as the video card does not need it, and as soon as the video card requests it, the system will be forced to free it. However, the amount of such shared memory, even if it exists, is usually limited to no more than half of the available memory, more often it is noticeably less.
Thus, our case went out of the ordinary. Then additional research was undertaken: instead of the old memory modules, a new 4 GB module was inserted into the laptop. The amount of available memory has increased to 2.75 GB. It already looked like an automatic “biting off” of memory by a video card (just about 1.25 GB should have been reserved, a number of sources on the Web spoke about the applied formula “half of the system memory minus 512 GB, which gave us 4 GB of system memory would be 1.5 GB).
Suspicion fell on one of the DIMMs. And rightly so: when trying to boot with only one old 2GB module, the laptop refused to boot. It turned out that the SPD chip on it, which tells the system the configuration of the module, was alive, and the memory itself was faulty, and therefore Windows excluded it from work.
After replacing the faulty 2 GB module with a new 4 GB module, the system returned to normal, and the picture of memory properties became as shown in the figure at the beginning of this article.
Note to the hostess: what Windows shows as " installed memory”Does not always reflect the amount of healthy memory. If there is a noticeable difference (more than 40%) between the installed and available memory, check the boot settings using msconfig, and also monitor the health of the memory modules. In addition, it is better not to buy such video cards or such laptops with integrated video cards that greedily consume system memory.