Badge samples. How to make badges in Word: detailed instructions and recommendations. Preparing Word for use
Badges are an excellent way to identify employees; they create a trusting atmosphere between partners at seminars, trainings, presentations and other events. The minimum amount of information guides potential client and helps direct the conversation in the right direction. In addition to the owner’s personal data, the product usually displays a company logo. This article will help you prepare a complete template for a badge of any size and print it on a printer. At the bottom of the article is a link to a standard size badge template.
Deciding on a standard size
The basic principle for choosing the size of a badge is the amount of information that needs to be placed on it and is available for that size. For standard badges containing the name, position and company logo, a 90x60mm format is sufficient. Badges for private security company employees are usually made in sizes 100x70mm, and for public events large badges in A6 format (105x148mm) are usually made. According to our statistics, the main size of pockets for badges is ordered for a horizontal liner of 90x60 mm. IN in this example We will proceed from these dimensions.
Create a template for a badge in MS Word
Step-by-step instructions for preparing a template in Word for printing badges of the required size.
STEP 1
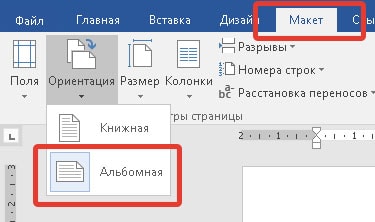
We create new document in MS Word and select the sheet orientation. Depending on the version of the program - this is done in the tab "Page layout" or "Layout". For a horizontal format badge, it is best to use landscape orientation, for a vertical badge - book. In our example, we will make a badge in a horizontal format, so on the “Page Layout” tab we select Landscape. 
To ensure maximum working space on the sheet, we need to reduce the margins from the edge of the document: "Page Layout or Layout - Margins - Narrow".

STEP 2
Now, we insert a table into our sheet, for this in the panel quick access choose "Insert - Table - 3 x 3"(or any other required number of cells). 
 The table we need has appeared and now we need to click right click mouse on the cross, which is located in the upper left corner of the grid.
In the context menu that lights up on the screen, select the section "Table properties...". 
To begin with, select the “Line” tab and set the line height to 6 (cm), size to exact and uncheck "Allow line wrapping to new page"
. On the "Column" tab, set the column width to 9 (cm). If you need other sizes, please indicate them. 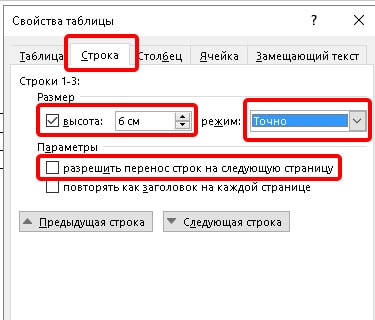

The table is ready, its cells have received the size we specified. 
STEP 3
At this step we begin the layout of the first badge. It is necessary to enter two required fields in the initial cell of the table - full name and position. For full name, a larger font size is usually used than for the position. Also, on the badge, depending on its purpose, you can place a photo of the person and additional fields- this is the name of the company and the name of the event at which it is used. It is advisable to insert the logo of the organization for which we are printing badges into the upper corner of the cell. Let's do it in a standard way: "Insert - Drawings" and then select the saved image on the computer. To reduce the size of the image, select it and drag it inward beyond the required impact area. Set the text and image to the correct sizes and move on to the next paragraph. 

Now, we need to copy the contents of our badge to other cells. To do this, place the cursor at the end of the inscription and triple-click the left mouse button, Word selects the entire necessary area for us. Press "CTRL + C" to copy the data and move the cursor to the familiar cross at the top of the table and click on it. 

Word will highlight the entire table for us and all we have to do is press the combination “CTRL + V” so that our badge template appears in all cells of the table. 
Manually change the field with full name and position for each badge and go to the printing section.
Microsoft Word is excellent text editor which is included in the package Office programs. It is one of the most used in the world. Many users mistakenly believe that Word has earned such popularity solely due to its affiliation with one of the largest companies, but this is far from the case.
Editor "Word"
This program opens up many possibilities for formatting and layout of text of varying complexity, and it will be convenient for both beginners and professionals to work with it. Word is widely used by office workers, journalists, copywriters, schoolchildren and students. It can be both a complex mechanism for creating a unique design and a platform for editing quick notes. The program adapts perfectly to many text formats, synchronizes with other Office products, has a huge range of fonts and functions for modifying them, etc. Word will become an indispensable assistant and to create primitive information material.
A badge is a small plate that indicates the identity of the employee (first name, last name), his position and, as a rule, the name of the organization. Badges are worn suspended by a string around the neck or attached to a pin on the chest. You might have seen such cards from employees of supermarkets, beauty salons, large firms, corporations, and so on. The “trend” has reached schools and institutes. So, duty officers, interns, library workers and others carry such cards. Plastic holders can be found in a huge variety of office departments. But how to make badges and their informative content in Word? We will talk about this further.
How to make a frame for a badge in Word using a ready-made template?
There are several ways to make a badge. The simplest of them is to edit a ready-made template. Some of them are already installed by default, but templates such as badges need to be downloaded additionally. However, it won't take much time. First, you need to check whether such a template has been downloaded in advance and look at the available templates. To do this, go to “File”, then click “Create” and “Sample Templates”. If there is no badge template, click “Office.com Templates” and download the required option. Further work will proceed in the same way as with any other document. We enter the required data, you can add the organization’s logo, play with fonts, add a border, fill it, and more.

But often the badge template does not meet user expectations. They want to create their own unique option from the very beginning. How to make badges from scratch in Word?
Create your own version of the badge
Even though all badge holders are made in a standard size, you still need to measure it to be on the safe side. We will make this version of the badge using table blocks. They are fairly easy to draw and cut after printing. If the badge is horizontal (this is the most common type), it is better to immediately set the sheet to landscape orientation. This parameter can be easily changed in the "Page Layout" tab and in the "Orientation" item. In the "Margins" item, you can set the "Narrow" checkbox. I would like to note that it is better to make several badges at once and print them on one sheet.
Badge using table designer
Open the "Insert" tab and select "Table". We denote the number of cells. It depends on the number of badges you want to receive as a result. When the table is ready, you need to adjust the size. To do this, hover your cursor over the table and click on the small cross that appears in the left corner. Go to "Properties".

Set the size to “Exact” and uncheck the “Allow line breaks” checkbox. We set the line height to 5.5 (standard badge height, if your holder has other sizes, you should stick to them). Set the column width to 9. Now you can start editing the content.
How to make an inscription for a badge in Word?
If you need to place an organization’s logo on a badge, it is best to do it right away so that you don’t have to cut it, stretch it, or narrow it later. To do this, let's use the "Insert" tab again and do the work as with a regular picture. By the way, you can place a photo of a person in the same way. Now you can enter the personal data of the employee or student. The capabilities of Word allow you not to edit the contents of each cell.
If you need badges of the same type (for example, only the first and last names of employees will differ), then you can easily copy the contents of one badge, paste it into another cell and make minimal adjustments. You can even save the badge template in Word’s memory and then use it as a template. To do this, click “File” and select “Save as Word template”.

How to make badges in Word without the help of a table designer? To do this, you can draw a rectangle autoshape and then continue editing the content. This is less convenient, but it will work as an alternative option.
So we figured out how to make badges in Word. We hope that this process will be simple and quick for you in future.
Often at various events, to quickly and conveniently identify a person, it is necessary to use a badge - an element of the uniform in the form of a card, badge or sticker. It usually contains the full name of the event participant and additional information, such as position.
Making such a badge is not at all difficult: a word processor contains all the necessary tools for this. But if the appropriate program is not at hand, and the matter is urgent, special online services come to the rescue.
Almost all web tools are designed to make certain tasks easier. And the services we are considering in this article are no exception. Thanks to ready-made solutions like complete templates, layouts and others graphic elements, creating badges using the resources described below is unlikely to take more than five minutes of your time.
Method 1: Canva
Popular web service designed for creating designs different documents, such as cards, letterheads, flyers, posters, etc. There is also all the necessary functionality for working with badges. Canva contains a huge library of all kinds of logos, icons and stickers that allow you to diversify appearance ready-made name plates.
- So, the first thing after going to the site is to click "Create nameplate".

- On the page that opens, indicate what you intend to use the service for.

- Sign up for Canva using "account", or.

- Then on the new page click "Create Design" in the menu on the left.

- Click "Use special sizes" top right.

- Please indicate the size for your future badge. The best option- 85x55 millimeters. After that click "Create".

- Layout your badge using the Canva editor, using ready-made layouts, or compose it from individual elements. Presented to you wide choose backgrounds, fonts, stickers, shapes and other graphic components.

- To save the finished badge to your computer, click the button "Download" in the top menu bar.

- Select the desired document format in the pop-up window and click again "Download".

After a short preparation, the finished image will be loaded into the memory of your computer.
If you show your imagination and take advantage of all the capabilities of the resource described above, you can create a stylish and high-quality badge for any event.
Method 2: Badge Online
A free online badge maker that allows you to create name plates either based on templates or using your own structure and imported graphic elements. The service does not require registration and is one specific page with all the necessary functionality.

As you can see, this tool allows you to create badges in just a couple of clicks. Yes, you won’t be able to do anything complicated with it, but otherwise the resource does its job perfectly.
Homemade quick production
When I was a child, I didn’t even know what badges and business cards were, but now they have become part of office life and official events. I remember when my child went to first grade, the teacher asked parents to bring badges with the child’s name so that the children could get to know each other faster ( good idea, Truth?). And now, many years later, there was a need for urgent badging. As always, I didn’t want to go anywhere, so I had to come up with a technology to quickly make a lot of badges from scrap materials. It’s not a problem to find plastic bottles in the summer...
Materials and tools
1. Plastic bottle 1-2 l without corrugation in the central part.
2. Safety pin.
3. Scissors, preferably large tailor's ones, they are more convenient for making an even cut on fairly hard plastic.
Job
To make name tags from plastic bottles, first of all you need to find a suitable transparent plastic bottle with a smooth cylindrical part of the required size (for example, from a “Caravan” drink). The neck and bottom of the bottle are removed and used for other crafts; the plastic is cut along the generatrix to obtain a blank ().
Next you need to select the size of the badge. If the dimensions are too large (for example, 12cm by 8cm), it will be difficult to make the badge neatly, without bending or warping after installing the plastic rivets. Practice has shown that the most optimal sizes approximately 90x60mm. This is quite enough for all the necessary representative information to be placed on it.
![]()
After choosing the dimensions, it is necessary to bend the plastic along the generatrices of the cylindrical blank so that the natural convexity of the cylindrical shape is inside the future badge (). The distance between the bend lines is equal to the width of the badge. Particular attention should be paid to the parallelism of the bend lines. After bending, I recommend straightening the bend line with force, for example, on the flat edge of a table.
The height of the workpiece () should be taken 2-3 cm greater than the length of the badge, so that after forming its width by bending the plastic, it is possible to obtain the specified length by cutting off the edges of the workpiece. You can do this using a shoe knife or large scissors. Trimming edges with small scissors in the vast majority of cases results in a jagged or skewed edge. Thus, the height of the glass of the blank should be 2-3 cm greater than the length of the badge, and the diameter of the bottle should be 2-3 cm less than the width of the badge.
The plastic parts of the workpiece from the cutting line after folding into a rectangle should overlap by about 2 cm in order to be fastened with a plastic rivet. I tried to secure it with tape - it’s terribly inconvenient (but here it’s convenient - http://), the plastic always tries to unfold and, as always, I don’t have enough hands or fingers to hold it.
![]()
The overlapping strips of plastic at the back of the future badge are connected using plastic rivets as shown in. In this case, a plastic rivet should be selected (or manufactured) with a minimum head height. You should melt the hole and install the rivet by placing a spacer inside the future badge, for example, tweezers or a screwdriver. In this case, the holes for the rivets must be formed extremely carefully so as not to damage the plastic of the front part of the future badge. You may not get an even rectangle the first time, but once you get the hang of it, making a neat badge of the sizes indicated above is not a problem.
Naturally, the badge needs to be attached to clothing somehow and the easiest way to do this is with a safety pin, but you can cut an improvised pin from a plastic bottle. To fix the pin on the badge, two holes approximately 2 mm wide and 10 mm long () were melted into the plastic of the back of the badge using a burner. The length and width of the hole should be such that the head of a pin can be inserted into it. Those. What kind of pins are there, these are the sizes of the holes that need to be made. The position of the holes should be such that a pin inserted there (
IN Microsoft Word You can not only work with text, but also with pictures, diagrams, tables, formulas and more. Using the various features of the editor, you can beautifully design the cover of a book, or make a report, formatting it according to all the rules.
Now we will figure out how you can make a badge in Word. I’ll tell you about using templates: where you can download them and how to change them. Next, we’ll look at how to do everything ourselves from scratch: create a block of a suitable size and insert text, a drawing or a photograph into it. Then you will print what you have, cut it out and paste it into a badge.
Using Templates
If you want to use ready-made badge samples, then create a new document in Word.
Then in the search bar for available templates, type either “Cards” or “ Business Cards» and click on the arrow to search. You need to look for cards, since there are only so many badges this list They just don’t, and they are most like them.

On the list available options Select the one that suits you best and click “Download”.

When the template is downloaded, it will open in a new window.

If you don’t like anything from the list that appears, then you can find an option on the official website:
Follow the link, select the item we need on the left, and then look for what you like. Make sure that Word is written under the image. Then click on the name of the template and download it by clicking on the corresponding button.

The next thing to do is to move on to editing and formatting the blank. Almost all the necessary buttons will be located on the “Working with Tables” tab – “Layout” or “Designer”.
Click on any word and look at the top to see what size the table cell is. In the example, the blocks are 8.82x5.08 cm. This may not always be suitable. The size of a standard badge in centimeters is 8.5x5.5. If you do not have a standard one, it is better to measure the width and height of the leaflet that you will insert there.

I will stick to the standards, so select the table and enter 8.5 in the “Width” field (your value may be different). Then change the height value, where it is 5.08, and press “Enter”. After this, each cell will become the size you specified.

To make it clear where the table boundaries are, you can “Display grid” by clicking on the corresponding button. As a result, all transparent lines will become a blue dotted line, but they will not be printed.

Let's change the sample - enter your organization name.

Then delete the text below - select it and click “Delete”.

By pressing “Enter” I made an additional indent from the top line and typed the person’s first and last name. Select them, go to the “Home” tab and here select the appropriate size and font, you can use italics or bold.

The bottom lines remain. We delete them, print the appropriate text, this is my position. Then change the font and letter size. To place words, for example, in the center, left or right, click on one of the stripe buttons.

The next step is to add an image. This is not necessary, so in principle, the badge can be considered ready. If you want your badge to have a picture, then click on the cell that you edited and select “Picture” on the “Insert” tab.
There is a detailed article on this topic: inserting a picture into Word.

In the window that opens, select either a logo or a photo and click “Insert”.

Then you need to reduce the image using the markers on the frame.

To ensure that it is displayed correctly on the sheet and the words do not move, select it and select “Text Wrap” – “before” in the drop-down list.
Read more in the article: how to make text wrap around a picture in Word.

Again using the markers and arrows in different directions on the frame, move the drawing to the desired location. I have it in the top left.

Once one badge is ready, copy it and replace the pattern in the other cells. Then change names and positions. This way, you can make several copies for different workers or schoolchildren.
To make a badge, go to the "File" tab.


Specify the number of copies, select a printer and click on the desired button.

We do it ourselves
Considering that there are no ready-made templates, and the cards need to be remade, which is not entirely convenient, let's figure out how to make a badge yourself from the very beginning. As for me, this option is simpler - you don’t need to change anything, you immediately indicate required sizes, choose the design and the like.
Open “Insert” at the top and add a table with the appropriate number of rows and columns to the page. In my example, I will have 2x3.
An article on how to add a table in Word is already on the site.

Then select it by clicking on the crosses in the upper left corner and specify the values for the width and height of each cell. Since my dimensions are 8.5x5.5 cm, I divide 8.5 in half (since there are 2 columns) and 5.5 into three (3 lines).
You will get a table with all the same cells. If this is not suitable, you can make a cell with a width of 3 cm in one line, then the second will be 8.5-3 = 5.5 cm. In general, decide on the type of badge and calculate the size of the cells.

Since we don't need borders, they need to be removed. For convenience, we will leave only the outer borders so that it is convenient to cut. Select the entire table, click on the small arrow next to the “Borders” button and click “None” in turn, and then “External”.
You can read how to remove borders in a Word table by following the link.

Now on the “Layout” tab we display a grid to make it convenient to work with data. It looks like a dotted line and is not printed.

In addition to the text, I will also add a picture, for this I will combine 2 cells at the top right. You can also make one out of several, as described in detail in the article: merging cells in Word.

I insert the picture in the same way as described in the previous paragraph. I change the wrap around it and make it the right size.
Select the text in parts and change the font, size, boldness and more. To make the letters colored, select a color from the drop-down list by clicking on the button with the letter “A”. You can fill a cell with color by placing italics in it, clicking on the paint bucket and selecting any color.
To choose the position of text relative to the cell, use the Align button. The list that opens presents various options.
To place several badges on a page, select the one you made, copy - “Ctrl + C”, and paste it a certain number of times - press “Ctrl + V” for this. Change the data.
Making a school badge is no different. For example, for a duty class: we indicate the school, class number, first and last name. You can either add a logo or a photo of the student.
These are the results I got. You can download a sample badge from Yandex.Disk using the link:
https://yadi.sk/i/G6unfmhk3NdsLyhttps://yadi.sk/i/G6unfmhk3NdsLy
The file will contain both those made using the converted template and the last two.
I hope the article helped, and now you can make a badge in Word with a beautiful inscription and design quickly enough. Well, or just slightly correct those that you downloaded from my Disk.
Badges are an excellent way to identify employees; they create a trusting atmosphere between partners at seminars, trainings, presentations and other events. The minimum amount of information guides the potential client and helps direct the conversation in the right direction. In addition to the owner’s personal data, the product usually displays a company logo. This article will help you prepare a complete template for a badge of any size and print it on a printer. At the bottom of the article is a link to a standard size badge template.
Deciding on a standard size
The basic principle for choosing the size of a badge is the amount of information that needs to be placed on it and the pocket available for the badge for that size. For standard badges containing the name, position and company logo, a 90x60mm format is sufficient. Badges for private security company employees are usually made in sizes 100x70mm, and for public events large badges in A6 format (105x148mm) are usually made. According to our statistics, the main size of pockets for badges is ordered for a horizontal liner of 90x60 mm. In this example, we will proceed from these dimensions.
Create a template for a badge in MS Word
Step-by-step instructions for preparing a template in Word for printing badges of the required size.
STEP 1
Create a new document in MS Word and select the sheet orientation. Depending on the version of the program, this is done in the “Page Layout” or “Layout” tab. For a horizontal badge, it is best to use landscape orientation, for a vertical badge, portrait orientation. In our example, we will make a badge in a horizontal format, so on the “Page Layout” tab we select Landscape.
To ensure maximum working space on the sheet, we need to reduce the margins from the edge of the document: “Page Layout or Layout - Margins - Narrow”.
STEP 2
Now, insert a table into our sheet; to do this, in the quick access panel, select “Insert - Table - 3 x 3” (or any other required number of cells).
The table we need has appeared and now we need to right-click on the cross, which is located in the upper left corner of the grid.
In the context menu that lights up on the screen, select the “Table Properties...” section.
To begin with, select the “Line” tab and set the line height to 6 (cm), the size to exactly and uncheck the “Allow lines to be moved to a new page” checkbox. On the “Column” tab, set the column width to 9 (cm). If you need other sizes, please indicate them.
The table is ready, its cells have received the size we specified.
STEP 3
At this step we begin the layout of the first badge. It is necessary to enter two required fields in the initial cell of the table - full name and position. For full name, a larger font size is usually used than for the position. Also, on the badge, depending on its purpose, you can place a photo of the person and additional fields - the name of the company and the name of the event at which it is used. It is advisable to insert the logo of the organization for which we are printing badges into the upper corner of the cell. We do this in the standard way: “Insert - Pictures” and then select the saved picture on the computer. To reduce the size of the image, select it and drag it inward beyond the required impact area. Set the text and image to the correct sizes and move on to the next paragraph.
Now, we need to copy the contents of our badge to other cells. To do this, place the cursor at the end of the inscription and triple-click the left mouse button, Word selects the entire necessary area for us. Press “CTRL + C” to copy the data and move the cursor to the familiar cross at the top of the table and click on it.
Word will highlight the entire table for us and all we have to do is press “CTRL + V” so that our badge template appears in all cells of the table.
Manually change the field with full name and position for each badge and go to the printing section.
Printing the badge on a printer
To print the page with badges, press “CTRL + P” and in the window that opens, click the Print button. At this stage, all you have to do is carefully cut out rectangles along the lines of the table and insert them into a special pocket for the badge.
We hope that you easily completed our training lesson on creating a badge template in Word, and now you can create badges yourself to the required size. Also, in our store you can buy pockets for badges with various holders: ribbons, laces, clips, retractors. Standard solutions for employees can be viewed at the link in this section.
Download the badge template in Word (MS Word).
For badges on paper, holders are needed:
In most cases text documents are created in two stages - writing and giving a beautiful, easy-to-read form. Working in a fully functional word processor MS Word follows the same principle - first the text is written, then it is formatted.
Lesson: Formatting text in Word
Templates, of which Microsoft has integrated a lot into its brainchild, are designed to significantly reduce the time spent on the second stage. A huge selection of templates is available in the program by default, even more are presented on the official website Office.com, where you can certainly find a template on any topic that interests you.
Lesson: How to make a template in Word
In the article presented at the link above, you can familiarize yourself with how you can create a document template yourself and use it in the future for ease of work. Below we will look in detail at one of the related topics - creating a badge in Word and saving it as a template. This can be done in two ways.
Creating a badge based on a ready-made template
If you do not want to delve into all the intricacies of the issue and you are not ready to spend personal time (by the way, not that much) on creating a badge yourself, we recommend turning to ready-made templates. To do this, follow these steps:
1. Open Microsoft Word and, depending on the version you are using, follow these steps:
- Find a suitable template on the home page (relevant for Word 2016);
- Go to menu "File", open the section "Create" and find a suitable template (for more early version programs).
Note: If you can't find a suitable template, start typing in search bar the word “badge” or open the section with “Cards” templates. Then select the one that suits you from the search results. Additionally, most business card templates will work just fine to create a badge.
2. Click on the template you like and click "Create".
Note: Using templates is extremely convenient because there are often several of them on a page at once. Therefore, you can create several copies of one badge or make several unique (for different employees) badges.
3. The template will be opened in a new document. Change the standard data in the template fields to the ones that are relevant to you. To do this, set the following parameters:
- Full Name;
- Job title;
- Company;
- Photography (optional);
- Additional text (optional).
Lesson: How to insert a picture into Word
Note: Inserting a photo is not a mandatory option for a badge. It may be absent altogether, or you can add a company logo instead of a photo. You can read more about how best to add an image to a badge in the second part of this article.
Once you have created your badge, save it and print it out.
Note: Dotted borders that may be present on the template are not printed.
Lesson: Print documents in Word
Let us remind you that in a similar way (using templates), you can also create a calendar, business card, greeting card and much more. You can read about all this on our website.
How to do it in Word?
CalendarBusiness cardGreeting cardLetterhead
Creating a badge manually
If you are not satisfied ready-made templates or you just want to create a badge yourself in Word, then you will obviously be interested in the instructions below. All that is required of you and me for this is to create a small table and fill it out correctly.
1. First, think about what information you want to place on the badge and calculate how many lines it will require. There will most likely be two columns ( text information and photo or image).
Let’s say the badge contains the following information:
- Last name, first name, patronymic (two or three lines);
- Job title;
- Company;
- Additional text (optional, at your discretion).
We do not count a photo as a line, since it will be on the side, occupying several lines that we have allocated for the text.
Note: A photo on a badge is a controversial point, and in many cases it is not needed at all. We are looking at this as an example. So, it is quite possible that in the place where we propose to place a photo, someone else will want to place, for example, a company logo.
For example, we will write the last name on one line, under it on another line the first and patronymic, in next line there will be a position, another line - the company and, the last line - a short motto of the company (and why not?). According to this information, we need to create a table with 5 rows and two columns (one column for text, one for photos).
2. Go to the tab "Insert", press the button "Table" and create a table of the required sizes.
Lesson: How to make a table in Word
3. The size of the added table must be changed, and it is advisable not to do this manually.
- Select the table by clicking on its anchor element (a small cross in the square located in the upper left corner);
- Right-click in this place and select "Table Properties";
- In the window that opens, in the tab "Table" In chapter "Size" check the box next to the item "Width" and enter the required value in centimeters (recommended value 9.5 cm);
- Go to the tab "Line", check the box next to the item "Height"(chapter "Column") and enter the desired value there (we recommend 1.3 cm);
- Click "OK" to close the window "Table Properties".
The base for the badge in the form of a table will take the dimensions you specify.
Note: If the resulting dimensions of the table for the badge do not suit you for some reason, you can easily change them manually by simply pulling the marker located in the corner. True, this can only be done if strict adherence to any badge size is not a priority for you.
4. Before you start filling out the table, you need to merge some of its cells. We will do in the following way(you can choose another option):
- Combine the two cells of the first row under the company name;
- Combine the second, third and fourth cells of the second column under the photo;
- We combine the two cells of the last (fifth) line for a small motto or slogan.
To merge cells, select them with the mouse, right-click and select "Merge Cells".
Lesson: How to merge cells in Word
5. Now you can fill in the cells in the table. Here is our example (no photo yet):
- Insert the picture into any empty space in the document;
- Resize it according to the cell size;
- Select a location option "Before the text";
- Move the image into the cell.
Lessons on working with Word:
Inserting a picture
Wrapping text around a picture
6. The text inside the table cells must be aligned. It is equally important to choose the appropriate fonts, size, and color.
- To align the text, turn to the group tools "Paragraph", having previously selected the text inside the table using the mouse. We recommend choosing an alignment type "In the center";
- We recommend aligning the text to the center not only horizontally, but also vertically (relative to the cell itself). To do this, you need to select the table, open the window "Table Properties" via the context menu, go to the tab in the window "Cell" and select an option "In the center"(chapter "Vertical alignment". Click "OK" to close the window;
- Change the font, color and size to your liking. If necessary, you can use our instructions.
Lesson: How to change the font in Word
7. Everything would be fine, but the visible borders of the table certainly seem unnecessary. To hide them visually (leaving only the grid) and not print them, follow these steps:
- Select the table;
- Click on the button "Border"(tool group "Paragraph", tab "Home";
- Select an item "No border".
Note: To make it easier to cut the printed badge, there are buttons in the menu "Border" select option "Outer Borders". This will make the outer outline of the table visible as in electronic document, and in its printed interpretation.
8. Done, now you can use the badge you created yourself.
Saving a badge as a template
1. Open the menu "File" and select "Save as".
2. Using the button "Review", specify the path to save the file, give a suitable name.
3. In the window located under the line with the file name, specify the required format for saving. In our case it is « Word Template(*dotx)".
Printing multiple badges on one page
It is possible that you need more than one badge, placing them all on one page. This will not only help to significantly save paper, but will also significantly speed up the process of cutting and making these same badges.
1. Select the table (badge) and copy it to the clipboard ( CTRL+C or button "Copy" in the tools group "Clipboard").
Lesson: How to copy a table in Word
2. Create a new document ( "File" - "Create" - "New document").
3. Reduce page margins. To do this, follow these steps:
- Go to the tab "Layout"(previously "Page layout");
- Click the button "Fields" and select an option "Narrow".
Lesson: How to change margins in Word
4. On a page with such badge fields measuring 9.5 x 6.5 cm (the size in our example) 6 will fit. To arrange them “densely” on the sheet, you need to create a table consisting of two columns and three rows.
5. Now in each cell of the created table you need to insert our badge, which is contained in the clipboard ( CTRL+V or button "Insert" in Group "Clipboard" in the tab "Home").
If the boundaries of the main (large) table move during insertion, do the following:
- Select the table;
- Right click and select "Align Column Width".