Where are the images of the Windows 10 lock screen. Windows: Interesting (Spotlight) does not work - solution. Adding program widgets
For a long time, use a new operating system, but still do not have the concept where you are pictures used for the lock screen in Windows 10? Today we will touch this issue and several concomitant, for example, how to pull the right picture to yourself.
During the time of operation in the "dozen", users noticed that the blocking screen screensaver periodically changes in the operating system. Sometimes there are very beautiful pictures that you want to use as a background desktop pattern.
Only for this you need to know where these images are stored. Advanced users even tried to find all the graphic files stored in the catalogs system volumeBut all in vain, the desired images were not found. Why it happened that the search did not find files, Consider below.
Activation of the image option on the lock screen
It happens that the mapping of pictures is deactivated in the settings (especially concerns these assembly lovers aimed at maximum speed of Windows 10). Enable them, select the displayed photo, playing pictures in the form of a slideshow and even change the directory with the desired photos as follows.
- Open the menu "Parameters" through the combination of the Win + I keys.
- Go to the Personalization section.
- We make an active tab "Lock screen".
- As the first "background" option, install "Windows: interesting".
Check if everything looks like, as we thought, you can combine the Win + L keys that will cause the lock screen.
After selecting "Photo", it will be possible to replace the background from the lock screen in Windows 10, and the Slideshow option will allow you to specify several pictures or directories with graphic files that will be used as slides.
Keep a graphic file from the lock screen to your collection
Any image that is invited to install as a blocking screen background is stored in the user directory along the way - C: \\ Users \\ Your_In the user \\ APPDATA
\\ Local \\ Packages.ContentDeliveryManager_CW5N1H2TXYEWY \\ Localstate \\. Find here the "Assets" folder and open it.
One nuance! Just to see the AppData catalog may not work, as it is systemic, and therefore has the attribute "hidden". By default, such objects file System Not displayed in the window of the standard conductor, but it is completely easy to fix it with a literally single mouse click.
1. Open the Win + E conductor window or via a shortcut.
2. Call the main menu item, referred to as "View".

3. We celebrate the "Hidden Elements" checkbox.
The same is done through the "folder parameters".
1. Call the "Change folder and search parameters" item.

2. In the "View" tab, the switch in the last option is transferred to the "Display hidden files and folders. "

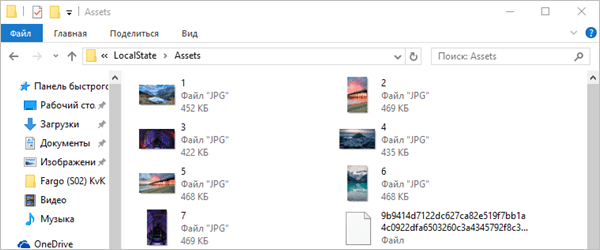
After that, you can open the "ASSETS" folder, where the pictures of the lock screen are located in Windows 10.
Simply, no single picture will not see, unless you open the image viewer and drag the file to its window with a long name, which is a set of characters.
All these files are images, but without expansion, and to view them to the end of the file, add its extension - JPG. The lack of these characters is the reason why Windows 10 search engine could not detect the graphic files used in it as background drawings for the lock screen.
If one photo is renamed quickly, then change the names of several dozen documents manually for a long time. Consider how to change the file extension packet through.
1. Copy all the images to the directory that will be in an individually distinct.
2. Rename all files to any named name, and set the image ".jpg" format.

Now you can switch the way to visualize the items of the directory to "large icons" or "sketches" and choose the desired pictures or remove unnecessary.
The Windows Recent Editorial Lock Screen additionally performs an information function: it displays the time and date, important notifications and even some system applications. Through the user specified by the user, the interval of the computer's inactivity is locked, after which it is necessary to enter a password to enter an account. On the service Computer Or PC, where several people work, the function is very useful, but for a user who uses a laptop one - this possibility is not needed.
Consider both cases: for the first - how to configure the lock screen in Windows 10, using its new features (display notification, slideshow as a back plan), and for the second - how to deactivate its appearance.
Background replacement
The Windows 10 developers provided the ability to set the background image to the lock screen. This is done as follows.
- Open the Charms panel and go to "Parameters".

- Select the Personalization item and go to the "Lock Screen" tab.

For reference: in Windows 10 there is an opportunity not only to choose a background image, but also to set a slide show in its quality, like on the desktop.
- In the drop-down menu "Background", choose the "photo" and click "Review".

- We ask the way K. raster image In the standard file selection dialog and click "Select Pictures".

After that, at the top of the window, a small block of previewing the current view of the lock screen will appear. With the next computer lock, you will see the selected picture as a background.

In order to set the sequence of pictures as the rear layout of the lock screen, in the third step, choose a "slideshow".

I click "Add folders" or "Images" to select a directory with graphic files or select pictures, respectively.

Going to "Advanced Slideshow Options", get the ability to configure the display of frames "for yourself".

Here everything is intuitively understandable, therefore it will not stop on details.
Application Setup
Sracks just below in the additional slide display settings dialog, see the block that is responsible for adding applications that will be displayed on the lock screen.

To do this, click on icons with "pluses" and choose a block with programs.

Then click on the icon of the application itself.

Changes come into force during the next blocking of Windows 10.
Deactivation of the blocking window
For the second case, when one person or the lock screen is not needed at the computer with Windows 10, we will figure it out how to turn it off with both methods.
First method
- Run the editor group Policy Through the search string or the "gpedit.msc" command.
System commands are entered into the command interpreter, started by "Win + R" or a search string.

- Go to the "Personalization" directory, located along the path displayed in the screenshot.

- We find the "Prohibition of displaying the lock screen" and perform a double click on it.
- In the left block of the window, we transfer the trigger switch to the "Inclusive" position and click "OK".

After restarting windows 10 The screen will be disabled.
The second method
In the second way, you must start the registry editor.
- This is done by the "Regedit" command introduced into the "Run" window.

- Go to the branch located at:
- Call the context menu of the free area of \u200b\u200bthe right screen screen and select the creation of a new string 32x bit key - DWORD.

- We enter its name as "NOLOCKSCREEN", that is, the lack of the lock screen, select a hexadecimal calculus system and set the logical unit as the value of the forming parameter.

- Restart Windows 10 to apply changes.
Follow all these actions allow both tweaker programs such as Winaero Tweaker or Ultimate Windows Tweaker, but why clog the computer are superfluous when everything is quick and easily carried out by means operating system.
This is familiar with the new Windows 10 function. Do not be afraid to experiment with external species and the parameters of this useful tool.
(Visited 16 997 Times, 1 Visits Today)
With a welcoming lock screen in the tenth version of Windows, all users who have installed this operating system are initially faced as it is activated by default. In other words, if the screen lock password installed for a particular user is used, the screen will appear constantly when changing the registration record or when you exit sleeping mode. The owners of homeproof computer terminals or laptops, this function by and large is not particularly needed. But for office workers, when several users can be registered on one terminal, it will come in handy.
However, not everyone knows that the Windows 10 lock screen itself can be configured at its discretion. In addition, it performs not only blocking function, but also has a mass of informative opportunities. Next will be given several tips for configuration, and when necessary - and on a trip.
Windows 10 Lock Screen: Purpose and Basic Functional
So, the main purpose of the screen, as already mentioned, when using a password of access to the system consists in banning the entrance to some particular accounting. Roughly speaking, this is a certain function related to system security and user data protection.
On the other hand, many probably paid attention to that at the moment when the screen is locked, some additional elements are displayed on the display. By default, this time and date. In general, it is very convenient, but for greater comfort, the user simply can change the screensaver (background), add some additional items in the form of standard applications or enable the display of notifications that will be displayed without direct login under their registration.
Windows 10 Screen Lock: Background Setup
To begin with, consider changing the background. Something like it looks like standard setting Displayed pictures on the "Desktop", but this action is performed somewhat differently.

The screen lock at the first stage is configured from the personalization menu, access to which can be obtained through the parameters section called their main menu "Start". In the left part of the window, the corresponding string is selected, after which its type is selected in the drop-down list. For example, choose the "photo". To select a picture, use the view button below, after which it is indicated required filewhich will be displayed on the screen.
Setting the slideshow parameters
However, the screen lock will be more interesting and unusual if you set the slideshow mode. You can choose it in the same list where the photo installation was used. In this case, you can add not one, but several pictures (adding them one or specifying a whole folder containing them).

If necessary, you can use the optional parameter button to go to the advanced settings. There are four basic parameters that the user can activate or disable by adjusting the slideshow behavior under itself.
Adding program widgets
But only the above settings are not limited. For greater informative, you can add multiple applications to the screen.

To do this, you need to switch to the block that is responsible for adding programs (it is located just below). Immediately you can see that there are several buttons responsible for standard applications (calendar, mail, alarm clock, clock, etc.). When you click on the button, the menu appears from which the desired widgets are selected. Along the way, you can immediately configure some of the blocking screen parameters.
The only disadvantage of such settings is that custom applications are not available on the screen. By and large, it is not necessary. Although when using some third-party programsallowing you to manage some advanced features, it is possible to do this.
Setting notifications
After the actions described above, you must configure the display of notifications. By default, this option is in an active condition. However, as they say, it is better to check it for loyalty.

It is done in the parameter menu with the selection of the system partition, in the menu of which you need to go to the notification and action item. There is a string of notifications on the lock screen, in which you want to install the slider into the included position.
Disconnecting the screen
Now let's see how if it is not required. The easiest way for the case when there is only one user registration on the terminal - just remove the password (section of user accounts). After applying the settings, the screen will not be displayed when entering the system.

In addition, in the input parameters you need to deactivate the function of the so-called re-input, setting the value of the option to "Never".

However, two alternative methods can be offered. Locking the screen in the first case can be disabled through the settings of group policies. In the editor that is called by the gpedit.msc command, through the administrative template menu, we find the personalization section and the display of the display of the locking screen, we enter the edit menu and activate the "Enabled" string. We save changes and reboot the system. After that, the lock lock will be completely disabled.

In the second case, you will have to operate through the system registry (Regedit in the "Run" console). In the HKLM branch through the Software section, we find the Personalization directory, on the right side of the editor through the PCM menu, create a new DWORD parameter (32 bits), assign the name of the NOLockScreen, through a double click entering the edit window and set to the value 1 as in the previous case. , Restart system is required.
If someone does not suit the above methods, there is nothing easier than to use third-party utilities like Ultimate Windows Tweaker or Winaero Tweaker. However, the installation of such programs will lead to the fact that they will constantly "hang" in memory with icons with system tray. So why clog the computer if all actions can be performed using the operating system toolkit?
Actions on mobile devices
Since it is originally about operating windows system 10, actions carried out on mobile devices, consider very briefly.
In Android devices, for example, in smartphones or Samsung smartphones, the screen lock is configured through the Personal Data section and the Security menu. There are several options for action. If the device blocking is not required, you can set a complete shutdown.
Note: If the PIN code or graphic keyWhen you try to access settings, the system will offer to enter them.
In the "iPhone", the screen lock turns off through the basic settings where the screen selected and brightness is selected. It has an auto-lock item in which you can set the wait interval or disable the blocking completely. If this item is not available (highlighted in gray), you must first turn off the power saving mode through the battery settings.
In both cases through initial screen Or the section of its parameters can be selected a picture that will be installed as a background.
Finally
Summing up, it can be noted that you can easily configure the blocking screen in Windows 10. Compared to previous versions of the system, the possibilities here are clearly more, not to mention the parameters of informative. Again, it is worth saying that the user who works on the terminal is solely, this function can be completely deactivated (there is practically no meaning in its application). But when there are several registration records - another thing. Mobile gadgets were considered very briefly, since the above-mentioned models for Windows-systems have no relationship.
As for smartphones, working precisely under Windows, the setup actions are practically identical to the stationary systems, however, a shutdown is made in most cases by the method described for Android and Apple devices.
When you turn on or disconnect the computer appears lock screen, where on beautiful background Displays notifications of various applications. This is one of the few visual components that moved to the "Tent" from previous version Systems. The lock screen does not carry a special functionality, so it can be disconnected without any consequences for "windows". On how to disable (enable) and change (configure) the lock screen including through new feature "Windows: interesting" (Windows Spotlight) - read further after the button of the same name.
How to disable (enable) the lock screen inWindows 10
There are two ways to disable the lock screen in Windows 10: using the Local Group Policy Editor gpedit.msc. and by editing the registry. We will go the second way, because In some versions of the OS, the policies editor is not available.
So that disable the lock screen Click the key combination " Win + R."And dial regedit. → "OK"→ In the registry editor, expand the chain HKEY_LOCAL_MACHINE \\ SOFTWARE \\ POLICIES \\ Microsoft \\ Windows \\ Personalization → In the last section, create " DWORD parameter (32-bit)" under the name NOLOCKScreen. And also through right button Mouse Set the value equal 1 "(Screenshot below). If the section Personalization You do not have, you have to create it manually.

To enable Lock Screen Do the above manipulations with the system registry, setting the value of the parameter NOLOCKScreen.equal 0 " → "OK". Changes will take effect immediately, but to check the performance of the option, click" WIN. + L."(User change or system lock), and better reboot PC.
Setting the lock screen inWindows 10

Starting with Windows 8, Operations from Microsoft learned to add your favorite images (background, photo) of nature, relatives and loved ones, plus, create a cyclical slideshow. In order to configure Lock Screen through " Start"Select" Parameters"→ Next" Personalization" → "Lock screen". The current background will be shown on the right side of the window, while some of its options are displayed in the form of tiles below. You can replace" Photo "to any of the presented or something on something, clicking on" Overview"To select from the entire collection of images. In addition:
- to show slides Touch the drop-down menu of the "Background" subcategory and stop on " Slide show"→ Select folders containing photos of the desired resolution (extended settings are hidden under the link" Advanced Slideshow Options");
- on the "Windows: Interest" mode "(screenshot), which saw the light with the release of Threshold 2 batch update, read in the details of the third part of the presented review.
How to Change Image (Background) Windows Spotlight Lock Screen
After the announcement of the last November update latest version "Windows" users have the opportunity to see the lock screen in style Windows Spotlight ("Windows: interesting"), "smart" Lockskrina (English. l.ockscreen.), which is not limited to the provision of familiar information - time, date and reminders. Using machine learning algorithms, Spotlight Shows various applicationscapable of improving your productivity in his opinion. In the same principle, with the observance of the user taste, the background images are selected, loaded from Microsoft servers.
To open them with any graphic viewer (editor) / Rename / Delete / Move to another folder you need:

- open the conductor and turn on the display of hidden items on the View tab (Screenshot);
- in the address string of the conductor insert the path C: \\ Users \\ [Suitable_name_name] \\ APPDATA \\ Local \\ Packages \\ Microsoft.Windows.contentDeliveryManager_CW5N1H2TXYEWY \\ Localstate \\ Assets → "ENTER";

- in folder Assets., via click on the file and key " F.2 ", Rename all files as shown on the prefinal screenshot.
Now you know where the blocking screen images are stored Windows 10 When you turn on the "Windows: interesting" mode, and it's small to configure the system "for yourself", according to personal preferences and taste.
![]() Often windows feature: interesting (Spotlight) intended for automatic download and installation of various background images For the lock screen in Windows 10, many users of this operating system simply does not work properly.
Often windows feature: interesting (Spotlight) intended for automatic download and installation of various background images For the lock screen in Windows 10, many users of this operating system simply does not work properly.
Even though the corresponding option is enabled in the settings, many of us notice that on the lock screen and when entering Windows 10, the same image is shown all the time, for example, a mountain lake (as in the screenshot).

This should not be - the picture should change (about once a day).
If you encountered such a problem (the image does not change), then in most cases the performance can be returned by performing the reset and re-registration of this function. How to do it, read further.
Windows: Interesting does not work - Solution
To achieve a successful result, be sure to follow (strictly and consistently) to all the indications below.
And so, for resetting and re-registering Windows: Interesting (Rus. Spotlight) Perform the following:

By the way, if you liked some pictures from Windows: Spotlight and you would like to keep them in your collection or, for example, use as a desktop background, then how to do it, read.
other methods
If the method here is not helping (for one reason or another), you can try to solve the problem, deleting manually files in the directories (also pre-disabled Windows Interesting in settings): C: \\ Users \\ Your_The user\\ APPDATA \\ Local \\ Packages \\ Microsoft.Windows.contentDeliveryManager_CW5N1H2TXYEWY \\ Localstate \\ Assets and C: \\ Users \\ Your_The user\\ APPDATA \\ Local \\ Packages.conTentDeliveryManager_CW5N1H2TXYEWY \\ SETTINGER → Reload PC → Answhere to activate the function. 
In addition, check in windows settings 10 Is applications allowed to work in the background: Parameters → Privacy → Backgrounds → incl.