How to configure the DLNA server on Windows, connect the TV to the home network. How to configure a DLNA server on Windows, connecting a television to the home network How to make a media server on Windows 10
As part of this article I will write how to create a home media server for Windows 10. Creating a DLNA server will allow you to use the library placed on the PC to other devices. First of all, it is useful for those who have a Smart TV.
What is a DLNA server?
DLNA (Digital Living Network Alliance) is a special protocol that allows compatible devices to transmit and take media traffic (video, music, photos) in the home LAN, as well as broadcast it in real time.
If devices support this technology, you can configure them at the request of the user and further automatically combine into a single network.
What is needed for streaming playback?
Tip! To reproduce the media content on another device (tablet, smartphone or smart TV), it is not necessary to configure the DLNA server, a home group or open sharing folder. Use the function.
To work home media server in Windows 10, it is not necessary to align the folder for open access on the network. It is possible in a public network (that is, the detection over the network is hidden), but streaming playback will work.
To configure the DLNA server Windows 10, you need:
- Two devices must be in one home local network (for example, connected to one router). How these devices will be connected (by LAN or Wi-Fi), the role does not play.
- So that Smart TV (or other device) is turned on and maintained DLNA technology. In LG TVs, it is called Smart Share, in Samsung - Allshare, in Philips - Simple Share.
Setting
Configure homemade media server in several ways:
- using the built-in Windows 10;
- with the help of special programs.
Built-in tools of Windows 10
To turn on:
- In the Windows 10 paging line, enter the multimedia streaming parameters request and open the application found.
- Click "Enable multimedia streaming".

- All devices that are online will receive access to multimedia files. Optionally, some can be deleted or configured.

- Removing the "Use default settings" checkbox, you can set some filters that will apply for this device.
- Now you can get access to multimedia broadcast from Music folders, "Video" and "Images". To transfer the video from any location on the translating device, press the PCM on the file and in the context menu, select "Led to the device".

- Windows media player opens through which the network device is found. Then the specified content starts and is broadcast on SMART TV.

- There is a similar function in the movie and TV player. Depending on which player is selected by default, it will be used for streaming playback.

If you wish to open a broadcast directly from the TV, place the media system into publicly available folder for home network or add a new one. This can be done using Windows Media Player:

Using programs
In fact, free and convenient programs with the necessary functionality are not much. Among the programs for DLNA server I would like to note:

In general, compared with the method of setting up streaming playback in Windows 10, the programs can be easily configured. They work with playlists, a variety of audio and video formats (including RAW), have convenient sorting and navigation. The interface is easy in understanding and should not cause difficulties from a regular user.
Tip! If you use the Android Box console, you can also access the media. For this, on the Windows 10 computer. Download the ES conductor on Android, open "LAN" and click Scan. Select the device found on the local network and you will access a shared folder.
One of the characteristics that distinguishes some modern TVs from others is the degree of their intelligence. In a figurative sense, of course. We are talking about the technological advantages of the so-called Smart TV. Conventional digital TVs, as a rule, can play the role of the TV itself, working paired with the receiver, reproduce the media content using the built-in player (alas, often with a limited list of readable formats), and also serve as a monitor for a computer, game or TV console . Whereas Smart TV, they are as smart televisions are able to morely participate in the content chain as independent participants.
1. About streaming multimedia and DLNA technology
Smart TV is actually the same computers, because they have their hardware facilities, have their own software, can connect to wired and wireless networks. And the latter is almost complete independence from source devices. The advantages of direct television access to the Internet are obvious, but a lot of them and with local access to the computer. Multimedia streaming from a computer on TV is direct television access to files on your computer. Streaming is eliminated from non-flash drives and external hard drives. From the computer on TV files are transmitted over the network. Without the participation of the computer, if only it was simply included, without the participation of the smartphone, without the participation of consoles and other source devices using the TV, the entire allowed material - video, photo, music, any media files that such a TV can play are played.
The devices of the same network will exchange the media content allows the DLNA technology. It is supported by many modern devices capable of connecting to the network - computers, tablets, smartphones, TV and game consoles, and, of course, SMART TV. For example, smart TVs from the company LG, supporting DLNA technology, have a SMART Share SMART application - the shell of this technology with the user interface. Applications of other SMART TV brands are called differently and, accordingly, have a different interface. In particular, smart TVs Samsung Sheath for DLNA technology is a regular Allshare application. And Sony TVs are Vaio Media Server.
How to configure multimedia streaming with a Windows computer - PC or laptop - on TV? In this question, we will understand in detail below.
2. What is needed to configure streaming from a computer to TV?
To configure streaming from a computer to the TV, as mentioned, it is necessary that the latter supports the network. By the way, for streaming media files "Status" SMART TV for the TV is not required. The TV may not have a super functionality, it simply must support the network and allow the selection of a signal source at least primitive standard functionality. In such a TV, there should be a built-in either a Wi-Fi module or a network Ethernet port. As a rule, modern Smart TV provide both options - both wired and wireless network connection.
Both devices - both TV, and PC or laptop - must be connected to a single local network. When connected to the router (router), any devices - computers, smartphones, tablets, consoles, smart TVs - automatically combine into one small network. Of course, if the router is not available, you can do and directly connect the TV to the computer over the network. What you need for this is to connect the power cable to the Ethernet ports of devices. But in this case, if the computer has only one network port (one network card with one Ethernet port), you will have to constantly reconnect the cable from the TV and the Internet provider's cable. It is not comfortable. The router must be in the house, if there is a matter of disclosing the SMART TV potential. Well, a Wi-Fi router is just necessary if smartphones or tablets are used in the house.
The method of connecting the TV to the network is wired or wireless if it provides both options, not principled.
The following streaming condition - configured access using DLNA technology to the media libraries on the computer. In the Windows system, this can be done in several ways.
3. Setting the network access to the computer files in the Windows Media Player
The way to configure access to the computer files in the Windows system without the need to install third-party software - the use of a regular Windows Media Player.
On the Windows Media Player toolbar, we click the "Stream" option and exhibit a tick near:
- "Enable streaming multimedia ...".


After enabling this parameter, the system window with streaming parameters can open, where you can specify the name of the library and flexibly configure the availability of the media system for specific network devices: to leave the preset permission, and to remove it.

Customized permissions will open network access to other devices to files only in the user profile folders. These are the folders "Video", "Music", "Images", which are displayed in Windows Explorer with the disk partitions, drives and removable computer devices. If this is more than enough, you can already start testing the playback of files on the TV through local applications running with DLNA technology.
But the storage of files in the user profile folders on the system disk is not the most successful idea and from the standpoint of the availability of a free disk space, and from the position of the safety of these files in case of a critical work failure. As a rule, the mediates of impressive sizes are stored on the non-system sections of the computer disk. Folders of these libraries are required to add to the Windows Media Player library,
To make the contents of other computer folders available for streaming on the TV in the Windows Media Player window by clicking the "Sort" option, select the "Control Library" item, and in it one of the types of content: "Phonoteka" for audio files, "Video" for video files , "Gallery" for photos and pictures.

A window will open with a list of already available libraries, and to add to this list of the desired folder click the button on the side of "Add". Add this folder in the opening conductor window, then click "OK" in the list window.

An alternative way to add folders with media content to a system list of open-access folders for home network devices - add to the library using the context menu command in Windows Explorer. At any time to any folder on a computer where video, music or photos is stored, you can open access to playback from network devices. To do this, you need to open this folder in the Explorer, call the context menu and select the "Add to Library" command. The folder will be added to the corresponding library, and its contents will be available for streaming broadcast.

The list of folders with the video and audio files open for streaming and audio files will also vary and when you make changes to Windows 10 "Cinema and TV" and "Music Groove". In the following applications section, you can add and delete folders to local collections of video and audio files. Local application collections work in conjunction with system libraries.
4. Setting the network access to the computer files using the LG SMART SHARE program
Some SMART TV brands have their own software for desktop operating systems by which you can configure access to computer media files. These programs can be downloaded on the site of TV manufacturers or on the Internet. For example, to access smart Samsung TVs to the Content of Computer Computers, the South Korean corporation has created a Samsung Allshare program. And for LG TVs on the company's website is available for free download Windows-program LG Smart Share for PC. Consider it in more detail. On the LG website, select the version for Windows and download.

Installing LG Smart Share Standard. Running the program, you need to select any of the proposed content settings options - Movie, Photo, Music.


In the appeared window, access must be enabled. If it is disabled, set the switch to the "On" position.

Switch to the "My General Files" tab. Here you can enable access to files in the specified folders. Using the button in the form of a folder with a plus card, you need to add any other folders with the media content in the end to existing folders of the user profile. After adding the clamp the "Apply" button below, then "OK".

All - Now the content of all the folders displayed in the "My General Files" program will be available for network devices, in particular, for TV.
In the program parameters tab, just below - "My Device Settings" - you can change the computer name. Using this name, the computer will be determined on the network for other devices.

The LG Smart Share service process will automatically start with the Windows system, providing further access to the computer's media files.
In order to make sure that everything works as it should, launch the SmartShare application on the TV.

Go to the "Devices" section and choose our media server.

Open any of the shared folders in which there are media files.

We try to play the file.

5. Setting the network access to the computer files using the Home Media Server program
Another way to provide access to TVs, consoles, mobile and other devices that support the network and DLNA technology, to the media content of the computer is the Windows program "Home Media Server (UPNP, DLNA, HTTP)". The program works with many popular TVs: LG, SAMSUNG, TOSHIBA, SONY, PHILIPS. With this program, the DLNA server is running on the computer to which all network devices can be connected. The default program provides control from the TV files of the server - in fact, computer files.
The advantage of using the "Home Media Server" program compared to all the methods of access to streaming transmission listed above are a larger number of functions and a large configuration. The program provides for various transcoders of video and audio files, which allows you to convert a media system if on the computer it originally exists in an unsupported TV format, to the format that is supported by them. You can additionally adjust the broadcast on the TV of individual Internet channels (radio and digital television).
"Home Media Server" can be downloaded absolutely free on the site of the creators.
Download the program, install it and run. When starting, the initial settings window will appear immediately. It can be left by default and refuse to scan media files. We move to the program settings in a separate order.

In the program window, click the "Settings" button on the toolbar at the top of the window.

In the settings window that opens, we will see the right-tab-tab. In the first tab of "Media Resources", we can use the "Add" button, respectively, add any folders with the media content to the list of programs to open access for streaming broadcast. Common access can be opened immediately to all partitions of the computer (C, D, E, etc.), to all network drives to all connected removable media. To do this, it is necessary at the bottom of the window to set ticks near the necessary options - respectively, "local disks", "network drives" and "removable devices".

The "Media Resources" settings tab provides many options for added folders. For example, by clicking the "Change" button, we will get the ability to exclude hide files and directories, remove individual file types, set the other name of the folder - and all this as part of the DLNA server, without changes on the computer.
At the bottom of the Media Resources tabs there are separate sections with an abundance of various settings. In the "Scan" section, you can pay attention to the option "Always use the file name as the name of the media resource." Without establishing a tick on this option, the names of the media files in Russian will be converted to a latin translitement or unreadable crochels.

In the Device Settings tab, we will see a list of all detected network devices that the DLNa server files will be available. Any of the List devices can be turned off by removing the green activity button.

In the "Server" settings tab, instead of the default DLNA server name, set your name, for example, more convenient for perception. Next to the server name field, we will see his port - 45397. It may happen that the anti-virus or firewall operating on the computer or the firewall will block the DLNA server operation. In the case of such a blocking for the port of the DLNA server, you must provide permission to work in the settings of the anti-virus or firewall.
Also, in the "Server" tab, you must pay attention to the default option that prevents the computer to switch to sleep during the DLNA server operation. If it becomes necessary to translate a PC or laptop to sleep mode, the DLNA server will later need to stop. If, on the contrary, a check mark on the "obstacle to the transition of a computer into sleep mode during server operation," for some reason it is not installed, it is better to set it. Otherwise, watching the movie on the TV will be unceremoniously interrupted as soon as the laptop is plunged into sleep to save battery charges.

The Home Media Server program has a very rich selection of settings, and its potential can be disclosed gradually, testing those or other opportunities as they meet them. In the meantime, you will restrict the settings already done and save them. We click "OK" below and agree on scanning media files in customized folders.
After the program completes the scanning process, we can run a DLNA server. To do this, click the "Run" button on the toolbar at the top of the main program window.

The "home media server" works in the background, and the program can be controlled from the system tray. Calling the context menu on the program button in the system tray, the DLNA server can be stopped, run, restart.

Automate this process so that the DLNA server starts automatically with the running Windows, you can in the program settings. The last settings tab "Advanced" provides in the "Auto-loading" column, the startup of the program itself when Windows startup, the DLNA server autorun, along with the start of the program, as well as installing its background service in the Windows system.

As soon as the DLNA server is running, the entire computer media system can be played on the TV through the local application to interact with DLNA technology. The DLNA server app will be displayed as a connected playback device. Inside it, folders with a computer media content configured in the Home Media Server program will be available.
You can start the available media system for playback not only in the TV application. Starting the playback of media files on the TV can be charged with the means of the "Home Media Server" program. To do this, in the main window of the program, select the appropriate content - click on the toolbar at the top of the "Movies" button, "Music" or "Photo". In the right-hand side of the program window, the folder files will be displayed to which the broadcast access to the TV has previously been opened. Select the desired video, audio file or picture in the list, call the context menu on this file and choose "Play on" on this file. In the device list that appears, select TV. The selected movie, track or photo will unfold on the TV screen.

6. Function "Lead to Device" Windows 8.1 and 10
The function of playing media files on a computer with an image output to the TV is provided and among the staffing functional in versions of Windows 8.1 and 10. If Windows is installed on the Windows media files to play network devices in the Windows Media player, as discussed above, film, audio, or photo You can run on your computer, and view or listening to continue on the TV. This is a comfortable thing when there is no special desire to mess around with the TV console and search for, for example, the desired film among the heap of other media files, killing the nerves by the monotonous turning file by the file.
To start a media file on a computer, you need to call the context menu on Windows in the Windows Explorer and select the "Lest to Device" command. This is a Windows 10 system command. In Windows 8.1, this context menu command is called "Play To".

After that, we will see the list available to play the network devices. Choose TV. The running file will unfold on the TV screen, and on the computer screen, we will see the small Windows Media player window with a playlist where you can additionally add some files.

7. The "Device" function as part of Windows 10 "Cinema and TV"
Available for media files In the context menu of Windows Explorer, the "Conduct to device" function is implemented in the Windows 10 "Cinema and TV" application. It works on the principle of starting a video file in the application on a computer and continuing it to view it on the network device, in particular, on the TV screen. Open the "Cinema and TV" application, run the video and in view mode, press the first button at the bottom - the connection button to the available playback devices. A list of all the network devices defined to display the video file will appear in a small window. Choose TV.

In the future, you can continue to view the movie on the computer, in the "Cinema and TV" app. This is a wonderful idea for the house filled with digital technology, which is combined into one network. For example, starting watching a movie on the TV screen in the living room, you can continue on the kitchen TV screen. And then you can move to the living room with the film again. And for this, just need to be interrupted for a pair of simple actions on the computer.
8. Conclusion
As you can see, the choice of ways to configure the computer part of the computer interaction chain and the TV on the network is great. Despite the fact that the article turned out to be volumetric, in fact not all programs in the software market for the implementation of multimedia streaming from a computer to a TV. With the tv setting easier.
As mentioned above, access to the media files of the computer can be obtained in local applications of smart TVs. And these are mentioned above Smart Share for LG TVs, AllShare for Samsung, Vaio Media Server for Sony and others. In ordinary televisions that support the network where the firmware does not provide individual applications, access to the computer files can be configured by selecting a media server as a signal source. In many cases, the source button on the TV panel is called "Source".
Excellent day!
A homemade media server for Windows 10 is a specific program that allows you to provide access to different kinds of multimedia resources, such as photos, video and audio files of a single computer, other UPNP devices located in one home network. Due to the modern technology of streaming data over the network, you can easily view any media resources, which are stored on a rigid disk One computer through another device, such as the Xbox One or Sony Playstation 4 game console, a mobile phone, a media player or any other device supporting device.
The program includes a set of different video and audio format codecs, which, in turn, allow you to transform media files to the format you need for the reproduction device, that is, in other words, provide a file playback on the device. Thanks to modern transcoding technologies, it is possible to redirect Internet television or radio streams from one computer connected to other media devices connected to the computer.
What is a DLNA server Windows 10
 People who are not interested in modern technologies or just badly disassemble them, may not know what exactly this Media Server, DLNA, UPNP and so on. That is why it is worth noting that the DLNA (Digital Living Network Alliance) is a specific protocol, due to which you can access different kinds of media content located on the main server (for example. On a personal computer) in any other supporting gadget technology. The main requirement for them is only connecting to one single network. All sorts of films can be in the role of content, video, photos, documents, music and much more.
DLNA server for Windows 10 may be useful in cases where the user has no desire or the ability to connect to, for example, a large-format TV laptop, smartphone or tablet directly. Thanks to streaming through the media server, it is possible, without applying special efforts, broadcast content, for example, video recording directly to the TV, to a large screen via the network.
In addition to the above, the inclusion and configuration of such a server may be incredibly useful for owners of tablets or smartphones with a small amount of memory. The thing is that such devices are completely inconvenient to download content, for example, movies. Since high-quality film is quite much weighs and is downloaded for a long time, it will be much easier to start streaming through homemade media and watch the movies immediately on the big screen directly.
How easy to create your Media Server
Instructions for creating your DLNA server is quite simple and will not take much time. But before considering it, you should carefully read the basic requirements, with what will be required to create your own homemade media server. The main requirements look approximately as follows:

Configuring Media Server For Windows 7
Make sure that all the conditions are met and you can start installing your own media server. Since the action scheme on other versions of the operating system is approximately similar, then consider the process of setting on the example Windows 7..

The easiest way to play streaming video in Windows 10
 There are also many other ways to play multimedia files through streaming. For example, you can download a special third-party media server program or use the Miracast feature. However, there is another incredibly simple method of streaming video content.
The thing is, what is the Windows 10 operating system By default, it includes the DLNA - Content Playback, in particular, video files of various formats. The only requirement when using the method is the need to connect to one local network of all devices. That is, a computer that performs the role of the media server, and the device where you plan to play videos by streaming, must be connected to the same local area network source - router or Wi-Fi.
Here is the whole procedure:
- Right-click on the video file that you want to view on another device through streaming data.
- Select "Led to Device" (or Cast to Device, in case you have the British version of Windows).
- From the list that appears, select the desired device, and the streaming of the file will automatically start through the Windows Media player.
DLNA - allows compatible devices such as computer, TV, laptop, telephone, tablet Transmit, receive or play various media system files. The function gives huge opportunities to play media system. The video file downloaded on the PC can be found on the TV, and listening to the phone to listen on the audio system. It is very convenient. You just need to create a DLNA network.
How to create a DLNA network
There are many programs to install the DLNA home network, but you can simply use your own Windows tools.
Installing on Windows 7:
- Enter the Start menu and select "Control Panel".
The "Start" menu is located in the lower left corner of the monitor, it is necessary to select the "Control Panel" item.
- On the "All Control Panel Elements" tab, there is an item "Home Group", click on it.
On the Control Panel tab, select the "Home Group" item, it is indicated by the Red Arrow
- A new window will open, go to the "Change additional shared parameters" tab.
The "Change Additional Common Access Parameters" item is located on the Home Group tab.
- Check the connection of all positions.
All positions of the tab "Change additional shared option parameters" must be in an active position.
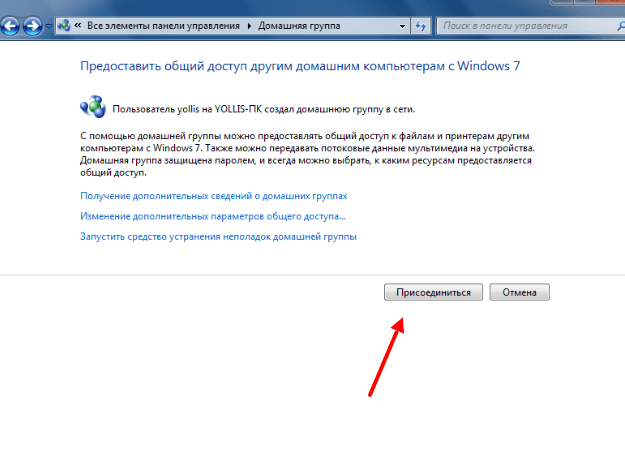
- Return to the "Home Group" window in its lower part there is an item "Create a home group" Click on it with the mouse.
The "Create Home Group" button is located at the bottom of the "Home Group" window.
- In the next window, enter the name you came up with the DLNA server and click OK.
In the "Multimedia streaming parameters" window, specify the server name and click "OK"
- Record the password that appears in the window can print it (it will be necessary when adding other devices to the home group), click Finish.
Password that appears in the window, you need to record or print
- In the Home Group window, click on "Select Multimedia streaming options".
In the Home Group window, you must select "Choose multimedia streaming parameters"
- The media server window will appear, it is necessary to mark the types of content for which the shared access will be opened.
In the media server window, you must mark the types of content that will be available to the home group.
- Click "Next".
The DLNA Windows 7 server is connected. The "Computer" tab will appear the "Network" icon by clicking on it, you can see all connected devices. Selecting the desired device, click on it. All available media system files will open in the media player window, you can view them and transmit to other devices.
On Windows 10, everything is easier, it is not necessary to create a "home group".
Installing on Windows 10:
- In the "Search" window of the control panel, type "Multimedia streaming parameters", open this item.
In the Search window, type "Multimedia streaming parameters"
- On the open tab, click "Enable Multimedia Stream Transfer".
In the "Multimedia streaming parameters" window, turn on the streaming of the multimedia
- On the next tab in the Multimedia Library name, write the name of your DLNA server, click OK.
In the "Enable Multimedia Stream Transfer" window, you need to enter the name of the future library of multimedia
Record the Created Password and click Finish.
After holding settings, you can access the media system to your computer from your home network devices to the media system, view them and play them.
Equipment for building home network with DLNA
To create a DLNA network, you will need a computer or laptop with a media server configured on it. With the help of a wired or wireless Wi-Fi connection, it connects to the router, which, in turn, distributes a signal to other devices.
DLNA network will turn your home to the media center
Such devices can be: TVs, laptops, tablets, phones, music centers. If there is no router distribution of the signal, you can configure directly from the computer, but in this case you will need a Wi-Fi adapter for the computer. The principle of building a DLNA home network, like the Internet.
In the end, you will need:
- computer or laptop;
- wi-Fi router or adapter;
- at least one more device with DLNA support.
TV is better to connect to a computer with a cable connection. Wireless communication is convenient and modern, but when viewing powerful media system files, a loss of streaming data is possible and as a result of a television failure.
Connecting TV with DLNA support to Wi-Fi router
You can connect the TV to the DLNA home network, such a step will give the opportunity to fully use the installed server. First of all, the TV must be connected to a Wi-Fi router. This can be done in one of two ways.
It is enough just to connect the TV and the router on the Internet cable with LAN connectors:

The location of the LAN nockets on different models of TVs is different, but they are signed everywhere and confuse them with the outputs of another destination will not work.
You can connect the TV to the Wi-Fi Wireless Wireless Network Routher. In the new models of TVs, as a rule, there is already a built-in adapter. If the older model, you will have to use an external Wi-Fi adapter. It must be inserted into the USB connector of the TV, while the system itself will detect it and turn on to work.
Wi-Fi adapter need to connect to a TV via USB port
- Take the remote control of the TV, press the Menu key.
- In the menu that opens, click "Network", then "Network Settings" and select "Wireless (General)".
- In the list that opens, select your own and click "Next".
- In the window that opens, enter your home network password.
- If everything is done correctly connects.
Adding other DLNA devices compatible with home network
Configuring the DLNA server on a PC, you can connect other devices to a Wi-Fi router. Connecting to the home network, possibly via a wireless connection, and through the cable.
Laptop or other PC
To add a laptop to the home network you need to configure it with a router. In the case of a wired connection, it is sufficient to connect the LAN connectors of it and the router. With a wireless connection, you need to pay attention to the lower right corner of the monitor. There you will find the icon, in the form of different gray sticks.
The icon on the panel indicates that the laptop is disconnected from the Wi-Fi network
By clicking on it, you will go out in the Network Connection Settings menu, all networks are displayed here. Select the desired network, click.
On the General Access Management Center tab, the required Wi-Fi network is connected.
If the network without a password - the connection will occur automatically. Otherwise, the window will pop up in which you want to enter a password.
Enter the password from the home network, click Finish.
Video: How to connect a laptop to the Wi-Fi network
Before you can transmit a media system to other devices, you need to make a media server settings.
To add a laptop to the home network you need:
Media player
To embed a media player to the home network, simply connect it to the router. The player automatically connects the found DLNA resources. Enough on the device speaking as a media server to open sharing folders for home group devices.
Setting up DLNA on TV
Televisions connected to the home network are served a server and folders with content-resolved content in automatic order. On LG TVs, the folders of the available media servers appear in one row with pre-installed programs and functions.
There are many alternative programs for creating a media server. Included with LG TV, there is a disk with a program called Smart Share, you can download it on the Internet. This program allows you to create a media server without using Windows. It is enough to download it to the computer, click on its launcher and wait for the installation.
A folder with the Smart Share logo will appear on the program panel and television connections. On the computer in the program settings window, you can assign folders to play content. You can view photos and video files that are in these folders on the TV.
SMART Share A good program for those who are too lazy to dig in Windows settings. It lands pretty much the system. Even when the TV is turned off, on a weak computer, its presence can be felt. For some reason, it does not always update the folder with the added files. Sometimes you have to do it manually. It is better to configure a normal Windows server.
There is a universal program that allows you to connect any TV that supports the DLNA with a computer. It is called "home media server."
Video: Instructions for installing and configuring the "Home Media Server" program
Using DLNA on Android OS
To use the Android device, first of all you need to connect it to the router:
- To do this, enter the settings and switch the Wi-Fi connection slider to the "On" position.
When the Wi-Fi function is enabled, the slider is in the "On" position
- Next, you need to go to the Wi-Fi settings.
- You will see a list of networks available at the moment.
In the settings of Wi-Fi devices on the Android OS, select the required network
- Choose the desired and enter the network password.
- After a while there will be a connection.
In the Wi-Fi settings you can see the network information to which the device is connected on Android OS
Devices on Android OS have a large functionality with their help, you can not only view files with a media content, but also allows them to transmit them to other devices. On Play Market, you can download a program that will significantly expand the capabilities of your smartphone or tablet. It is called a DLNA server.
Download the program and set to the phone, then do the following steps:
- Come in the program and click "Add\u003e DLNA Server", so you create a DLNA server.
The program will help create a server in the device on Android OS
- On the next tab, you specify the name of the server in Server Name, the port item remains default.
In Server Name, you need to set a name for the server.
- Go to the Roots tab, select and assign a folder with content designed to view.
On the Roots tab of the device on the Android OS, you can assign a folder with content to view
- Next, click "back" and save the settings.
- In the starting window of the device, find the created server, click Start to start.
Going in the TV menu you will find a new media server created on the device with Android OS
Video inhibits other problems
Sometimes annoying interference and malfunction interfere with the viewing of your favorite films, do not appreciate all the advantages provided by using the DLNA network. Possible problems and methods for solving them see the table provided.
Table: Errors arising when playing a media system and methods to eliminate them
| № | Errors and malfunctions. | Causes of errors and malfunctions. | Possible Solution. |
| 1 | Devices cannot detect the network. | perhaps the Wi-Fi router has occurred. | Try to restart the Wi-Fi router. |
| 2 | Low data transfer rate with wired connections. | Cable or poor mounting in LAN connectors. | Check the integrity of the cable and the density of its attachment in the connectors. |
| 3 | The media server is not available. | Errors in the work of the media server. | Make a reboot media server. |
| 4 | Media device is not available. | Errors in the work of media devices. | Make a reboot of media device. |
| 5 | Video slows down. | Insufficient to view the film data transfer rate. | Temporarily stop watching a movie to download a sufficient data volume to view. |
| 6 | The system stops watching movies indicates the cause - insufficient disk space. | There is not enough space to store temporary files. | Choose low-quality video with a smaller frame size. |
| 7 | A message appears - the film format is not supported by media device. | Media device does not support this format of films. | Locate the movie supported format. |
Often the reason for braking the TV when watching movies is easy to remove small details. The main reason lies in the unstable work of the media server. For normal operation, periodically spend optimization and cleaning system. Do not overload the computer unnecessary programs.
Configure home devices with DLNA support, can each. It is absolutely not hard. A TV connected to the home network acquires second breathing. Having spent half an hour to connect to the DLNA network you can view any content from your devices on the big screen. Films, photos taken on the phone rollers, now all this can be viewed by simply by pressing the buttons.
Home Media Server (UPNP) - A universal program that provides access to the contents of your computer's hard disk by electronic devices, such as televisions, players, game consoles. Data is transmitted via UPNP (DLNA) protocol. This program is working with TVs, game consoles, musical centers, mobile phones and smartphones.
Today, human life in modern realities is very difficult to imagine without high technologies. Each of us is surrounded by laptops, computers, TVs, music centers. It often happens when I really want to see your favorite film on a big TV or play a computer game through the console. Solving such tasks are called by a multifunctional software complex home media server for Windows. With it, you can organize full access to the entire media content of the hard disk of the computer.


Download home media server for free
The Home Media Server (Home Media Server) program has a small size. Install a home media server can be configured in a few minutes. Its main opportunities include video and audio transcoding in the view that supports TV or tape recorder. You can also configure subtitles, choose the desired image size for any screen and select an audio track yourself. The user has the ability to send Internet radio or television directly to the TV or player.
If you do not see your life without digital television, you can also download a home media server. It supports all modern digital formats (C, S, T), works great with the VLC Media Player program and can use the digital signal to other electronic devices using Digital Media Renderer functions.
Homemade media server in Russian has a wide functionality. It is possible to save transcoding profiles. Their use greatly simplifies the setting when connecting new devices. Download free Home Media Server (DLNA) is recommended for owners of televisions and Philips, Sony, Panasonic, JVC, Toshiba, Samsung. Each of them has all the necessary connectors to interact through the UPNP protocol with a personal computer. Thus, with the help of this program, you can significantly expand the capabilities of these TVs.
All novice users are recommended to look at the official website of this application. There is a wonderful forum where solutions to the most frequent problems are described in detail. You can also find out how to effectively connect this or that device.
Download Home Media Server without registration and SMS can be on the Softtaca website. We always have the latest and relevant updates.