What is the Gmail service on the phone? Gmail email for your company Aft shell gmail com when mail is created
Gmail is a free and convenient email service from Google. The best proof of the quality of the Gmail service is the number of users, which has already exceeded 400 million. Security, accessibility and convenience are characteristic features all services from Google. Step-by-step instruction about how to create Mailbox on Gmail.com, helps you set up email quickly and easily.
Step 1. To get started, open the website www.google.ru in your computer’s browser. The example uses Google Chrome, but the process of creating an email is similar for other Internet browsers:

Step 2. On the Google website page in the upper right corner there is a link “ Mail", which you need to follow:

Step 3. Will open new page, where you can see all the benefits of using Gmail. To proceed to directly creating an email account, click the " Create an account" in the middle or at the top of the window:

Step 4. Filling out the data is the most critical step when creating an email. note that Gmail account can also be used for other Google services: social media, maps, multimedia:

Step 5. Data filling window:
The first fields to fill out are your first and last name. You can enter data in Latin or Russian. Both fields are required, but they can be changed even after you create your email.
Next, you need to come up with a username that will be displayed before the combination “@gmail.com”. The mailbox name can only contain periods, numbers and Latin letters. Since Google email is quite popular, you may not be able to find a free username right away. If the option you select is busy, you will see a warning message about this:

The password for your future mailbox must consist of at least eight characters. For reliability, it is better to include numbers and capital letters. For security purposes, do not use passwords that you have already assigned in other services, programs or social networks.
In field " Confirm the password"You need to re-enter the password you specified. Please note that the passwords must be completely identical.
Field " Date of Birth"Required to be filled out. In the column " Floor"You can select the option " not specified».
It is not necessary to enter a spare email address and phone number. However, if you forget your mailbox password, it will be easier to recover it with additional data.
To check that you are not a robot, enter the combination of numbers shown in the picture.
Be sure to check the box before you agree to Google's email terms and privacy policy:


Gmail.com is an example of an email service. Therefore, I created my personal, main mailbox on Gmail.com, although by that time I had about five e-mail addresses from other mail services.
I love the ease of use, reliability, and capacity of my Gmail.com inbox. By registering a mailbox on Gmail, you get the opportunity to log into other accounts with the same login and password. Google services: the most popular video hosting YouTube, calendar, Google documents and many other useful services.
Registering with Gmail.com
To register for Gmail in Russian, go to the official website https://mail.google.com.
The Google Account login window will appear.
In order to log in, you need to enter the mobile phone number or email address specified during registration. But since you are not registered yet, click the More options link 
From the options provided, select Create an account.
A page will open with a form that you must fill out. 
We fill out the form.
- What is your name. Here I advise you to indicate your real First and Last Name. Because other Google services, including those on your smartphone, will be associated with this account. I think this will be your main inbox for a long time! If you need a temporary mailbox, then you can follow my tutorial in a few minutes.
- Create a username. This will be the name of your mailbox and login to your account. You will have to work hard to find a clear and memorable name. After all, names like olga, nina, ivan have been taken for a long time. Substitute names, and the system will tell you whether this name is occupied or free. To create a name, you can use letters of the Latin alphabet, numbers and dots.
- Create a password. The password must have at least eight characters. For security reasons, it is not recommended to use passwords from other sites.
- Confirm the password. To make sure you entered the password correctly, enter the password again. If the system displays that the passwords do not match, check whether the keyboard layout is set correctly. There must be Latin letters, not Russian.
- Date of Birth. Select from the drop-down list.
- Floor. Selected from the list.
- Mobile phone number - required for more reliable protection account. If important documents are stored in your mailbox, you can allow login to your account only after receiving an SMS with a password on your mobile phone. Also, if you forget your password, you can request an SMS with a code to change your password.
- A spare email address is necessary for more reliable account protection. For example, if suspicious activities are noticed in your account, the gmail administration will be able to send an alert to this address.
- Make Google mine home page y. If you check this box, the search engine will always appear when you open the browser. Google system. But many users make their favorite site their home page. Then, you don’t need to check the box here, otherwise your page will be replaced with a Google page.
- A country. Select the country in which you currently live from the list.
After filling out the form, click Next. 
The Privacy Policy and Terms of Use page opens. Read (scroll down the page) and click the “I Accept” button. 
The "Verify your account" window will open. Enter your mobile phone number and click the "Continue" button. 
A window will appear to enter the Confirmation Code, which will be sent to you via SMS. If the code does not arrive within 15 minutes, try again. I managed to complete the registration the third time. After entering the code, click the Continue button. 
You will be congratulated on your successful registration and asked to log into your Gmail account. Click the "Go to Gmail service" button and start getting acquainted with your new mailbox. 
You will see buttons that you can click to select a theme ( appearance) of your mail account, change (add) the main photo of your profile, import addresses and mail from another mail account. By the way, in your new mailbox there will already be a letter from Google describing the possibilities Google account. And by clicking the “How to use Gmail” button, you will learn all the features of working with this mail service.
Video: how to register with Gmail - create a profile on Google
The video clearly shows:
- How to register with Gmail and gain access to all Google services;
- how to create folders,
- how to sort emails into folders,
- how to prepare a signature for letters,
- how to add files to letters,
- how to switch to other Google services?
Login to gmail.com
If you have already registered, then to log into Gmail, click the link mail.google.com
In the window that opens (Fig. 1), enter the Email or mobile phone number associated with your account and click Next. By the way, you can enter not the entire email address, but only the login - without @gmail.com
A password entry field will appear. Enter your password, click "Next" and your mailbox will open in front of you.
Sign in to other Google services
By registering with your email, you can use this username and password to log into any Google service. 
While in your Gmail account, in the upper right corner, click the square (shown by the red arrow). A window with many buttons will open (see Figure 5). By clicking the desired button, you will be taken to the most popular Google services: Calendar, YouTube, Search, Maps.
And by clicking the link More, you will see buttons to other Google services, for example, Docs.
Hello, dear readers of the blog site. Today I want to talk about free service Gmail.com email. The main feature of this mailbox is its incredibly convenient and functional web interface.
It is, perhaps, in no way inferior to desktop email programs, but at the same time it will be accessible from absolutely any device capable of accessing the Internet. Therefore, using the Gmail box, you can safely forget about such a thing as synchronization.
Besides, Google mail has one of the best (if not the best) spam cutter in the world (it is because of it that I collect correspondence in this mailbox with, and other services that do not fight spam in any way), allows you to automatically sort correspondence by dozens different ways, mark letters, import them from any , and also knows how to remove and send correspondence from dozens of mailboxes you already have, and in such a way that your opponent will not suspect a substitution.
Plus, working using a secure protocol and warnings about access to your mailbox from other IPs - what could be cooler. Probably nothing, so in this article I will try to take Gmail apart and show all its capabilities with examples. Don't switch.
By the way, quite recently it came out on top in the world, overtaking another popular Post service entitled . However, in Russia the undisputed leader is, although it does not have any outstanding functionality (it just appeared earlier).
Registering and creating a mailbox in Gmail
Let's start with the trivial, but in need of some comments, registering a mailbox on Gmail. Addresses must be distinguished Gmail.com and Gmail.ru. Historically, the s.ru service at the end appeared before the Jimail mail service, and Google could not get this domain (although last year they seemed to succeed). For example, about ten years ago I almost fell for this incident, because gmail.ru also had a free email service.
How to create an account in Google Mail
Actually, receiving a mailbox is a nice bonus when creating an account. If you are now go to the Jimail page If you don’t have an account in Google, you will be asked to correct this misunderstanding:

Clicking the button "Create an account", you will be taken to a page with a web form that you will need to fill out very carefully. Due to the enormous popularity of Gmail, it can be quite difficult to use it, but still, if you show your imagination, you can choose something suitable.
For example, you can insert dots in the name, which means it is acceptable to use the domain name of your site, which with a high degree of probability will not be taken:

Please note that the reliability of the information you provide must correspond to the tasks that you will assign to this particular mailbox. Of course, Gmail.com is very well protected from hacking (work is carried out through the encrypted https protocol), but no one has canceled the human factor.
For example, the simplicity of the password I once came up with for my mailbox on Gmail became the reason for its hacking and subsequent theft of money from my own electronic wallet in the WebMoney system. I registered this email in time immemorial, when I didn’t even think about it, so I chose it surprisingly complex password QWERTY. Now, which gives a certain amount of peace of mind.
You also need to understand that an unrealistic alternative E-mail address or phone number can play a cruel joke on you, because they could help you restore access to your account in case you lose your password or your mailbox is hacked by various scammers:

IN SMS message You will receive a confirmation code on the mobile phone specified during registration, which you will need to enter to complete the registration (unfortunately, you won’t be able to create a Zhmail.com account without a phone).


Next, fill out all the fields, click on the “I Accept” button to agree to the terms of the box and send the data. You will be asked to scroll through a small slider “Young fighter course from G Mail”, and at the last step a button will appear to enter the web interface for managing your mailbox - “Go to Gmail”.
Login and get acquainted with the Jimail interface
If you already have a Google account, then you will receive you can always log in from any page of any Google service, simply click on the button next to your name in the upper right corner:

Well, or just by typing in the address bar of your browser gmail.com and clicking on Enter.
Gmail interface quite understandable and familiar (it has not undergone significant changes for quite some time, which, in my opinion, is a good thing, because there is no need to solve another puzzle on the topic - “where is it now?”):

It appeared quite a long time ago separation of correspondence to Unsorted, Social Media, and Promotions (at the top of your inbox). If you click on the plus sign next to it, you can also add “Alerts” and “Forums”.

If you don’t need this sorting (like me), then simply uncheck the unnecessary checkboxes in the settings (six in the upper right corner - “Settings”) on the “Inbox” tab:

When you first log into G-Mail, you will immediately be told that although your account has been created, there is still something to add and configure to it. In particular, you will be offered to quickly set up the import of mail from your existing mailboxes (both in G-mail and in other similar services). We will talk about this in detail below.
You will also be prompted to quickly add a photo to your account and, if desired, choose a different design theme. You can really do this right now, because everything is implemented in literally two clicks (don’t get lost).
A new mail interface is already available in Google Mail for everyone
Lately, Google Mail has been actively promoting its new interface. You can try it by clicking on the settings button (gear in the upper right corner) and selecting the first item “Try” new version G-mail".

It is currently in testing and is not used by default. There aren’t really many striking differences, but you still have to get used to it.

If you wish, you can return back to the old interface, and you can also configure the location of letters in the new Gmail by clicking on the “Interface” button in the settings drop-down menu. Three options are offered, differing from each other mainly in compactness and clarity:

I am still using the old interface (and I will show everything using its example), but you are free to choose for yourself (I think you can figure it out by analogy in my screenshots).
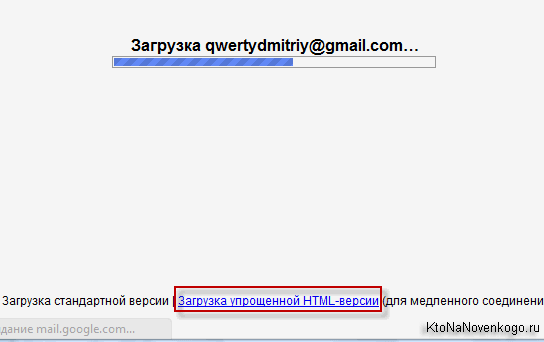
When loading the mailbox web interface, your browser is checked to see if it supports all this beauty, and if a discrepancy is detected, the good old HTML version. Although you yourself, in case of a long loading of the new frame, can switch to the retro interface:
By default, you are offered a mailbox approximately 15 GB in size(although this is not only for one email, but also for yours, and), but if you wish, for a fee you can increase this limit.

The few letters that will already be present in your mailbox tell you about some of the features of Gmail (for example, importing contacts and letters from any mail service you previously used) and about the delights of .
Pros and cons of Gmail, security settings
What’s noteworthy is that by registering a mailbox on Gmail, you are not obliged to give up all the others that you have received over your long life on the Internet. It is possible to configure the reception and sending of mail to them from the Google mail interface. It’s very convenient, and I’ve been using it successfully for a long time (read more about necessary settings Let's talk a little later).
Gmail is an online service that is as convenient as email programs
Also, one of the default messages will talk about the ease of using Gmail on mobile phones using a proprietary application. In general, use for working with mail using the web interface, rather than a desktop program, has one huge advantage - you no longer need to synchronize your different email programs on various devices(desktop PC, laptop, phone, tablet, etc.).
A web interface will be an excellent universal solution, but only if it allows you to implement all the goodies that abound in email programs. Well, of course, Google, together with its wonderful Jimail, is striving with all its might to become this ideal option, and, frankly speaking, they are doing it very well.
At the beginning of its journey, Google Mail found itself at the epicenter of a scandal precisely because of ads that appeared with contextual advertising(having your own website, by the way, you can too) and not due to the irritation caused by its display. No. It’s just that the theme of contextual ads in its ideology corresponds to the text that takes place in this message. This meant that the system was reading our letters, which caused a storm of indignation.
But over time, all the goodies that Google threw at users of its free email outweighed the negative from the invasion of their personal space. In short, we were bought. Sometimes the thought still comes to mind that this corporation is gradually becoming an “empire of good”, and besides, how beautifully it all began (read my account). However, let's return to our sheep.
Let's talk now about security of working with your mailbox. I advise you to immediately go into the settings for this purpose (find the gear in the upper right area and select from it context menu Settings item):

Immediately pay attention to the link located in the footer (bottom) of the Gmail web interface called “ Additional Information" There you can monitor or set up an alert for suspicious calls to your mailbox.

Protecting your email login
If the data stored or received in your mail account, are extremely important, then you can sacrifice the ease of working with the mailbox and configure it (using a password and confirmation code sent to your mobile phone). You can do this on the page " Security and entry" your Google account:

There is never too much security, and the main thing is to take care of it before, and not after the thunder strikes (learn from my mistakes). Well, I’ll still briefly describe all the possibilities that this double security system provides. So, two-factor authentication in Gmail allows you to do the following:

Passwords for applications to access your mail from any device
If you use any email reading apps on your desktop computer or mobile phone (tablet), then after activating two-step authentication, these same applications will not be able to access your mailbox. What to do?
There is a way out and it is quite simple. You will need in the area "Application Passwords"(see screenshot above - located on the “Security and Login” page) click on the spoiler. The page that opens will list the applications that already have access to your Gmail account (by the way, you can disable them if necessary).

And at the very bottom there will be an opportunity to set a password for any application to access Jimail mail (it doesn’t matter, mobile or desktop, for example, an email client).
First select from the drop-down list Google app, which you want to log in to (mail, YouTube or others), then from the second list, select the device from which you want to log in, and click on the “Create” button. As a result, you will receive a password for this application and instructions for using it:

All you have to do is go to the settings of the mobile or desktop application to change the Gmail access password there to the one you just generated.
In my opinion, everything is very simple and convenient. Personally, I am very happy about this opportunity make your mailbox as secure as possible from the encroachments of all sorts of radishes seeking to steal money, websites and other material and virtual values. Respect to the developers for this.
Okay, now let's understand the features of Jimail mail and configure this miracle of programming thought to suit ourselves and our habits.
Shortcuts (folders) and their configuration in Gmail
To sort correspondence in Gmail, use shortcuts and filters. The latter allow automatic mode according to given criteria, distribute letters into different folders (labels). A shortcut, in fact, is very close to the usual concept of a folder, but has broader capabilities. By default, Google offers you a certain set of shortcuts and folders, which are located in the left column. But we are free to customize everything to suit our needs.
How to create a shortcut in Google Mail
First, you will probably need to go to the settings (Gear - Settings) and on the second tab, using the “yes” or “no” activation, configure the display of left menu items (some shortcuts can not only be disabled, but also deleted).

There will also be an opportunity to create a new one using the corresponding button. Create a shortcut in Gmail You can also when viewing a letter (from the context menu of the icon called “Shortcuts” on the top panel):

In general, I don’t really understand these icons, so for more information and clarity, you can check the “Text” option in the settings on the “General” tab in the “Button Labels” area.

After this, instead of mysterious icons, clear inscriptions will appear on the top panel of G-Mile:

As you can see from the above screenshot, in fact, even the Inbox folder is a shortcut. In Gmail, shortcuts can be nested (previously, this required installing an add-on from the Laboratory), which gives more more possibilities for inducing cymus.

How to customize appearance and use shortcuts
The created shortcuts should be observed in the left menu(additional directories with the names of shortcuts will appear), and their configuration or deletion can be easily done by clicking on the arrow button that appears on the right (the left arrow reveals a list of nested shortcuts, if any) when you hover the mouse cursor over any of them in your mailbox:

A context menu will open where you will be asked to select a color for this shortcut, as well as make a number of additional settings:

Now, after assigning a unique color, when viewing incoming messages in Jimail, you can very easily see what labels they are marked with.
Although, in my opinion, it is best to configure the filters automatic removal messages from the inbox, if they meet any condition for moving under the label (there is no need to clutter the inbox - only unfiltered messages will be there):

When viewing this letter, you will also have the opportunity, if necessary, to remove unnecessary cross labels:

Removing an Inbox shortcut sends the letter to the archive, but it will still be available in other existing shortcuts (folders, in other words). And, of course, in the “All Mail” folder you can always find them safe and sound. Okay, at first it’s difficult to figure it out, but you can imagine all this shamanism as creating the folders you need in the future. There is a possibility if necessary, but this is a last resort.
It is clear that when reading messages you will be able manually assign them to one or another shortcut (in other words, place them in folders) using the button of the same name located at the top and its context menu. In fact, in this way you can manually distribute the letters from your mailbox in Jimail into the folders you need and pre-created. However, this is a tedious task and, if possible, I would like to automate the routine.
Filters in Jimail and a detailed example of their use
How to do it? Using a second tool codenamed Google Mail filters. These wonderful filters are available in the settings (from the gear menu) on the corresponding tab. There you will see the filters you have already created (if any) and a link that allows you to create a new impeccable example of indestructible logic (called Create a new filter).

In the window that opens, you need to enable logic and try to set a unique algorithm by which Gmail will filter the correspondence you need. If someone has used desktop email programs before, then there will be no problems with this.

If the filter doesn't work, you can always correct it. You can filter, for example, by the subject of the letter, by specific terms found in it, by the address of the sender or recipient (if the message is sent to Jimail from another mailbox of yours).
At the next step of the filter creation wizard, you will be asked to assign the fate of those unfortunate letters that are filtered in accordance with the algorithm you specified. For the example given with filtering mailings coming from the left mailbox, you need to check the boxes in accordance with the screenshot:

Let's Let's look at an example of this Gmail filter:
All. Create a filter, test its suitability, correct shortcomings and enjoy cleanliness and order in your correspondence on the most wonderful web-based email client.
Importing addresses and letters into Gmail, collecting mail from other mailboxes
Now let's assume that my agitation for Soviet power had an effect and you were inspired by the idea moving to Gmail with all his belongings, i.e. with accumulated contacts and tons of letters. It won’t be that difficult to do this, although not very quickly (even with Google’s unlimited power, transferring an array of correspondence can take up to two days). However, all this will be done automatically, and you will only need a little patience in making the necessary settings.
In addition to, in fact, a complete move with all your property to Jimail, this email service will allow you to use all your accumulated for a long time mailboxes are fully operational, and your opponents who will send messages to them will not even notice that you no longer live there (responses to their letters will come with the same return address to which they wrote). It's actually a wonderful thing that also works great.
Import contacts into Jmail from your other mailboxes
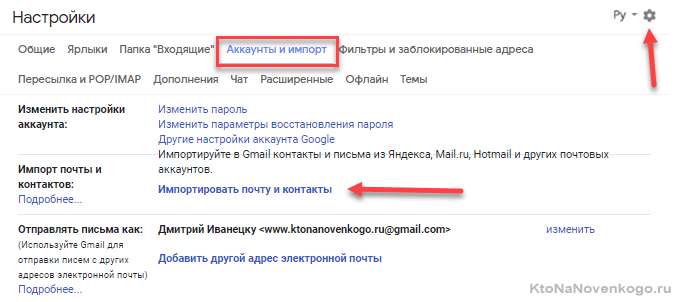
All settings are made on the tab "Accounts and import". In the “Import mail and contacts” area, you need to click on the link shown in the screenshot:
Import from a huge number of email services is supported, a list of which you can see on this page. In the first step, the wizard will ask you where Google will collect contacts and messages, and in the second step you will be asked to enter the password for that mailbox.

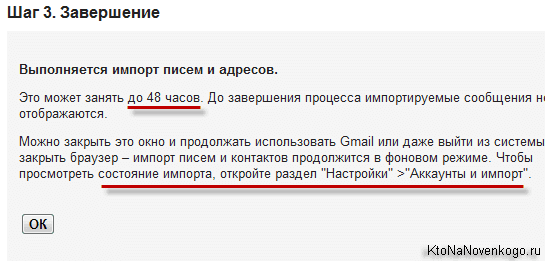
After clicking the “Import” button, you will be notified that this is not a quick process. You can verify that the process is complete in the Google mail settings using the path indicated in the screenshot:
You can teach Google to pull chestnuts out of the fire (letters to Gmail from your other mail services), but the collection will not be carried out in real time, but sporadically with an interval of one hour. If the speed of collecting correspondence is critical for you, then it’s better do reverse operation — go to the settings of those same third-party accounts and add to them the forwarding of all mail to Google.
Forwarding mail from other mailboxes to Jemail

Well, it’s probably worth mentioning that in Gmail settings on the tab Forwarding and POP/IMAP you can set all incoming correspondence to be forwarded from your new Google mailbox to your current main mail account.
And if you are used to using a desktop program to work with mail, you can, if necessary, disable the POP protocol and enable a more advanced one IMAP to pick up correspondence and read it on your computer.
Useful Settings and Gmail Lab
Among all possible settings Gmail (Gear - Settings) we have not considered the “chat” tabs (which I don’t use and don’t know what to say about them), as well as the settings for enabling the smart mode for separating inboxes into important and unimportant on the “Inbox” tab, and so on. tab "Themes", where you can put the most pleasing skin on the web interface:

By and large, there is nothing interesting there.
Let's see if there's anything left that we haven't covered "General" tab of Jimail settings:

- The interface language - well, there’s nothing to talk about here.
- Maximum page size - the number of letters (chains, which, by the way, are an amazing invention of Google - all correspondence with the same user reduced into one chain, where you can remember the essence of the matter) and contacts (available from the drop-down list of the Gmail button located above the left list - I advise you to add photos to all your contacts in the settings or for style).
- Chains of letters - you can disable the wonderful function described just above, but I assure you, it’s not worth it.
- Shortcut keys are disabled by default, but perhaps constant work with mail will become more convenient when activated. A list of hotkeys can be seen on this page.
- Desktop notifications - if you work with Gmail from Chrome, you can enable this function, and when new messages arrive, a pop-up window with information about this extraordinary event will appear in the lower right corner of the screen.
- Signature - if you don’t want to write “With respect, Dmitry Petrovich!” at the end every time, then just fill it out once per general settings and this template will be automatically inserted into all letters you send.
- Autoresponder - you probably received an almost instant response to your letters with general words (I’m not here right now, but I’ll definitely answer). This is what an answering machine is. This kind of stuff just pisses me off.
All other settings have either already been discussed above or do not deserve to be said anything more about them. So, trifles, which, however, may seem useful to someone.
Laboratory and advanced settings in Jmail
Let's move on to a tab that has not yet been touched upon by us, but nevertheless, probably the most interesting tab from settings – Laboratory.

It is, however, only present in the settings of the old interface, and in the new one there is a tab instead "Advanced". Some of what could be enabled in Labs is now available there (in the new interface).

But in the new interface there is also an opportunity on the “General” tab to check the “Enable access to experimental functions” field and after saving the settings, they should, in theory, appear on this very “General” tab. But I have not yet noticed any changes from checking this box.
In general, Google mail was born in 2004 and was in the beta stage until 2009. During this time, "Lab" took root and became the main source of innovation in this by far the best online email client.
I have repeatedly observed that additions from the “Lab” over time took up space in the main settings. Apparently, Gmail, therefore, tests out new features and makes a verdict on their implementation based on the collected statistics of their popularity (this is similar to a test browser, the successful developments in which are then implemented into the main project -). Well done, what can I say.
But let’s see what interesting things are being tested in the “lab” now, although if you read this article after a while, you won’t find much there. I will only review what I use in my account (please don’t kick me too hard for this). So, what useful little things can you do? attach to your Gmail.com mailbox:
- Unread messages icon- a small but pleasant trifle. After activating this function, the number of newly received messages will be displayed in the tab of your browser where Google mail is open. It probably won't be superfluous.

View area— this cartoon seemed extremely convenient to me, because I’m slowly switching to Gmail from an email client integrated into Opera, where everything is organized exactly like this. Now you can close the window for viewing the list of messages and view the contents of the selected letter in the freed-up area. Comfortable.
Activate, save the settings and, having gone to view the list of letters, glance at the top panel, see a new button that will allow you to configure the screen split vertically (shown in one of the top screenshots), horizontally, or not at all:

Response templates— I use it often so as not to retype the message every time. Quite convenient, but requires little initial setup. First, activate this cartoon, and then open the dialogue for writing and replying to a letter. Did you see the arrow at the end below?

First, go to the only item from the context menu “Response Templates” and name the future template. Then, in the letter writing field, enter the text of the future stamp and select it completely. From the "Canned Answers" context menu, now select the name of your template, but only what is in the "Save" area:

- Custom shortcut keys— I haven’t used it yet, but it’s a rather interesting option that allows you to assign the most common operations to hotkeys.
I also forgot to mention that in some browsers (Chrome and Firefox for sure) you will have the opportunity to make an online mail client Jimail default program on your computer, which will contain . This is very convenient if you are imbued with this client and do not think about working in any mail program. When you open the mail web interface in Chrome, a line will appear at the top of it asking you to commit the act of vandalism described just above:
Until you answer “Yes” or “No”, this inscription will not stop haunting you.
Good luck to you! See you soon on the pages of the blog site
You might be interested
 Creating icons from E-mail and ICQ numbers, as well as getting to know Gogetlinks Yahoo Mail - updated free mail
 How to create an email - what is it, how and where to register and which email to choose (mailbox)
Hi all. Today I’ll tell you what Gmail.com mail login is. If authorization on Google mail is unsuccessful, it would be a good idea to try to recover your password. To get started, go to the website – accounts.google.com (do this preferably from the device from which you last successfully logged into your account). Login pages offer their users the opportunity to change the language, choose the one that is most comfortable for you and get started!
Then you need to find the link: “Can’t access your own account?”, and, following it, enter exactly the email address that caused problems with authorization. Here you will need to confirm that you are not a robot by entering verification code.
Very often the solution to the problem is a simple password recovery. How to do this, read the next article.
The resulting page offers a list of various options for restoring access. If you have another email address in the settings, or a phone number, the recovery procedure is greatly simplified.
Check if cookies are enabled for this site
Cookies are files that help a web browser remember client settings on a specific resource, while saving its configuration and collecting statistics. Now virtually all sites require these files. For this reason, to check their availability for Google Mail, you need to open your browser settings and enable them. We invite you to consider the process of enabling them in three popular browsers, such as: IE, Firefox, Google Chrome.
- Enabling cookies in Internet Explorer. First you need to go to the “Control Panel” and find “Internet Options” there. Click on the “Privacy” tab, then “Advanced”. In the resulting window, you will need to check the “Override auto-processing of cookies” checkbox and set the “Accept” markers on both primary and third-party files.

- Enabling Cookies in Mozilla Firefox. First of all, open your browser and go to settings. There you will find the “Privacy” tab. Find the block with history, where you will need to click on the last item from the drop-down list “will apply settings for saving history.” On top of that, check the “Accept cookies from sites” checkbox. Close the settings window by clicking the “OK” button.
- Enable cookies in Google Chrome. Open the browser, then go to “Settings” (in the upper right corner there is an icon with three stripes; after clicking on it, a window appears in which you can find those same settings).
At the bottom of this window there is a subsection “ Additional settings", go into them and click on "Personal data", and then - "Content settings". In the resulting window, check the box under “Allow saving local data.” Finally, confirm the configuration by clicking on the “OK” button.
Upon completion of cleaning Cookies you can also clear your browser history and cache. As a rule, the browsing history becomes so large that performance is significantly reduced, and certain functions stop working altogether. We invite you to take a closer look at deleting history in popular browsers.
Clearing your browsing history in IE.
First you need to go to “Service”, and then hold down the “Alt” button. As a result of this, a menu will appear; in the list of suggested items, select “Delete browsing history.” In the resulting window you will need to mark those items that you need to delete. All that remains is to confirm your actions by clicking on the appropriate button. Made!
Clearing your browsing history in Mozilla Firefox.
With this browser it will be somewhat simpler: you just need to hold down the key combination “Ctrl+Shift+Delete”, in the resulting window, select the items that you need to delete. It is important to systematically clear your browser cache and history. By the way, upon completion of the deletion procedure, you will need to log into your profiles on the sites again.
Clearing your browsing history in Google Chrome.
Removal process in general outline similar as with other browsers, but there is one caveat: upon completion of this procedure on one of the devices, the history is deleted on absolutely all devices from which authorization into the Chrome account was performed. So, open the web browser menu, go to the “Tools” tab. On the resulting page, select Clear Browsing Data. In the window that appears, select the items that need to be deleted.
Along with this, it would be a good idea to look at what extensions are installed in the browser. If you find unfamiliar and unnecessary extensions, it is better to remove them, as they (to some extent) reduce the performance of the browser.
By following our advice, you can easily solve the problem with authorization on any website.
Gmail.com mail login to mail
If you were not registered in Gmail, you can fix this on the website - mail.google.com. On the right side, click on the “Create account” button.
You can create your own profile in this system in 3 steps.
The first stage involves filling out a questionnaire.
- Write your first and last name. An email account is usually created on long term. Moreover, it can be used to activate mobile devices under operating room control Android systems. If you need an additional email address, it is better to use the services of mail.ru.
- Choose a login name. This stage is not the easiest, since choosing a name takes a lot of time from users. For example, names such as artem, andrey, etc. are already in the database. It’s good that the system is fully automated, so you only need to enter your option, and it will tell you whether you can use it or not.
- . Its length must not be less than eight characters. Try to make it different from those you have installed on other portals.
- Confirm the password. The site needs to make sure that you actually remember set password. Important: the password must include Latin characters. Errors often occur due to incorrect keyboard layout, so be careful.
- Please enter your date of birth.
- Select gender.
- You can write your own phone number for the purpose of protection account. If it will store important confidential message history, then you can set up two-step authorization by entering an SMS message. Along with this, if you forget your password, you can easily recover it using your mobile phone.
- The reliability of the protection system will increase significantly if. Suppose your main mailbox is hacked and commits their nefarious deeds, and corresponding notifications are sent to your secondary email address.
- You can check the box next to “Make Google my home page” if you want this to be displayed on your home page when you open your browser. search system.
- After this, you need to pass a verification that distinguishes spam robots from real users. This is an absolutely simple task, and it is completed quickly.
- “Country” item: select your place of residence.
- Check the box to indicate your agreement with the rules for using this system.
- If in the future you intend to actively use Google+, then it would be a good idea to check the box “I want to see what they recommend...”. Thanks to this, you can watch what your friends recommend to you.
This is all that is needed for the survey. Click on the “Next” button and proceed to the next registration stage.
At the second stage, if you wish, you can choose an avatar.
That's all for me!
Currently any user world wide web can get yourself an email account, because it’s very easy to do. It’s a completely different matter which resource to choose for this. Most Russians use services from or, but foreign users are increasingly registering on Gmail.com. For those who are not in the know, this is an email service owned by the most famous search engine in the world, Google.
It is worth noting that mail from Gmail is very convenient and well thought out. However, in our opinion, the greatest beauty of this service is that there is a so-called two-step identification, which allows you to link your email account to mobile phone. Therefore, no one except you will be able to read your letters, since in order to enter your mailbox, you must first enter the code received on your cell phone. For those who keep valuable information in their mail, this is a very important service.
Free mailbox registration
Now let's move on to registration. Go to the gmail.com link and click “Create an account.” It looks either like this:

Or like this:


What is your name. It is not difficult to guess that here you must indicate your first and last name. Whether they should be real or fictitious is up to you to decide, but we believe that it is better to indicate real data, as this is not only more convenient for your interlocutors, but will also help restore mail in the event of loss of access to it.
Create a username. You will have to come up with a nickname () that you will use to log in to the mail. It's worth noting that most "simple" logins are already taken by users, so you'll probably have to come up with something special. We hope there will be no problems with this.
Create a password. The password must be complex. Don’t even think about using simple ones like qwerty or 123456 - attackers pick them up very quickly. You can create a complex password in this way: take a Russian word, for example, “Mowgli”. Write it to English layout- it turns out Vfeukb. Amazing. Now add some numbers and symbols here, something like this: %?Vfeukb1975. We received a 12-character password, which is very difficult to guess. And if you use double authorization, it will simply be impossible to get into your mailbox.
Confirm the password. Re-enter the password specified above in the field.
Date of birth, gender. Whether this information is worth providing is up to you to decide.
Mobile phone. At this stage, it is not necessary to add a cell number.
Alternate email address. If you have another mailbox, you can specify it. In case of loss of access, all necessary information will be sent to it.
Prove that you are not a robot. It’s easy to prove this - you just need to enter a captcha, which, however, is not so simple. However, after a couple of attempts, you will probably be able to enter incomprehensible characters.
A country. Here you need to indicate your country of residence, although it is usually automatically set for your region.
NECESSARILY Please check the box next to “I accept the Terms of Use...”, since without this it is impossible to continue registration.
After filling in all the information, click on the “Next” button. Congratulations, registration is completed!
The next step will ask you to add your photo, but you can choose not to do this if you wish.
In order to access your mail, at the top of the Google page, click on the icon in the form of dots, and then select the mail service.

Double authorization
And now we get to the most interesting part. Now we will tell you how to enable double authorization so that no one can get into your mailbox except you, of course.
On the right side of the screen you can see your avatar. Click on it and select the “My Account” section from the drop-down menu.


Enter your phone number and follow the instructions.

Finally, I would like to remind you that it is highly advisable to use only the one registered in your name as a telephone number. If you lose this phone, you are unlikely to be able to regain access to your account. Be careful!