How Microsoft Excel is launched. How to run Excel program. Starting a macro in Excel. Hotkeys
Pressing the button Start Activate the main menu, set the mouse pointer to the item Programs, In the menu that appears, set the mouse pointer to the item Microsoft Excel. and click on it.
Microsoft Excel program window.When you hover the mouse pointer to some windows area (total 17 fragments are allocated ) The pointer will turn into the palm and a hint appears with the title of the specified window area.
Excel document called Working book, the book is a set Workers sheetsEach sheet has a table structure and may contain one or more tables. The Excel document is saved as a file with an extension * .xls. In the document window displays only currentworking leaf, it is called active. Each work sheet has namewhich is displayed on label sheet. With the help of labels, you can switch to other working sheets of this book. Each sheet has a horizontal and vertical scroll bar. The working window contains a standard header string, toolbars and a string in which the field name field and formula string are located. At the bottom of the window there is a status string. At the right end of the status string, NUM is located if the Num Lock mode is on on the keyboard (Small Digital Keyboard).
Task 1.1:Starting the program.
1. Method 1. Click on the button Start Task panels, in Main menu Select item Programs, in the submenu that appears to install the mouse pointer to the item Microsoft Excel. and click on it.
2. Close the program window File / output.
3. Method 2. Find Microsoft Excel's shortcut on the desktop and activate it with a double mouse.
4. Close the program window by pressing the ALT + F4 keys.
Addressing cells
The work sheet consists of row and column. The columns are entitled with capital Latin letters (a, b, ... aa, ..., iv), the maximum number of columns - 256. Rows are entitled with numbers, maximum amount Rows - 65536. At the intersection of rows and columns are located cells Tables. Designation ( address, link) Cells are made up of a column number and string. One of the cells is always active and stand out frame. The active cell frame plays the role of the cursor. The headlines of the active cell are highlighted in bold and reliefly raised.
Example. In the figure, the address of the active cell is A5.
Moving the frame is carried out by the mouse or cursor control keys. To select a cell, just click on it with the left mouse button, while it becomes active. For moving along the sheet, scroll bars and the HOME, CTRL + HOME keys are also used, Page DOWN. The name field reflects the address of the active cell.
Example. F4, E8, A1.
There is another way to address the cell. The columns are set by the numbers, the letter R is set before the line, before the column number - the letter C.
Example. Addresses of cells from the previous example given by another method: R4C6, R8C5, R1C1.
When selecting cells, the mouse pointer has the appearance of a white cross.
Task 1.2:Addressing and selection of cells.
1. Select the cell turns with the addresses A5, B1, F40 using the mouse or the cursor control keys and the scroll bar.
2. Check the actions of the HOME keys (to the current line column), Ctrl + Home (to the A1 cell), Page Up (on one screen up), Page DOWN (on one screen down), when moving across the tables of the table.
3. Set the cell name R1C1 menu command Service / Parameters/ Tab_ General/ Install_flug_ Style_Slick _ R1C1.
4. Determine the address of the cells A5, B1, F40 in the current style (R5C1, R1C2, R40C6).
5. Return to the previous addressing cells menu command Service / Parameters /Tab_ General/ Remove_flug_ Style_Slick_r1c1.
MS Excel 2007.
What do with spreadsheets
Electronic excel tables - the second most important program in office package program Microsoft Office.. At the same time, this is the simplest and understandable program with a successful, intuitive, interface. If you have ever launched the Excel program, you will agree with this, because even at first glance, there is nothing difficult in it.
The idea of \u200b\u200bspreadsheet itself, it seems to be in the head of programmers, thanks to the memories of school notebooks with sheets in a cage, in which it is convenient to make a wide variety of calculations: from addition to the column to calculations in large tables. Accordingly, the Excel program window is very similar to the usual notebook.
What can be done using spreadsheets?
All you need for work and study. They are even you can use instead of an ordinary calculator. However, the Excel program was developed to solve a wide variety of economic and scientific tasks, so it is happy to use everywhere where it is necessary to produce uncomplicated, but multiplely repeated calculations: calculate the results laboratory work, balance sheet, draw graphs according to scientific workYes, and just keep home budget.
Work in the Excel program is intuitive, as mathematical operations that are studied in school are automatically automated. In addition, Excel, in contrast to other Microsoft products, is a completely compact and non-reported system. However, for more fruitful work in Excel, the user needs to know the typical techniques to perform some operations, which will increase the comfort of work and will automate the routine actions. In addition, there are "Secrets" Excel, to which the user independently gets very soon. And they seriously facilitate the lives of experienced users and help create comfortable spreadsheets.
To start the program, find the icon with the Microsoft Office Excel 2007 signature on the desktop. Double-clicking with the mouse button on this icon will open the Excel program window with a blank table, as shown in Fig. 1.1. The title of the window will be the inscription Book1 - Microsoft Excel, and a button with an Excel icon and an inscription book1 will appear on the taskbar. This means that a new empty document (spreadsheet) has been created in the Excel program.
Document files in the Excel program are called books. Traditional for personal computers The operations of opening, closing and saving files in Excel are manufactured with books.
The book consists of working sheets. Each work sheet has a name that is displayed on its label. By default, sheets are called: Sheet1, Sheet2. etc. To activate the sheet you need to click on its label.
Workspace Each sheet is a table. The columns of the table are entitled with Latin letters and, further, two-letter combinations. In total, the work sheet is 256 columns (from BUT before IV.). Rows are numbered from 1 to 65536.
The minimum storage element is cell .
Cell address - This is a column header and line number, on the intersection of which is a cell, for example, A2, B25, C65.
One of the cells is always active (current) and highlighted by the frame. Input and data editing operations are always produced in the active cell. Make an active other cell (Move the cursor frame) in several ways:
click the mouse in the desired cell;
use the navigation keys arrow;
press the key < Enter> .
Under the toolbars, the Excel window is located row of formulas
.
On the left side of this line displays the address of the current cell (or its name), on the right side - the contents of the current cell. Between the address field and the content field are the buttons:
- opens a list of named cells (for the rapid transition to them), and when entering the formula, a list of 10 functions used by the latter;
- calls the functions wizard window,
When you start entering data from the keyboard into a cell in the formula line, two more buttons appear:
- Cancel input (equivalent to key
- Data Data in the cell (equivalent
reference system
The reference system in Microsoft Office 2007 software package contains several levels. reference informationcalculated both on novice users and on professionals. If you first work in the Excel program, then in the help system you will easily find the description of the simplest techniques of work. If you have experience in Excel, the reference system will be a convenient tool for everyday activity. A professional will be convenient to use the reference system when you need to find a certificate for a rarely used formula or clarify a number of programming subtleties in spreadsheets.
The very first level help system - this is contextual tip (pop-up small window). It is very convenient for beginners, as well as for those who worked with previous versions Excel programs. For detailed reference information, the traditional for computer programs Reference window with hyperlinks and thematic sections.
NOTE
The Excel program works function key F1 on the keyboard with which the help system window is called. If you do not know what to do next, and questions arose, then press this key.
In difficult situations, you can enter in the line (located to the left of the Search button) the word or a few words that are related to your problem. After pressing the Search button in the Help window, the list of hyperlinks will be displayed on the topic of interest to you.
This is brief step by step guide It is intended for novice users and talks about how to insert the VBA code ( Visual Basic. For Applications) in the Excel book, and how to run inserted macro to perform various tasks on this sheet.
Most users are not a MICROSOFT Office Guru. They may not know all the subtleties of this or that function, and will not be able to answer the question of how the VBA macro is different in Excel 2010 and 2013. Many simply use Excel as a data processing tool.
Suppose you need to change the data on excel sheet in a certain way. We have a lot of googled and found a VBA macro, which solves this task. However, our knowledge of VBA leaves much to be desired. Here it will come to the rescue step-by-step instructionWith which we can use the found code.
Insert the VBA code in the Excel book
In this example, we will use the VBA macro that removes the crossing of the rows from the cells of the current leaf of Excel.

- Press Alt + Q.To close the VBA editor window and return to Excel book.
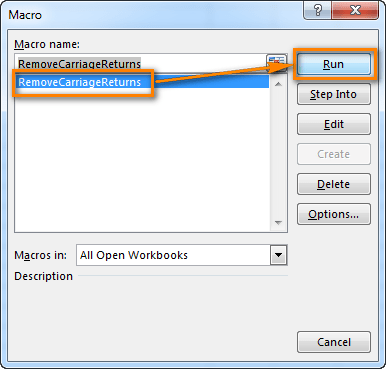
Run a VBA macro in Excel
To run just added macro, click Alt + F8.. A dialog box opens Macro (Macro). In the list Macro name (Macro Name) Select the desired macro and click Perform (RUN).
If your computer has already installed Microsoft Office 2013 software package, you can immediately run the Microsoft Excel 2013 program and proceed to its comprehensive study. If you are just going to install it, refer to the installation article. There is a detailed process microsoft installations Office 2013. In this article, we will look at the launch of Microsoft Excel 2013 and the main questions regarding the creation of documents.
If you have the Windows 8 operating system on your computer, you need to start Microsoft Excel 2013 start screen Using the scroll bar to move to the right (to see the tiles that have not been placed on the screen) and click on the Excel icon (it is green). An example of this icon on the initial screen is shown in Fig. 1.1.
If you use the operating room windows system 7, click on the button StartIn the menu that appears - on the Microsoft Office 2013 folder, and then in the list discontinued - at the Excel 2013 paragraph (Fig. 1.2). As a result of these actions, starting will open microsoft window Excel (Fig. 1.3).

Here you need to immediately clarify that the document with which you work in Microsoft Excel is called a book. The starting window allows you to choose the book with which you have worked before, in the list on the left side of the window or create a new book. Moreover, you can create an empty book, but you can create a book based on a template. Template - This is a blank book with pre-enabled inscriptions and other elements. Templates help quickly create single-type documents. If you create a book for the first time, click on the Empty Book Element, as shown in Fig. 1.3.

A window opens with the title inscription Book1 - Excel and a clean sheet with a grid-separating cell in the windows working area. You can proceed to work.
When working in Microsoft Excel, it is necessary to open several documents or the same file in multiple windows. In older versions and versions, starting with Excel 2013, do not make any particular problems. Just open files standard method, And each of them will start in a new window. But in the versions of the application 2007 - 2010 new document Opens by default in the parent window. This approach saves system resources Computer, but at the same time creates a number of inconveniences. For example, if the user wants to compare two documents, placing the window on the screen next, then standard settings It will not succeed. Consider how this can be made by all available ways.
If in versions of Excel 2007-2010 you already have a document, but you will try to run another file, then it will open in the same parent window, simply replacing the contents of the initial document on data from the new one. There will always be able to switch to the first running file. To do this, visit the cursor to the Excel icon on the taskbar. Small windows will appear for the preview of all running files. Skip to a specific document you can simply click on such a window. But it will be a switching, and not a full opening of several windows, since simultaneously to display them on the screen in this way the user will not be able to.

But there are several tricks with which you can display multiple documents in Excel 2007 - 2010 on the screen at the same time.
One of the fastest options once and permanently solve the problem with the opening of several windows in Excel is the installation of a Patch MicrosOFTEASYFIX50801.MSI. But, unfortunately, Microsoft has ceased to support all solutions Easy Fix, including the above product. Therefore, it is impossible to download it on the official website. If you wish, you can download and install a patch from other web resources at your own fear, but it should be remembered that you can subjected to your actions in danger.
Method 1: Taskbel
One of the most simple options The opening of several windows is the execution of this operation through context menu icon on the taskbar.
- After one document Excel is already running, bring the cursor to the program icon posted on the taskbar. Click on Neh. right-click Mice. The context menu is launched. In it, choose depending on the version of the program item "Microsoft Excel 2007" or "Microsoft Excel 2010".

You can instead to click on the Excel icon on the taskbar with the left mouse button when the key is squeezed Shift.. Another option is to just hover the cursor on the icon, then click the mouse with a wheel. In all cases, the effect will be the same, but you will not need to activate the context menu.
- Opens blank sheet Excel in a separate window. In order to open a specific document go to the tab "File" new windows and click on item "Open".
- In the running file of the file opening, go to the directory where it is located. necessary document, highlight it and press the button "Open".
- We recruit the keyboard keyboard Win + R..
- A window is activated "Run". We type in his field command "Excel".


After that, you can work with documents immediately in two windows. In the same way, if necessary, you can launch more.

Method 2: "Run" window
The second way implies actions through the window "Run".

After that, the new window will start, and in order to open it the desired file. Perform the same actions as in the previous method.
Method 3: Start Menu
The following way is suitable only windows users 7 or more early versions operating system.


After these actions, the new program window will start, in which the file can be opened in the standard way.
Method 4: Label on the desktop
To run the Excel program in a new window, you need to click on the application shortcut on the desktop. If it is not, then in this case the label needs to be created.


Now you can start the new window through the application label on the desktop.
Method 5: Opening through the context menu
All methods that were described above are supposed to first launch the new Excel window, and only later through the tab "File" Opening a new document, which is a rather uncomfortable procedure. But it is possible to significantly facilitate the opening of documents by using the context menu.


The document will start in a new window.
After doing the operation with the addition of a shortcut in the folder "SENDTO"We got the ability to constantly open Excel files in a new window through the context menu.
Method 6: Changes in the system registry
But you can make the opening excel files Multiple windows are even easier. After the procedure that will be described below, all the documents open will be launched in a similar way. in conventional method, i.e, double-click Mice. True, this procedure implies manipulation with system registry. This means that you need to be confident before you take for it, since any wrong step can fatally harm the system as a whole. In order for the situation in case of problems, the situation can be corrected, take the system recovery point before starting manipulations.


After performing this procedure files xLSX format Also will be opened in a new window.
Method 7: Excel Settings
Opening multiple files in new windows can also be configured through Excel parameters.


After that, new running files will be opened in separate windows. At the same time, before the completion of the work in Excel, it is recommended to remove a check mark "Ignore DDE requests from other applications"Since in the opposite case the next time you start the program, there are problems with opening files.
Therefore, in some way, this method less convenient than the previous one.
Method 8: Opening a single file several times
As you know, usually the Excel program does not give open the same file in two windows. Nevertheless, it can also be done.

As you can see, although by default in Excel 2007 and 2010, when you start multiple files, you will open in the same mother window, there are many ways to run them in different windows. The user can choose a more convenient one that matches its needs option.