D link dir 615 connection instructions. Change the default password
This article will help you configure the dir 615 router without any specific skills. If you are not confident in your abilities or simply do not want to delve into the settings of the router, Triaservice specialists will help you connect d-link dir-615 quickly and inexpensively. Our center can configure the router in Kharkiv and Kharkiv region. The d-link dir-615 router is the ideal solution for those who need a quality home router that works with WiFi n technology (and, of course, supports b and g). The cost of this device ranges from UAH 217 to 350. (from 35 to 47 US $). Below we will explain in detail how to set up an internet connection through a router using a WiFi-enabled device.
Briefly about the characteristics of the router:
Standard: 802.11n with a frequency of 2.4 GHz; WiFi transmitter power: 15 dBM; Number of antennas: 2 x 2 dBi; Maximum speed: 300 Mbit / s; Encryption: WEP, WPA, WPA2, PSK; Implemented support: VPN pass through, NAT, Firewall, Dynamic DNS, DHCP server, SPI; Ethernet ports: 4 pcs. RJ-45.
DIR 615 firmware 1.0.0 - unstable!
ATTENTION!!! A lot of faults were found in the firmware of the router 1.0.0. D-link officials advise using only the patched version of dir 615 1.0.7. Read about how to reflash a d-link dir-615 router in the corresponding article.
Instructions for configuring the dir 615 router
Step-by-step instructions with pictures are relevant for firmware 1.0.7 and older! Standard firmware 1.0.0 is unstable, its use is not recommended. If you do not know how to install a new firmware, read the corresponding article on our website.
1. Connecting a router. This article discusses a router with revision K1; your device revision number can be found on the bottom side of the box.
After unpacking, connect your Internet cable to the WAN socket of the router (yellow port next to the power socket), turn on the router to the network, connect the LAN cable to your computer (if you will configure the router through a PC) or turn on the WiFi adapter on the laptop.

In order to configure the router, go to any Internet browser and enter 192.168.0.1. In the address bar, then fill in the login: admin, password: admin. Forms, then enter the new user data and log into the router.

In the window that opens, click on the "Click-n-Connect"


Then select the type of connection: static or dynamic IP (for more details, check with your ISP). First we describe the settings for a static connection, then for a dynamic one.

Then we click on the "detail" button at the bottom of the page.

In the window that opens, enter the data received from the provider. If the Internet was connected directly to this computer, click on the "Clone MAC" button. If the Internet was on another PC, enter its address in the MAC field, then "Next".

Check the settings and click "Continue"

If your ISP provides a Dynamic IP address, check the settings and click "Next".

Check your settings and click "Continue"

Then, returning to the main menu, select "System - Save and Restart"

After rebooting, pay attention to the network information. If the green light is on, then the WAN (Internet) is working properly.

Now let's move on to configuring WiFi on the DIR-615 router. To do this, go to the "Wi-Fi" menu.

Click on the flag "Enable wireless connection", then "Next"

In the new menu, we make the settings:
- network name (how our router will be displayed on Wi-Fi devices);
- country (of your residence, of course);
- router operating mode (mixed - if you are going to connect devices operating on different Wi-Fi standards)

A new menu allows you to configure network security. Various types of network authentication can be selected. Triaservice recommends WPA2-PSK as one of the most reliable protocols. If you want your network to be public, select Open.
The DIR 615 router is a model manufactured by Dlink, which has proven itself well in the computer hardware market. The router holds the network steadily, has Wi-Fi connectivity. It allows you to protect all home computers, while providing transparent communication between them. But not everyone will be able to correctly configure everything they need right away, so let's check how simple it is.
Equipment
When buying such a device, you need to make sure that everything that we need for initial work is already included in the package. It's not very pleasant, having bought a router, bring it home and understand that now you need to go for the cable, because when you turn on the D Link DIR 615 for the first time, the configuration is carried out only via the network cable. The special case of setting up via Wi-Fi is not suitable for the first time - the network is disconnected.
But the package contains everything that we need for the first time: a wire for connecting to a computer, a pair of antennas, a power supply for the network, the device itself and a disk with programs. Also, a whole bunch of papers, guarantees and, most importantly, instructions in Russian. There is also a special stand: the router can be placed on the edge so that it takes up less space on the table.
We connect to the computer
The connection is very simple. First, we fasten the antennas, they have the most common thread, then we take out the Internet cable from the computer and plug it into the wan socket on the D Link DIR 615. The first connection must be set up via the cable. There is usually a sticker next to the wan socket, unhook it, behind it there are 4 identical ports. Connect one of the ports to the computer with the supplied cable. Which port of the four to choose - decide for yourself, now they are equal. On the computer, we plug the cable into the socket where the Internet used to be. We connect the power supply. Everything we need for the initial setup is ready. We plug the plug into an outlet and wait for the router to boot up. At the same time, we turn on the computer, if we have not done this before.
Start setting
So, we connected the cables, turned on the computer, the router, but now there is no Internet - however, for the first time we do not need it. An instruction will be needed in the instruction, which is quite detailed, so we will use it.
We turn the pages to Russian (it is usually the second in the brochure) and begin to customize. First, you need to communicate to the Internet. To do this, you need the settings provided by the provider when connecting. However, if your Internet connection is via adsl-modem, the settings will be much easier. Now turn on the browser and drive in the following numbers in the address bar: 192.168.0.1. The router receives this address at the factory, perhaps we will change it later.
In the highlighted login window, we drive in the necessary data. They are in the instructions, but for this router they are usual: admin in both fields. Press "Enter" to confirm and get to the main screen of the DIR 615. Setting all parameters is displayed here. You can configure it in semi-automatic mode using the buttons on the left, but it is more correct to check and make all the settings yourself. Click "Advanced settings" in the lower right corner and proceed to the step-by-step setting. Usually the tongue is picked up correctly. If it is not Russian, you can fix it at the button on the right.
Setting up the Internet
Let's make a reservation right away that if the Internet cable is connected to the modem, and not to the DIR 615, the setup is greatly simplified. The difference will be if the Internet goes through a modem, then you can choose a static one in the router, or the rest will be picked up by itself. If there is no modem, we will configure access to the network in the DIR 615 itself. Opens the Wan link in the “Network” block in the newly opened window. Follow the link and select the type of connection. Most ISPs use PPPoE. Select the type of connection in the upper field. Then just below the port and name (rather, you need it). In order for your ISP to recognize the router and allow it to go online, sometimes you need to replace the MAC. We do this a little lower in the "Ethernet" section. If you connected the router to the same network through which you used to go online, press the "clone MAC" button. In the figure below it is not signed, in this firmware version it is located to the right of the MTU -1492 field
In the "PPP" section, enter the username, password and set the MTU value to 1492. This data is provided by the provider when connecting, and if the MTU value is higher than the specified one, there may be problems with the network. Set the rest of the parameters as in the picture below.

We skip further, in the "Miscellaneous" block we put two checkmarks: NAT is obligatory, it is also desirable to enable "Firewall" - additional protection when working on the network. This is the same firewall or firewall, but built into the router. In the picture below, they are turned on.

We save all the settings by clicking on "Apply". The main part is done. In a new browser tab, you can open, for example, the Yandex search engine.
Wi-Fi setup
If we have a laptop or smartphone, they can also access the Internet through a router. To do this, let's go back to the main window of DIR 615 settings. It is done in the block, which is called that. Click on "General settings" and in the window that opens, select "Enable".

Having saved the changes "Modify", we will return to the main window. Now, in the same block, follow the link "Basic settings". Here you need to set the network name (your smartphone will see it when searching for a network). Click "Change" again.

Actually, that's all, if you live in a private house, the smart will catch not only next to the router. If you are in an apartment and do not want neighbors to use your connection, you need to protect it with a password. From the main window, follow the link "Security settings". Set the settings as shown in the picture below. Enter your password. Click "Change".

Now those who want to connect to your network must provide a password. You will also have to specify it, so you need to save the password.
That, in fact, is all that is necessary for the normal operation of the DIR 615, the wifi setting is completed, now on a laptop / smartphone you need to try to find a new network and connect to it.
You can put an end to this. You can deal with the stand and try to put the router on its edge. We examined the main parameters of the DIR 615. Setting the remaining parameters is done according to the same principle and is described in detail in the instructions.
Conclusion
In conclusion, let's touch on the issue of resetting the DIR 615 settings. You may not need it, but it's worth considering. The reset button is located on the back of the router as a small hole in a circle labeled "reset" next to the power connection. With the router turned on, press it with a paper clip or pin (it is in this hole) and hold it for a minute. After releasing, the router will start rebooting, after which you can reconfigure the Internet, wi-fi and other parameters.
Every user is faced with the problem of changing the factory settings of a new router. This publication will discuss the issue of changing the default preset password and wi-fi key for the D-link dir 615 router.
So, to start configuring the D-link dir 615 wi-fi router, or, more precisely, changing access keys, you first need to go to the device's authorization home page. The web interface of the router is located at the standard address, which is written in the address bar of the working browser - http://192.168.0.1.
Changing the factory password
When purchasing a new device, the first thing each user needs to do is to change the authorization key without fail. This step is very important, because by setting a reliable access key to the web interface, this blocks the paths for fraudulent actions on the part of cybercriminals. Through the settings page of the D-link dir 615 router, you can not only find out the required key for wi-fi, but also steal user information for accessing the services of an Internet provider.
Often, after purchasing a router, delivery managers change the password in the settings in advance to the serial number (S / N) of the access point. This number is always indicated on the factory box and is duplicated on the device's brand label. It is very convenient to use this number as an authorization code, since it is unique, difficult to select, and it is simply impossible to lose it.
To set up a new password, in the interface of the D-link dir 615 router, you need to find and click on the "Tools" link. Then open the "Administration (Admin)" section. In the window that opens, there will be special lines in which you need to enter a new password. In the “Password” field, you must enter a new code, and in the “Verify Password” line, repeat the characters entered earlier in order to set them as a new password.
 Now that all the keys have been entered, all that remains is to save the changed values by clicking the "Save Sattings" button. The D-link dir 615 router will then reload the options page and prompt you to log in again using the new login options.
How to set up a wireless password
Usually, new devices do not have a ban on the use of a wi-fi network, which means that neighbors can use it completely free of charge. Everything would be nice, but due to the large number of devices connected to the Internet through one access point, the connection speed is noticeably reduced, which means that it is simply necessary to limit the number of connected devices.
To put a new access key to wifi, you still need to open the web interface of the D-link dir 615 access point. Find and select the "Setup" section, then click the "Wireless Settings" link in the left column. And in the new window that opens, at the bottom of it, click on the "Manual Wireless Network Setup" button.
 It remains only to set the necessary parameters and you can start using the wireless private wi-fi network.
 All settings must be made exactly as shown in the picture above. In the first section "Wi-fi Protected Setup", it will be better if you uncheck the "Enable" checkbox, otherwise, otherwise, problems may arise in working with wireless wi-fi devices, since not all wifi adapters support this technology.
- Set the checkbox "Enable Wireless", "Always".
- In the "Wireless Network name" column, indicate the name of the new wi-fi network.
- Security mode: "WPA-Personal"
- WPA mode: "WPA-Only"
- Cipher type: "AES"
- Pre-Shared Key: here you need to put the same key for accessing wi-fi, for which all these settings were made.
As mentioned at the beginning of the article, you need to use the serial number so as not to lose the access key, so we look for the S / N number on the back of the wifi device, and then you need to put it as an access code.
After all the necessary values have been changed, all new parameters must be saved by pressing the "Save Settings" button. After that, the D-link dir 615 router will reboot, and you can start working.
In order to get into the web interface of the router, you need to open your Internet browser and type 192.168.0.1 in the address bar, User Name - admin , Password - leave this field blank(provided that the router has factory settings and its IP has not changed).
Changing the factory password
Default: Login admin, password empty.
Tools (TOOLS), menu Administration (ADMIN).
In field New Password Enter a new password.
In field Verify Password repeat new password.
Then press the button Save Settings.
After that, the router will offer to re-enter its settings.

Setting up an Internet connection
In the router interface, select the tab at the top SETUP, in the list that opens, select INTERNET... Push the button Manual Internet Connection Setup

Configuring L2TP connection (Beeline)
- In field My Internet Connection is: choose Russia L2TP (Dual access)
- Below you activate the item Dynamic IP
- In field Server IP / Name enter L2TP server address
- User Name: Your login from the contract
- Password: Your password from the contract
- Verify Password: password repeat
- Activate the item Always opposite the parameter Reconnect mode.
- MTU: change the value to 1450 or less
- Push the button Clone MAC Address
- Save the settings with the button Save Settings

Configuring PPPoE connection (Rostelecom)
- In field My Internet Connection is: choose Russian PPPoE (Dual Access)
- User Name: Your login from the contract
- Password: Your password from the contract
- Verify Password: password repeat
- Push the button Clone MAC Address
- MTU: 1472
- ReconnectMode- connection setup mode Always-on for permanent connection
- Save the settings with the button Save Settings and wait for the router to reboot.

Configuring PPtP (VPN) when automatically obtaining a local IP address (DHCP)
- In field My Internet Connection is: choose Russia PPTP Dual Access
- Select a connection with dynamic address assignment by your ISP Dynamic IP
- Push the button Clone MAC Address
- Server IP / Name- IP / Server name of the provider (ppp.lan or 10.10.3.36)
- PPTP Account- username for authorization in the provider's network
- PPTP Password- password for authorization in the provider's network
- PPTP Verify Password- repeat the password for authorization in the provider's network
- MTU value - 1372
- ReconnectMode Always for permanent connection
- Save Settings

Configuring PPtP (VPN) with a static local IP address
- In field My Internet Connection is: choose Russia PPTP Dual Access
- We put a point opposite Static IP
- IP Address: We drive in your IP address under the contract
- Subnet Mask: We drive in the mask under the contract
- Gateway: We drive in the gateway under the contract
- DNS: We drive in the DNS of your provider (Rostelecom Omsk - 195.162.32.5)
- Server IP / Name: ppp.lan
- Username: Your login from the contract
- Password: Your password from the contract
- Verify Password: Your password from the contract
- Auto-reconnect: Always-on
- MTU: 1372
- ReconnectMode- connection establishment mode. Please select Always for permanent connection
- Save the settings by pressing the key Save Settings.

NAT when automatically obtaining an IP address (DHCP)
- My Internet Connection is: choose Static IP
- Push the button Clone MAC Addres.
- Save the settings by pressing the key Save Settings.

Setting up Wi-Fi on the router
In the router interface, go to the tab Installation (SETUP), menu Wireless Setup... Button Manual Wireless Connection Setup.

- In chapter WI-FI PROTECTED SETUP from point Enable It is better to uncheck the box, since not all wireless adapters support Wi-Fi Protected Setup technology;
- Specify ID SSID Your wireless home network (tochka) in the field Wireless Network Name(dlink by default)
- Select a wireless channel, any channel from the dropdown list Wireless Channel
- Select wireless security mode
- In the dropdown list Security Mode select Enable WPA / WPA2 Wireless Security (enhanced) is the safest way to protect your wireless network
- Cipher Type - TKIP
- PSK / EAP - PSK
- In field Network key You must enter any set of numbers, from 8 to 63. They also need to be memorized so that you can specify them when connecting to the network
- Click on the button Save Settings to apply and save the settings

Saving / restoring router settings
- To save the current settings of the router, press the button Save(parameter Save Settings To Local Hard Drive). The settings file will be saved to the specified location on the hard disk.
- To restore the settings from the file, you must click the button Overview, specify the path to the file with the settings, then click the button Upload Settings.
Attention! Pressing the button Restore device will restore factory settings!

Before proceeding with configuring the router, let's check the settings of the local network connection. For this:
Windows 7
1. Click on " Start", "Control Panel".
2. Click on " View network status and tasks".

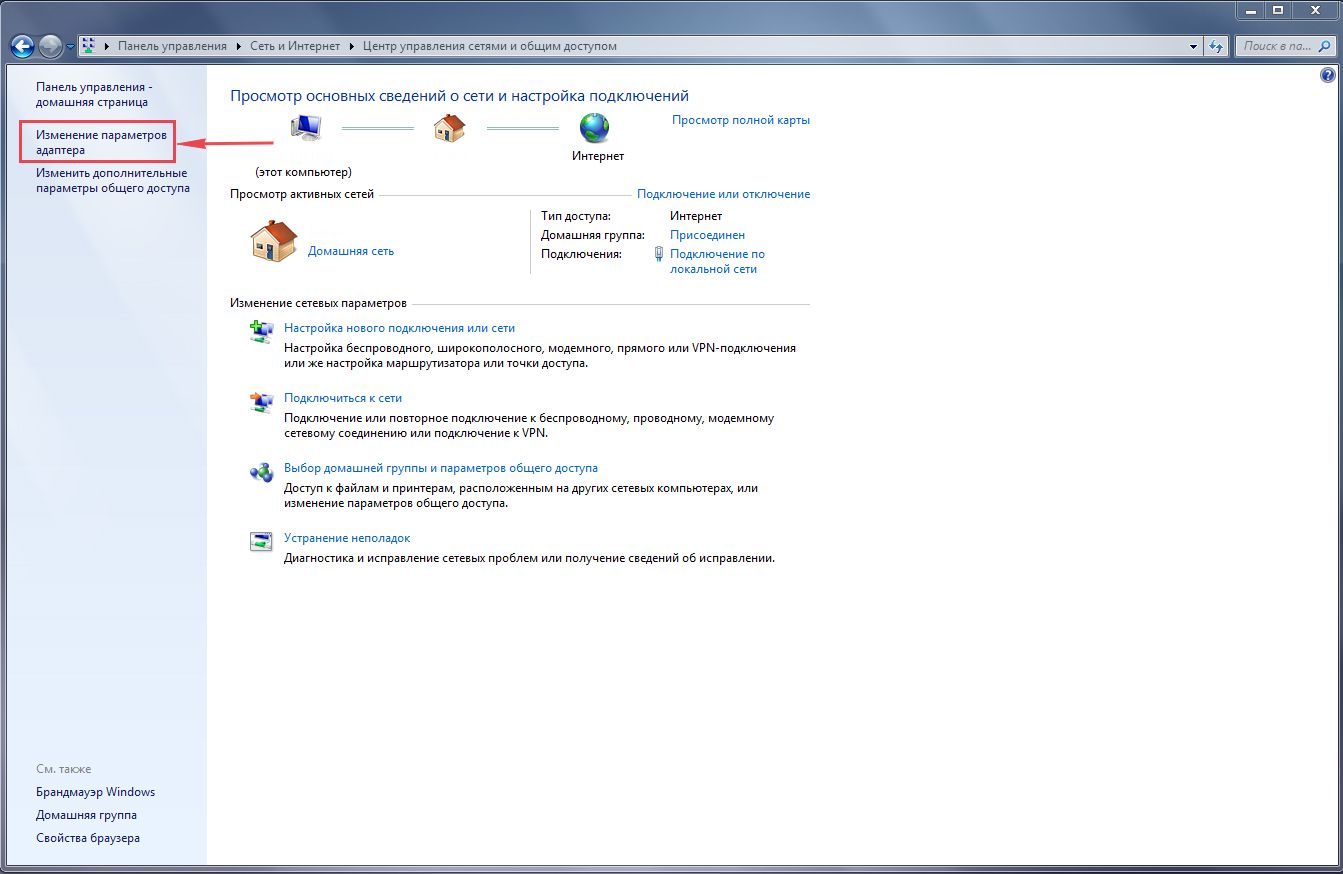
3. Click on " Change adapter settings".
4. LAN connectionProperty".

5. Select from the list " Internet Protocol Version 4 (TCP / IPv4)"and click" Property".

6. "and" ", then press the button" Ok".

Windows 10
1. Click on " Start", "Options".

2. Click on " Network and Internet".

3. We choose " Ethernet"and click on" Configuring adapter parameters".

4. In the window that opens, we see " Ethernet". Click on it with the right mouse button, select" Property".

5. Select from the list " IP version 4 (TCP / IPv4)"and click" Property".

6. In the window that opens, you need to check the boxes " Obtain an IP address automatically" and " Obtain DNS server address automatically", then press the button" Ok".

Router connection D-Link DIR-615 to the computer
The next step is to connect the router D-Link DIR-615 to your laptop or personal computer. To do this, you need to connect the cable that the provider led you to the port of the router, where it is signed "INTERNET", in older models this port is signed as "WAN"... The cable that came with the router, connect one end to a laptop or computer, connect the other end to one of the four ports, which are marked in black on the router (the colors of the ports may differ depending on the version of the router). And yes, don't forget to plug in the power cable.

D-Link DIR-615 router authorization
So, we connected the router, now you need to get into its web interface through any browser (be it Google Chrome, Mozilla Firefox, Internet Explorer, etc.). To do this, open the browser and type in the address of the router in the address bar: 192.168.0.1
- Username - admin
- Password - admin
So, we drive in the data and press " Enter"

Configuring the router D-Link DIR-615.
And finally we got to the web-interface of the router and now you need to configure the equipment. The first step is to secure the wireless network by setting a password for wi-fi. Then you will need to find out what type of connection is used to access the Internet, it is PPTP, L2TP or PPPOE. You can find out by calling your provider (this is an organization with which you have concluded an agreement for the provision of Internet services). So, let's start configuring the router. First, let's change the language of the Web interface to Russian. To do this, move the mouse cursor over the word " English"and choose" Russian"

Setting up a password for wi-fi on a router D-Link DIR-615.
1.
Choose from the menu of the Web interface " Wi-Fi"and we get into" basic settings"
2.
Let's check " Enable wireless connection" and " Broadcast wireless network"must be ticked.
3.
Below in the line " SSID:"come up with and specify a name for your wireless network, this name will continue to light up when you connect to the network.
4.
"Country" - "Russian Federation", "Channel" - "auto", "Wireless mode" - "802.11 b / g / n mixed".
5.
Click " Apply".

6.
On the menu " Wi-Fi"choose" Security Settings".
7.
In line " Network Authentication:"choose" WPA2-PSK".
8.
In line " Encryption key PSK:"you need to come up with and drive in a password for the wireless network that we created above.
9.
Click " Apply".


Configuring PPTP on a router D-Link DIR-615.
1.
Net", we get into the settings" WAN".
2.
Click " Add".

3.
In point " Connection type:"choose" PPTP + Dynamic IP".
4.
Check the box next to " Connect automatically".
5.
Username:"), password (in the line" Password:Password confirmation:VPN Server Address:").
6.
Apply".

Configuring PPTP with a static IP address on the router D-Link DIR-615.
PPTP with static IP on the router D-Link DIR-615
1.
In the menu of the web interface, select " Net", we get into the settings" WAN".
2.
Click " Add".
3.
In point " Connection type:"choose" PPTP + Static IP".
4.
Below in the " IPIP address:", subnet mask on line" Netmask:", main gateway on line" Gateway IP:"and DNS in the line" Primary DNS Server:".
5.
Check the box next to " Connect automatically".
6.
Below we drive in the Username (in the line " Username:"), password (in the line" Password:"), confirm the password (in the line" Password confirmation:") and indicate the server address (in the line" VPN Server Address:").
All of the above data is provided to you by the provider (the Organization that conducted the Internet for you).
All these data are usually prescribed in the contract with the provider. If for some reason you could not find them, you need to call your provider's hotline and find out how you can get them.
7.
After all the manipulations with the settings, press the button " Apply".

Configuring L2TP on a router D-Link DIR-615.
1.
In the menu of the web interface, select " Net", we get into the settings" WAN".
2.
Click " Add".
3.
In point " Connection type:"choose" L2TP + Dynamic IP".
4.
Check the box next to " Connect automatically".
5.
Below we drive in the Username (in the line " Username:"), password (in the line" Password:"), confirm the password (in the line" Password confirmation:") and indicate the server address (in the line" VPN Server Address:").
All of the above data is provided to you by the provider (the Organization that conducted the Internet for you).
All these data are usually prescribed in the contract with the provider. If for some reason you could not find them, you need to call your provider's hotline and find out how you can get them.
6.
After all the manipulations with the settings, press the button " Apply".

Configuring L2TP with a static IP address on the router D-Link DIR-615.
Let's consider the connection setup L2TP with static IP on the router D-Link DIR-615... Usually, a static IP address is provided to legal entities, or as an additional service to the basic tariff for individuals.
1.
In the menu of the web interface, select " Net", we get into the settings" WAN".
2.
Click " Add".
3.
In point " Connection type:"choose" L2TP + Static IP".
4.
Below in the " IP"specify the ip-address in the line" IP address:", subnet mask on line" Netmask:", main gateway on line" Gateway IP:"and DNS in the line" Primary DNS Server:".
5.
Check the box next to " Connect automatically".
6.
Below we drive in the Username (in the line " Username:"), password (in the line" Password:"), confirm the password (in the line" Password confirmation:") and indicate the server address (in the line" VPN Server Address:").
All of the above data is provided to you by the provider (the Organization that conducted the Internet for you).
All these data are usually prescribed in the contract with the provider. If for some reason you could not find them, you need to call your provider's hotline and find out how you can get them.
7.
After all the manipulations with the settings, press the button " Apply".

Setting up PPPOE on a router D-Link DIR-615.
1.
In the menu of the web interface, select " Net", we get into the settings" WAN".
2.
Click " Add".
3.
In point " Connection type:"choose" PPPOE + Dynamic IP".
4.
Below we drive in the Username (in the line " Username:"), password (in the line" Password:Password confirmation:").
All of the above data is provided to you by the provider (the Organization that conducted the Internet for you).
All these data are usually prescribed in the contract with the provider. If for some reason you could not find them, you need to call your provider's hotline and find out how you can get them.
5.
After all the manipulations with the settings, press the button " Apply".

Configuring PPPOE with a static IP address on the router D-Link DIR-615.
Let's consider the connection setup PPPOE with static IP on the router D-Link DIR-615... Usually, a static IP address is provided to legal entities, or as an additional service to the basic tariff for individuals.
1.
In the menu of the web interface, select " Net", we get into the settings" WAN".
2.
Click " Add".
3.
In point " Connection type:"choose" PPPOE + Static IP".
4.
Below in the " IP"specify the ip-address in the line" IP address:", subnet mask on line" Netmask:", main gateway on line" Gateway IP:"and DNS in the line" Primary DNS Server:".
5.
Below we drive in the Username (in the line " Username:"), password (in the line" Password:") and confirm the password (in the line" Password confirmation:").
All of the above data is provided to you by the provider (the Organization that conducted the Internet for you).
All these data are usually prescribed in the contract with the provider. If for some reason you could not find them, you need to call your provider's hotline and find out how you can get them.
6.
After all the manipulations with the settings, press the button " Apply".

Connecting a computer to wi-fi
After connecting and configuring the router, you need to connect the computer to a wireless network (wi-fi), consider connecting to wi-fi in two operating systems, this is Windows 7 and Windows 10:
Windows 7
Video instruction
1.

2. Sultan

3.
Connect automatically" and press
"Connection".

4. You must specify " Security keyOK".

5.

Windows 10
Video instruction
1. In the lower right corner of the desktop, we find the wireless network (wi-fi) icon, click on it with the left mouse button.

2. A window pops up with a list of available wireless networks. We choose a wireless network, in my case it is a network " Sultanova"(You choose the network that was named when).

3. After selecting a network, check the box next to " Connect automatically" and press " Connect".

4. You must specify " Security key"this is the password of the wireless network that you specified during. After you specified the key, click" Further".

5. We are waiting, perhaps a couple of seconds and you are connected to your wireless network.
