Lg k7 won't connect to wifi. What to do if the Wi-Fi adapter does not connect to the network? External Wi-Fi faults
Very often, when connecting to a wireless network, users encounter various errors. Probably the most common one is that Windows was unable to connect to the WiFi network. What is this error and how can I fix it? This is what will be discussed.
But before moving on to the connection problems and solutions, first a few words about how the wireless network works. The fact is that WiFi routers are usually used to create private groups. It is to them that the computer subsequently connects. This means that first of all, if you have any problems with the connection, you need to check the access point (router).
Why Windows can't connect to WiFi network
There are more than enough reasons for the appearance of such an error. It is simply impossible to consider each of them. Therefore, let's take a look at the most common problems with connecting to a WiFi network and their solutions. So, if the computer sees the network, but cannot connect to it, then the following parameters should be checked:
- Checking the correctness of the introduction.
- Router settings.
- Driver check.
- Wireless settings in Windows.
- Firewall and antivirus settings.
There may also be software and driver conflicts, and even a malfunction of the wireless adapter. Let's go in order.
Checking the network key
Very often, the reason for the connection error is a mismatch in the password. This means that you simply made a mistake when entering the key. Therefore, first of all, you should check the correctness of writing the code. Try reconnecting to the network, but carefully check the keyboard layout and if Capslock is enabled.
How to find out the password for your WiFi in the router parameters: Video
Configuring the router
If you are still sure of the correctness of the entered key, then it is worth checking the settings of the router. To do this, connect to it with a cable. Next, open your favorite browser and write down the IP of the router in the address bar. It is indicated on the bottom of the device, as well as in the instructions (if any).
How to easily find out the IP address of a WiFi router: Video
Now we need to enter a password and login. Initially, these are admin, admin, respectively. If you have already changed this data, then enter your values. After that, go to the settings menu. Everything is simple here. We are interested in setting up a wireless network (Wi-Fi). Find the Security Settings. Find the network key in the security settings. You can change it if necessary.
Next, you should check the MAC address filter. It is possible that you, or someone else who has access to the router (not excluded), entered your computer into the filter by MAC address. Because of this, even with the correct password, you will not be able to connect to the WiFi network.
To check this, you need to go to the "MAC-Filtering" item in the wireless network settings and check if there are any devices there. You do not need to find out the MAC address of your computer, you just need to remove all devices available there from the list.
How to set up a MAC filter in a router: Video
It is also recommended to reboot the router, as they may malfunction. This applies to absolutely all models, from the budget ones to the most expensive ones. If you have done all the above steps, and Windows still failed to connect to the WiFi network, then go to the operating system settings.
Driver check
First of all, it is necessary. The fact is that any version of Windows needs hardware software, since a special program is needed for a particular module to work. The operation of the equipment (in our case, the wireless module) also depends on the correctness of its operation.
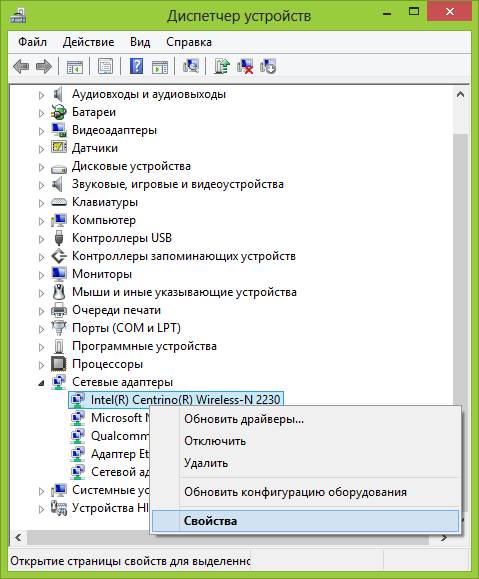
So, you can check this in the task manager. You can open this service in any version of Windows through the properties of my computer. Find "My Computer" on the desktop or in the start menu, right-click on it and select "Properties". In the window that appears in the left menu, we find the "Device Manager". Now we need to find a branch called "Network adapters" and open it.
If there is no such branch, then this indicates that there are no drivers for network cards. In this case, they need to be installed. But if you can turn on the WiFi module, and the computer sees available networks, but cannot connect to them, then the drivers must be installed. The only question is the correctness of their work. So, open the network adapters branch. It must have at least two devices:
- Network adapter.
- Wireless Network Adapter
In addition, there may be Bluetooth devices and other network modules. If the wireless adapter is highlighted with an exclamation mark, it means that the drivers are not working properly. There may be other problems as well. You can find out the error by right-clicking on the module and selecting "Properties".
In the window that appears, in the "General" tab (as a rule, it opens first) you will find the item "Device status". The error and its number will be indicated here (if the device is not working properly). Knowing the error, you can find a way to fix it. As a rule, reinstalling the driver solves all problems.
Reinstalling the driver is very easy. It is available on the disc that came with the laptop. But even if there is no such disk, you can download them on the official website of the laptop manufacturer. After downloading and installing, check their software operation as above and try to connect to your network.
How to Reinstall WiFi Driver: Video
Configuring a Wireless Connection in Windows Management Console
First of all, we need to open the Network and Sharing Center. It is this tool that allows you to manage all network connections, including wireless ones. This can be done in several ways, but we will consider the simplest one.
Find the network icon in the tray (lower right corner), right-click on it and select "Network and Sharing Center". In the window that appears, we are primarily interested in the "Change adapter parameters" item. Now we are in a service that allows you to manage connections. We find the shortcut "Wireless network". Click on it with the right mouse button and select "Properties".
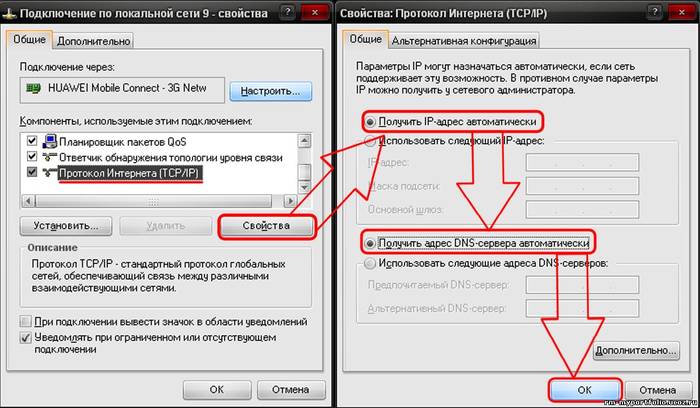
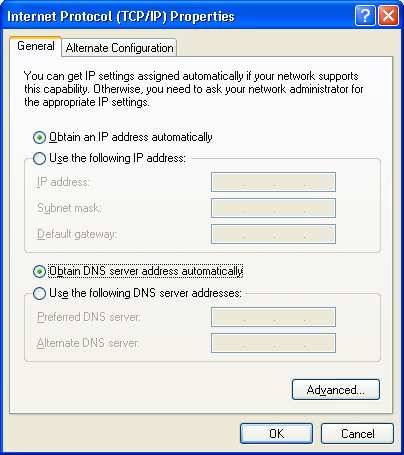
In the window that appears, in the "Network" tab, you need to find the Internet protocol version 4 TCPIPv4. Select it and click "Properties". In the menu that appears, check the box “Obtain an IP address automatically”. A little below it is also worth setting a marker on automatic data acquisition. Click "OK", close the window and try to connect to the network.
If Windows still cannot connect to the network, then we return to the control center and select the item "Manage wireless networks". Find the required network in the list and click "Adapter Properties". Next, we check the TCPIPv4 protocol, as described above. Trying to connect again.
If the problem persists, enter the "Manage wireless networks" menu, find and delete the required network. Don't worry, Windows will find it anyway. This is necessary to reset all connection parameters.
System diagnostics
If you have completed all the above steps, and the system still gives an error and Windows was unable to connect to the WiFi network, then you need to run diagnostics. There are several ways to enable it. It should be noted that in the event of any errors, as a rule, the system itself offers diagnostics. But if, nevertheless, this did not happen, then the fastest way to start it is to right-click on the network icon in the tray and select "Troubleshoot".
After that, the system will automatically start searching for and eliminating errors. You just have to follow the prompts on the screen. It should be noted that such diagnostics can be performed several times in a row, since Windows does not always find and fix the error the first time.
We've covered the most common errors that you can fix on your own. However, there are also more serious mistakes that require an individual approach. All records of problems and crashes are contained in the Windows log. If necessary, you can view it and find out the error code associated with the wireless connection. This will help you find a solution faster.
How to view the Windows event log
On all operating systems, this log is located in one place. In order to open it you need to find the shortcut "My Computer". It can be on the desktop, in the start menu, or in the file manager. Click on it with the right mouse button and select the "Management" item.
In the window that appears in the left menu, we find the "Event Viewer". Open it and find the "Windows Logs" folder. We open it. Now we find the item "System". This is the required log. We open it. When opening, you will need to wait a little, since the system has a huge number of records, which take some time to scan.
In this log, warnings are marked with yellow triangles with exclamation marks inside, and errors are marked with red circles. Now it just remains to find an error in the list related to the Internet connection or local networks, and open it by double-clicking the left mouse button. In the window that appears, you will see all the information about the error, as well as its code, by which you can find a solution to the problem on the Internet.
Recently helped one of the blog readers to solve a problem with a wireless network. Its essence boiled down to the fact that his phone does not connect to the WiFi router. Moreover, it was not just some cheap Chinese Lenovo, but an expensive (although also Chinese) fashion iPhone 6S. We spent a lot of time, tried many different options and, in the end, found a solution to the problem. Looking ahead, I will say that the "root of evil" was the misconfiguration of the home router.
After all this, I decided to bring all our actions into one universal instruction - what to do if the tablet or phone does not connect to Wi-Fi, does not see the network, or sees, but cannot connect to it. Go.
1. The phone does not see the WiFi network
The most common reason is the mismatch between the region settings for the router and for the tablet or phone. The fact is that almost all home routers and access points that are sold in Russia have the "Russia" region by default, which uses 13 radio frequency channels. But phones, especially those brought from abroad, have a different region by default, in which there can be 10 or 11 channels. It is this sore that is most often found in iPhones and iPads that came to us from the USA. The funny thing is that you can connect to a router, enjoy the pleasures of a wireless network for a while, and one fine moment discover that the phone does not see the WiFi network of the router. The solution is very simple. First, restart your router. With a high degree of probability, after restarting it will take another radio channel and everything will work fine again. In order not to fall into the trap again, you can go to the settings of the router by entering its IP (or) in the address bar of the browser. After that, you need to go to the basic WiFi settings:

In the "Region" field, try to put the value "USA" instead of "Russia":
You can do without changing the region. In the "Channel" list, set the value 1 or 6 instead of "Auto":

As a rule, after that, iPhones no longer lose their wireless network and everything works like a clock.
2. Unable to connect to Wi-Fi
In this case, usually all devices see the wireless network without problems, but when they try to connect to it, they are simply discarded. Several options are possible here:
- Endless connection
This usually happens when the communication standards used on the devices do not match. For example, 802.11n is forced on the router, and 802.11b or 802.11g is used on the smartphone. Or vice versa. Therefore, it is best to set the mixed type on the router - 802.11bgn.

- Endless authorization
This very nuisance can happen if the password on the router is changed, and the old one remains in the smartphone's memory, which is why it cannot connect to the WiFi network. Try to find it in the list of available ones, click on it and in the menu that appears, select the option "Delete this network".

After that, select from the list again and try to connect.
Doesn't help - then go to the router in the security settings and try to set the "WPA2-PSK" standard with "AES" encryption.

If this does not help, turn off security completely and observe how the connection will go.
- The message "Obtaining an IP-address" hangs
This usually happens when the DHCP server is disabled in the router settings. We go into the web configurator, find the LAN or DHCP section and see that the DHCP server item is set to "Enable".

Sometimes it can get stuck on getting an IP address due to the fact that a static IP address is registered in the Wi-Fi settings on the phone or tablet itself. To check this, open the "Settings" -> "WiFi" section and click on the network to be connected. In the menu that appears, select the "Change" item. This will open a window in which you need to check the "Advanced" checkbox. Next, make sure that the "IP-address" field is set to "DHCP".

3. There is a connection, but there is no Internet
Start by checking if other phones, tablets or laptops are working through this Wi-Fi. Are they working? Then we climb into our device, namely "Settings" >>> "Wi-Fi" >>> "Change network":

We check to see if work through a proxy server is enabled by chance.
This option is also possible, albeit very, very rare, when an incorrect or inoperative DNS server is assigned when connecting. It is easy to check it - in the phone, click on the desired network, select the "Change" item in the menu, check the "Advanced" checkbox, the "Manual" IP address and write the complete IP address from the router's subnet, mask and gateway. But in the DNS servers field, enter the following values:
8.8.8.8 77.88.8.8
On an Android phone or tablet, it looks like this:

These are public DNS from Google and Yandex. They are 100% working, which will completely eliminate this option.
If none of the above methods helped, then try this. Take your device and check on a different wireless network - from a friend, acquaintance or comrade. If the phone or tablet does not connect to the WiFi router there either, then the problem is clearly in your device and it must be brought in for repair.
If your laptop laptop does not connect to Wifi, writes with limited access or without access to the Internet, you should understand this problem in more detail.
There are several reasons for the problem:
- outdated or missing drivers on a laptop;
- breakage of the Wifi card itself;
- incorrect router configuration, etc.
We are looking for the culprit - laptop or router
To understand why the laptop does not connect to the Internet via Wifi, consider all sides of this issue.
The first step towards solving the problem is identifying the culprit. Problems with Wifi can be in the laptop itself, or in the router. Finding the reason is important so as not to make things worse by changing all the settings.
First, try connecting another device via Wifi - a phone, tablet, laptop. The Wifi button on the router should be green. If the connection is normal on other devices, then the problem is with your laptop. And if the selected network does not work everywhere, then the cause of the problem is in the router and its settings.
If the reason is in the router, then you still need to check if there is Internet at all. Connect the cable to your laptop or computer directly. If everything works, then the problem is definitely in the settings of the router, and if not, contact your Internet provider to fix the problem.
Checking the version of the network driver
A common reason for missing Wifi on a laptop is an incorrectly installed or outdated network driver. This is evidenced by such an icon at the bottom right of the notification panel.

It shows that there are no connections available (although they actually are). This often happens when reinstalling the system. Drivers that worked on Windows XP may not work with Windows 7, and Windows 7 may not work on Windows 8.
You need to check if the drivers are installed and, if so, their version, as follows:

- here already look for the "Network adapters / cards" tab and in it your network adapter. It can be named differently, it all depends on your laptop;
If there is a device, and there are no exclamation marks near it, then everything is in order with the driver.
To find out its version, you need to right-click on the driver and select "Properties".

In the window that opens, select the "Driver" item and see its development date.
Hardware enable adapter
Is the network device driver working, but the network is still down? Or did the Internet work before, but now there are no available connections? This indicates that the network adapter on the laptop is turned off.
This is done differently on different models, but often you need to press the FN + F2 key combination at the same time or FN + another key with a drawn Wifi icon.
Some models have a dedicated button on the case.
Video: How to distribute wi-fi from a laptop
In the system itself, you can also enable the wireless network.
If you have Windows 7, then follow these steps:
- open "Start";
- select "Control Panel";
- "Network and Internet";
- Network and Sharing Center;
- "Change adapter settings".
If in the window that appears, the wireless network icon is colorless, this means that the network is inactive and must be turned on by right-clicking
To do this in Windows 8, then:
- click the "Options" button on the right panel;
- hereinafter - "Changing computer parameters";
- select "Wireless network". It must be enabled.

You can perform the same operation as for operating system 7 to make sure the network is on for sure.
In Windows XP, it's even easier to do:
- "Start";
- "Control Panel";
- "Network connections";
- enable wireless network by right-clicking.
The inclusion of the adapter will be indicated by such an icon in the notification bar.
Laptop stopped connecting to WiFi
If the laptop used to connect to this Wifi network, and then suddenly stopped (the settings did not change), a virus may be the cause of the problem. It can damage the file or confuse settings. Even if the antivirus check showed nothing, the installation of some program on the laptop could knock down the settings.
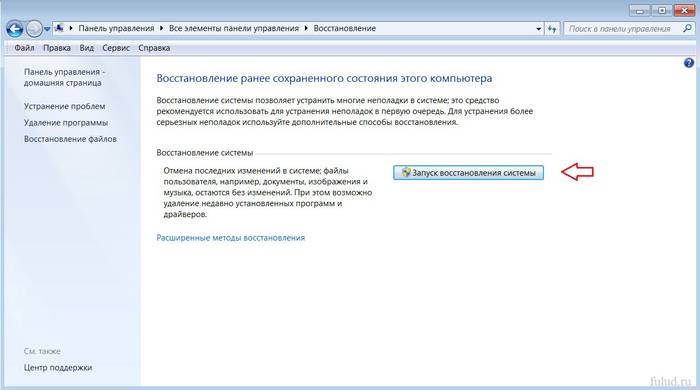
Simple removal of this program will not restore the network. Alternatively, you can delete the network connection and recreate it, you can reset the router settings and connect it from scratch, you can look for a knocked down parameter on a laptop for a long time, but the easiest way is to restore the system to the level the program got into it.
We restore the system
Starting this process:
- "Start";
- "All programs";
- "Standard";
- "Service";
- "System Restore" ;
- "Launching System Restore";
- "Further";
- select a restore point (updating and installing programs is recorded in the registry, therefore, in the window that opens, select the desired recovery time);
- "Further".

The recovery process will start and when it finishes, the laptop will restart. If the problem is malware, then Wifi will work after that.
Updating hardware drivers
If, when checking the network adapter, there is an exclamation mark next to the driver icon in the device manager, right-click on it and select “Enable”.
The absence of a driver entry means that it needs to be installed. Then it must be downloaded from the manufacturer's official website. Or use the driver disc that comes with your laptop.

You can find out the name of the driver from the information in the device manager, in the description for the laptop or using a special program.
You can update the driver by right-clicking on it and choosing Update. Or go to its properties and select this item there. Even if everything is in order with the driver, it is recommended to download and install it again.
Checking connection settings
To check your connection settings:

When trying to connect to the selected Wifi network for the first time, a password entry message appears. Next, there should be an automatic connection to the network when the laptop is turned on. But if the laptop does not want to automatically connect and asks for a password every time, check if the "Connect automatically" checkbox under the network name is checked.
Internet without access or limited on Windows
It happens that after completing the connection, identification occurs without access to the Internet via Wifi and a yellow triangle appears next to the network icon on the panel:

Also, if you go to the "Network and Sharing Center".
Enter the connection properties. If everything looks like this in the window and says "Without access to the network" in the IPv4 connection, the problem is with incorrectly entered IP addresses or with a DHCP server disabled on the router.

Check if you forgot to check the boxes for receiving addresses automatically. But if they are already there, then try to do the opposite - register everything manually. You can get the network address in the router settings. But basically the IP address is the standard 192.168.1.X and the DNS is 192.168.1.1.
If the connection properties show an IPv4 connection "Without Internet access", then the DNS server addresses or router settings are incorrectly entered.
In this case, we only manually change the DNS settings, leaving the IP address automatic.

- 8.8.8.8 is Google's public DNS server;
- 77.88.8.8 - Yandex.
Some connection errors
If your laptop connects to the Internet, but sites load slowly, you might have gone too far out of the router's range. And if the problem does not disappear with a high Wifi signal, most likely you have many other networks caught and the Wifi channel is busy.
This changes in the settings of the router. The default is - 6, you try changing it from 1 to 13, and watch the speed change. You can also try the "Auto" option.
If your laptop connects to Wifi but doesn't go online and programs like Skype and ICQ are working, check the DNS addresses. They should be automatic or registered, as in the paragraph above.
In case the laptop does not immediately connect to the Internet:
- open the "Start" menu;
- "Control Panel";
- "System and safety";
- "Power supply";
- Power Button Actions;
- in the "Shutdown Options" section, uncheck the "Enable Fast Startup (Recommended)" box;
- "Save".
Windows could not connect to ...
After selecting the desired network and entering the security password for it, I suddenly knocked out the error "Windows could not connect to ...":
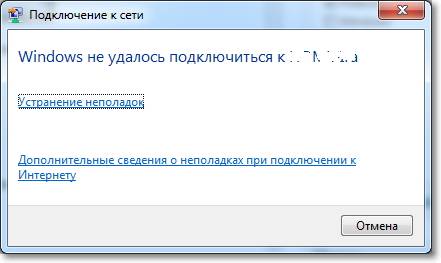
You can try clicking "Troubleshoot" and see the written reason. The network devices and settings will be checked.
Also, this inscription appears due to a router error. Try restarting both it and the laptop.
In Device Manager, in the properties of the network adapter, disable "Allow this device to be turned off to save energy."
Long authorization process
If, after entering the Wifi security key, while connecting to the network, the inscription "Obtaining an IP address" is displayed for a long time, and after that the connection is terminated and tries to reconnect, this indicates an error in setting the IP addresses. In this case, in the connection properties, you need to configure the automatic acquisition of an IP address. And if it doesn't help, write them manually.
Unidentified network - what to do
If the laptop does not identify the network, check if the internet cable is connected to the router. Reboot your router and laptop. You also need to check the IP addresses and DNS servers, which was written about in the above paragraphs.
>There can be several reasons for the lack of Wifi on a laptop, the main ones are an incorrectly configured router (see the instructions for configuring your model), problems with the network adapter (outdated or not installed), an incorrect IP address or DNS server.
Often, after the long-awaited purchase of a brand new laptop, connecting a router for distributing WiFi, or simply completely reinstalling all the software of the device, the computer, for some unknown reason, cannot connect to the Wi-Fi network. Every second person finds himself in a situation where the laptop does not connect to the Internet via WiFi, and this, to put it mildly, causes discontent. The laptop simply refuses to see all kinds of Internet networks, and the special icon itself, which is located on the bottom notification panel of the device, together with the usual little white stripes, shows an exclamation mark (connection is limited) or, even worse, a red cross (a personal computer does not see networks at all).
Why won't WiFi connect on my laptop?
The reasons for this behavior of your laptop are incredibly many. In most cases, the problem lies in the fact that the special WiFi module cannot be turned on. In this case, the laptop will work and detect all networks, but during connection it will write that the operating system, unfortunately, could not connect to this network. How to solve the problem if the laptop sees WiFi but does not connect? The first step is to make sure that all the necessary drivers are installed on the so-called network adapter.
Oddly enough, this happens most often with laptops running on the Windows 7 operating system. As noted earlier, there are many reasons why your laptop cannot connect to the wireless network. Since there are so many reasons, it means that there are also many ways to still force a personal computer to connect to the Internet. Is your laptop not connecting to WiFi? Windows may not have to do with it!
The laptop is not always guilty!
The problem may be not only in the PC, but also, as practice shows, in the router itself (in other words, the access point to the network). If the laptop does not connect to the Internet, then first of all, you should determine what the problem is: in a PC or in a router. How to do it? There are several ways to confirm or deny the fact that the problem is with the router, the easiest of which is to help a neighbor. Just visit your neighbor. Ask for a password from the network to check your laptop. If he can connect, then everything is in order with him, and the problem is hidden in the router. If the laptop does not connect to WiFi, writes the same thing as at home, then the problem is in the laptop.
Most likely difficulties
The most common problems with connecting a laptop or netbook to a wireless network are as follows.
- WiFi does not turn on on a personal computer. This is one of the easiest problems to solve, so if you find yourself in such a situation, you should not worry - everything will work out!
- The device does not detect the network of your personal router, although it can see neighbors and others. This problem is not solved as easily as the first, but the main thing is, what? The main thing is that it is being solved!
- The personal computer sees all networks, but cannot connect to any of them, and writes: "Failed to connect." It is possible to solve this problem, because it is the most common one. Of course, it's not a fact that you can fix everything yourself, but it's worth a try, especially since there won't be any complicated actions.
- The PC quickly connects to WiFi networks, but under no circumstances opens Internet pages in browsers. The problem is also more than common, you can solve it yourself, but, unfortunately, not always. You may need to call a professional technician to fix this.
Enabling WiFi on a laptop
Unfortunately, not all laptop models have default settings, which is why the laptop does not connect to the Internet via WiFi. In some situations, you still have to perform various actions in order for the laptop to connect to a particular wireless network and no longer bother its owner. This method can really help, but only for those users who have not reinstalled the Windows operating system on their computer. If you've done this before, the advice may not help. But worth a try!
Key combination, dedicated switch
There are laptop models in which, in order to enable the ability to connect to a wireless network, you need to press the required key combination on the keyboard. In such PCs, the first mandatory button is Fn, and the second is a special hardware key located somewhere from F1 to F12. Most often, these keys are F2, F6 and F10 - it depends on the manufacturer of the personal computer, as well as its model.

If your laptop does not belong to those mentioned above, then on your laptop model the network is turned on using a small switch. The switch can be anywhere on your PC - back, bottom, side. Finding it will not be so easy, but then you just need to move the slider from "Off" to the opposite side of "On". Note: the special keys will not work if you have reinstalled the operating system. However, try it anyway - it wasn’t. On this, your problems about the fact that WiFi does not connect on a laptop can be solved.
Turn the wireless capabilities of your laptop on and off
It is very important to know that after you have turned on the wireless adapter using the special keys, you may also need to turn it on "from the inside", that is, in the operating system of the laptop itself. There are only 2 options: Windows 7 and Windows 8.
Enabling WiFi in Windows 7
If for some reason your personal laptop does not connect to WiFi, you will have to try to fix it yourself. First of all, go to the PC control panel, select "Network Management" there, then find the button "Change network adapter parameters".

For faster execution, you need to press the Win + R key, and then enter the simple command ncpa.cpl. Pay your attention to the network icon, if there is simply no one there, skip this item. If, nevertheless, there is a wireless network icon that is in a disabled state (that is, it has a gray color), right-click on the object, in the drop-down menu select "Enable network" or simply "Enable".
Enabling WiFi in Windows 8
Everything is a little more complicated here. If you don't understand why the laptop won't connect to WiFi, this option is worth trying.
On the right panel, select "Options", then click on "Change ...", after that you need to find the "Wireless network" button. Make sure the button is on, if not, turn it on yourself.
Now we follow all the same steps as in the Windows 7 operating system. Simply put, you must completely make sure that the ad hoc wireless connection on your computer is turned on.
Also, regardless of the OS version, you may have to turn to a program that specializes in wireless networks and connecting to WiFi. Almost all manufacturing companies have their own programs with the word "Wireless" or "WiFi" in the name.

Drivers
Another reason why the laptop does not connect to WiFi, writes: "Connection limited" or something like that, is the hated PC drivers. This happens especially often after the operating system has been reinstalled on a personal computer. You may have been able to reinstall Windows yourself, but you were unable to install the drivers from the official website of the company that created your laptop.
There are also situations when the computer automatically installs the necessary drivers after installing a new OS, but the PC itself has never done anything right. Even if you installed the drivers using some program, you still need to go to the official website of the company and download all the necessary drivers there. Only after installing them will you be able to connect to the WiFi network, if that was the case, of course.
Router
It was already mentioned above that the problem may not be in the computer, but in the router itself, which emits a signal. You can check the health of the router in several ways:


Connection limited
Such an inscription quite often pops up on laptop screens, the owners of which do not understand why WiFi is not connected on the laptop. The solution to such a problem will not take much time, but you still have to do everything exactly according to the instructions, otherwise you can "cheat".
When a person finds himself in a similar situation, panic begins: what to do if WiFi on the laptop does not connect, “Limited” is written, and you still don’t understand anything at all? Don't worry, everything can be fixed. It's another matter that not everything is on your own, but this is not such a big problem.
If you select a network in the list of available ones, then enter the password correctly (if, of course, there is one), then wait for the connection ... and then a message pops up that everything is connected. But on the network icon, there is some kind of incomprehensible exclamation mark icon in a yellow triangle. Hover your mouse over this sign and the system will tell you that the connection is limited. No internet resources will work. What if the laptop does not connect to WiFi, or rather, it connects, but there is no Internet?
Certain problems with providers. Reinstall OS
The situation is that the problem may not be in the router or even in the laptop. If the connection is limited, one of the options for solving the problem is to call the technical support of the provider. Experts will try to solve this problem within 24 hours, perhaps a little more, but after that such problems will not arise.

If the technical support claims that they do not have the problem, but yours, then it is. In this case, when the laptop does not connect to the WiFi network (or rather, it connects, but does not work), you can repeat some of the tips that are a little higher. However, it will be easiest to call some private specialist who, for 200-300 rubles, will completely reinstall Windows for you on any one you want. He will also install all the necessary drivers in order for everything to work, well, and if you wish, if you ask, he can install a good antivirus.
Many more find themselves in a situation where, in fact, nothing is broken, but only a slight failure has occurred in the router. Don't worry, you won't have to reconnect anything, you just need to completely disconnect the router from the cables and wires for 5-10 minutes, so that it "rests" a little. After that, reconnect everything: the Internet cable and the power supply. And after a couple of minutes, the laptop will automatically connect to the network (if this does not happen, do it yourself), and everything will work fine without interruption.
There is also a situation when there are no problems with anything, but suddenly WiFi stops working. What to do in this case? Either call support or restart your router. Or the problem may still be in the laptop. There will be nothing complicated in the actions: you just need to first disconnect from the network, and after a couple of minutes reconnect to it by entering the password. Everything should work, there should be no more such complaints. We hope you have received an answer to the question why the laptop does not connect to WiFi.
Wi-Fi is ubiquitous. It is available in almost all public places and parks, and some private apartments and households have begun to equip Wi-Fi. Manufacturers install such a module in many electronic devices.
Now, not a single computer can do without it, whether it is a stationary or a laptop, and there is no need to remind about phones, TVs and tablets, because even some watches already have a built-in Wi-Fi adapter.
For sure, very soon this function will be present in kettles, door locks, refrigerators, coffee makers, microwave ovens and even air conditioners.
From entertainment, educational and communication uses, wireless connectivity has rapidly grown into an absolute must for everyone. But what to do when there are difficulties with the connection?
Below is a guide on how to quickly and effectively eliminate connection difficulties for various types of electronic gadgets.
Solving Internet Connection Problems
If the user was unable to connect to Wi-Fi from his electronic device, then first of all it is necessary to check the presence of the Internet at the router itself, which broadcasts the wireless signal.
To do this, you need to connect a computer to the router via a wire and see if it will connect to the global network. If not, then difficulties arose in the incorrect settings of the device or on the side of the company of the communication service provider.
If the result is positive, that is, in the case when the PC has access to the Internet via a cable connection, then proceed to the wireless network settings.
Solution
First, make sure that the LED with the "Wi-Fi" icon on the router is active, and also make sure that the Wi-Fi module is turned on in the gadget from which you plan to connect to the network.
If the router indicator is off, you need to open the device's web configurator (you can access it through a browser, and the address is indicated in the device's documentation or on a sticker on the bottom of the device's case) and turn on the network.
In the case when there is no communication activity in the PC or in the mobile device, then reboot the device. When using a laptop, the module is already activated in it by default.
However, the device may have been turned off by some other user to conserve battery power. Then on the keyboard you should find a key with a characteristic image. For example, on "ASUS" you need to hold down the "FN" button and click on "F2".
 On different laptops, switching on is carried out in different ways, for example, on "Acer" and "Lenovo" there are separate switches located on one of the ends of the mobile PC.
 Such a toggle switch just needs to be set to the "On / On" position and the adapter is activated.
Then, after waiting for the router to boot completely, you need to restart your laptop or gadget. An exception can be made only for Vaio laptops from Sony, since they will be connected automatically, but even for these machines, an extra reboot will not hurt.
Activating Wi-Fi in a computer using the operating system
On a Windows PC, you need to do the following:


 When the execution of the described activities did not lead to success and the computer still does not connect to the Internet, then you will have to move on to studying the next paragraphs of this manual.
Software problem
A common problem that causes such a problem is incorrectly installed drivers or their absence.
At the same time, the name of the module is not displayed in the "Device Manager", and it can also be marked with a "!" 
What to do when Wi-Fi module software is not installed?
You only need to complete a few of the following steps:
- Writing out the exact name of the laptop model, that is, it is not easy, for example, "Samsung", and from the documentation or from the packaging of the device, find out its full name. In the case of using a stationary PC, in the same way find out the model of the Wi-Fi adapter itself;
- Log in to the equipment manufacturer's Internet resource and download software for your device;
- The software is installed like any other program; you just need to follow the requirements of the installation wizard. After the procedure, be sure to restart the PC. You can also install it through the "Device Manager", but first you need to extract the driver distribution to a separate directory in the PC's memory. Then in the column "Driver" click "Update" and click "Search on this computer". Next, show the program the location of the directory with the distribution kit and the OS will install the software itself.
If access does not appear, even though the device now sees the network but cannot connect, then the mode is probably set incorrectly in the router's web configurator.
Checking router settings
Open the Wireless tab in the web configurator and set the Mixed mode. In the D-Link instrument interface, this standard is displayed as follows:
In the settings of Zixel devices, you need to set the template, as highlighted in the screenshot below:
 In the case when it is still impossible to access the Internet, then most likely at this stage the computer already perfectly sees the wireless network, but does not connect.
To remedy the situation, you just need to follow the measures described in the next paragraph of this instruction.
Debugging the connection
In such a situation, the "Network and Sharing Center" will display the following picture.
 It is necessary to perform the following actions:

1 scenario:
 This means that the problem is in the Wi-Fi module, which cannot receive an "IP" address, or it is simply not specified correctly.
To fix the problem, you need to do the following:

Scenario 2:
A menu like the following appears:
 This means that the network parameters were entered incorrectly in the web-based interface of the router, or the wrong DNS addresses were specified.
To fix the problem, you should do this:

If logging in again is problematic, the only option left is to simply remove the restrictions in the router's web configurator.
Difficulty connecting to Wi-Fi on an Android device
Before starting to perform the measures described below, it is recommended to make sure that the broadcast access point is working properly, and for this, connect to it from another device, for example, from a laptop. It is possible that the problem is not with Android, but with the translator's settings.
![]() Often, an Android gadget normally recognizes a wireless network, but cannot make a connection.
Often, an Android gadget normally recognizes a wireless network, but cannot make a connection.
This often happens through the fault of the owner of the mobile device, since there is a high probability of an error when entering the access key to the protected network. It is necessary to carefully check each character of the code and the difficulties will quickly disappear.
 The next most popular reason is that the phone or tablet does not support the kind of protection that is specified in the router's web configurator.
You just need to change this type by entering the device settings interface, after this adjustment, the connection will occur without problems. 
Application of third-party applications
Many utilities are available for free use in the Google Play Store, designed to solve all the difficulties that arise with connecting Android devices to Wi-Fi.

The application shows the state of the connection and all points available in the range. According to information from the developers, the utility is able to increase the signal reception power if it is weak or the translator is located too far away.
And also, and vice versa, to reduce the strength of Wi-Fi with an excessively strong signal, this is especially true when the device is in close proximity to the router.
To take advantage of the utility, you just need to install it, and then, after launching it, it will automatically fix all the problems and then work in the background, so, as a rule, users do not have any difficulties with the connection.
When is the cause of the firmware malfunction?
Sometimes, after installing a new version from a third-party developer in a gadget, connection problems appear. In this case, the best option would be to reset the device parameters to the factory state.
Analysis of the characteristics of a wireless signal translator
If the filter for "MAC" addresses is activated in the web configurator, then the gadget can simply be on the list of unwanted clients. In this case, simply disabling this filter will help, or you will need to exclude the device from the black list. For this purpose, the MAC address of the device can be found by entering the settings of a smartphone or tablet.
The gadget from "Apple" does not want to connect to Wi-Fi
Often, iOS devices, when trying to connect to the module, start to write: "Failed to connect to the network." Why Apple has not developed guidelines on how to deal with such situations is still unclear. Below is a homemade technique to fix this error.
 Only a few of the following steps need to be taken:

This technique does an excellent job of eliminating the difficulties that arise when connecting, however, it is not entirely convenient for users due to the removal of saved network access codes. Therefore, at first, you can try the methods described below, although they are not as effective.
Restarting iPhone
In order to forcibly restart the device, hold down the "Home" key and press the button to turn off the device.
Reconnection
In the case when the gadget detects Wi-Fi, but is not able to connect to it, then several actions should be performed:
- Open Wi-Fi settings in the menu;
- Specify the access point planned for connection, click "Forget this network";
- Search for connections;
- Reconnect to the required Wi-Fi.
If the above methods did not lead to the desired result, then the problem is probably a malfunction of the Wi-Fi adapter or in the router.
In the first case, you will need to take the iPhone for diagnostics to a service center, and in the second, you can independently perform several manipulations with the router, and for this you do:
- Open the web configurator of the router;
- Change the security type to "WEP";
- In the settings, set the user's area of residence - "USA".