Printer port is not removed. How to uninstall a printer an easy way to uninstall. Delete files manually
Content of the article:
Very often, when trying to uninstall drivers for a printer, you can run into difficulties. In this article, we'll show you how you can fix the "Unable to uninstall the printer driver ..." error.
Error description
Print Server Properties
Unable to uninstall driver: Driver_Name, Type 3 - user mode. The specified printer driver is busy.

If you use the recommendations that were given in the article:, then we get the following error:

Correcting the error
Option 1
A similar error manifested itself on Windows Server 2008 R2, which runs in terminal mode and active Easy Print. Although none of the users used this printer, the system did not want to delete it. The following helped:
- Open "Devices and Printers" under account administrator and delete the hated printer.
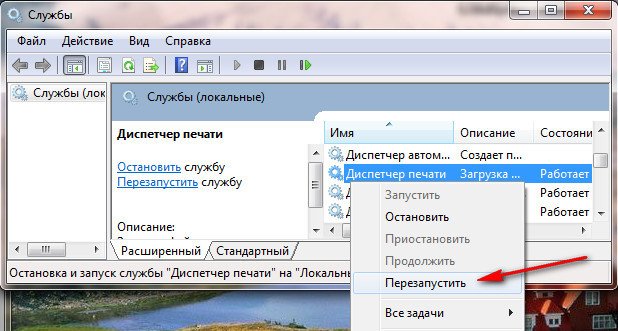
- Open "Services" (control panel - administration - services) or (start - run - services.msc) and look for a service there " Print manager", aka" Spooler ".
- We stop this service.
- Open the registry editor (start - run - regedit).
- Open the branch HKEY_LOCAL_MACHINE \ SYSTEM \ CurrentControlSet \ Control \ Print \ Environments \ Windows x64 \ Drivers\
- Rename the printer driver, which the system does not allow us to remove. In our example - Brother DCP-116C, for example, Brother DCP-116C_1.
- We start the service " Print manager", aka" Spooler ".
- Remove the printer as described in the article:
- Profit.
If he continues to swear, then on the Internet I have also met such a solution:
Option 2
- In step 5, open the branch HKEY_LOCAL_MACHINE \ SYSTEM \ CurrentControlSet \ Control \ Print \ Environments \ Windows x64 \ Print Processors\
- Rename everything that is there, for example: hpcpp117 ==> hpcpp117_old, hpzppwn7 ==> hpzppwn7_old, winprint ==> winprint_old ...
- We start the print manager service, delete the printer, stop the service, rename everything back, start the print manager service again.
In the modern world, a computer plays an important role in human life. He just became an integral part of life. However, sometimes in the process of work, peculiar nuances arise that are difficult to solve without help and tips. When a person starts installing software on different operating systems, there is a difficulty in uninstalling. Let's take a look at how to get rid of the HP printer driver on various operating systems.
Removing the driver
Windows XP operating system
There are several standard ways How to completely uninstall the HP printer driver in Windows XP:
- If you cannot uninstall the HP printer driver completely in Auto mode, you should use manual way... To do this, you will need to perform a number of manipulations: enter the "Start" menu; switch to the "Control Panel" tab; click on "Printers and Faxes"; click right click mouse on this tab by calling the context menu; select "Properties"; in the "Driver" attachment, select the highlighted "delete" key and click on it. After carrying out simple manipulations, it will be possible to completely remove the printer driver from the Windows XP operating system.

- The second method of uninstalling the XP printer driver: you need to go to the \ WINDOWS \ system32 \ spool \ drivers \ w32x86 \ 3 \ folder (this folder contains the drivers of all installed printers); delete all contents of the folder (only do not delete the folder itself); reboot the system. This method completely removes the drivers for all printers installed on the system.
- The third way to delete is through system registry... We go to the "Start" menu, select "Run". In the pop-up window you need to enter "RegEdit". Then we go through the following sections: HKEY_LOCAL_MACHINE / SYSTEM / CurrentControl / SetControl / Print / EnvironmentsWindowsx86 / Drivers / (printer name). We remove it from the Windows XP system. After these steps, restart your computer.

Windows 7 operating system
There are several effective methods to manually uninstall a printer driver in Windows 7. Let's consider the best method: remove the "device" in the "Control Panel" / "Printers and Devices" tab; in the command line, write the action "Services.msc"; restart "Print Manager".

In the command line, write "printmanagement.msc", which will enable you to use print management. Go to the "Custom Filters" / "All Drivers" folder. In the window that opens, you need to call the context menu on the driver that you want to remove from Windows 7. Then press the "Remove driver package" button.
The second way to uninstall the printer driver in Windows 7 (same for Windows 8.1):
- Go to the taskbar "Start" / "Control Panel" / "Devices and Printers" (how the window looks like, see the photo below).
- Then it is necessary to simultaneously press the keys "Win + R" and register the command "Services.msc" (or enter the "Start" / "Run" menu).

- Right-click on "Print Manager". In the window that appears, click "restart".
- Next, you need to execute "printui / s / t2" (in the same way as described above).
- The "Print Server" tab appeared in the pop-up window (in this window, you need to remove all packages installed drivers for the printer. After clicking the "delete" button, a system message will appear confirming the action. We accept it and move on).
- Go to the command line again and execute the "printmanagement.msc" command.
- In the pop-up window, also remove all installed drivers for MFPs or printers.
- Go to the "Program Files" folder and clear the folders related to the names of the printers.
- Go to the line of commands and register the action "Regedit" (in the pop-up window, press "Edit" / "Find". In the pop-up window, write the name of the printer or MFP and delete the entries in the registry).
- Restart the Windows 7 operating system (Windows 8.1) for the changes to take effect.
Windows 10 operating system
Windows 10 has its own specifics of removing the printer driver completely. First you need to uninstall software device that was installed earlier, and then take on the cleaning of garbage.
- The very first thing you need to do in the Windows 10 operating system is to start an admin account (to access administrator rights). Call the context menu on the "Start" taskbar. In the pop-up window go to " command line(administrator)". In the window that appears, write "net_user_administrator / active: yes" (if the computer is running Russian version Windows 10) or "net_user_administrator / active: yes" (for English).

- Go to the "Control Panel" tab, then to "Uninstall the program". We are waiting for the construction of a common list installed programs... We are looking for the name of our printer that needs to be deleted. Press the "Delete / Change" key. We are awaiting the completion of the uninstallation process for the printer software.
- The next step will be "remove the device". Go to "Start" / "Control Panel" / "Hardware and Sound" / "View devices and printers". Click on the printer icon with the right mouse button. Select "Remove device" from the context menu. We confirm.
- Press the key combination "Windows + X" and select "run". Register the command "printui / s" and click "OK". Go to "print server" / "properties", find the "Drivers" section, highlight required driver and click "Delete". In the pop-up window, select "Remove driver and driver package" / "Ok". After that, a system message will appear confirming the removal of the driver. Click "Yes". Again, the system returns to the Remove Driver and Driver Package tab. Click "Delete". In Windows 10, after uninstalling the printer driver, the package remains. You cannot completely remove it.

We press restart (after restarting the Windows 10 operating system, all changes will take effect).
Sometimes you have to face the need to solve a problem related to how to completely remove a printer in windows 7. A variety of problems can be the source of the need for such an action. For example, a complete removal of printer drivers may be required if the device refuses to print (the operation cannot be completed), an error appears, or its driver is already very outdated and needs to be replaced with an up-to-date version. In any case, in order to correctly remove a printer from a computer running Windows 7, you should carefully read the following recommendation.
- To remove the mfp from the system and clear any mention of it, first of all open the section in the "Control Panel", where a list of connected devices and printers is presented. You can also get there using the "Run" program (Windows + R), where you should drive in the command "control printers".
- Find the required printing device among the list of presented devices. Call its context menu by right-clicking on its icon.
- Find and click on the item that launches the delete function among the presented list. this device... This will allow you to erase the printer driver.
- Open the Run window again and type in the Services.msc command to run the Services add-in. You can find this add-on through the "Control Panel" by going to the administration section. There you need to click on the service called "Print Manager" and right-click on it. In the drop-down list, click on the item responsible for restarting this service.
- The actions taken will reboot the above-named service. This procedure is necessary for the printer driver to be uninstalled normally.
- Now you will need to pay attention to the print server. Call again with the combination Windows keys+ R program "Run" and type in the command "printui / s / t2". As a result of this action, a window with the properties of the print server will open in front of you.
- Find and go to the tab where all the drivers are indicated, then find the option that applies to your printing device and, having checked it, click on the "Remove" button.
This completes the main part of the steps aimed at solving the problem of how to completely remove a printer in Windows 7. However, this is not all, since using the steps described above, not all traces of the printer's presence on your computer can be removed. Therefore, you should proceed to the next steps:
- Open the add-in called "Print Management" by first opening the "Run" program window and entering the command "printmanagement.msc" there.
- In the new window, you should go to the "Custom filters" section, and from there click on "All drivers".
- As a result of the described manipulations, a list of drivers will appear on the left side of the add-in window responsible for printing management.
- Find your equipment among them and, opening its context menu, click on the delete item.
Using the uninstall panel
Now you need to delete everything software applications that are specific to your printer or multifunctional device. To do this, you need to use regular means Windows 7 through the uninstallation panel. Find everything related to your device among the list of installed software and uninstall it. It should be added that this way suitable not only for Windows 7, tk. it can be used on windows 10, 8, and XP. In the latter version, the only difference is the name of the section for office equipment.
We clear "Program Files" and the registry
But before reinstalling the device or connecting a new printer to the PC, you should clear all the junk. To do this, open the "Program Files" folder and delete from there all those folders that could be connected in one way or another with your office equipment. You will also need to clean the registry. To do this, open "Run" and type the "regedit" command into the only field of this program. In the window that appears, you should click on "Edit" and in the list that opens, click on the "Find" item. Enter the name of your printing device in the search field and click on "Find Next". Everything connected with the printer will be highlighted by the program. In this case, you just have to start deleting all these items until a message appears stating that nothing more suitable was found.
Now you just have to restart your computer and, if necessary latest version or perform some other actions that the old software prevented.
What to do if the driver is not removed
But it so happens that the Windows 7 printer is not deleted. What to do in this situation? To do this, you can open the registry by running it with the "regedit" command, which you need to drive into the "Run" window. After that open the branch
Control \ Print \ Environments \ Windows \ "and go to" Print Processors ". All that you find there, be sure to rename, for example, instead of winprint, enter winprint_old. After that, open the print manager and, after removing your device from it, stop the service. Then rename it back and start the given manager again. By doing this, you may be able to solve the problem of uninstalling the printer driver.
If the described method does not help you, then follow these steps:
- Open the section with devices and printers under an administrator account. Find the device you need there and remove it.
- Go to "Administrative Tools" through the "Control Panel" and click on "Services". There, find the Print Manager service and stop it.
- Open the registry as described above and go to the branch
"HKEY_LOCAL_MACHINE \ SYSTEM \ CurrentControlSet \
Control \ Print \ Environments \ Windows \ Drivers \ ". - Find the driver you are unable to uninstall and rename it.
- Start the print service again and remove the printer from there, as described in the first half of this article.
When connecting (or disconnecting) computer peripherals, users often expect a number of technical problems, the main of which is the impossibility of deleting a printer in Windows 7, 8 and 10. In this article, we will show you how to completely remove a printer or MFP driver without saving information about it in the system.
A printer is a complex printing device in which signaling between it and computer goes in both directions via a dedicated port. Given the fact that there are countless brands and models of office equipment in the world, it is not surprising that many of them are poorly compatible with Windows and may not work properly.
The most common problems are:
- loss of communication between peripheral device and PC;
- crashes and errors;
- limitation or failure of some functions;
- impossibility complete removal printer driver.
As already mentioned, problems can be caused by poor compatibility devices with operating Windows system, incorrect installation drivers, improper operation of equipment, low quality software and technology itself.
Very often, when trying to rollback or uninstall a driver, you can come across an error with the following content: “Unable to remove driver: Name, Type 3 - user mode. The specified printer driver is busy. " In other cases, after uninstalling and restarting the computer, the device reappears in the control panel list. In more rare situations, the driver is partially removed, and its components interfere with the work of new office equipment.
Below we will give step by step actions to permanently uninstall the printer driver.
Important! Do not forget to log in to the system as "Administrator" before doing this.
Remove the printer from the device list
It would be logical to start our guide with the most basic things. First of all, you need to try to remove the printer from the list of devices. in the usual way.
To do this, do the following:
- Open the menu "Start" and go to "Control Panel / Hardware and Sound / Devices and Printers".
If you have not previously removed the printer in this way, restart your computer and see the result. If you have already done it, but to no avail - do not restart it and go to the next methods.
Restarting the print manager service
Before proceeding to delete all data about the printer on the hard disk completely and completely, you need to restart the service responsible for printing documents.
This is done like this:


Removing the driver from the print server
Starting from this point, we proceed to completely erase the printer driver and information about it on the PC in order to reinstall it later without errors.


We remove the printer in the print management console
Driver files may still be in console directories "Print Management", therefore:

Now you can restart your computer and admire the absence of the driver in the list.
Clearing the Windows Registry
Those who were not satisfied with the previous activities can edit the system registry. It is advisable to do this manually and only after saving a copy of it in order to roll back the system in case of problems.

Important! To return the registry to its original form, you need to double-click on the saved copy.


Now absolutely all data about the printer has been permanently deleted from the computer. You can reboot the system and reinstall the driver if necessary.
Finally
With this article, we answered in detail the user's question on how to completely remove the printer in Windows 7, 8 and 10. The item with editing the registry is optional, since it is designed for people who have at least some idea of the purpose of this database.
At the end we will give a small helpful advice: download and install the driver only on the official website of the device manufacturer and for a specific model.
Deleting Windows printer 7 is associated with certain difficulties and in a simple way removing the wrong driver will not work. Let's do this operation together, screenshots of each of our steps at the end of the article.
- First thing to do: Go to Control Panel->Devices and Printers and delete our printer until we reboot.
- Second: Start-> Run, type Services.msc and we get to the tab Services restart Print manager.
- Third: Start-> Run, type printui / s / t2 we get into the window Print Server Properties and remove our printer driver. We can choose Remove driver and driver package.
- Fourth: We open Print management Start-> Run we type printmanagement.msc... In folder Custom filters need to choose All drivers, right-click on our driver and select Remove driver package... If an Error comes out, then it has already been deleted.
Also in Print Management, in the tab Print servers, select the item Drivers and Printers remove our driver.
Basically uninstall Windows 7 printer driver now it has already succeeded and after reboot it should get up successfully new driver, but you can still do the rest of the manipulations to be sure.
- Fifth: Look at the menu Removing or changing a program is there any mention of your printer, if so, click Uninstall, then uninstall all components of your printer software. Delete all files related to the printer from your computer, start with the folder Program Files.
- Check the registry just in case for the presence of keys with the name of your printer.
Reboot and install the new printer driver.