How to sync iPhone to iPhone. Syncing iPhone to Computer: An Overview of All Methods Other Synchronization Methods
In order to be able to control your iPhone from a computer, you will need to use iTunes, through which the synchronization procedure will be carried out. Today we'll take a closer look at how you can sync your iPhone, iPad, or iPod using iTunes.
Synchronization is a procedure carried out in iTunes, which allows you to transfer information both to and from an apple device. For example, using the sync function, you can keep your device's backups up to date, transfer music, uninstall or add new applications to your device from your computer, and much more.
How to sync iPhone with iTunes?
1. First of all, you need to launch iTunes and then connect your iPhone to iTunes on your computer using a USB cable. If you are connecting to a computer for the first time, a message appears on the computer screen. "Do you want to allow this computer to access information [device_name]" where you need to click on the button "Proceed" .

2. The program will wait for a response from your device. In this case, in order to allow the computer access to information, you will definitely need to unlock the device (iPhone, iPad or iPod) and to the question Trust this computer? click on the button "Trust" .

3. Next, you need to authorize the computer in order to establish full trust between devices to work with your personal information. To do this, in the upper area of the program window, click on the tab "Account" and then go to step "Authorization" - "Authorize this computer" .

4. A window will appear on the screen in which you will need to enter your Apple ID credentials - login and password.

5. The system will notify you about the number of authorized computers for your device.

6. A miniature icon with a picture of your device will appear at the top of the iTunes window. Click on it.

7. The screen will display the menu for controlling your device. The main control sections are located in the left pane of the window, and the contents of the selected section are displayed in the right pane, respectively.
For example by going to the tab "Programs" , you have the ability to work with applications: customize screens, remove unnecessary applications, and add new ones.

If you go to the tab "Music" , you can transfer your entire iTunes music collection to your device, or transfer individual playlists.

In the tab "Overview" , in the block "Backups" by checking the box next to "This computer" , a backup copy of the device will be created on the computer, which can later be used both to fix problems with the device and to comfortably move to a new Apple gadget with all the information saved.

8. And finally, in order for all the changes you made to take effect, you just need to start synchronization. To do this, in the lower area of the window, click on the button "Synchronize" .

The synchronization procedure will begin, the duration of which will depend on the amount of information being processed. It is strongly recommended not to disconnect your Apple device from your computer during the synchronization process.

The end of synchronization will be indicated by the absence of any work status in the upper area of the window. Instead, you will see an image of an apple.

From this point on, the device can be disconnected from the computer. To do this safely, you need to first click on the icon shown in the screenshot below, after which the device can be safely disconnected.

The process of controlling an Apple device from a computer is somewhat different from, for example, working with Andoid gadgets. However, after spending a little time exploring the capabilities of iTunes, the synchronization between your computer and iPhone will proceed almost instantly.
Some people own more than one gadget from Apple, but several at once. Naturally, they often have questions about synchronization in order to use the same data on multiple devices at once. How to sync iPhone to iPhone and what do you need for it? To transfer data between devices, we may use services and programs provided by Apple. In this review, we will consider the functionality of the iCloud service and the iTunes program.
The iCloud service has powerful functionality for quickly transferring data between two devices. It is he who will help us sync iPhone with iPhone, and wirelessly. In order to start synchronization, you need to go to the iCloud settings and activate the backup. It works under the following conditions:
- iPhone is locked (in standby mode);
- You have an active internet connection via Wi-Fi;
- iPhone is connected to a charger.
That is, to start backing up data to iCloud, you need to connect your smartphone to a charger and to the Internet, and then leave it alone. After a while, copying will end and you can start transferring data to the second iPhone. What to do next?
And then we turn on the second iPhone and start setting it up. When you turn on and configure for the first time, you need to select the "Restore from iCloud copy" item - that is, the previously created backup will be downloaded to the current device. We select the desired item, log in with our Apple ID and wait for the operation to complete. Depending on the amount of data and the speed of the network connection, restoring from a copy can take up to several tens of minutes.
Backing up to iCloud allows you to save only the most important data - photos, contacts from your notebook, accounts, documents, and settings. Music and videos cannot be transferred with this backup.
Now we know how to sync iPhone with iPhone. But you also need to know the following information - devices authorized under one Apple ID can sync automatically using the iCloud cloud storage. That is, the documents you create will be available almost immediately on other devices. This is how we can sync an iPhone and an iPad (or two iPhones).
The iCloud service copies not only documents, but also other data - contacts, settings, messages, application data, and much more. In the iCloud settings on your device, you can select the data to sync - by sliding the switches, you mark what should be synced automatically. 5 GB of free space is allocated for data storage... If necessary, this limit can be increased through paid subscriptions.
What other useful features can we find in the sync settings of our iPhones and iPads? You should definitely enjoy such a feature as the automatic download of purchased content to multiple devices at once authorized under the same Apple ID. To do this, go to "Settings - Store" and set the appropriate checkboxes there. Apps, books and music are subject to automatic download.
How to sync iPhone to iPhone via iTunes
Many users are wondering - how to synchronize two iPhones with each other? We can use the iTunes app for this. The operation is performed literally in a few mouse clicks. This is done like this:
- We connect the first iPhone to a computer running iTunes;
- Go to the "Overview" tab and create a backup;
- Disconnect the first iPhone and connect the second;
- Upload the backup to the second device and reboot.
Please note that when setting up a second iPhone, you need to select "Restore from iTunes copy".
Now you know how to sync iPhone to iPhone using the iTunes multimedia application. The advantage of this method is that along with contacts, settings and other data, multimedia files - music, podcasts and videos - are also copied. When copying via iCloud, all this data will have to be copied manually using additional programs.
Other Synchronization Methods
How else can you sync an iPhone with an iPhone or an iPhone with an iPad? To do this, we can use popular cloud services such as Dropbox or Yandex.Disk. They allow you to access files from a wide variety of devices, even if they run on different platforms. In order to sync files, you need to follow these steps:
- Install the client of the selected service on two devices;
- Create an account on one device;
- Enter the details of the created account on another device.
As soon as you add any files to the shared folder, they will be copied to the cloud storage. Then they can be accessed from another device. For example, you can create a file on iPhone to continue editing it on your computer, which is very convenient and practical. Also, cloud services will allow you to transfer files from your computer to iOS devices without using iTunes..
The initial volume for storing user data in cloud services is not very large. For example, for Dropbox it is only 2 GB, and for the Yandex.Disk service - 10 GB. You can expand your storage space with paid subscriptions. Moreover, in the Dropbox cloud service, you can use a referral program to expand free space - for each referral brought, the user receives an additional 500 MB.
Cloud services are good because they save free space on iOS devices - all data is stored on remote servers, not in the device's memory. They are downloaded only at the time of use.
- most often this question is asked by users who have purchased a new "iPhone" instead of the old one. And, of course, the question immediately arises of transferring all data from one smartphone to another. Or there are situations when you need to partially transfer data from one iPhone to another: for example, sync only contacts or photos. In this article, we will look at several ways to solve this problem. Even the most inexperienced users will be able to sync their iPhone. So let's go!
Sync iPhone via iTunes
This method has its pluses and minuses. You definitely need a working computer on Windows or OS X with iTunes installed (we recommend using the most current version).
Cons of this method:
- everything is done by hand,
- the system may refuse to restore a backup if the second device uses an earlier firmware version than the first (in this case, the second iPhone must be updated first).
Sync iPhone via iCloud
I like this method the most, since you perform the minimum number of actions. The system does everything for you. The essence of the method is to create a backup copy of all data on one iPhone, and then upload it to another device. You must have access to the Internet and a working iCloud account.

Situation 1:
If you have a freshly purchased iPhone in your hands, first you need to activate it, select the interface language, etc. Next, you will see an item such as "Setting up iPhone", where you will be prompted to set up the iPhone as new, or restore data from an iCloud copy or through iTunes. Naturally, we choose the second option - "Recover data from iCloud copy". After that, you just need to enter your iCloud account details (email and password), and then the system will do everything for you.
Situation 2:
If you are holding an already working iPhone, to which you actually need to transfer all the data. Then we do it this way. Open the application Settings - General - Reset - Erase content and settings on it. All information from the second phone will be deleted, after that you can upload a backup copy - go to the third point, situation 1.
Situation 3:
You can do the recovery not necessarily through iCloud, but also through iTunes - see point 4 of the "Synchronization via iTunes" instruction.
Cons of syncing iPhone to iPhone via iCloud:
- thus, you cannot sync multimedia files (music, movies, some application data),
- only photos, contacts, calendar data, iCloud Drive, reminders, Safari data, notes can be copied.
The iOS platform the iPhone runs on is closed- this means that every newly minted owner of an "apple" smartphone will have to forget about how he used to copy music to his Android and start mastering the program iTunes... Without synchronization with iTunes nowhere: of course, there are other programs that can help fill the iPhone with media content, however, all of them are either paid or cannot boast of correct work.
IPhone Synchronization - the process during which the contents of the program iTunes transferred to the gadget. Please note: exactly is the recipient of information, which means that:
- Transfer any data from a smartphone to a PC (for example, photos taken with the device's camera) via iTunes will not work. Other programs are suitable for this, for example, iTools.
- Deleting a file in the library leads to the fact that it will also be deleted from the gadget at the next synchronization.
Many users, alas, do not understand the essence of synchronization.
A common mistake: After downloading music to iPhone, the user clears the library so as not to get confused when adding new songs. Naturally, the next sync will erase all tracks from the device.
How to sync iPhone with iTunes via USB?
If you want to download music or video to iPhone via iTunes, proceed like this:
Step 1. Connect the gadget to the PC with a USB cable and run the program iTunes... A window like this will appear:
In the left column in the section " Devices»You will find your gadget (in our case, the iPhone, highlighted in red).
Step 2... Click on the device icon located in the top bar:
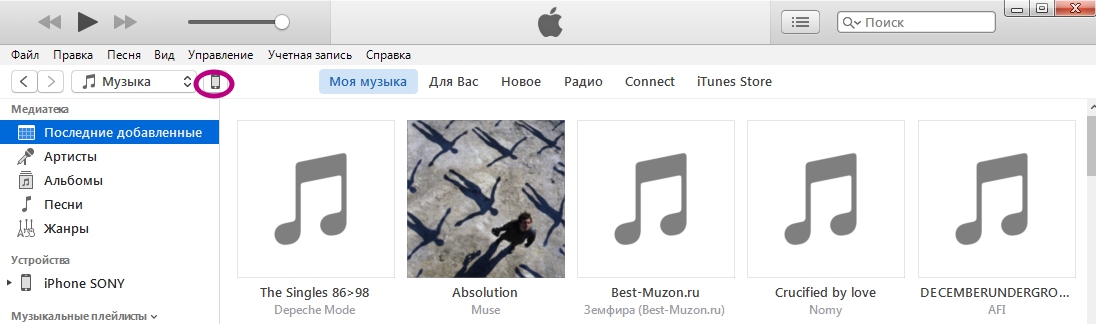
You will find yourself in the section dedicated to the connected device.

Step 3... In the tab “ Overview"Scroll down and check the box next to" Sync only tagged songs and videos". Such a "tick" will allow you not to lose the data that was uploaded to the iPhone just now, during general synchronization.

Step 4... Click " Apply", after " Synchronize»:

In the upper field (highlighted) you can watch the progress of synchronization. You can also use the gadget during synchronization if the version of the smartphone operating system exceeds 5.0. Upon completion of the procedure, you will see that the new compositions are already available in the built-in application " Music».
Important: Do not unplug the USB cable from the computer or device until the data transfer is complete. The lesser of evils is that synchronization stops - you can also provoke a malfunction of the gadget.
What if iPhone won't sync music?
If you have exactly repeated all the steps described, but there are still no new tracks on the iPhone, then the problem is 90% as follows: synchronization is not activated in the " Music». Go to this tab and check the box next to “ Sync Music»:

You can choose the most convenient synchronization option out of two: when transferring data to the iPhone, either all tracks will be copied indiscriminately (" Whole media library"), Or individual albums, playlists, compositions of specific artists (" Selected playlists ... ").

Here you can set up sync so that clips and voice recordings are copied to iPhone along with songs.
How to sync iPhone to computer via Wi-Fi?
In 2011, after the release of iOS 5.0, it became possible to synchronize without connecting the gadget to a PC with a USB cable. But those users who are already looking forward to saving on accessories should be aware that a cable is still needed for the initial setup. Set up sync like this:
Step 1... Connect the gadget with a cable to your computer and run iTunes.
Step 2... Click on the " Device».

Step 3... In the tab “ Overview"Find the block" Options", And in the block itself - the item" Sync with this iPhone over Wi-Fi". Check the box next to this item.

Do not forget to enable synchronization of music (video, sounds) in the corresponding tab.
Step 4. Click " Synchronize" and " Ready". Now you can transfer data to your gadget without using a cable.
Now consider, how to sync over Wi-Fi... Before transferring data in this way, the user must perform a number of preliminary steps:
- Put your smartphone on charge.
- Connect iPhone and computer to one Wi-Fi networks.
- Launch iTunes on PC.
Step 1... On the device, follow the path " Settings» — « The main» — « Sync with iTunes over Wi-Fi».

Step 2... Click " Synchronize", And you will see that in the status bar in iTunes the usual countdown of steps began.

During Wi-Fi synchronization, the iPhone can also be fully used.
Synchronizing a gadget via Wi-Fi has several drawbacks compared to transferring data over a cable: firstly, the battery of the device is discharged much faster, and secondly, the synchronization itself is longer.
Synchronization is not working: possible reasons and how to fix it
Most often, the problem of missing sync is solved by simply restarting the iPhone. If that doesn't work, the cause is most likely one of the following:
- iTunes not "fresh" enough. Try to update the program to the latest version - in the menu iTunes select " reference» — « Updates"And in the window that appears, click" Download iTunes».

- The synchronization process is blocked by antivirus... Turn off the protection and dare again. If it's really about antivirus, think about installing another program, because the iPhone owner has to deal with synchronization all the time.
- The router settings are set incorrectly (when synchronizing via Wi-Fi). Set the security type WPA-Personal and the encryption type is TKIP(but not AES). In the router settings, it is worth changing the operating mode of the wireless network (paragraph Wireless Mode) with Auto on B / G.
Conclusion
The fact that you have to use additional software to download music iTunes, introduces many new Apple users into a stupor. However, the application iTunes as an intermediary between a PC and a gadget is extremely important from a security point of view: downloading a malicious file to a smartphone through this program is minimal. Besides, iTunes is one of Apple's effective tools in the fight against music piracy, as it distributes music completely legally and at a low cost.
There are no prerequisites for the fact that in the near future Apple will provide other free options for downloading music to the iPhone, so every Apple owner should know about ways to synchronize and eliminate possible problems with iTunes.