How to fix GRUB2 if Ubuntu won't boot. Installing the Grub Boot Loader Via the Boot Loader Repair Utility
A specialized bootloader program is used to select and start the operating system during computer boot. The most popular bootloader is Grub. When installing multiple operating systems, for example Linux on top of Windows, the last installed OS will be the first in the bootloader menu.
This will not cause problems for users who use Linux as their main system, for them it is even a preferable option. But if you are still a beginner and want to use Linux as a second system, and Windows is still the main one, until you get used to it, then you probably want Windows to be the first. In this article, we'll take a look at how to make Windows boot first in Grub. Let's look at two ways: using the Grub Customizer program and manually using the Grub bootloader configuration files.
Grub customizer
Grub Customizer is a program that allows you to customize various parameters of the Grub bootloader. Including the position and order of loading points. You can install the program from the official repositories. For example, on Ubuntu you need to use ppa:
sudo add-apt-repository ppa: danielrichter2007 / grub-customizer
$ sudo apt-get update
$ sudo apt-get install grub-customizer
To run the program, open a terminal (Ctrl + Alt + T) and type grub-customizer:
For the program to work, you need root rights, on some systems you may have to use the following command:
gksu grub-customizer
Also, the program can be launched from the main menu. The main window looks like this:
A few seconds after starting the program will scan the installed operating systems, then in the same window we can move the Windows boot to the first place. To do this, right-click on the desired item to open the context menu:

In the menu, select Move up... This action will need to be repeated several times until Windows is the first in the list. The default windows grub will now boot.
If you later want to bring Windows back down, there is a reverse action - Move down.
To save your settings, just click the Save button. Ready. You can restart your computer and see what happens.

But I want to touch on a couple more settings that might be useful. Instead of making Windows boot first in Grub, you can change the default entry. Go to the tab basic settings:
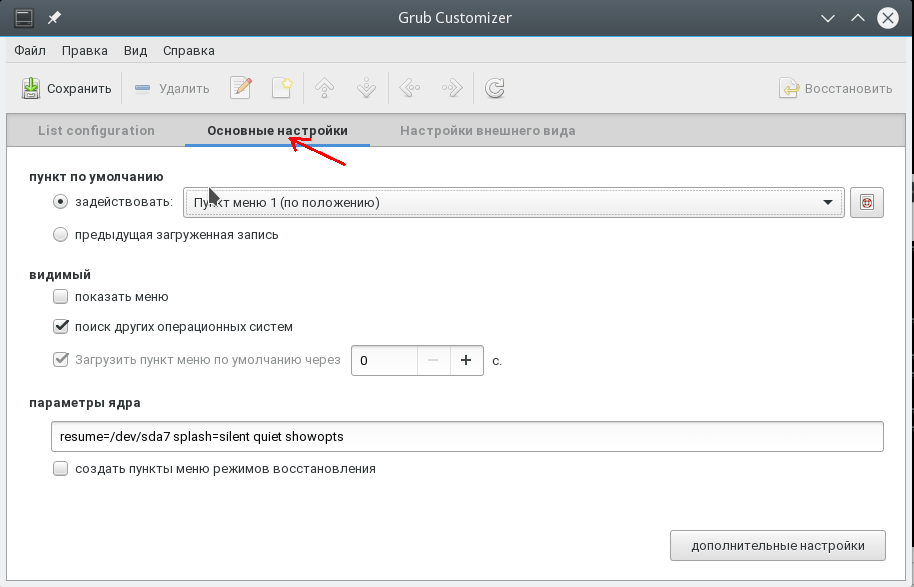
There is a list to select the default item used by default. Engage:

In addition, you can boot the last loaded OS by default, there is a checkbox for this:

Changing the boot order of Grub via terminal
As I promised, now let's take a look at how to make WIndows boot first in Grub using config files. The Grub configuration is located in the /boot/grub/grub.cfg file.
gksu gedit /boot/grub/grub.cfg
Typically, menu bars look like this:
menuentry item_name --options (
...
For example Windows item:
menuentry "Windows 8 (loader) (on / dev / sda1)" --class windows --class os $ menuentry_id_option "osprob
er-chain-FC324E26324DE66C "(
....
Now, to change the order of menu items, it is enough to cut everything up to the back closing parenthesis, along with this line, and insert before all other items. Then you can save the file and you're done. Reboot and watch. Windows boots by default. The only drawback of this method is that when you update the Grub configuration, all settings will be lost.
Similar to how we configured the default entry in Grub Customizer, this can be done in the terminal.
Open the file / etc / default / grub.
gksu gedit / etc / default / grub
Here we are interested in the line:
Replace 0 with the item you want to download, you can also specify the name of the item instead of a number, for example:
GRUB_DEFAULT = "Windows 8 (loader) (on / dev / sda1)"
You can view the available download points without opening the configuration file with the command:
sudo grep menuentry /boot/grub/grub.cfg
You can also configure the boot of the last loaded system, for this add the line
GRUB_SAVEDEFAULT = true
And in GRUB_DEFAULT specify saved:
GRUB_DEFAULT = saved
The obvious advantage of this method is that the settings will not be lost during the update of the Grub configuration, since during the update the information is taken from this file. Now let's update the configuration and save the settings with the command:
Not all systems work this way, so you can use another command:
grub2-mkconfig -o /boot/grub/grub.cfg
That's all. Now you know how to make Windows boot first in Grub. But the information presented in this article can be used for broader purposes. It will be useful not only for Windows, but also for any other multiple systems, the boot order of which needs to be controlled.
Related entries:

Ubuntu, like many other Linux distributions, uses GRUB2 as the boot loader. If GRUB2 breaks, for example, if you install Windows after installing Ubuntu, or when you overwrite the MBR, you will not be able to boot Ubuntu.
GRUB2 can be easily repaired using an Ubuntu Live CD or USB stick. This process is different from restoring the GRUB Legacy bootloader on older Linux distributions.
The process below should work with all versions of Ubuntu. It has been tested on Ubuntu 16.04 and Ubuntu 14.04 versions.
GUI method: Boot Repair ###
Boot Repair is a GUI application that can fix GRUB2 with just one click. Ideal solution for most users.
If you have the media from which you installed Ubuntu, insert it into your computer, reboot, and boot from the removable media. If you don't have the media, boot the Ubuntu Live CD and burn it to disc or create a bootable USB stick.
When booting, click "Try Ubuntu" to load a working desktop environment.
Make sure your internet connection is working before proceeding. You may need to select a Wi-Fi network and enter a password.
Open a terminal from Dash and run the following commands to download and install Boot Repair:
Sudo apt-add-repository ppa: yannubuntu / boot-repair sudo apt-get update sudo apt-get install -y boot-repair boot-repair
Boot Repair will automatically scan the system after running the boot-repair command. After that, click the Recommended repair button to repair GRUB2.
You can also do advanced settings here, however the Ubuntu wiki does not recommend doing this unless you know exactly what they are responsible for. The recommended option allows you to fix most of the problems automatically, and choosing the wrong settings can only make the situation worse.
Boot Repair will start working. You might be prompted to open a terminal and copy / paste a few commands.
Just follow the instructions on the screen. Follow all instructions Boot Repair and click Forward to go to the next screen. The utility will guide you through all the necessary steps for recovery.
After Boot Repair finishes work, restart your computer. Ubuntu should start normally.
Terminal method
If you are not afraid to get your hands dirty, you can fix the system through the terminal. You will need to boot from a Live CD or USB stick, just like the method described above. Make sure the Ubuntu version on the disk matches the version installed on your computer. For example, if you had Ubuntu 14.04 installed, you should use the Ubuntu 14.04 Live CD.
After the system boots up, open a terminal. Identify the partition of the disk where Ubuntu is installed using one of the following commands:
Sudo fdisk -l sudo blkid
Following is the output of both commands. In the case of fdisk -l, the Ubuntu partition can be identified by the word Linux in the System column. In the case of using the blkid command, the partition is determined by the use of the file system ext4.
If your computer has multiple Linux partitions in the format ext4, take note of their size and the order in which they are listed.
Run the following commands to mount your Ubuntu partition on / mnt / ubuntu, replacing / dev / sdX # with the name of the device where your Ubuntu partition is installed above:
Sudo mkdir / mnt / ubuntu sudo mount / dev / sdX # / mnt / ubuntu
In the example above, the Ubuntu partition is located at / dev / sda1. This is the first partition on the first hard drive.
Important! If you have a separate boot partition, skip the command above and mount the boot partition in / mnt / ubuntu / boot. If you do not know if you have a separate boot partition, then most likely it does not exist =).
Run the following command to re-install GRUB2 from the Live CD, replacing / dev / sdX with the hard drive name above. Do not include the number. For example, if you used / dev / sda1 above, just enter / dev / sda.
Sudo grub-install --boot-directory = / mnt / ubuntu / boot / dev / sdX
Reboot, Ubuntu should boot normally.
For details on how to use the chroot command to access corrupted Ubuntu system files and repair GRUB2, see the Ubuntu wiki page.
Despite the fact that the Linux operating system occupies an insignificant market share, its various assemblies are gaining popularity for their official free-of-charge, fairly stable work, and also considerable flexibility in settings. Yes, some things don't work the same as they do on Windows or Mac OS, and most software is built primarily for these two products. But this does not stop everyone.
For Linux to work, you need to restore the Grub boot loader if a failure occurs.
While almost any Linux build works flawlessly, sometimes a bootloader error can occur, making it impossible to start the operating system. What are the reasons for this? How do I repair the Grub bootloader in Linux? What working methods are there? We will talk about all this and even a little more in today's article.
After you install Linux on your hard drive, all files are copied to separate folders. Some directories store common software files that you can safely remove. Others write files without which the operating system will not work. This includes the Linux kernel, graphical shell, and the Grub boot loader. It is the latter that is used to run the installed operating system. How does this happen?

In a special boot partition, the system creates a master boot record. Its English abbreviation looks like MBR, and stands for Master Boot Record. When the computer starts, the BIOS accesses this entry, and then Grub comes into play and, when everything is in order, Linux starts up. And if the bootloader is damaged, an error will occur at startup and the system will not start.
For what reasons can this happen? The vast majority of cases are due to the fact that after installing Linux as the first system, you install Windows in the secondary role. Microsoft has traditionally disliked Linux, so the Windows installer removes Grub Linux. The same problem can arise when the Linux itself is not installed correctly, when you switch to another distribution, or because of disk repartitioning.
The most important thing to consider is that you don't have to immediately think about reinstalling the entire system. You just need to restore Grub and everything will work as before. Let's move on to considering the most effective methods available even to inexperienced users.
Via terminal from bootable media
To do this, you need a bootable USB flash drive or a disc with the recorded Linux distribution. Ideally, it should be similar to the system installed on the hard drive. But if the distribution kit is not the most important point, then the bit depth should be the same in any case. Otherwise, it is fraught with even greater consequences, as a result of which you will definitely have to reinstall everything.
- Insert a USB flash drive or disk into the computer connector, and then as a priority for loading. The required setting is located in the Boot Device Priority or First Boot Device section. To start the BIOS, at startup, press the desired button or their combination on the keyboard. The most popular options are F2, Del, Shift + F2, F10. In order not to deal with BIOS, you can simply press F11 or F12 and select a medium from the list provided.
- Next, you need to find out on which partition of the hard drive the system is installed, and which one is specified as the bootloader. To do this, you need to launch a terminal (analogue of the Windows command line) by finding it in the application menu or by pressing the key combination Ctrl + Alt + T, or Alt + F2. In the window that opens, you will need to type the command sudo fdisk -l. Immediately, the utility will scan all partitions on the disk and display information about each of them. Even information about other operating systems installed on the computer will be shown. You can find out the name of the partition, its location, size, and the type of its file system. Provided that you did the partitioning manually when installing Ubuntu, you can easily figure out which partition is bootable and which is root. For automatic partitioning, be guided by the name Linux. It is he who will be the root of your system. The partition name usually consists of the abbreviation sdc or sda and a number with a sequential number.
- Next, you need to mount the root file system to the / mnt folder. The sudo mount / dev / sda1 / mnt command will help you with this, where instead of sda you need to write the name of your partition.

From this point on, there are two ways to restore Grub on Linux.
Method 1
- Enter the bootloader repair command: sudo Grub-install -root-directory = / mnt / dev / sda.
- Reboot the Computer using the sudo reboot command. As a result, the OS selection menu should appear.
- If this menu displays outdated information, update the MBR boot record. To do this, start Linux normally, open a terminal and use the sudo update-Grub command. If that doesn't work, apply sudo update-Grub –output = / mnt / boot / Grub / Grub.cfg and then repeat the previous one.
- Restart your computer again.
Method 2.
- After mounting the root of the file system to the / mnt partition, you need to additionally mount the folder with the boot files, as well as other components of interaction with the kernel. To do this, run the commands one by one:
sudo mount / dev / sdc2 / mnt / boot
sudo mount –bind / dev / mnt / dev
sudo mount –bind / sys / mnt / sys
sudo mount –bind / proc / mnt / proc
- Next, you need to run the chroot shell. To do this, add chroot / mnt / bin / bash in the terminal. The first parameter draws attention to the root directory, and the second to a special shell for converting user commands.
- Next, you need to apply the commands to get into Ubuntu and use almost all of its applications, except for services and the graphical interface:
source / etc / profile.
- Now you can start restoring Grub directly. To do this, you need to use several commands:
- To re-install the bootloader on the hard drive: sudo Grub2-install / dev / sdc (the last parameter is the name of your partition).
- To create a new config file: sudo Grub2-mkconfig -o /boot/Grub/Grub.cfg.
- To update the boot menu: sudo Grub-update.
- To complete the procedure, exit the chroot shell using the exit command, and also unmount the previously mounted file system partitions:
sudo umount / mnt / dev
sudo umount / mnt / proc
sudo umount / mnt / sys
sudo umount / mnt
sudo umount / mnt / boot.
- Reboot via reboot.
Through the bootloader repair utility
Since the previous method may not be for everyone, we will take advantage of the feature of Ubuntu that it can fully work, being launched from a USB flash drive. To do this, we will use a special boot-repair utility. What should be done?
- Launch Ubuntu from a USB stick and make sure you have an active internet connection.
- Find a terminal and run the following commands one by one in it:
sudo add-apt-repository ppa: yannubuntu / boot-repair
sudo apt-get update
sudo apt-get install boot-repair.
- Find "Boot Loader Repair" in the application menu and enable the utility.
- Click on the button "Recommended recovery method" and wait until the end of the procedure.
- In most situations, these steps are sufficient for the Grub Linux boot loader to function properly.

Through the command line with partial access to the file system
Sometimes the Grub bootloader is not so badly damaged that the entire system cannot boot. For example, the boot partition remains intact, but the utility itself does not have access to it. In this case, a program shell is opened, something similar to the command line, and a message with the following content is displayed: Minimal BASH like line editing is supported. Here, using this command line, you can try to boot Ubuntu.
You are expected to be sure and know exactly which of the hard drives hosts the system and the kernel. There are only four commands available, they must be applied sequentially:
- Issue the ls command to have the system scan disks and partitions. As a response, you will receive a list of hard drives (for example, hd1, hd2), as well as the type of file system on them (for example, msdos1, msdos2). For example, let's assume that the boot partition is located at / dev / sda1.
- Next, you need to select the section with which you want to work. In our case, the command will be written as follows: set root = (hd1,1).
- Boot a regular Grub shell: insmod ext2, insmod normal, normal.
- Start Linux kernel: linux / boot / vmlinuz.
- Boot the system: boot.
- After starting Ubuntu in normal mode, open a terminal and finish the boot loader repair procedure with the following commands:
sudo Grub2-install / dev / sda
sudo Grub2-mkconfig -o /boot/Grub/Grub.cfg.
- Reboot and enjoy normal work.

Conclusion
Although at first glance, restoring the Grub bootloader in Ubuntu may seem like something very difficult, and many Linux users will immediately start reinstalling the operating system with such a problem, with the normal instructions everything is done very easily and without any complications. We hope we were able to help you avoid losing important information. Bookmark this page and share this information with your friends and acquaintances. Leave your questions in the comments.
Original: How To Repair Grub Boot Loader On Ubuntu Linux 16.04 /15.10 / 15.04
Author: Aun
Publication date: June 21, 2016
Translation: A. Krivoshey
Date of translation: October 2016
Grub (GRand Unified Bootloader) is the default bootloader for most Linux / Unix systems. It allows you to load different operating systems (you can install multiple systems on your computer), or load different versions of the kernel if you are running Linux. If this program is damaged in any way, you will receive error messages during the boot process, and as a result, you will most likely not be able to boot your operating system. Typically, the only way to restore normal operation in such a case is to repair or reinstall the Grub boot loader. If done correctly, this procedure avoids data loss. Today we are going to learn how to repair / reinstall Grub bootloader on Ubuntu system. The steps below were performed on Ubuntu 16.04, but should also work on any fairly recent version of Ubuntu. To accomplish our task, we will use the well-known "Boot Repair" utility.
Installing Boot Repair in Ubuntu
Boot Repair is most commonly used to fix bugs related to the Grub bootloader. First, you need to boot your computer from the Live CD / DVD / USB for Ubuntu (if you are looking for a way to restore Grub, then most likely you can no longer boot your installed operating system).
$ sudo add-apt-repository ppa: yannubuntu / boot-repair
After adding the PPA, update the package list:
$ sudo apt-get update
Now you can install Boot Repair:
$ sudo apt-get install -y boot-repair

After successful completion of the installation, launch Boot Repair from Applications> Boot Repair:

Using Boot Repair to Fix Grub Errors
After starting Boot Repair, you will see the start window of the program:

The very first option (Recommended repair) can fix Grub errors, click it and it will start the repair / reinstall process shown in the screenshot below.

According to the instructions in the screenshot, open a terminal and run the following three commands:
After completing these commands, click “Forward” to proceed to the next step in the recovery process. This is what you will see in the next step:

Follow the instructions to run the three commands below in the correct order. During this step, a window will appear asking you to confirm the removal of Grub 2, select "Yes".
$ sudo dpkg --configure -a $ sudo apt-get install -fy $ sudo apt-get install -y --force-yes grub-pc linux-generic
Click “Forward” after completing the process, below is a screenshot of the next step.

As instructed, run the command below in a terminal and, when prompted, specify the hard drive where grub will be installed.
$ sudo apt-get install -y --force-yes grub-pc linux-generic
Now you need to wait a couple of minutes for the necessary operations to be performed, and you should see the message below:

Reboot your system and you should see the bootloader menu.
Conclusion
Grub can be broken for a variety of reasons, especially if you have multiple operating systems installed, various errors can occur when updating or installing them. Therefore, it is useful to have such an excellent and free program for fixing bootloader problems on hand.
This article should have been written six months ago, but still nothing.
We will talk about how to install Linux OS of the second OS on new laptops with UEFI and pre-installed Windows. Provided that the usual installation does not give the desired result, namely, after the correct installation of Linux "next to" Windows, only Windows is loaded anyway.
To begin with, as has already become a tradition, let's put all the dots on E.
Problem.
We have a laptop (possibly a desktop, but the author only dealt with a laptop) that uses UEFI and has Windows preinstalled (most likely 8.1, although now it's already 10)... We want to install Linux on this laptop (we'll talk about Linux Mint, but for the rest the situation should be similar) second operating system (dual boot: the ability to use both Windows and Linux at the user's choice)... Install Linux in the usual way * (about which I will also write someday, but there are a lot of similar instructions on the Internet), reboot and find our actual problem:
stubborn Windows always boots, no Grub, not a hint of some kind of dual boot.
* There are actually at least two important considerations for installing Linux on UEFI computers. 1) Before installing in this very UEFI, you must disable the secure boot option - Security Boot Control (or something similar, depending on the UEFI version). Otherwise, the storage medium with the Linux distribution will almost certainly not be able to start. 2) The bootloader (Grub) must be installed on an EFI \ ESP partition, usually named sda2, and not just sda, as it used to be in the BIOS era. This option is adjusted during the Linux installation process, usually somewhere around the disk partitioning step.
Fast solutions for the lucky ones.
First, try to go to UEFI (F2 or DEL button BEFORE starting Windows). There, find the section indicating the download list. It must contain elements: at least a hard drive and Windows Loader... The latter usually has the highest boot priority. Look through the rest of the items in the given list if there is something like Ubuntu Loader(or whatever, depending on the Linux distribution you are installing), then we smile and wave, set it to the highest priority and reboot. After rebooting, the long-awaited Grub interface should appear with a choice of OS to boot.
If there are no other "loaders", then you are out of luck, like me: your laptop sold its soul to Microsoft and does not want to see other boot loaders. Or, less likely, the Grub bootloader is not installed correctly. (we read the notes to the previous section and do everything in Feng Shui).
Mat.part and necessary knowledge.
About what UEFI and BIOS are, why they are needed. The difference between MBR and GPT, as well as their meaning, is described in detail. We will not repeat ourselves. This information should be enough to understand this article.
Also, the reader will be required to have a basic knowledge of Linux OS installation. We read somewhere in the same place.
You will also need basic skills in this OS, in particular, managing the file system using the Midnight Commander (MC) ( overview of the main features and commands) and the very basics of working in the Linux console ( for Ubuntu-like Linux a good guide for beginners).
You will need to install MC (in the same Mint Linux it is not by default), run it as root (administrator), make changes to the text file and execute a couple of simple commands in the console.
If you can do all this without the above instructions, I'm happy for you, we can move on. These instructions are given just in case, in order to avoid questions consecrated in them.
Solution.
Please note that the entire algorithm is built for Linux Mint OS. In other Linuxes (not based on Ubuntu or Debian) directory names and commands may differ slightly.
- Install Linux next to Windows using the appropriate option in one of the first steps of the installation, or (if this option did not appear) by partitioning the hard drive properly (deserves a separate article, it has already been written about this on the ubuntu wiki).
- DO NOT RESTART your computer after installation. If you rebooted, it's okay, you just have to boot from live-cd \ usb \ dvd again (after all, you can't start Linux?).
- Just in case, run the command in the console sudo update-grub(by entering an empty password when prompted).
- Open console \ terminal or by other means (for example, using the program manager in Ubuntu \ Linux Mint) install mc. In the console (for systems with apt) this is done as follows: sudo apt-get install mc(after which you will need to enter a password, let me remind you that there is no password in live mode, just press Enter and agree to the installation).
- Run mc as root: sudo mc (and again an empty password if asked).
- Find the following directory in the file system: / boot / efi / EFI.
- Rename directory (combination of ctrl + F6 in mc) Microsoft into something else, like Microsoft2.
- Create a new directory named Microsoft (F7 key).
- We go into the newly created Microsoft directory and partially (see below) create inside its hierarchy of folders similar to the old Microsoft (to what was renamed)... In my case, it had a folder structure like this: / boot / then a bunch of folders and a file bootmgfw.efi next to them. It is necessary to recreate the folder structure exactly up to this file. Those. everything that lies next to him is not needed, but everything that comes before him (i.e. parent folders, adjacent to them are also not needed) recreate in our new Microsoft folder. In my case, I only needed to create the boot folder, the final path to the new directory came out like this: / boot / efi / EFI / Microsoft / boot .
- We find in the directory from step 6 a folder with the name of our Linux distribution, in our case it is ubuntu... Copy (we leave the originals of the files and the ubuntu folder just in case, they will not interfere) all files from the given to folders in the final directory created in the previous step (v / boot / efi / EFI / Microsoft / boot) .
- In the resulting file system (in the directory created at the 9th step and the files moved to it at the 10th step) find the file grubx.efi or grubx64.efi (there will be only one of them: depending on the bitness of the installed Linux)... Rename it to bootmgfw.efi .
- Find the file /boot/grub/grub.cfg... We open it for editing (F4 key)... Inside it we find (the F7 key calls the text search form) the word "Microsoft" in the context of a line starting with "chainloader" and replace this word (there should be only one occurrence and it is in the line with "chainloader", so you can't go wrong) to the name of the directory where we renamed Microsoft in the 7th step (i.e. on Microsoft2 in our example)... Save changes to the file (F2 key - save).
That's all. It looks very difficult, but if you follow everything exactly step by step (which are painted in as much detail as possible!), then everything will work out without any problems. And, after rebooting and then booting from the hard drive (not from live media) we will see the coveted screen with the OS selection menu. Hurray, comrades!
What have we just done?
Let me explain. As you can see, the manufacturer of your (and mine, I have an Acer if that) laptop sold his soul to Melkosoftam, as I said earlier. Namely, a laptop at the UEFI level does not want to load anything other than a file / boot / efi / EFI / Microsoft / boot bootmgfw.efi where the Windows bootloader is located. Such is the discrimination!
By replacing the file with Grabowski, we thereby deceived both the laptop and Microsoft. Forced to load our beloved Grub, instead of the evil and stubborn Windows.
What to do next? + Precautions when upgrading.
Live and rejoice. But exactly until grub wants to update. Or, you do not want to sin and update your Windows
First about updating Grub.
The fact is that after the update, Grub runs the update-grub command, which does not find the Windows bootloader in the folder hierarchy we created. (for reasons I don't understand)... And, thus, after updating grub and then restarting the PC, there will be no harmful Windows in the OS selection list (and it serves it right!). The solution is confusing, but the algorithm is familiar
- Rename the Microsoft folder (in which the files from the hornbeam and Linux are now) to something temporary, for example, MicrosoftLinux.
- You rename the good old Microsoft2 folder (which contains the Windows bootloader) to simply Microsoft, thereby returning it to its original state.
- Execute the command sudo update-grub.
- Return the folder names, giving them the look from the solution. Those. Rename MicrosoftLinux back to Microsoft, Microsoft back to Microsoft2.
- We repeat step 12 from the solution and again we are glad that Windows appears in the OS list when the computer boots.
Yes, so far only so. This business would be automated, but so far I was very lazy. After all, grub is not updated very often. And a manual description of the solution will never be superfluous, then it will be useful for automation.
Now what you need to know if you are going to update Windows .
Most Windows updates require a restart. After such a reboot, Windows 8.1, as expected, failed to boot, because it did not find its bootloader at / boot / EFI / Microsoft (Linux now lives there)... Therefore, be sure to replace the bootloader before installing Windows updates. Those. to the Microsoft folder in our example. Yes, after that the whole problem will return, because only Windows will be loaded again, but after all, it will be easier to execute the algorithm from the solution a second time?;)