WebMoney payment system Registration. How to register a WebMoney-wallet and use it? Step-by-step instruction creating a wallet
Hi friends! Want to know how to create a WEBMONEY wallet? Then you are at! I hope you liked the previous article about the newcomer I wrote about last time. Who did not read be sure to read. But, and today it will be talking about the popular WebMoney electronic Internet wallet.
Even without planning any purchases, leaving the house, the subject that everyone has with him is a wallet. Walking on the network is usually related to the search for information, but also on the Internet, you may need money at any time.
If you are the owner of your own business, then you must know about the need, and the WebMoney payment system will open up a lot of opportunities in front of you, most of them - payment for goods.
Electronic money applicable not only on the Internet, pay the rent, consumption of electricity, gas, water, purchase tickets and insurance - a list of available operations is huge. The benefit is obvious - the minimum commissions, the saving time and strength. It remains only to learn how to create a Webmoney e-wallet in Russia and beyond without a passport and get a personal account in the system.
Summary:
How to create a WEBMoney wallet in Russia
Types of Wallets Webmoney and their appointment
Before gradually stay at the registration stages and create a Webmoney e-wallet, consider the main electronic wallet control options:
WebMoney Keeper Mobile.
It may happen that you will have the need to pay for something, that is, to access the WebMoney wallet, but at hand there will be no laptop or computer.
In order to facilitate user access to electronic wallets, the system offers WM Keeper Mobile. - This is an application with the possibility of installing the program to the phone, it is adapted to work with almost any mobile device.
WebMoney Keeper Light
Wallet Management through the browser on the System Online Service page with mandatory JavaScript support.
WebMoney Keeper Mini.
Management method similar WM KEEPER LIGHT.But JavaScript support is not required.
WebMoney Keeper Classic.
Program, webMoney Keeper Classic, To control the WebMoney-wallet, is installed on personal Computer. It is considered the most convenient and reliable way.
How to create a wallet WebMoney Keeper Classic on a computer
How to register a wallet Webmoney
First you need visit the payment system website, on the main page On the right above you will see two noticeable buttons. Registration and input. Choose the first one, you will need the second after you register.
On the page that opens, you will be offered registration and management account using a social network or enter the number mobile phone.
Pay attention, Create an electronic WebMoney Wallet can only be provided with a condition for providing reliable data about yourself, starting with the phone number. Passport data must matchOtherwise, then you will not be able to withdraw money from the system.
After entering the number in international format for Russia, it begins with +7, click continue and fill out.
Then you must fill it with its form and agree with the conditions, and click on the activation button " proceed". Next to the specified you mailbox Or the mobile phone will be sent a registration code. We drive the code into the shape, and click to continue.
After checking the system correctly entered the code, you fall on the page with the choice software To control electronic wallet.
In the next step you need download WebMoney Keeper program. Runing the installation file, it is advisable to familiarize yourself with the terms of the agreement and then follow the installation program instructions.
When you first start the WebMoney wallet, select the option indicating your desire to register with WebMoney.
In the next step, you must enter the registration code earlier. It must be entered in the appropriate field and then follow all the instructions that the registration wizard offers.
As soon as the key generation is over, you will become the owner of your own WM identifier (WMID). It is necessary for logging in, so it is better to write it down.
Attention. The key file is saved in the computer's memory, access code is assigned to it. In a situation, if you decide to reinstall the operating system or decide to use Keeper on another hardware, the keys and code to them will definitely ask.
For more security, the key files are recommended to store out of the offshore place and have a backup on any replacement media. Of course, with the worship of the keys, they can be restored, but it will take time for this. There is one more the storage method of the keys file is the Enum-Storage service..
At the last stage of registration in the system, you will receive an offer to enter a special activation code, it will come to the phone or email specified at the beginning.
Congratulations! Now you have a Webmoney wallet, the registration of which will allow you to instantly make various financial transactions.
How to use WebMoney Keeper on a computer
You can run the WM Keeper Classic program from the start menu. After entering the WM identifier (WMID) and the password selected during registration, the program will connect to the certification server, and you will access and manage WM wallets. To do this, in the main menu of the program, go to the wallets tab.
How to create a webmoney wallet WMR, WMZ, WMU
By analogy with ordinary money, there may be rubles or euros in your wallet, your electronic money will be stored in different accounts depending on the currency. Create them enough simply using a special WebMoney tab you will fall in the wallet creation menu. To begin with, it is possible to limit ourselves to the ruble, it will begin with the letter R (WMR) and dollars, it is called WMZ.
Only these twelve-digit numbers must be specified when replenishing the balance Cash or indicate to translate electronic payments. If necessary, you can add wallets to your WMID and in other currencies.
Now, as soon as you need to spend or get any payments, you just need to start WebMoney Keeper, in the window that appears, specify a WMID and password.
How to exchange currency in WebMoney
If you need to exchange dollars on rubles, you can do it in a few seconds. It is enough to highlight the desired wallet and using the right mouse button to see the available operations. In the list that opens, select the item to exchange and enter the currency amount that you want to exchange in the appropriate field, the second line will be filled automatically, there you will see the amount in the desired currency at the system rate.
If she suits you just follow the prompts.
How to use WebMoney on mobile phone
It may happen that you will have a need to pay for anything, that is, to access the virtual wallet, but the right technique will not be at hand. Webmoney offers WM Keeper Mobile. - This is an application with the possibility of installing on a mobile phone or communicator, it is adapted to work with almost any mobile device.
It is worth only to take into account that getting a Webmoney certificate or not depends on your desire. This is an optional operation, but for doing business, it is very useful. Thus, users with a certificate are lower than the initial and having only received when registering in Keeper Mobile have some limitations and one of them concerns the maximum possible amount on the account, it should not exceed 5 thousand rubles or an equal amount in another currency.
The sum of one translation cannot exceed 1 thousand steering wheelThere are limits and the number of operations for any specific period, for example, per day. You can read more details with the rules for using the system, limits and other types of wallets on the official website of the WebMoney payment system.
I hope you liked the post, how to create a webmoney's e-wallet, and you will gladly read my previous article about, but first help me in the development of the project, all that is required of you - click on the button below from your social network, and this material will be seen your friends. New meetings friends.
Today I will tell you how to create my wallet in the WebMoney system. We will pass with you the full procedure for registering Webmoney, which will allow you to fully use online money (get, transfer, exchange, output, pay them products and services, etc.). What is especially useful to you if you have decided to create an online store for free.
In this article you will learn:
Preparation and important points
I want to immediately emphasize your attention on the fact that it is better to immediately indicate my real data so that it subsequently has no problems confirmation of the authentication of the introduced information. You can not be afraid for privacy, this system is quite safe, for example, I myself use Webmoney for more than four years.
But let's start registering in Webmoney. To do this, it is desirable to prepare your passport, identification number, a mobile phone number, and, of course, keep the phone itself next.
For access to your wallets in WebMoney there are 4 different clients:
- WM KEEPER LIGHT;
- WM Keeper Mobile.
In order for you to understand which client is best to choose, read this article.
WebMoney Registration Mini
First, we need to register Webmoney mini, make it simpler simple. To do this, open any browser (in my case - it is an inernet Explorer, as it is installed by default on all computers with operating system Windows). It starts using a shortcut on the desktop or from the Start menu, as shown in the screenshot:
You will open the browser window in the address bar of which to enter the address of the WebMoney system: https://webmoney.ru. and click " ENTER" on keyboard. The following window will open in front of you: 
In the left part of the site, you will see two large buttons: "Registration" and "Login". The first of them we will need only now when we are going to create a WebMoney wallet. On the second button, "Login", we will now press now, when we want to log in to the webmoney system. So, let's register in WebMoney, for this, click the "Registration" button: 
Now the page with the choice of a registration method will open. Methods two: 1) with your social network account; 2) either with your personal mobile number. In principle, there is no difference, you register through a social network or through a mobile phone, however i still recommend you to register via Mobile number (You still have to be introduced to remove the restrictions), and subsequently the registration will be easier.
However, I do not seeking easy ways and despite not what I chose registration through social networks (I read a little regretted). If you want to repeat it, then you note that only real name and surnames should be indicated in your social network. If there are nicknames there, they will be used to create a WebMoney wallet, and therefore, to attach a card to output from WebMoney. You will have to change the name and surname (for real), and for confirmation it will be necessary to send a passport scan, and for Russians yet Scanned identification number. In general, the carrots for one or two weeks exactly! Better still immediately register via mobile phone
But, I choose registration in WebMoney through a social network: 
My choice fell on a twitter account account, but regardless of the selected social network, you will still show a slightly similar window in which you will be asked to enter your login and password. Do not be afraid to enter, this procedure is absolutely safe. Many sites practice this procedure, And the logins and passwords will still not be known to Webmoney, since the procedure passes through the server of the selected social network (in my case, through twitter).
So, in the selected window, enter the login, password and click on the "Authorize" or "OK" button, as shown in the picture below: 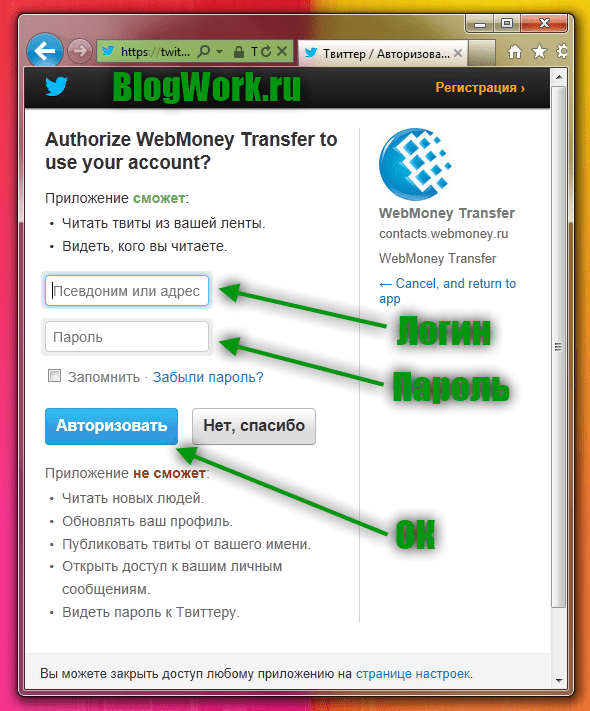
After the login and password entered, and you click "OK", a window will appear in front of you for a few seconds that the authorization has passed successfully and you will be redirected back to the application (in our case to Webmoney): 
Once the webmoney system will receive your data from social networks. You will open the window in which it will be written "Welcome, Your name! Your personal data obtained from ... ". And under this message you will see your nickname, name, language, time zone. If the data is correct, put a tick in the appropriate place and press the "Next" button. In general, do everything as shown in our screenshot: 
Next, you will find a page through which you can invite other friends on social networks that have no Webmoney yet. To do this, you need to note the checkbox of those people you want to invite. In my case, I will not do this, since most of my friends already have wallets in WebMoney, and the rest to send letters in the form of spam - no desire.
If you do not want to send invitations to anyone, then follow the checkboxes nowhere, or first put all the checkboxes, and then remove it is shown in the screenshot below. After that click the button at the bottom page "Next": 
And now I found a solemn moment, you registered in Webmoney! Congratulations !!! Those who registered through the phone are the window shown in the screenshot below, they saw me a little earlier.
So, what we see on the screen:
- We congratulate us with successful registration in the WebMoney Transfer system! (This window can be safely closed by pressing the red cross in the corner of the green message)
- We give advice to enter a mobile phone number, as a limit is now installed a limit of 5,000 Russian rubles, and entering your number, we immediately increase the limit to 15,000 Russian rubles that are more often called WMR in webmoney.
- However, we lack wallets. They need to create. To do this, click on the link "You can create" in the "Wallets" field. As shown in the picture below.

Creating a wallet pretty simple taskTo do this, select the desired currency first (WMR - Russian rubles, WMZ - dollars, WME - Euro, WMU - Ukrainian hryvnias, etc.). After that, read the agreement (I honestly did not read, because I do not understand anything in legal tricks). Next, check the box next to the text, which indicates that you accept the terms of the agreement. And in conclusion, click Save.
More clearly can be considered in the screenshot: 
- At number one, we are shown alert, which says that the WMR wallet is created (if you have chosen another currency, then, accordingly, another wallet will be created).
- Under the second arrow is shown our wallet number. That's it, and we will give those from whom we want to obtain the specified currency.
- If you want to add a new wallet, then click on the appropriate button that looks like "[+]". After that, it will reinforce you on the previous window, in which it will also need to choose a currency, accept the agreement and click the "Create" button.
- Under the fourth arrow, we see your balance. IN this moment It is 0.00 WMR. You can click on these numbers to get a more detailed report.
- Well, in fact, the fifth arrow points to us to the long "update" button by clicking which we will update the system and get more accurate information about the state of our wallet.
Here is the very picture with the arrows: 
How to use Webmoney
That's actually passed the first part of the registration of wallets in Webmoney. Those who have enough of this minimum (receiving small amounts, payment of services, goods, withdrawal of money, etc.), they may be on it, and finish reading this article. Those who decided to receive a maximum of opportunities from WebMoney and not feel limited, as recommended to continue to fulfill our recommendations.
First, let's repeat how to log in to the webmoney system. To do this, as usual, in the address bar of the browser, enter https://webmoney.ru. And click on the "Login" button, which is located on the left side of the site. Here is a screenshot for clarity: 
Next, you will open a page called WebMoney system as "WebMoney ENTER". Scroll the scroll of the mouse down and see not only the fields for entering the WMID and password, but also WM Keeper of different versions. We are interested in WM Keeper Mini, then we choose it.
For more information, see Figure: 
Next, we will be offered to introduce yourself, for this you will need to enter your username (phone number) and password, or use social networks if you are registered through them. I registered through Twitter, I choose it (I hope you did it through the phone): 
I can not show how this happens when the login and password are introduced, so I show how this happens: when you press your social network. First pops up the window asking for authorized, you click on this button: 
After that, there is an automatic entrance to the wallet. The advantages of this entry is that you do not need to introduce logins and passwords into the system.
Now let's expand the possibilities of our wallet, by increasing the limit: Introduce your phone number. To do this, we use the advice that hangs in a yellow framework. And then turn on the "Specify your phone number" link, as shown in our screenshot (if you have already entered the phone, simply skip this item). 
In the next window, we need to assign a phone number. We enter it in a special field, but note that it must be mobile and it is in full, but only without the sign "+" at the beginning. After what are the "OK" button and expect SMS messages to your mobile phone (it comes within a few first seconds). 
As soon as I received the code in SMS, Introduced it to a special field and rejected my phone number safely. Now my limit is changed to 15,000 Russian rubles.
How to get a formal certificate in WebMoney
If you want to further expand your use of WebMoney. We recommend you to get at least a formal certificate, which will also help you when using the webmoney wallet during transactions with other participants in the system. If you say, briefly, you need to provide your passport data to the system, that is, to indicate where they live, as well as enter your passport information. Case three minutes. Again, you can absolutely not worry about security!
To get a certificate, go to the "Certificate" tab and click on the "Get Certificate" button, which is located on the left side of the site. However, if you have no such links, just go to this link: https://passport.webmoney.ru/asp/aprocess.asp.
Most likely, you will again be asked to log in either through the phone or through the social network. Therefore, log in. Next, click on the "Your Personal Data" link, the link can be found in the left sidebar of the site. If lazy to search, here it is: https://passport.webmoney.ru/asp/auserinfo.asp
Here you will find such a page in which you will need to enter all your personal data: 
Note that it is better to immediately indicate your real passport data, otherwise you will have to change them to real if you have to confirm the specified passport data. In addition, you will not be able to attach a bank plastic card to your WebMoney wallet if the data will differ from those that you specified in the bank. In general, believe me better to specify your real data! After all the data is specified, click the Save button.
You can not enter the city, you can only specify it, for this click on the link indicated opposite the city, you will open the new window in front of you, in which the checkmark will be indicated, which city will indicate (city permanent registration, passport city). In my case there was one city, so I immediately noted the three ticks all points, then I pressed the "Select City" button. As shown in Figure: 
Once you have entered all the data and pressed the Save button, you will be transferred to the Certificate Control Panel page, where you will see that now have a formal certificate. Congratulations! 
I also recommend to pass to you E-NUM authorization for greater safety and great opportunities. To make it quite simple, for this, follow the link: https://security.webmoney.ru/asp/setenum.asp
I will not describe, since there is nothing difficult, but everything comes down to the fact that you need to enter your mobile number, then confirm it by email. And not everyone wants to put this feature.
How to change WebMoney Keeper Mini on WebMoney Keeper Classic
Now it came to turn to finally remove all the restrictions from your wallet! Change WM Keeper MINI on WM Keeper Classic. It's easy enough to do this, you can do it through the wallet settings, or go to the "Security" tab on WebMoney website, then select the item in the left column "Management Methods". Or just follow the link: https://security.webmoney.ru/asp/controllist2.asp.
As you always have to confirm the reality of your personality, with the help of a social network or a mobile phone. My E-NUM security system is connected so the input is somewhat complicated. In particular, I first are asked to log in with the help of a social network: 
And then send the code to be entered into a special field. 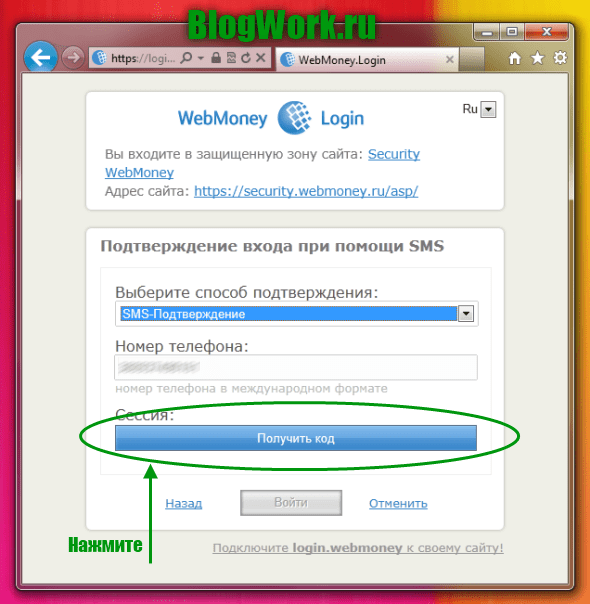
However, in the end, I get into the ways to control the account. At the moment, the green light is on the WM Keeper Mini. Therefore, click on the "Disable" button, then click on the "Connect" button, however, already in the square WM Keeper Classic, as shown in the screenshot published below. 
You certainly choose and another management method, such as WM Keeper Light or WM Keeper Mobile. However, the WM Keeper Light with WM Keeper Mini cannot be proceeded (the system has not yet implemented this function), and WM Keeper Mobile in its functions is even more trimmed than mini. Therefore, the output one - WM Keeper Classic! Moreover, for many, this is the most ideal option, as it gives maximum opportunities, and it is very simple to use.
After pressing this button, you will be offered to download the generated key, which you will subsequently need to enter the WebMoney program. For this click right-click Mice on the link "Download keys". In those who opened context menu, Select "Save the object as ...". You will be offered to save the file, just specify where to save the file and that's it. Then click on the Continue button: 
WebMoney Registration Keeper Classic
In this part we will tell you how to register WM Keeper Classic and how to use it. To begin with, it is necessary to download it better from the official site, last version You can find on the link: https://wiki.webmoney.ru/projects/webmoney/wiki/wm_keeper_classic
Go on the link, choose the "Russian version" (you can English, if you want), after which the download occurs installation File:
The downloaded file looks like this: 
Candle on the file double click the left mouse button and the application will start. Most likely, the security system will ask you about whether it is worth really running this application, answer "Yes, run" (if you swing it from the official site): 
Next, the WM Keeper Classic program will welcome you and tell what version you install, ask you to close the rest windows Apps (To install without interruptions), and also reports that the program is protected by copyright. In general, nothing particularly important, so boldly press "Next": 
The following window will be an agreement that, as a rule, is in any program or computer game. Of course you can read carefully this agreement, and then take or not accept it. However, the majority (I do not hide, and I mean them), absolutely do not read such agreements, since if you are not going to do nothing illegal with the program, it is unlikely to find something very interesting or important for yourself in this agreement.
Therefore, you can just put a tick next to the message that you agree with the agreement and accept it. Then click on the "Next" button. 
In the next window, you need to specify where you want to install the program (you can leave unchanged and the program will install your files, in the root of others windows programs). At the end, again, click "Next". 
The next window tells us that the root certificate from Webmoney Transfer Root Authority will be installed on the computer. Therefore, click the "Yes" button. In general, again, nothing serious, just click the "Next" button. 
Upon completion, you are also offered to install a browser plugin, which will increase your safety when visiting sites. You can put, you can - no. The main press at the end "Ready". 
So, the program is installed on the computer, now start the shortcut that should already lie on your desktop. After that you will open the next small window in which you need to click on the "Restore" link: 
In this window, enter your WMID number, which can be seen in WM Keeper Mini in the upper right corner (a small blue line on which the numbers are written). Then enter your password. And now specify the path to the file that we have saved when registering WM Keeper Classic. It will have a name - the number of your WMID, and the extension will be ".kwn." For example, my file is called "878503901335.kwm". When everything is entered, click "OK": 
Next, you will be asked about the wallet file, which you most likely do not have, so feel free to allow the program to create a new wallets file and click the "OK" button. 
And, voila! We createdWebMoney! And notice, did it completely free! Congratulations!

If you have any questions - ask them in the comments! And if you want to start earning a lot of WMR, WMZ or WME - subscribe to our blog and read new articles on how you can make money online! Good luck to all!
Posted by authorWebMoney - Payment system, which appeared 18 years ago (in 1998) and became one of the popular methods for calculating and payment on the Internet. For today wallet WebMoney There are about 31 million registered accounts with annual cash transactions on them at $ 17 billion.
Residents from different countries can enjoy the international and use of them, including from Russia, Ukraine.
The main competitors in the CIS market are and
The owners and the country of registration of the company are not known and the site is not listed, except mentioning the Lithuanian management company. All major technical departments and support are located in Russia, in Moscow there is a chief attestation center.
Website WebMoney - www.webmoney.ru. In addition to Russian, present Spanish, Turkish, Portuguese and English.
Units calculated are title signs nominated in different currency units - WMZ, WMR, WMB, WME, WMU and others, which are equivalent, respectively, the US dollar, the Russian ruble, the Belarusian ruble, the euro and the Ukrainian hryvnia. If you look from the legal side, they cannot be called electronic money, but are financial assets. For a title currency card, a wallet has its own guarantor, for example, in Belarus - this is Tekhnobank OJSC, in Ukraine - the company "Agency Guarantee Guarantee" LLC, in Russia, the guarantor is LLC VMR.
In the fall of last year, the VM began to officially produce electronic money in the EU countries, using the appropriate license of the British FCA regulator on their release. Thus, all user accounts in WME have acquired the right to be called electronic money and are governed by European laws, with the possibilities of compensatory payments in cases of bankruptcy.
In the event of controversial situations between clients, the service provides the ability to use arbitration. After filing a free application, the WMID holder is a warning or block the wallet, depending on the type of complaint. It is discussed within a week and a decision is made, which cannot be appealed.
Registration Webmoney
Registration in Webmani takes place in several stages. It is not difficult to figure them out, you need to follow the instructions of the system and after four steps you will be the user with the initial certificate. Before working with the system, read agreement on the provision of services.
First step. We enter a mobile phone number. Specify only to you personally, as it comes to an SMS with the code, without which you do not complete the registration. In the future, access passwords will come to it when entering the personal account and confirmation of the commission of various monetary operations.
The second step. Here I introduce personal data:
- Date of birth
- Country where you live
- E-mail address,
- Specify security Question.
Third step. As I used to speak, a four-digit code will come to the phone. Enter it into the appropriate form field.
Fourth step. Mobile number is a login to enter the VM website. It remains to come up with a password - I advise you to use online generatorswho will give it out of any complexity, but will need to write it or save it in a reliable place. We enter a captcha and all, we registered in the WebMoney service and already many of its functions are available, even having the lowest certificate. The limits are not very large, but you can always provide required documents And get formal and higher.
I forgot to mention - on electronic drawer A message will come with a reference, which is moving, thereby confirming the specified e-mail.
Each client is assigned a user ID or WMID, consisting of twelve digits. The WM identifier number can be found by the wallet number.
The entrance to the webmoney's wallet is carried out through the website www.webmoney.ru, indicating:
- Login
- Password
- Enter caps.
The access code will come to the mobile phone, which we enter in the newly appeared row. Log in to WebMoney, you can and through a profile on social networks or through a kip application.
Login via WebMoney Keeper Classic, which can be downloaded here.
Wallet WebMoney
For receiving and transfer funds, you need to open a wallet. Webmoney provides it in seven title signs. Electronic money can only be called funds on the wallet in Euro WME, since the British license of the FCA financial regulator was obtained in the fall on their release, which implies their insurance and payment of compensation. There are no such guarantees for the other accounts.

The webman's woven number consists of a Latin letter and 12 digits. For example, R123456789012. The figure shows an example where and how to find a room in Keeper Standard and a classic.
The number of wallets created is not limited by quantity.
You can carry out operations with it through:
- Keeper Standart, works through the web interface on the site itself. The login is carried out with the login and password input. Something to get into it, follow the link Mini.Webmoney.ru. Features of the functional are limited, used to pay for goods, services, replenishment and transfer of money,
- Web Pro. The more advanced version of the above standard kiper, the entrance is similar as in the first case. It cannot be used in conjunction with the program - WM WinPro (Classic), which is below,
- Keeper WinPro Classic - special program For more convenient use of the service. Download Keper Classic
i advise everyone, as it has full functionality and opportunities,
- Mobile application - for a mobile phone, the same limited capabilities as in the standard, but you can always be online.
You can connect control to the settings and selecting the desired method.
Or at wMID Management Page:
When opening a wallet through Keeper Standart, you need to choose the currency of the account and agree with the proposed conditions.
Creating a wallet in Keeper WinPro, which can be downloaded by the above link.
Webmoney Certificates
WebMoney Certificate is a confirmation of your data provided by personal information during registration. It can be said that it is like a passport, but only on the Internet. The surname, name, patronymic, passport data and other information needed to identify an account is introduced into the certificate. Thus, you can influence the limits, increasing them, as well as on other limitations.
All this is necessary for the security of payments, prevent fraudulent schemes and raising confidence in you from the VEBMANI service. You can see it by on the website WebMoneyBy entering the identifier or wallet number.
The pseudonym certificate is obtained simultaneously with the completion of registration. Suitable for performing operations with small amounts. Confidence from the payment service is the most minimal. According to statistics, most, about 60%, have only it.
In order to gain an increase in limits on operations and add other functions, for example, for binding to the score, a formal certificate is needed. To receive it, you download the scanned copy or photo of the passport through the site. After checking them, which lasts within a few days, get a notice to the phone and e-mail about its passage. Getting fully free.
If you are the owner of the business and work related to the permanent receipt and exchanges of money through WebMoney, you need an initial certificate with verification of passport data. Obtaining paid through the personalizer: getting a certificate in Belarus can be for 200,000 thousand. rubles to Tekhnobank. Full list can be seen on the site.
Personal certificate is issued to registrars on a fee. After receiving it, you will open the maximum list of services and opportunities to make money in the affiliate program.
The affiliate program implies issuing certificates to other users at a personal meeting. For providing this service you get a commission from the full cost:
- for the issuance of the initial one - 50% of the amount
- for personal - 75%.
For all the issue, which arose with receiving a certificate, write to support support.wmtransfer.com.
Limits depending on the level of identification:

Top up webmoney
The company provides a wide range of opportunities to make money on WEBMONEY wallet. The table shows all available methods Entering funds with commissions and timing of their receipt for each title currency. For more information on your own region, you will find on the site by going to the field of money in the link, and I will go through some basic.

- Put money on webmoney with bank card Visa or MasterCard. Day limit 500 US dollars or 10,000 per month. To do this, type the required amount, remembering the commission, then enter the data of banking in the form plastic card - Number, action date, security code.
You can replenish the webman's wallet in Belarus through the system of the ERIP or, for example, on the E-Pay service.
- Bank transfer on the guarantors sites. For example, details for replenishment in Belarus through TECHNOBANK OJSC, you only need to enter the number of the wallet, the amount, last name, name and patronymic and go to the nearest branch of the bank and pay
- Top up VM through the score in Yandex Money, or Easy Pay. Previously need to tie them to your wallet.

- Replenishment through payment terminals. For example, you can replenish WMZ through terminals in the following countries: Armenia, Bulgaria, Georgia, Spain, Kazakhstan, Kyrgyzstan, Lithuania, Moldova, Turkey. Money comes instantly, the Commission for all countries is different.
- Transferring money through Internet banking - VTB24, Promsvyazbank, Alfa-Bank, Sberbank.
- Translate from a mobile phone - only for residents of Russia and Ukraine. Available mobile operators - MegaFon, Beeline, MTS, Tele2.
- Making cash via Svyna Salon Network or Euroset Terminals.
- Through the banking department. Come on the bank of the bank and replenishing the wallet in cash.
- Replenish WM with money transfer within Russia through the contact system, Unistream, Mail.
- By purchasing and activating prepaid maps, which are produced different value rates. They can be purchased both in Russia and Belarus.
- Go to the nearest ATM and replenish WebMoney.
- exchanged the most popular payment systems, such as Kiwi, Perfect Money, Skrill, Adv Cash, on WebMoney.
Translate WebMoney
Translate from WebMoney to webmoney to another user can be used various applications For managing a wallet. For the safety of translations, they should be protected, which happens on the code or in time. In this case, sending money to another person, they are blocked by the system. After receiving the goods or cash, you inform the code of the seller and only after that the deal is considered complete.
If the transaction is set in time, the recipient will receive money when this time is over. But if the goods are not received, then open a claim in arbitration.
The following restrictions apply:
- After 8 incorrect code input attempts, the translation returns back to the sender,
- The mode of shipment with the code also has a validity period, after which it will become inaccessible to input,
Consider the transfer of money from WebMoney using a Ceper Classic. Go to the menu, choose to transfer Webmoney and the window that appears enter the recipient's wallet number, the payment amount, if you need to write a comment. Further choose the type of translation -
- Normal - choose if you are safe and trust the recipient,
- Through the Escrow service
- With Protection - Recommended Method. By choosing this item, you will protect yourself as much as possible from possible fraud.
Specify need type, Protection period and remember the code. In the next window, we see the recipient WMID information, its business level and the presence of other complaints.
Almost similar actions should be done using a standard chacher in which we work on the site. Select the item Translate the funds and specify anyone and specify the type of protection.
Commission for the translation - 0.8%, but not lower than 0.01 title unit. She can't be more installed restrictions - For a wallet Z is 50 WM, respectively, for B - 100.000, R - 1500, U - 250.
The Commission is absent if the translation is carried out within one WMID, as well as for owners of the initial certificate.
If you need to exchange funds from one of your wallet to another, that is, for example, to translate WMZ in WMB or in WMR, it is easy to do with Keeper Classic, selecting the wallets and specifying the amount. Here the averaged course is seen on the exchange exchange.
Withdraw webmoney
Opportunities how to bring webmoney, a large amount. Full list and commissions for each Wallet type can be viewed on the Overview page. all ways to bring money from the account.
Or using standard Keeper on the site:
- We go to the site, enter your credentials,
- Choose the desired wallet,
- Press out the means - all the ways,
- Choose from the list the most suitable,
- In a new window, guidance on further action will appear.
A team works above the articles. On the site, the site is published guides, instructions, reviews: cryptocurrency, cryptobrge, exchangers, payment systems, mining, earnings, investment.
Of course, to start working in the system, you will need to create a webmoney of a wallet. Immediately note that the registration procedure on this service is not complicated, but takes time. In addition, the system has its own rules by violating which you cannot connect the online wallet and make payments. But, if you do everything right, then you will receive one of the most popular and protected wallets in the online payment system.
Registration: Initial level
Even before you proceed to registration on webmoney, you need to register yourself mailOtherwise, create WebMoney wallet you will not work.
Remember that if you have already registered a wallet, then when re-registration You can not use the same data: cell number and mail - they should not be "mounted" in the system, otherwise you will not be "registered".
In order for the registration start, go to the website www.webmoney.ru or find it through the search in your browser. Creating a personal account begins with the fact that in the upper right corner you click "Register" and fall on the right menu.
Creating a wallet is almost completed. It remains only to come up with a password and enter it in your personal account. At this stage, many users, registration causes difficulties, because in the WebMoney system is very high requirements for password.
Instructions for inventing password:
- use Latin letters and Arabic figures;
- put capital and lowercase letters;
- turn on the password characters of the upper case;
- do not use Russian letters and lower registers.
Example good password: [Email Protected]#93
Come up reliable password. Repeat it. Enter code from the picture and click "OK".

If you are incomprehensible to the number in the picture, then click "Change the picture" so that the system has changed the image.
After successfully creating a password, you will be left to confirm the email address. On the specified e-mail address will receive a system message with a link to activate. Go through it.
On the new page It will take to enter the code from the image and click "Check".

If everything is done correctly, the email address is confirmed, and the system will offer you to enter your personal account. To login, specify your username - the phone number specified during registration, password and enter the code from the picture. Click "Login."

To log in in WebMoney, you will need to enter a disposable code sent to your phone number. Usually, the code comes in a few seconds.
Registration: Creating a wallet
Many believe that after they register in WebMoney, they will be able to start working with a wallet, but this opinion is mistaken. Before you can enjoy the capabilities of the payment system, you will need to open a WM wallet. The system itself will offer you it as soon as you are for the first time.

- Click "Yes" to create a wallet for work.
- Select the currency in which you are going to work. If this is Russia, choose WMR.
- In a new window, put a tick about the adoption of the agreement.
- Click "Continue" to create a wallet end.

Creature WMR wallet Completed and you can carry out operations with the Russian currency. However, WebMoney service offers more opportunities, including work with multiple currencies. About this next.
Creating walkov WM.
Electronic service Webmoney offers 9 Valve optionsWith which you can work in your personal account. It remains only to deal with how to start a multivatory webman's wallet. Creating a current account in another currency - an extremely simple procedure:
- Come in your personal account.
- In the options menu, choose "Add an existing wallet".
- From the proposed list you choose the one, whose currency interests you.

For example, you choose "Create WMU-Wallet" - this is the Ukrainian currency. You will have an agreement window. Read the terms of the user and check the box that you agree to continue the creation.
You will have a window where the new wallet number will appear. Set the limits - if you need to install them and click "Add" to arrange a Ukrainian billing account.
To confirm, you will receive a message to the phone - enter it in the appropriate field and click "OK".

Now you have several settlement accounts, Russian and Ukrainian. Upon the above scheme, you can make the rest of the wallets: WMZ, WMH, WMX, WMG, WMV, WMK, WME, WMB. All of them will be displayed in the top control panel or in the wallets list, if you use another Keeper.
Currency exchanges
If you start WEBMoney wallets in different currencies, then it gives you the opportunity to exchange your cash Directly on the service. That is, if you want to get dollars, and you list rubles to you, then this situation is easy to change.

Now you can exchange rubles for dollars right in the WebMoney personal account. To do this, open and at the bottom, click on the green circle, meaning the exchange.
You will have a sharing window in which you must specify how much money you want to change. Choose the currency in which the exchange will be committed and the service will find how much money you will receive and what will the Commission be.
Click "OK" to carry out the transfer from one WM to another.

If all data is entered correctly, then you will receive a message with a confirmation code. Enter it on the site to complete the exchange.
Features of the pseudonym certificate
Certificate Webmoney is your level of access. Getting a higher certificate, completely free and gives users more possibilities and security. To see your level of certificate, just click on the avatar in your personal account.

This is the initial level of the certificate obtained without a passport and automatically assigned to all users who opened the WM-wallet. What opportunities does he give?
- translate funds inside the system, but with minimal limits and only on certain wallets;
- make funds to your account by terminals and prepaid cards;
- use the entire list of features included in the "Payment Service" section;
- conduct correspondence within the network;
- make exchanges between your settlement accounts.
In the "Payment Services" menu, you are available to you: payment of mobile and utility bills, replenishment of any bank card, payment of online games, Internet and social networks.
Getting a formal certificate and its capabilities
To get more high level Attestate, click on the inscription "Pseudonym" in the Avatar section. The service climbs you into a new window where you can read in more detail about the levels of certification. Click "Get Certificate" at the bottom of the page to issue a new access level.

In a new window, you will tell you about the possibilities of a formal certificate - this reference Information. Click "Continue" after you familiarize.
Here you will find a questionnaire in which you want to enter your personal data:
- surname;
- patronymic;
- date of birth;
- city;
- postcode;
- address.
All data specified in the questionnaire must be reliable, otherwise you will not pass the check.

On the side of each field there is a check mark "Do not show." This means that other users will not be able to see this data. If you remove the checkbox, you will make this data open for all WebMoney users.
- citizenship;
- passport data;
- date of issuing a document;
- the branch where the document was issued.
After entering this information, click "Continue data entry."

After you specify this data, the system will ask you to download a copy of your passport and starts checking. Having received formal certificate, you can:
- use more opportunities for translations;
- tie cards and electronic wallets of other systems;
- withdraw cash from webmoney;
- use exchanger;
- write reviews;
- create claims;
- you will have the limits.
Getting a formal certificate is necessary if you at least periodically work in WebMoney. If this is not done, then the personal account will be problematic.
In RuNet, popular electronic money are WebMoney (abbreviated WM, in Russian "WebMoney"). Webmoney employs many online shopping and commercial portals.
Who is thinking about receiving additional income in the network, he may need to make a WebMoney wallet for this. Also webmones can be used to pay for products and services, utility payments, mobile communications, Television, etc.
Many users have WM wallets and if there are some experience (and experience, as they say, the case is hiring) with pleasure using this payment system.
How to start a webmoney wallet
If you have a Webmoney wallet, then you can work with it either directly through the browser, or through the applications installed on your computer or on your mobile phone. For those who use small sums, probably easier to work through the browser.
Registration On the official website of Webmoney, one-only time should be passed, and then you can use your webmoney's wallet through "input" (4 in Fig. 1).
In fig. 1 In the top menu it is clear that the registration of webmoney is free of charge for 4 steps (clicable steps):
It all starts from the first step:
1) input phone
To start WEBMoney wallet, go through the link to
And we enter the number of your mobile phone, which when registering should be at your hand:
Fig. 1. The first step to start WebMoney wallet: enter phone number
We enter the phone number without errors in the field marked with the number 1 in Fig. 1 in format: country code, without spaces immediately operator code and phone number. For Russia, the country code 7. Therefore, we introduce a phone number for Russia, for example, in this form: 79100012345. We click the "Continue" button (3 in Fig. 1). Hooray, the first step is made!
Figure 2 in Fig. 1 It is noted that you can use webmoney applications for social networks if there are accounts on social networks.
Is it possible to register a webmoney wallet for Ukraine? Of course, it is possible.
When entering the site, you can immediately click on the selection of the language (5 in Fig. 1). Then we will see, what languages \u200b\u200bis webmoney:

Fig. 2. Select language on WebMoney website
There is Russian, English, Ukrainian, Spanish, Portuguese, Turkish languages \u200b\u200band others. German is missing, probably in Germany WebMoney payment system does not apply.
Registration WebMoney Wallet for Ukraine and for some other countries (see languages \u200b\u200bin Fig. 2) consists of the same four steps that are described here.
2) Enter personal data
To be able to solve possible questions or problems with webmoney, you should enter reliable data: the letter in the letter, as in the passport. Data after registration is changed, it is impossible to edit it, you may have to make another WebMoney wallet. Although you can change the mobile and e-mail number.
Clicking "Continue" (3 in Fig. 1), go to the second registration step:

Fig. 3. The second step for the registration of webmoney for free: Enter personal data
1 in fig. 3 - We enter the date of birth. To do this, click on small triangles in the field 1. A drop-down menu will appear from the numbers in which you need to find and click on your date.
2 in fig. 3 - Choose a country of residence if another country is offered. If you click on the small triangle in the field 2, we will see a huge list of countries: there is from what to choose. It is necessary to find your country and click on it for her choice.
3 in fig. 3 - In this field we enter your email without errors.
Note:
- To register in the payment system, it is better to use a new e-mail and in the future this mail on the Internet if possible not to show. This is useful to reduce spam in the mailbox, and most importantly, to prevent the account hacking. Login, password, control question from new mail It should be recorded in the notebook.
- No need to confuse the password from the e-mail and password from Webmoney wallet, these are different passwords.
4 in fig. 3 - choose the control question.
In addition to the maiden family name, you can choose a "favorite number", "nickname of a pet", "Favorite sports team", "Brand of the first car". (By the way, in Spain, every child at birth is given 2 surnames: the first - from the father, the second - from the mother. In passports they have two surnames. Therefore, for the Spaniards, the version with the Mother's maiden's last name is hardly suitable).
5 in fig. 3 - Enter the answer to the question that was chosen in the 4 field.
All this data is better to record in Notepad as the data necessary to access the webmoney wallet.
6 in fig. 3 - Ticks can be left (they stand by default), but you can remove them.
7 in fig. 3 - Without a tick in front of "I give ... consent" further ordered the way, so this checkbox is required!
Please note that at each step you can return to the previous step by clicking on the "Return" button. While registration is not completed, you can easily edit your data to start Webmoney wallet.
Click "Continue" (8 in Fig. 3). The "Check again the correctness of the personal data you specified" appears.

Fig. 4. Check your data for registration Wallet WebMoney
Checking carefully again all the data, it is better to write them down. At the bottom of this window there are "Back" buttons (if something is wrong) and "continue."
If everything is true, again click on "continue." Hurray, the second step is made!
3) phone check
After clicking on the "Continue" button on the mobile phone immediately comes an SMS message containing the code to confirm that you are the owner of the phone.

Fig. 5. Confirm your mobile to register WebMoney: Enter the code from SMS
We enter the code received on your mobile phone in SMS message (1 in Fig. 5), and click "continue" (2 in Fig. 5).
4) Password Purpose
Here you have to come up with a password for your Webmoney wallet. It should be new passwordwhich is not related to the password from that e-mail that you specified when entering personal data (Fig. 3).
You can use. A password consisting of numbers only is bad, for the numbers are faster than all the appropriate password selection programs. The password for the wallet, besides the letters, at least the Latin letters should be included. The presence of other characters (!,: Etc.) increases the reliability of the password.

1 in fig. 6 - come up with a reliable password and write in a notebook,
2 - repeat the input of the same password, the main thing, repeat without errors,
3 in fig. 6 - Enter the characters from the picture.
Click "OK".
Note: Record to a notebook or somehow otherwise your data entered during registration.Hope only for your memory among the flow of information in life and on the Internet - utopia.
We fall into the window (Fig. 7), in which you can immediately choose the currency of the walker.
Wallet with currency rubles is WMR, its number begins with the letter R, for example, ruble webmoney number can have this kind: R530000018008. Although it will be possible and later in your WebMoney account to start wallets with other currencies, if they need. The rules are selected below (digit 0 in Fig. 7).

Fig. 7. We accept the Agreement and create your webmoney wallet
In the upper right corner, pay attention to WMID is not yet a WebMoney wallet number (1 in Fig. 7), this is a WM identifier, which is just an address of the participant of the WebMoney payment system.
Do not confuse WMID with a webmoney wallet number, these are different things. Top up webmones - this means putting money on the webmoney wallet number, but not on WMID.
So, as can be seen in Fig. 8, Task - Warent WebMoney Wallet - Solved:

Fig. 8. Ruble Wallet WebMoney Created
Webman's Wallet Number in Fig. 8 is highlighted in numbers 1. It is this number that will be needed to, for example, to replenish the webmoney's wallet through the terminal, what it will be discussed below.
E-mail confirmation
In his mail, which was specified during registration (Fig. 3), we are looking for a letter from WebMoney Team with the "Confirm your email address" header:

Fig. 9. Confirmation of the email address for the webmoney wallet
To confirm the e-mail, click on a long link (the red frame in Fig. 9). True, the entrance to the Webmoney wallet is carried out mainly by a mobile phone number, at least for an anonymous (unidentified) user.
Entry after registration
The webmoney website is registered once. In the future, on your computer (smartphone), you can enter the browser by reference:
Entrance to Mini WebMoney https://mini.webmoney.ru/
To enter your webmoney wallet, you need to enter a login and password. As a login, use no e-mail, but a mobile phone number.
In the future, if necessary, you can take the identification of the webmoney wallet to change the status of an anonymous user on the identified. There are other levels of website certification, if necessary, you can pass them.
Exit from WebMoney
The right way out of the webmoney wallet is a small button in the upper right corner, which is in fig. 8 Arranged in a red rectangle.
How to put money on WebMoney?
You can put money on your Webmoney wallet, or if necessary, on someone else's wallet. To put money on someone else's wallet Webmoney (for example, through the terminal), you can not start your wallet, although it is more easier to deal with your wallet, of course.
To make electronic payments directly from the house, from the office or through mobile devices, you need to replenish your WebMoney wallet. To replenish the WebMoney account, there are different options, the following is a useful review.
WEBMONEY replenishment methods
On the official payment system website there is information about all available methods for replenishing the WM-wallet. This includes
- bank transfer,
- replenishment from a mobile phone
- remittance,
- terminals I.
- special WebMoney cards.
You can use the option that approaches at the moment.
Replenish the WEBMoney wallet in rubles. And if another currency is needed for calculations, then within the WebMoney payment system you can make a quick exchange. The exchange of currencies in Webmoney can be carried out directly through the system itself or through third-party services (through reliable exchangers). In order not to lose money on the Commission in their exchange, it can be recalled that it is securely and practical to use webmones on the network, for example, to pay for mobile, Internet, etc.
How to put money on webmoney through the terminal
If you want to replenish Webmoney in cash, then it will be necessary to write on a sheet of paper (or print) the WebMoney wallet number. As already mentioned, the number of the ruble wallet WM may have this kind: R530000012345. Approximately this type of room should write without errors.
With the number of Webmoney Wallet, recorded on a sheet of paper, go to the nearest terminal, which is located in the store, a shopping or office center, a bank, at the station. All modern terminals are equipped with the function of replenishing electronic wallets. Through the terminal you can replenish both your Webmoney wallet and any other wallet.
- In order to deposit cash, it is necessary to go to the "E-Commerce" section on the terminal.
- After that, select the WebMoney icon and enter your number of your or other R wallet without errors in the field (ruble wallet). Be sure to check the correctness of the input.
- Next, click "Forward" and make the required amount through the bill acceptor in the terminal.
Note that the replenishment of WebMoney through the terminal suggests the payment of the Commission. The amount of additional costs can be from 3 to 10%, depending on how the electronic terminal you use. If you need to translate someone a certain amount, consider this moment, otherwise you will have to re-go to the terminal to report money.
The money on the WebMoney account comes almost immediately. Do not forget to take a check at the terminal to avoid possible problems with not crediting funds. From technical failures, alas, no one is insured. You can, for example, put money through the terminal on the webman's wallet, come home or office and there on a computer (smartphone) check the receipt of money in your wallet.
Alternative methods of replenishment Wallet Webmoney
Get money on a wm wallet not only by making cash or electronic money. You can earn a certain amount on the Internet. Exchange of articles, comment exchanges and other projects for earnings online work with WebMoney (and some - only with webmoney), so the money received for the task is to receive on your webmoney wallet.
For beginners, such methods of earnings will be suitable, as writing reviews, writing articles for the content exchange, passage paid surveys, posting messages, comments on forums and social networks, etc. Of course, it will take time to earn even a small amount. Perhaps, no amount is important for the first earnings, but the very fact of its receipt. Therefore, this option to replenish the webmoney wallet has a place to be.
Now you know how to start webmoney and put money there.
How to start webmoney wallets another currency
Webmoney wallets can be created in the following currencies:
- rubles currency is WMR, such an account begins with the letter R (1 in Fig. 8),
- currency dollars are WMZ, the account number begins with the letter Z (4 in Fig. 10),
- euro currency is WME, its number precedes the letter E,
- WMU - Equivalent UAH,
- WMB - BMY Equivalent,
- WMX - Equivalent 0.001 BTC,
- WMG - equivalent of the 1st gram of gold,
- WMK - Equivalent KZT.
WebMoney's ruble wallet has already been created, now we create for the same WMID (1 in Fig. 10) WebMoney's wallet, for example, in dollars. This can be done for 6 clicks:

Fig. 10. How to start a webman's wallet with another currency: Steps are numbered
1 in fig. 10 - You need to enter your WebMoney account,
2 in fig. 10 - click on the + icon,
3 - Click "Create a Wallet",
4 - choose the required currency,
5 - read and be sure to put a tick opposite "I accept the conditions ...",
6 in fig. 10 - Click "Create". A wallet with a number will appear, which will begin with the letter Z (because in Fig. 10, the currency of dollars was chosen).
How to remove WebMoney
Delete webmoney is not as easy as it may seem. Webmoney wallet must be on the official website of Webmoney.
- Display all means.
- Repay loans if they are.
- Complete claims and complaints, if any.

Fig. 11 How to remove WebMoney wallet
1 in fig. 11 - you need to go to your wallet,
2 - click on settings,
3 in fig. 11 - in the window that opens, click "Send a request for refusal to maintain".
The request is checked by WebMoney Technical Support. A message is sent to E-mail that after 7 days the service will be completely discontinued, all data will be removed permanently.
Tech support Webmoney
Voting "What electronic money do you use or don't use them at all?"
Receive current articles on computer literacy right on your mailbox.
Already more 3.000 subscribers