Adjust the speed of the computer or laptop fans. How to adjust the speed of rotation of coolers (fans) How to turn on automatic adjustment of the fan rotation speed
This article describes the processor cooler speed control program, video cards and other PC elements. It does not matter whether to change the frequency of rotation of the fans due to their excessive noise or due to overheating, Speedfan will help in any case. The main condition for the proper functioning of the utility is the ability to adjust the coolers from the BIOS.
Speedfan.
Speedfan - absolutely free program For a cooler video card, a central processor and any other equipment with active cooling. The fan control can be carried out in automatic or manual mode.
Before starting the utility, it is advisable to disable the automatic change in the speed in the BIOS. If you disregard this condition, the proper functioning of the application is not guaranteed. After switching on Speedfan, reads information about fan speeds and takes these values \u200b\u200bas the maximum. It follows that if bIOS settings Do not allow to unwind the cooler to the limit, then the utility will not be able to do this.

For example, a CPU cooler during switching on Speedfan rotated at a speed of 1000 rp. The application will take this value as the upper limit and will not be able to increase the frequency when it reaches the critical level. If the computer does not automatically turn off, then it cPU It will fail.
First start
After starting, the program for adjusting the cooler speed will draw the window with brief reference. After studying the text, you should put a check mark on the only item and close the window. After that it will no longer appear on the screen.
Now the program will determine which equipment is installed active cooling with the possibility of adjustment and considers sensor readings. After that, the display will automatically display the fan speeds and the temperature of the main PC elements. In addition, in the application panel, you can observe information about the workload of the processor and voltage.
To switch the language into Russian, go to the "Configure"\u003e Options menu. Increate "Language" Set to "Russian". Click on "OK".
Main window
The program for adjusting the speed of the coolers in Russian displays all the necessary information for the user in separate blocks. In the middle of the window there are data that describe all found fan controllers. Their names are - etc. The list can have much more coolers than in PC. Opposite some of them, the velocity of the fans will be revealed. Others or will show values \u200b\u200bequal to zero, or "trash" (less than 1000 revolutions per minute).

Opposite the data describing the operation of the screws, there is a block of information about the temperature of the main components of the PC:
CPU - processor.
GPU - video card core.
HD0 - hDD.
Here can also be "trash". To determine what values \u200b\u200bare not real, you need to think logically. For example, the temperature of the devices in the running machine is unlikely to reach a level of 5 or 120 degrees.
This is the only drawback that a program for adjusting the speed of the cooler did not lose for all the years of development. It is worth saying that the official website offers a collection required settings Utilities for popular PC configurations. However, it is often much faster to perform all the settings manually.
Main blocks utility
The utility unit with a list of SPEED01, 02, etc. contains switches of screws. It is indicated in percent. The main task is to determine which switches from this block for which fans are responsible.
Navigate to the first selector and change its value by 20-30%. Jump the speed opposite which string "Fan" changes. Now change the settings of the next switch. Remember or write down each match found.
If the sensors cannot be identified, it makes sense to use the AIDA64 utility. Run it simultaneously and Speedfan. Change the Speed \u200b\u200bswitches values, and see what specifically the fans start spinning at the other speed.
Configuration
Go to the "Configuration" menu. Here you can set all the lines of the blocks of the main window understandable names. For example, the CPU cooler rotation sensor is renamed to "TEMPCPU". To do this, click on any item in the settings, wait a second and click again. After that, the line will be highlighted, and the cursor will appear in it.

Highlight the name of the desired sensor and pay attention to the lower part of the application window. Here you should enter, what temperature of each PC device program to adjust the cooler speed will be considered normal. When the equipment is cooled to this level, the fan turns will become minimal. Also specify the alarm temperature. Heating to this level will turn on the maximum cooler speed.
To find out what values \u200b\u200bit is worth using, refer to the official sites of your PC devices manufacturers.
Now press "+" in front of the sensor name. Remove all ticks from the "Speed" list. Leave only the one that matches the regulator of this device.
Navigate to the "Fans" tab and, if necessary, rename them as well as sensors. Unused Disconnect by removing the checkboxes.
Speed
For a program to adjust the cooler speed control, open the "Speed" tab. Highlight the row of the desired fan and rename it, as you consider it necessary. Now pay attention to the bottom window of the window. There are two points here:

With help speed \u200b\u200bcontrol systems vehicle, you can fix the speed value when it exceeds 30 kilometers per hour. It is also possible to maintain it at the same level.
The input signals include:
1. The rotational frequency of the crankshaft;
2. Load directly to the engine - measuring signal from mass air flow;
3. The speed at which the car moves;
4. Feed a braking signal;
5. Feed the signal that the clutch is squeezed;
Turning on / off signals from the SRS switch:
1. Control of the throttle block;
2. Control unit from the engine;
3. Measuring instrument of air mass flow;
4. Rotational frequency of the crankshaft sensor;
5. Sensor when you click on the brake pedal;
6. Sensor when pressed on the clutch pedal;
7. Switching SRS;
8. The speed at which the car moves.
On a specific signal sRS switch The control unit starts controlling the throttle. Then this throttle begins to open to such an extent that it needs to maintain the driver specified by the driver. In those machines that have a multifunction steering wheel equipped with an additional SRS switch. When signals come about that either braking is performed, or the clutch is squeezed, the system that adjusts the speed is automatically turned off. The accelerator pedal module gives signals that are subsequently enter directly to the block input that controls the engine control. In this block, signals begin to be processed, given all additional values, and then the best mode of operation for the engine is created, which corresponds to a torque specified by the driver. From the electric motor, the throttle valve is received by the signal, and the new operating mode begins. When caught fire control lampThis means that in the system itself there was some kind of malfunction.
Speed \u200b\u200badjustment by automatic mode:
Pretty comfortable I. useful feature – automatic. Adjusting speed. Especially when the driver comes for a long time Ride at one level level, it allows him to be more relaxed. With one key, which is on the arm driving, there are options to enable the function " cruise control ". But the speed at the same time should be from 30 to 240 kilometers per hour. There is another feature - adapted "cruise control"You can buy it to order. It will adjust the vehicle speed on the basis of how much the distance is up to the car in front. The principle of his work is as follows: in the central front air intake there is a special radar sensor, which begins to control the zone not more than 200 meters on its band, before the vehicle. Then this system begins to lower the speed, dropping the gas supply, and slowly the car begins to slow down, slowing down somewhere up to 3.5 m / s2. Thus, this system works until the configured distance in front of the car is not achieved. If you need to brake a sharper, the driver must do it yourself. In this case, the vehicle begins to follow in front of the riding car at a lesser speed.
Sometimes Gul Ot system Block It does not allow to enjoy silence or focus. In this article, I will tell you how to regulate the turnover of coolers with special Program For Windows XP / 7/8/10, and at the end I will show the whole process in more detail.
Why fans are noisy and what ways to fix it
With the exception of special flammificent modifications, each computer is installed: in the power supply, on the processor, video card, in the case and others. And each in its own way is noise, and it is bad news. Many are simply used to the noise of their Systems and believe that it should be. Maybe should, but not necessarily! In 99% of cases, noise from the computer can be reduced by 10% -90%, and this is good news.
As you already understood, noiselessness is achieved by a decrease in noise from coolers. This is possible with the help of applying more quiet, by nature, coolers, or by reducing revolutions already existing. Naturally, it is possible to reduce the speed to the values \u200b\u200bnot threatening! This article will be discussed in this way. More to reduce the noise will help the programs for.
So, to reduce the rotation speed of the cooler, one of the options can be used:
- Program for controlling the speed of rotation of coolers
- "Intellectual" revolutions control system, stitched in BIOS
- Utilities from the manufacturer of motherboard, laptop or video card
- Use a special device - refobas
- Artificially reduce fan supply voltage
Who works fine with BIOS control, can not read further. But often the BIOS is only superficially adjusting the revolutions without incline to silent, and at the same time still acceptable, values. Utilities from the manufacturer, sometimes, the only way of influence on the fans is because third-party programs Often do not work on unusual motherboards and laptops. We will analyze the most optimal - the first way.
Speedfan Coolers Management Program
This is a multifunctional and fully free program. Probably immediately a little bit, saying that this program does not work on all laptops, but you can try, and will not regulate the revisions of those fans that do not know how to manage motherboard From BIOS. For example, from my BIOS, you can enable the SMARTFAN cooler control function only for the central processor. Although watching current speed can still be for two. For.
ATTENTION: Before using the program, turn off the control of the BIOS coolers!
Otherwise, the following situation may occur. At the time of loading the Speedfan program, current speed is read and accepted for maximum. Accordingly, if by this time the BIOS will not spin the fan to maximum revolutions, then the program will not be able to do this.
I so once happened that at the time of loading the program the cooler on the processor was spinning at a speed of 1,100 rpm, and Speedfan could not set the greater value. As a result, the processor heated to 86 degrees! And I noticed it by chance when at the time of a large load did not wait noise from the fan. Fortunately, nothing burned, but a computer could
Running and appearance of the program
Download and install the application from the official site.
When you first start, an ordinary window will arise with a helping to help the functions of the program. You can put a tick so that it does not appear anymore and close it. Next Speedfan considers the parameters of the chip on the motherboard and the sensor values. A sign of successful execution will be a list with current values \u200b\u200bof fans and temperature components. If the fans are not detected, then the program cannot help you. Immediately go to "Configure -\u003e Options" and change the language to "Russian".

As you can see, the processor and information from the voltage sensors are also shown here.
In block "1" there is a list of discovered rotational speed sensors with names FAN1., FAN2...., and their number may be greater than there is actually (as in the picture). We draw attention to values, for example, FAN2 and the second FAN1 have real indicators 2837 and 3358 RPM (revolutions per minute), and the rest are zero or with garbage (in the picture 12 RPM it is garbage). Excess times we will remove.
The "2" block shows the detected temperature sensors. GPU. - this is a graphic chipset, HD0. - HDD, CPU. - Central processor (instead of CPU in the picture TEMP3), and the rest of the trash (there can be no 17 or 127 degrees). This is a lack of a program that you need to guess where that (but then we ourselves rename the sensors as needed). True, you can download well-known configurations on the site, but the procedure is not simple and complicated by English.
If it is not clear what parameter for what is responsible, then you can see the values \u200b\u200bin any other program to determine the parameters of the computer and sensors, for example, and compare with those defined the Speedfan program to know exactly where what kind of speed and temperature readings (on the video for an article all Show).
And in block "3" we have speed adjustments SPEED01, SPEED02.... with which you can set the speed of rotation in percentage (may be shown as PWM1, PWM2 ..., look for more details on the video). So far, we need to determine which SPEED01-06 on which Fanx affects. To do this, change the values \u200b\u200bof each from 100% to 80-50% and see whether the speed of some FAN has changed. I remember what kind of speed on what fan influenced.
I will repeat that not all fans will be adjusted, but only those that can manage the motherboard from the BIOS.
Setting Speedfan.
So got to the settings. Click the "Configuration" button and the first thing we call all sensors with clear names. In my example, I will programmatically control the cooler of the processor.
On the Temperature tab, we find the processor temperature sensor defined in the previous step (I have TEMP3) and the click on it first once, and then a second again - now you can enter any name, for example, "CPU TEMP". In the settings below fit the desired temperature, which will support the program with the minimum possible speed of rotation of the cooler, and the alarm temperature at which maximum turns are included.
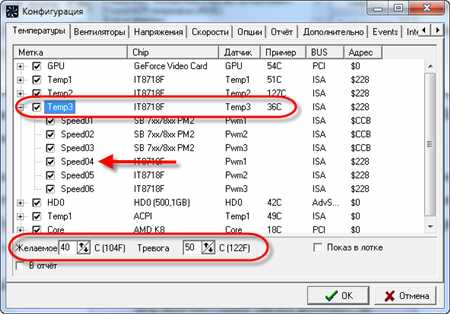
I install 55 and 65 degrees, respectively, but for each it is individually, experiment. With a highly low set temperature, the fans will always spin on the maximum turns.
Next, we deploy the branch and remove all the checkboxes, except for the SPEED0X, which regulates the FANX processor (we have already identified earlier). In my example it is SPEED04. And also remove the checkboxes from all other temperatures that we do not want to see in the main window of the program.
On the Fans tab, we simply find the right fans, call them as you want, and unnecessary turn off.

- Minimum - the minimum percentage of maximum revolutions that the program can establish
- Maximum - respectively, the maximum percentage.
My minimum costs 55%, and a maximum of 80%. Nothing terrible that the program will not be able to set a value by 100%, because on the "Temperature" tab, we set the threshold value of the alarm, in which 100% turns will be forced. Also for automatic regulation do not forget to put a tick "Autimension".

In principle, this is all. Now we go to the main window of Speedfan and put a tick "Automicacy of Vent-ditch" and enjoy the automatic adjustment of the rotational speed 🙂 from the first time it will not be able to optimally configure yourself, experiment and leave suitable parameters, it is worth it!
Extra options
Speedfan program has a bunch of functions and parameters, but I will not delve into them, because This is the topic of a separate article. Let's put some more you need on the Configuration -\u003e Options tab.
- Running fresh - To Speedfan started immediately in the turning form. If not put, then when starting Windows main The program window will hang on the desktop. If the program does not start with Windows, simply add its label to autoload.
- Static icon - I prefer to install that in the system tray, instead of numbers, the program icon is displayed.
- Turn on closure - Install that when you click on the "cross", the program did not close, but turned into a systemic tray (near the watch)
- Full fan speed when leaving - If you do not install, then after exiting the cooler turnover program will remain in the state in which they were at the time of closure. And since it will be no longer able to manage them, it is possible to overheat the computer.
And now video with detailed setting Speedfan. Note: A little failure occurred on the video. After manual regulation of the FAN1 processor fan, its value has not returned to 3400 RPM, and for some reason it remains at 2200 RPM. After restarting the program, everything was normal. IN recent versions Speedfan on my computer did not have this.
Question from the user
Good day.
Having played 40-50 minutes to one computer game. (approx.: The name is cut) - the processor temperature grows up to 70-80 degrees (Celsius). Changed the thermal paste, cleaned from dust - the result is the same.
Here I think, is it possible to increase the speed of rotation of the cooler on the processor to the maximum (and in my opinion he is slightly rotated)? The temperature without loading the processor is 40 ° C. By the way, is it possible because of the heat? And then we have about 33-36 ° C outside the window ...
Arthur, Saransk
Good day!
Of course, the temperature of the room in which the component temperature is also dependent and the temperature of the components, and the load on the cooling system (therefore, with overheating most often, it is necessary to encounter in the summer hot time). The fact that your temperature comes up to 80 degrees is not normal (although some laptop manufacturers allow such heating).
Of course, you can try to set the cooler rotation settings to the maximum (if it is not so), but I still would recommend a set of measures (You can learn about them from the article to measure and control the temperature of the processor, video card, HDD -).
By the way, the same often arises back side Medals: The coolers rotate at the maximum and create a strong noise (while the user does not load the computer at all, and they could rotate much more slowly and quieter).
Below I will consider how to adjust their speed of rotation, and what to pay attention to. So...
Increase / reduction of coolers rotation speed
Generally, on modern computer (laptop) Cooler speed sets the motherboard, based on data from temperature sensors (i.e., the coolers above - the faster, the coolers are rotated) and download data. The parameters from which the mat is repelled. The board, usually, can be set in the BIOS.
What is measured by the speed of rotation of the cooler
It is measured in revolutions per minute. Denotes this indicator as rPM. (by the way, they are measured all mechanical devicesFor example, the same hard drives).
As for the cooler, the optimal rotational speed, usually, is about 1000-3000 RPM. But this is a very averaged value, and to say exact which you need to set - it is impossible. This parameter is highly dependent on the type of your cooler, for which it is used, on the temperature of the room, on the type of radiator, etc. of the moments.
Methods, how to adjust the speed of rotation:

Speedfan.
Free multifunctional utilityallowing you to monitor the temperature of the computer components, as well as monitor the work of the coolers. By the way, "sees" this program is almost all the coolers installed in the system (in most cases).
In addition, you can dynamically change the speed of rotation of the PC fans, depending on the temperature of the components. All variable values, work statistics, etc., the program saves in a separate log file. Based on them, you can see graphs change temperatures, and fan speeds.
Speedfan works in all popular windows 7, 8, 10 (32 | 64 Bits), supports the Russian language (for its selection, click the "Configure" button, then the Options tab, see the screenshot below).

Main window I. appearance Speedfan programs
After installing and starting the Speedfan utility, the Readings tab must appear before you (this is the main program window - see Screenshot below). At my screenshot, I broke the window to several areas to comment and show what he answers.

- Block 1 - The "CPU Usage" field indicates the processor load and its nuclei. Nearby also arranged the "Minimize" and "Configure" buttons designed to fold the program and its settings (respectively). There is still a check mark "Automatic Fan Speed" - its purpose automatically adjust the temperature (I will tell about it just below);
- Block 2 - here are a list of discovered cooler speed sensors. Please note that everyone has a different name (SYSFAN, CPU FAN, etc.) and opposite each - their meaning. rPM (i.e. rotation speeds per minute). Part of the sensors show RPM by zeros - these are "trash" values \u200b\u200b(you can not pay attention to them *). By the wayIn the names there are incomprehensible abbreviations for someone (decrypt just in case): CPU0 FAN - fan on the processor (i.e., the sensor from the cooler, stuck in the connector CPU_FAN on the mat. board); AUX FUN, PWR FUN, etc. - Similarly shows RPM fans connected to these connectors on the mat. board;
- Block 3 - Component Temperature: GPU - Video Card, CPU - Processor, HDD - Hard Disk. By the way, there are also "trash" values \u200b\u200bfor which one should not pay attention (TEMP 1, 2, etc.). By the way, it is convenient to remove the temperature with AIDA64 (et al. Special utilities), about them here:
- Block 4 - But this unit allows you to reduce / increase the speed of rotation of the coolers (set in percentage. By changing percentages in the graph SPEED01, SPEED02. - You need to look at which cooler has changed the speed (that is, what is responsible for what).
Important! The list of some indicators in Speedfan will not always coincide with the cooler with which it is signed. The fact is that some computers are connected (for one or another considerations), for example, a processor cooler is not in the CPU FAN socket. Therefore, I recommend it to gradually change the values \u200b\u200bin the program and look at changes in the speed of rotation and temperature of the components (even better, open the roof of the system side and visually watch the speed of rotation of the fans).
Adjusting the speed of rotation of the fans in Speedfan
Option 1
- As an example, it will try to adjust the speed of rotation of the processor fan. To do this, you need to pay attention to the CPU "CPU 0 Fan "- It is in it that the RPM indicator should be displayed;
- Next, alternately change the values \u200b\u200bin the "PWM1" graphs, "pwm2" and others. When the value was changed - wait a while, and see if the show did not change rPM., I. temperature (see Screen below);
- When you find the right one PWM. - Adjust the speed of the cooler to the optimal number of revolutions (about processor temperature I , I also recommend to familiarize) .
Option 2.
If you want to be involved in the "smart" mode of operation (i.e. that the program dynamically changed the speed of rotation, depending on the processor temperature ), then you need to do the following (see Screenshot below):
- open the program configuration (Note: Button "Configure") , then open the "Speed" tab;
- next choose a line that is responsible for the cooler you need (It is necessary to first be found experimentally, as recommended in version 1, see a little higher in the article) ;
- now in the "minimum" and "maximum" graphs, set the desired values \u200b\u200bin percentage and check the "Autimension" checkbox;
- in the main window of the program, place a tick opposite the "Automicacy of Fans" item. Actually, the speed of rotation of the coolers is also regulated.

Addition! It is also desirable to go to the "Temperature" tab and find the processor temperature sensor. In its settings, set the desired temperature that the program will support and the alarm temperature. If the processor is heated before this alarming temperature, then Speedfan will start spinning the cooler full power (up to 100%)!
For those who do not work Speedfan
Setting up automatic adjustment of coolers in BIOS
Not always utility Speedfan. Works correctly. The fact is that BIOS has special functions responsible for automatic adjustment The speed of rotation of the coolers. Call each bIOS version they can in different ways, for example, Q-Fan, Fan Monitor, Fan Optomize, CPU Fan Contol etc. And immediately note that they are not always working correctly, at least SpeedFan allows you to very accurately and finely adjust the work of the coolers, so that they and the task are performed, and the user did not interfere with ☺.
To disable these modes (The photo below shows Q-FAN and CPU Smart Fan Control), you need to enter the BIOS and translate these functions to mode Disable. By the way, after that, the coolers will earn maximum power, it may become very noise (so it will be until you adjust their work in Speedfan).
Hot keys to enter the BIOS menu, Boot Menu.Recovery from hidden section -

This is all today, good luck and optimal work Fans ...
Proportional control - Pledge of silence!
What task is placed in front of our management system? So so that the propellers in vain do not rotate, the dependence of the rotational speed is from temperature. The hot device - the faster the fan rotates. Logical? Logic! On that and damaged.
Of course you can bother with microcontrollers, which will be even easier, but absolutely not necessary. In my opinion it is easier to make an analog control system - it will not be necessary to bother with programming on assembler.
It will be cheaper, and easier in commissioning and configuration, and most importantly, if desired, can expand and suck the system to taste, adding channels and sensors. All that you will need only a few resistors, one microcircuit and thermal sensor. Well, straight hands and some skill soldering.
Collecting top view

View from below
Structure:
- Chip size resistors 1206. Well, or just buy in the store - the average price of one resistor 30 kopecks. In the end, no one prevents you from a bit to correct the fee to hit the chip of the resistors to have ordinary, with legs, and in any old transistor TV in bulk.
- The multi-turn variable resistor is about 15k.
- Also required chip capacitor size 1206 to 470 NF (0.47MKF)
- Any electrolytic consumer voltage from 16 volts and above and the capacity in the 10-100mkp area.
- Screw terminal carts optionally - you can simply solder the wires to the board, but I put the terminal bar, clean for aesthetic considerations - the device should look solid.
- As a power element, which will manage the cooler nutrition, we will take a powerful MOSFET transistor. For example, IRF630 or IRF530 it can sometimes be able to exhaone from the old power supply units from the computer. Of course, for a tiny propeller, its power is redundant, but is there any little, suddenly you want to go there anything help?
- The temperature will be subject to the precharged LM335Z sensor, it costs no more than ten rubles and the deficit of itself does not represent, and it is possible to replace it with some thermistor, since it is also not uncommon.
- The main part on which everything is based is a microcircuit of four operating amplifiers in one case - LM324n is a very popular thing. It has a bunch of analogues (LM124N, LM224N, 1401UD2A) The main thing will be killed so that it is in the DIP case (so long, with fourteen legs, as in the pictures).
Wonderful mode - PWM

Education of PWM signals
So that the fan rotates slowly enough to reduce its tension. In the simplest deabulas, this is done by means of a variable resistor, which is posed consistently with the engine. As a result, part of the voltage will fall on the resistor, and the engine will fall on the engine as a result - reduction of revolutions. Where is Padlana, do not notice? Yes, the ambush is that the energy released on the resistor is not transformed into something, but in the usual heat. Do you need a heater inside the company? Obviously no! Therefore, we will go more tricky way - we will apply latitude and pulse modulation aka. Shimor PWM.. It sounds scary, but do not be afraid, everything is simple here. Imagine that the engine is a massive cart. You can push his foot continuously, which is equivalent to direct inclusion. And you can move kicks - it will Shim. The longer the time to push the foot with the stronger you accelerate the cart.
For Shim Nutrition on the engine is not constant voltage, but rectangular pulses, as if you turn on and turn off the power, only quickly, dozens of times per second. But the engine has a slight inertia, and also the inductance of the windings, so these impulses are as if they are summed up each other - integrate. Those. The greater the total area under impulses per unit of time, the greater the equivalent voltage goes to the engine. Serve narrow, like needles, impulses - the engine barely rotates, and if you apply wide, almost without cleansings, it is equivalent to direct inclusion. Turn on and off the engine will be our MOSFET. transistor, and to form pulses will be a scheme.
Saw + straight \u003d?
Such a cunning control signal is elementary. For this we need to comparator Turn the signal pilotum Form I. compare him with any constant Voltage. Look at the drawing. Suppose our saw goes to a negative way out. comparator, and constant voltage to positive. The comparator folds these two signals, determines which of them more, and then removes the verdict: if the voltage at the negative input is more than on a positive, then the output will be zero volt, and if the positive will be more negative, then the output will be the supply voltage, that is, about 12 volts. We saw in us continuously, it does not change its form over time, such a signal is called reference.
But the constant voltage can move up or down, increasing or decreasing depending on the temperature of the sensor. The higher the temperature of the sensor, the more voltage from it it comesSo, the dummy at a permanent entrance becomes higher and according to this, the pulses at the output of the comparator become wider, forcing the fan to spin faster. It will be until the constant voltage blocks the saw, which will turn on the engine to full rev.. If the temperature is low, then the voltage at the output of the sensor is low and the constant will leave below the lower body of the saw, which will cause the cessation of any pulses and the engine will stop at all. Uploaded yes? ;) Nothing, brains useful to work.
Temperature mathematics

Regulation
As a sensor, we use LM335Z.. In essence, it thermostabitrone. The joke of Stabilon is that on it, as on the restrictive valve, there is a strictly defined voltage. Well, and in thermostabilities, this voltage depends on temperature. W. LM335.dependence looks like 10mv * 1 degree by Kelvin. Those. Counting is conducted from absolute zero. Zero Celsius is two hundred seventy-three degrees in Kelvin. So, in order to get the voltage overlooking the sensor, let's say at the plus of twenty-five degrees Celsius, then we need to twenty-five to add two hundred seventy-three and multiply the resulting amount of ten Millivolt.
(25 + 273) * 0.01 \u003d 2.98V
At other temperatures, the voltage will not change much, on the same 10 Milvolt for degrees. This is the next substab:
The voltage from the sensor changes slightly, on some tenths of the volt, and it is necessary to compare it with a saw from which the height of the teeth is already reaches ten volts. To obtain a permanent component directly from the sensor to such a voltage, it is necessary to heat it up to a thousand degrees - rare crashes. How then to be?
Since we still have the temperature, it is still hardly dropped below twenty-five degrees, then everything is not interested in us, which means that it is possible from the output voltage from the sensor only the very tip, where all changes occur. How? Yes, just deduct from the output signal two whole ninety-eight hundred volts. And the remaining crumbs multiply on gain, Say, thirty.
In accurate, we get about 10 volts of fifty degrees, and up to zero at lower temperatures. Thus, we turn out a peculiar temperature "window" from twenty-five to fifty degrees within which the regulator works. Below is twenty-five - the engine is turned off, above fifty - is turned on directly. Well, between these values, the velocity of the fan is proportional to the temperature. The windows width depends on the gain coefficient. Than it is more, the window is already, because The limit 10 volts, after which the constant component on the comparator will be above the saw and the motor will turn directly, come before.
But we do not use a microcontroller, nor the means of the computer, how will we do all these calculations? And the same operating amplifier. After all, it is not for nothing that is named operating, its initial purpose is mathematical operations. All analog computers are built on them - stunning cars, by the way.
To subtract one voltage from another you need to submit them to different inputs operational amplifier. The voltage from the thermal sensor is applying for positive inputand the voltage that must be subtracted, the offset voltage, we feed on negative. It turns out the subtraction of one of the other, and the result is also multiplied by a huge number, almost at infinity, another comparator turned out.
But we do not need infinity, since in this case our temperature window is narrowed to the point on the temperature scale and we have either worth it, or a rotating fan is mad, but there is nothing more annoying than the turning and turning compressor of the scooping refrigerator. The analogue of the refrigerator in the computer is also not needed. Therefore, we will lower the gain, adding to our subtractor feedles.
Essence feedback In order to drive back to the input from the output. If the output voltage is deducted from the input, then this is a negative feedback, and if it is folded, then positive. Positive feedback increases the gain coefficient, but can lead to signal generation (automatic machines call it loss of system stability). Good example Positive feedback with loss of stability This is when you turn on the microphone and speake them in the speaker, usually once the opposite or whistle is once there is a generation. We should also reduce the gain coefficient of our operator to reasonable limits, so we apply a negative connection and start a signal from entering a negative input.
The ratio of feedback and input resistors will give us the gain affecting the regulatory window that affects the width. I figured that thirty would be enough, you can recount for your needs.
Saw
It remains to make a saw, and more accurately assemble the saw-shaped voltage generator. It will be from two operatingors. The first due to the positive feedback is in the generator mode, issuing rectangular pulses, and the second serves as an integrator, turning these rectangles into a sawn form.
The condenser in the feedback of the second operating amplifier determines the frequency of pulses. The smaller the capacitor capacitance, the higher the frequency and vice versa. Generally B. Shim Generation the greater the better. But there is one jamb, if the frequency falls into the audible range (20 to 20,000 Hz), the engine will disgust to squeeze at the frequency ShimWhat is clearly dispersed with our concept of a silent computer.
And from this frequency scheme more than fifteen kilohertz, I could not - sounded disgusting. I had to go to the other side and drive the frequency to the lower range, to the district of twenty hertz. The engine began to vibrate a bit, but it is not heard and felt only with his fingers.
Scheme.

Tax, with blocks figured out, it is time to look at the scheme. I think the majority have already guessed what's what. And I still explain, for greater clarity. The dotted line indicates functional blocks.
Block # 1.
This is a saw generator. R1 and R2 resistors form a voltage divider to submit to the generator half the supply, in principle they can be any nominal, the main thing is to be the same and not much greater resistance, within a hundred kilo. The R3 resistor to a pair with a C1 capacitor determine the frequency than their nominal value, the greater the frequency, but again I repeat that I could not withdraw the scheme for the sound range, so it's better to leave as it is. R4 and R5 are the resistors of positive feedback. They also affect the height of the saw relative to zero. In this case, the parameters are optimal, but if you do not find the same then you can take about plus minus kiloma. The main thing to observe the proportion between their resistances is approximately 1: 2. If the R4 is strongly reduced, then it will have to reduce R5.
Block # 2.
This is a comparison unit, there is a PWM pulse and constant voltage.
Block # 3.
This is just a scheme that suits the calculation of temperature. Voltage from the thermal sensor VD1. It is fed to a positive input, and the displacement voltage from the divider is supplied to the negative input R7. Rotating the handle of the rapid resistor R7 You can shift the control window above or below the temperature scale.
Resistor R8. May be within 5-10k, it is more undesirable, less too - a thermal sensor can burn. Resistors R10 and R11 must be equal to each other. Resistors R9 and R12. Also should be equal to each other. Nominal resistors R9 and R10 It may be in principle any, but it must be borne in mind that the gain depends on their relationship determining the width of the regulatory window. KU \u003d R9 / R10 Based on this ratio, you can choose the nominations, the main thing is that it is not less than kiloma. Optimal, in my opinion, is the coefficient of equal to 30, which is provided by resistors on 1kom and 30k.
Installation

Printed circuit board
The device is made by printing to be as compact and careful. Picture pCB In the form of a layout of the file lays right here on the site, program SPRINT LAYOUT 5.1. You can download and model biscuit boards from here

The same printed circuit board is performed once or twice by laser-iron technology.
When all the details are assembly, and the board is etched, then you can start assembling. Resistors and capacitors can be soldered without feet, because They are almost not afraid of overheating. Special caution should be shown with MOSFET. transistor.
The fact is that it is afraid of static electricity. Therefore, before getting it from the foil, in which you should be wrapped in the store, I recommend to remove synthetic clothes and touch with a hand of a bare battery or a crane in the kitchen. Mikruchu can be overlayed, so when you solder it, then do not hold the soldering iron on the legs longer a couple of seconds. Well, finally, let's give the Council on resistors, or rather on their marking. See the numbers on his back? So this is the resistance in Omah, and the last digit indicates the number of zeros after. for example 103
this is 10
and 000
i.e 10 000
Ohm or 10kom.
Upgrade is thin.
If, for example, you want to add a second sensor to control another fan, then it is not necessary to make the second generator at all, it is enough to add the second comparator and the calculation scheme, and the saw from the same source. For this, of course, you will have to redraw a picture of the printed circuit board, but I don't think it will be a lot of work for you.