How to check the health of your hard drive program. Checking and diagnosing the hard drive. Digital hard drive repair - what's it like?
All modern homes have a desktop computer or laptop. Some people need it for games, others for work or study. In any case, photographs, some important records, contact details of people, necessary addresses, etc. are stored on the computer. And the place where all this information is stored is a hard drive.
Not without reason, experienced programmers say that in a situation where there is an error in the computer hard drive, its formatting is a real disaster. After all, formatting is fraught with the loss of all information. But this is the case if appropriate measures are not taken. But if you notice some errors and malfunctions in the disk in time and correct them, then you can avoid this global catastrophe
The main causes of HDD problems are “broken” sectors - segments disk space, which are damaged in some way.
They are divided into physical and logical. The latter appear due to software errors and can be corrected, while physical ones cannot be corrected. In the latter case, you will have to replace HDD.
Such damaged areas can appear on both magnetic and standard SSD drives.
Causes of bad sectors and errors
Hard drive failures depend on the type of damaged areas:
- brain teaser“broken” - displayed when there is malware or viruses, as well as when there is a sudden loss of power or power cable during recording;
- physical“broken” - found on a completely new product. Then you need to contact the manufacturer with a request to replace the product.
IN magnetic storage devices“broken” sectors can appear as a result of wear of the moving parts of the device, when foreign bodies get into the disk mechanism, or from a simple fall to the floor. In the latter case, the magnetic head of the disk is scratched, which leads to errors.
SSD drives give errors because they have tried to write any information to them many times.
Checking the hard drive for bad sectors is quite possible. Windows has an application called "chkdsk" (check disks). You need to open the folder on your desktop or in the Start menu "My computer" by clicking on the drive to be scanned. By using context menu select “Properties” - “Tools”. Under the phrase “Check” there will be a button, by clicking on which you will be able to see the number of “broken” sectors.
During the test, the computer will eliminate errors in logical “broken” sectors, as well as mark areas with physical damage.
Attention! You can run the scan system manually, but if Windows independently detects “bad” sectors, the utility will launch itself when the system starts.
Checking utilities
Some software does not have built-in verification. For such cases, there are special programs that help identify “broken” sectors and errors and, if possible, correct them.
"Victoria"
It is a popular software for searching damaged areas. Besides in various ways analysis and reassignment of problem areas, has a function for searching for damaged contacts in a cable, as well as a function for assessing the performance of the hard drive. The only “disadvantage” of the program is the lack of official assemblies. Therefore, experts recommend using it separately from the OS.
"HDD Regenerator"
This utility uses its own methods to restore “bad” sectors (a combination of high and low signals) and supports any drive connection interfaces.
Minus - high price licenses ($90).
One of the best and multifunctional utilities to check the device for damaged areas. Has the following functionality:
- restores and reconfigures sectors;
- fixes partition tables;
- recovers files and creates them backups;
- selects files in the table;
- copies data from remote partitions;
- creates backup copies of data.
This utility uses several methods to identify problems, as well as the ability to track SMART attributes and cleaning hard disk.
Important! The program supports everything Windows versions, however, it does not scan/test the drive where the OS is installed.
With the help you can check both one and several hard drives simultaneously.
"Seagate Seatools" for Windows
The application supports all modern Windows systems. It can be used to do both basic and advanced testing. Simpler than "Seagate Seatools" for DOS, but less powerful.
Sooner or later (it’s better, of course, if early) any user asks himself the question of how long the device installed on his computer will last. computer hard disk and is it time to look for a replacement? There is nothing surprising in this, since hard disks by virtue of their design features are the least reliable among computer components. At the same time, it is on the HDD that most users store the lion's share of a wide variety of information: documents, pictures, various software, etc., as a result of which an unexpected failure of the disk is always a tragedy. Of course, it is often possible to restore information on apparently “dead” hard drives, but it is possible that this operation will cost you a pretty penny, and will cost you a lot of nerves. Therefore, it is much more effective to try to prevent data loss.
How? It’s very simple... First of all, don’t forget about regular backup data, and secondly, monitor the status of disks using specialized utilities. We will consider several programs of this kind from the perspective of the tasks being solved in this article.
Control of SMART parameters and temperature
All modern HDDs and even solid state drives (SSDs) support S.M.A.R.T technology. ( from English Self-Monitoring, Analysis, and Reporting Technology - technology of self-monitoring, analysis and reporting), which was developed by the main manufacturers of hard disks to increase the reliability of their products. This technology is based on continuous monitoring and assessment of the condition of the hard drive using built-in self-diagnosis equipment ( special sensors), and its main purpose is timely detection of possible drive failure.
Real-time HDD status monitoring
A number of information and diagnostic solutions for diagnosing and testing hardware, as well as special monitoring utilities, use S.M.A.R.T technology. to monitor the current status of various vital parameters that describe the reliability and performance of hard drives. They read the relevant parameters directly from the sensors and thermal sensors that all modern hard drives are equipped with, analyze the received data and display them in the form of a short tabular report with a list of attributes. At the same time, some of the utilities ( Hard Drive Inspector, HDDlife, Crystal Disk Info, etc.) is not limited to displaying a table of attributes (the meanings of which are unclear to untrained users) and additionally displays brief information about the state of the disk in a more understandable form.
Diagnose state of hard disk with the help of this kind of utilities is as easy as shelling pears - just read the brief basic information about installed HDDs: with basic data about disks in Hard Drive Inspector, a certain conditional percentage of hard disk health in HDDlife, the “Technical Condition” indicator in Crystal Disk Info (Fig. 1), etc. Any of these programs provides a minimum necessary information about each of those installed on computer HDD: data on the hard drive model, its volume, operating temperature, operating time, as well as the level of reliability and performance. This information makes it possible to draw certain conclusions about the performance of the media.
Rice. 1. Brief information about the “health” of the working HDD
You should configure the monitoring utility to launch simultaneously with the start of the operating system, adjust the time interval between checks of S.M.A.R.T. attributes, and also enable the display of the temperature and “health level” of hard drives in the system tray. After this, to monitor the status of the disks, the user will only need to glance from time to time at the indicator in the system tray, where it will be displayed brief information about the state of the drives available in the system: their level of “health” and temperature (Fig. 2). By the way, working temperature- this is no less important an indicator than a conditional indicator of the health of the HDD, because hard drives can suddenly fail due to simple overheating. Therefore, if the hard drive heats up above 50 °C, then it would be wiser to provide it with additional cooling.

Rice. 2.Display HDD Status
in the system tray with the HDDlife program
It is worth noting that a number of such utilities provide integration with Windows Explorer, due to which a green icon is displayed on the icons of local disks if they are working properly, and if problems arise, the icon turns red. So you are unlikely to forget about the health of your hard drives. With such constant monitoring, you will not be able to miss the moment when some problems begin to arise with the disk, because if the utility detects critical changes in S.M.A.R.T. attributes. and/or temperature, it will carefully notify the user about this (with a message on the screen, a sound message, etc. - Fig. 3). Thanks to this, it will be possible to copy data from the dangerous media in advance.

Rice. 3. Example of a message about the need to immediately replace the disk
Using S.M.A.R.T. monitoring solutions in practice to monitor the status of hard drives is completely easy, because all such utilities work in the background and require a minimum of hardware resources, so their functioning will in no way interfere with the main workflow.
Control of S.M.A.R.T. attributes
Advanced users, of course, are unlikely to limit themselves to assessing the condition of hard drives by viewing a brief verdict from one of the utilities presented above. This is understandable, because according to the decoding of the S.M.A.R.T. attributes. you can identify the cause of failures and, if necessary, take precautionary measures additional measures. True, to independently control S.M.A.R.T. attributes, you will need to at least briefly become familiar with S.M.A.R.T technology.
Hard drives that support this technology include intelligent self-diagnostic procedures so they can “report” their current status. This diagnostic information is provided as a collection of attributes, that is, specific characteristics of hard disk used to analyze its performance and reliability.
B O Most of the important attributes have the same meaning for drives from all manufacturers. The values of these attributes when normal operation disk may vary at some intervals. For any parameter, the manufacturer has determined a certain minimum safe value that cannot be exceeded under normal operating conditions. Unambiguously determine critically important and critically unimportant S.M.A.R.T parameters for diagnostics. problematic. Each of the attributes has its own information value and indicates one or another aspect of the work of the medium. However, first of all you should pay attention to the following attributes:
- Raw Read Error Rate - the frequency of errors in reading data from the disk caused by the fault of the equipment;
- Spin Up Time - average spin-up time of the disk spindle;
- Reallocated Sector Count - number of sector reassignment operations;
- Seek Error Rate - frequency of occurrence of positioning errors;
- Spin Retry Count - the number of repeated attempts to spin up disks to operating speed if the first attempt fails;
- Current Pending Sector Count - the number of unstable sectors (that is, sectors awaiting the reassignment procedure);
- Offline Scan Uncorrectable Count - the total number of uncorrected errors during sector read/write operations.
Typically S.M.A.R.T. attributes are displayed in tabular form indicating the attribute name (Attribute), its identifier (ID) and three values: current (Value), minimum threshold (Threshold) and the lowest attribute value for the entire operating time of the drive (Worst), as well as absolute value attribute (Raw). Each attribute has a current value, which can be any number from 1 to 100, 200 or 253 ( common standards there are no upper limits for attribute values). The Value and Worst values for a completely new hard drive are the same (Fig. 4).

Rice. 4. Attributes of S.M.A.R.T. with a new HDD
Shown in Fig. 4 information allows us to conclude that for a theoretically serviceable hard drive, the current (Value) and worst (Worst) values should be as close as possible to each other, and the Raw value for most parameters (with the exception of the parameters: Power-On Time, HDA Temperature and some others ) should approach zero. The current value may change over time, which in most cases reflects deterioration of the hard drive parameters described by the attribute. This can be seen in Fig. 5, which presents fragments of the S.M.A.R.T attribute table. for the same disk - data were obtained with an interval of six months. As you can see, in the more recent version of S.M.A.R.T. the frequency of errors when reading data from the disk (Raw Read Error Rate), the origin of which is determined by the hardware of the disk, and the frequency of errors when positioning the magnetic head unit (Seek Error Rate) have increased, which may indicate overheating of the hard drive and its unstable position in the basket . If the current value of any attribute approaches or becomes less than the threshold value, then the hard drive is considered unreliable and should be replaced urgently. For example, a drop in the value of the Spin-Up Time attribute (average spin-up time of the disk spindle) below a critical value, as a rule, indicates complete wear of the mechanics, as a result of which the disk is no longer able to maintain the rotation speed specified by the manufacturer. Therefore, it is necessary to monitor the condition of the HDD and periodically (for example, once every 2-3 months) carry out S.M.A.R.T diagnostics. and save the received information in text file. In the future, these data can be compared with current ones and certain conclusions can be drawn about the development of the situation.
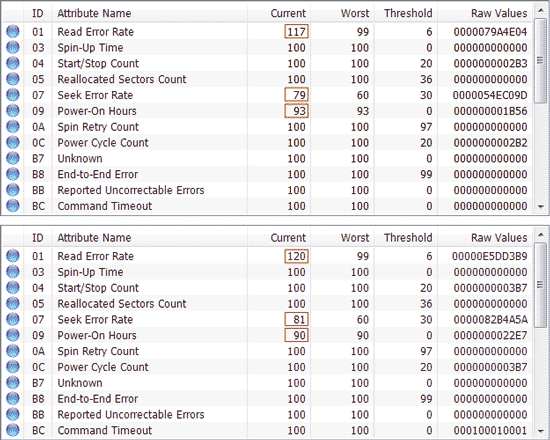
Rice. 5. S.M.A.R.T. attribute tables obtained at six-month intervals
(more latest version S.M.A.R.T. at the bottom)
When viewing S.M.A.R.T. attributes, you should first of all pay attention to critical parameters, as well as parameters highlighted by indicators other than the base color (usually blue or green). Depending on the current state of the attribute in the S.M.A.R.T. utility output. in the table it is usually marked in one color or another, which makes it easier to understand the situation. In particular, in the Hard Drive Inspector program, the color indicator can have green, yellow-green, yellow, orange or red - green and yellow-green colors indicate that everything is normal (the attribute value has not changed or changed insignificantly), and yellow, orange and red colors signal danger (the worst color is red, which indicates that the attribute value has reached its critical value). If any of the critical parameters are marked with a red icon, then you need to urgently replace the hard drive.
In the Hard Drive Inspector program, let's look at the table of S.M.A.R.T. attributes of the same drive, which we briefly assessed using monitoring utilities earlier. From Fig. Figure 6 shows that the values of all attributes are normal and all parameters are marked green. The HDDlife and Crystal Disk Info utilities will show a similar picture. True, more professional solutions for analysis and diagnostics, HDDs are not so loyal and often mark S.M.A.R.T. attributes more meticulously. For example, such well-known utilities as HD Tune Pro and HDD Scan, in our case were suspicious of the UltraDMA CRC Errors attribute, which displays the number of errors that occur when transmitting information via external interface(Fig. 7). The cause of such errors is usually associated with a twisted and poor-quality SATA cable, which may need to be replaced.

Rice. 6. Table of S.M.A.R.T. attributes obtained in the Hard Drive Inspector program

Rice. 7. Results of assessing the state of S.M.A.R.T. attributes
HD Tune Pro and HDD Scan utilities
For comparison, let’s take a look at the S.M.A.R.T. attributes of a very ancient, but still working HDD with periodically arising problems. It did not inspire confidence in the Crystal Disk Info program - in the “Technical Condition” indicator, the disk condition was rated as alarming, and the Reallocated Sector Count attribute was highlighted in yellow (Fig. 8). This is a very important attribute from the point of view of the “health” of the disk, indicating the number of sectors reassigned when the disk detects a read/write error; during this operation, data from the damaged sector is transferred to the reserve area. The yellow color of the indicator for the parameter indicates that there are few remaining reserve sectors with which to replace the bad ones, and the newly appearing ones will soon be reassigned bad sectors there will be nothing. Let's also check how more serious solutions assess the condition of the disk, for example, the HDDScan utility widely used by professionals - but here we see exactly the same result (Fig. 9).

Rice. 8. Assessing a problematic hard drive in CrystalDiskInfo

Rice. 9. Results of S.M.A.R.T. diagnostics of HDD in HDDScan
This means that it’s clearly not worth delaying the replacement of such a hard drive, although it may still serve for some time, although, of course, you cannot install an operating system on this hard drive. It is worth noting that if there are a large number of reassigned sectors, the read/write speed drops (due to the unnecessary movements that the magnetic head has to make), and the disk begins to noticeably slow down.
Scanning the surface for bad sectors
Unfortunately, in practice, monitoring SMART parameters and temperature alone is not enough. If the slightest evidence appears that something is wrong with the disk (in the case of periodic program freezes, for example, when saving results, reading error messages appear, etc.), it is necessary to scan the disk surface for the presence of unreadable sectors. To carry out such a media check, you can use, for example, the HD Tune Pro and HDDScan utilities or diagnostic utilities from hard drive manufacturers, however, these utilities only work with their own hard drive models, and therefore we will not consider them.
When using such solutions, there is a risk of damaging data on the scanned disk. On the one hand, if the drive really turns out to be faulty, anything can happen to the information on the disk during scanning. On the other hand, it cannot be ruled out incorrect actions on the part of the user who mistakenly starts scanning in write mode, during which data is erased sector-by-sector from the hard drive with a certain signature, and based on the speed of this process, a conclusion is drawn about the state of the hard drive. Therefore, compliance with certain precautionary rules is absolutely necessary: before launching the utility, you need to create a backup copy of the information and during the test, act strictly according to the instructions of the developer of the relevant software. To obtain more accurate results, before scanning, it is better to close all active applications and unload possible background processes. In addition, you should keep in mind that if you need to test the system HDD, you need to boot from a flash drive and start the scanning process from it, or completely remove the hard drive and connect it to another computer from which you can start testing the disk.
As an example, using HD Tune Pro, we will check the surface of the HDD for bad sectors, which did not inspire confidence in the Crystal Disk Info utility above. In this program, to start the scanning process, just select required disk, activate tab Error Scan and click on the button Start. After this, the utility will begin sequentially scanning the disk, reading sector by sector and marking sectors on the disk map with multi-colored squares. The color of the squares, depending on the situation, can be green (normal sectors) or red (bad blocks) or will have some shade intermediate between these colors. As we see from Fig. 10, in our case the utility did not find full-fledged bad blocks, but nevertheless there is a significant number of sectors with one or another read delay (judging by their color). In addition to this, in the middle part of the disk there is a small block of sectors, the color of which is close to red - these sectors have not yet been recognized as bad by the utility, but they are already close to this and will move into the bad category in the very near future.

Rice. 10. Scanning the surface for bad sectors in HD Tune Pro
Testing a media for bad sectors in the HDDScan program is more difficult and even more dangerous, since if the mode is incorrectly selected, the information on the disk will be irretrievably lost. The first step to start scanning is to create a new task by clicking on the button New Task and selecting the command from the list Suface Tests. Then you need to make sure that the mode is selected Read- this mode is installed by default and when used, the hard disk surface is tested by reading (that is, without deleting data). After this press the button Add Test(Fig. 11) and double-click on the created task RD-Read. Now in the window that opens you can observe the disk scanning process on a graph (Graph) or on a map (Map) - fig. 12. Upon completion of the process, we will get approximately the same results as those demonstrated above by the HD Tune Pro utility, but with a clearer interpretation: there are no bad sectors (they are marked in blue), but there are three sectors with a response time of more than 500 ms (marked in red color), which pose a real danger. As for the six orange sectors (response time from 150 to 500 ms), this can be considered within normal limits, since such a response delay is often caused by temporary interference in the form, for example, of running background programs.

Rice. 11. Running disk testing in HDDScan program

Rice. 12. Results of disk scanning in Read mode using HDDScan
In addition, it should be noted that if there are a small number of bad blocks, you can try to improve the condition of the hard drive by removing bad sectors by scanning the disk surface in linear recording mode (Erase) using the HDDScan program. After such an operation, the disk can still be used for some time, but, of course, not as a system disk. However, you should not hope for a miracle, since the HDD has already begun to crumble, and there are no guarantees that in the near future the number of defects will not increase and the drive will not completely fail.
Programs for S.M.A.R.T. monitoring and HDD testing
HD Tune Pro 5.00 and HD Tune 2.55
Developer: EFD Software
Distribution size: HD Tune Pro - 1.5 MB; HD Tune - 628 KB
Work under control: Windows XP/Server 2003/Vista/7
Distribution method: HD Tune Pro - shareware (15-day demo version); HD Tune - freeware (http://www.hdtune.com/download.html)
Price: HD Tune Pro - $34.95; HD Tune - free (for non-commercial use only)
HD Tune is a convenient utility for diagnosing and testing HDD/SSD (see table), as well as memory cards, USB drives and a number of other data storage devices. The program displays detailed information about the drive (firmware version, serial number, disk size, buffer size and data transfer mode) and allows you to set the device status using S.M.A.R.T. data. and temperature monitoring. In addition, it can be used to test the disk surface for errors and evaluate the device's performance by running a series of tests (sequential and random data read/write speed tests, file performance test, cache test and a number of Extra tests). The utility can also be used to configure AAM and safe removal data. The program is presented in two editions: commercial HD Tune Pro and free lightweight HD Tune. In the HD Tune edition, you can only view detailed information about the disk and the S.M.A.R.T. attribute table, as well as scan the disk for errors and test for speed in read mode ( Low level benchmark - read).
The Health tab is responsible for monitoring S.M.A.R.T. attributes in the program - data from sensors is read after a set period of time, the results are displayed in a table. For any attribute, you can view the history of its changes in numerical form and on a graph. Monitoring data is automatically recorded in the log, but no user notifications are provided for critical changes in parameters.
As for scanning the disk surface for bad sectors, the tab is responsible for this operation Error Scan. Scanning can be quick (Quick scan) and deep - with a quick scan, not the entire disk is scanned, but only some part of it (the scanning area is determined through the Start and End fields). Damaged sectors are displayed on the disk map as red blocks.
HDDScan 3.3
Developer: Artem Rubtsov
Distribution size: 3.64 MB
Work under control: Windows 2000(SP4)/XP(SP2/SP3)/Server 2003/Vista/7
Distribution method: freeware (http://hddscan.com/download/HDDScan-3.3.zip)
Price: for free
HDDScan is a utility for low-level diagnostics of hard drives, solid-state drives and Flash drives with a USB interface. The main purpose of this program is to test disks for the presence of bad blocks and bad sectors. The utility can also be used to view the contents of S.M.A.R.T., monitor the temperature and change some hard settings disk: noise management (AAM), power management (APM), forced start/stop of the drive spindle, etc. The program works without installation and can be launched from portable media, such as a flash drive.
HDDScan displays S.M.A.R.T. attributes and temperature monitoring on demand. S.M.A.R.T report contains information about the performance and “health” of the drive in the form of a standard attribute table; the temperature of the drive is displayed in the system tray and in a special information window. Reports can be printed or saved as an MHT file. S.M.A.R.T. tests are possible.
The disk surface is checked in one of four modes: Verify (linear verification mode), Read (linear reading), Erase (linear writing) and Butterfly Read (Butterfly reading mode). To check a disk for the presence of bad blocks, a test in Read mode is usually used, which tests the surface without deleting data (the conclusion about the condition of the drive is made based on the speed of sector-by-sector data reading). When testing in linear recording mode (Erase), the information on the disk is overwritten, but this test can somewhat heal the disk, ridding it of bad sectors. In any of the modes, you can test the entire disk or a specific fragment of it (the scanning area is determined by indicating the initial and final logical sectors - Start LBA and End LBA, respectively). Test results are presented in the form of a report (Report tab) and displayed on a Graph and a disk map (Map), indicating, among other things, the number of bad sectors (Bads) and sectors whose response time during testing took more than 500 ms (marked in red ).
Hard Drive Inspector 4.13
Developer: AltrixSoft
Distribution size: 2.64 MB
Work under control: Windows 2000/XP/2003 Server/Vista/7
Distribution method: shareware (14-day demo version - http://www.altrixsoft.com/ru/download/)
Price: Hard Drive Inspector Professional - 600 rub.; Hard Drive Inspector for Notebooks - 800 rub.
Hard Drive Inspector is a convenient solution for S.M.A.R.T. monitoring of external and internal HDDs. IN this moment the program is offered on the market in two editions: the basic Hard Drive Inspector Professional and the portable Hard Drive Inspector for Notebooks; the latter includes all the functionality of the Professional version, and at the same time takes into account the specifics of monitoring laptop hard drives. Theoretically, there is also an SSD version, but it is distributed only in OEM supplies.
The program provides automatic checking of S.M.A.R.T. attributes at specified intervals and, upon completion, issues its verdict on the condition of the drive, displaying the values of certain conditional indicators: “reliability”, “performance” and “no errors” along with a numerical temperature value and a temperature diagram. Technical data about the disk model, its capacity, total free space and operating time in hours (days) is also provided. In advanced mode, you can view information about disk parameters (buffer size, firmware name, etc.) and the S.M.A.R.T attribute table. There are various options for informing the user in the event of critical changes on the disk. Additionally, the utility can be used to reduce the noise level produced by hard drives and reduce HDD power consumption.
HDDlife 4.0
Developer: BinarySense Ltd
Distribution size: 8.45 MB
Work under control: Windows 2000/XP/2003/Vista/7/8
Distribution method: shareware (15-day demo version - http://hddlife.ru/rus/downloads.html)
Price: HDDLife - free; HDDLife Pro - 300 rub.; HDDlife for Notebooks - 500 rub.
HDDLife is a simple utility designed to monitor the status of hard drives and SSDs (from version 4.0). The program is presented in three editions: free HDDLife and two commercial ones - basic HDDLife Pro and portable HDDlife for Notebooks.
The utility monitors S.M.A.R.T. attributes and temperature at specified intervals and, based on the analysis results, issues a compact report on the condition of the disk indicating technical data about the disk model and its capacity, operating time, temperature, and also displays the conditional percentage of its health and performance, which allows Even beginners can navigate the situation. More experienced users can additionally look at the table of S.M.A.R.T. attributes. In case of problems with hard drive it is possible to configure notifications; You can configure the program so that if the disk is in normal condition, the scan results are not displayed. It is possible to control the HDD noise level and power consumption.
CrystalDiskInfo 5.4.2
Developer: Hiyohiyo
Distribution size: 1.79 MB
Work under control: Windows XP/2003/Vista/2008/7/8/2012
Distribution method: freeware (http://crystalmark.info/download/index-e.html)
Price: for free
CrystalDiskInfo is a simple utility for S.M.A.R.T. monitoring the status of hard drives (including many external HDDs) and SSD. Despite being free, the program has all the necessary functionality to monitor the status of disks.
Disk monitoring is performed automatically after a specified number of minutes or on demand. At the end of the test, the temperature of the monitored devices is displayed in the system tray; detailed information about the HDD indicating the values of S.M.A.R.T. parameters, temperature and the program’s verdict on the state of the devices is available in the main window of the utility. There is functionality for setting threshold values for some parameters and automatically notifying the user if they are exceeded. Noise level management (AAM) and power management (APM) are possible.
Unfortunately, a considerable part of modern HDDs work normally for a little more than a year, then various kinds of problems begin, which over time can lead to data loss. This prospect can be completely avoided if you carefully monitor the condition of the hard drive, for example, using the utilities discussed in the article. However, you should also not forget about regular backup of valuable data, since monitoring utilities, as a rule, successfully predict disk failure due to mechanical faults (according to Seagate statistics, about 60% of HDDs fail due to mechanical components), but they are not able to predict the death of a drive due to problems with the electronic components of the disk.
CrystalDiskInfo free program to check and monitor the status of hard drives. It allows you to give a general assessment and monitor the condition of your hard drive.
The interface of the CrystalDiskInfo program is simple, understandable and in Russian. The program provides detailed information about the hard drive installed on the computer: firmware, serial number, total operating time. Displays parameters of the S.M.A.R.T. self-diagnosis system: performance, reading errors, track search time.
The program weighs only 4 megabytes. You can download it from the link given below.
After downloading, launch installation file: Click the “Run” button.

Select the folder where the program will be installed and click “Next”.

If you do not need to install an additional add-on and search engine Yahoo!, select with a marker "Custom installation" and uncheck the boxes. Click “Next”.

If not all screenshots for installing the program are shown here, then you don’t need to change anything in them, just click “Next”. After completing the installation process, click “Finish”.
The main functions of the program include the following:
— monitoring the temperature indicators of hard drives;
— view information about current modes and hardware characteristics;
— monitoring of data from the S.M.A.R.T. self-diagnosis system;
— ability to change noise/performance settings;
— temperature change graph;
— resetting counters for sectors with failures;
- support external hard disks.
After starting the program, its main window appears. Pay attention to the state of the processor. If the value is Good, then no action needs to be taken - the disk is stable. The processor temperature is indicated below: it should not exceed 50 degrees. All Additional Information information about the hard drive is displayed at the bottom of the screen.

To load the program along with the operating system, go to the tab. By selecting “Start Agent”, the hard drive temperature will be displayed in the tray.

![]()
Will give you the opportunity to quickly check the current status and performance of hard drives.
Rate this article:Hello friends. Checking the hard drive or how to check a hard drive for errors and bad sectors, we will talk about this in detail today.
In the previous article I showed. Today you will learn about programs for testing hard drives and other storage media. At the end of the review I posted a short video tutorial.
Checking our disk
It is useful for anyone who has a computer to know about the status of the hard drive or drives, if there are several of them. After all, the hard drive stores information that is important for some, and not so important for others. So, in order not to lose it, I recommend making backup copies at least once a month.
You can purchase a portable disk or flash drive for storage important information, you can also use regular CDs and DVDs. If you don’t know how to save information on optical plastic discs, then I recommend reading.
You can test your computer disks different ways And special programs. In this article we will look at:
- Disk check using Windows 7
- Useful Victoria v4.3
- HDDScan program
- Ashampoo HDD Control 2
There are, of course, many other useful and worthy programs and utilities, but in this publication we will only talk about these 4 methods.
How to check your hard drive using Windows 7
Any hard drive or flash drive can be checked for functionality using Windows tools. I wrote more about this here. Here is a simple algorithm for the necessary actions.
Go to My Computer, select the desired hard drive or flash drive, right-click on it and go to Properties.


Check the boxes you need or all and click Start.

This procedure can take a long time, everything will depend on the size of the storage medium that you want to check for errors and bad sectors.
Checking the disk with Victoria program
Victoria one of the main programs that I personally use to check the hard drive through Windows or if operating system does not start at all, then after boot disk with this utility.
After downloading Victoria version 4.3, you need to go into the archive, unpack it or run the file with a green cross called Victoria43.

We launch the program, it is on English language, if you don’t know this language, don’t be alarmed, I will help you figure it out.
The Standard window describes the main characteristics of the storage medium: its model, serial number, disk size, how many cylinders, sectors it has, and so on.

In the Smart tab you can see the status of the hard drive. Click on the Get Smart button and look at the indicators that appear. Since my hard drive is new, my indicators are normal, SMART status = Good. You may have different meaning and information.

Smart is a technology of analysis, self-control and reporting. Using it, you can view and evaluate the condition of the hard drive, its built-in self-diagnostic equipment, and also predict possible time its failure.
To test the storage media, go to the Test tab and click on the Start button. If you have a lot of green, orange, red and blue rectangles (sectors) - this is not good. Ideally, all sectors should be light gray and grey.

If you have damaged sectors marked “Err X”, then after completing the test, check the box next to the word Remap and run the test again. The Victoria program will try to restore these sectors and fix errors on the hard drive.
Checking the hard drive may take a long time, so be patient, it all depends on the amount of information on the media. In the meantime, testing is underway, I recommend reading the article on how to set up your computer yourself or.
Checking the hard drive using HDDScan
HDDScan is a program for diagnosing and testing hard drives in English.
After downloading, you need to run the file called HDDScan.

Choose required device Select Drive, on the right there will be basic information about it.

Click on the blue round button and select the desired action. Go to Surfase Test - select and run the test.

Check the boxes next to Verify or Read and click the Add Test button. I do not recommend choosing Erase - it erases data.

Once you click add a test, it will start automatically and will appear in the lower Test Manager window.

Double-click on RD-Read, go to the test that has started and look at its process, you can see it on the Graph.

View on Map. At the top there are navigation buttons for controlling the Pause, Stop and Report test process, cluster and testing speed in KB/s, and on the right is the sector scanning time in numbers from< 5 до >500 milliseconds.

In the third column of Report you can see the scanned clusters and sectors of the storage medium, and at the very bottom the progress of the test process is shown as a percentage.

Upon completion of the test, a corresponding message will appear in the task manager window.
If for some reason you did not like the first three methods, then I offer you a powerful and useful utility for diagnosing hard drives and storage media from Ashampoo.
Cool program Ashampoo HDD Control 2
I have already worked with this utility for diagnosing and monitoring hard drives from Ashampoo. I really liked this program, so I decided to mention it in this article.

After you download and install Ashampoo HDD Control 2. Depending on language pack, the program can be in both Russian and English.
It has a simple and accessible interface that anyone can understand.
Here you can see probably almost all the information about a hard drive or flash drive that you want: model, partitions, size, condition, performance, temperature and much other useful information.

This program has extensive possibilities and many settings, there are seven navigation tabs at the top:
- Control
- Defragmentation
- Testing
- Disk Cleanup
- Removing Internet Traces
- Deleted files
- Content Analysis
You can browse through all seven tabs and explore useful information.
We are interested in checking the hard drive, go to the Testing tab, click Scan hard drives, select the one you need and click on the magnifying glass that says Start. This test can measure the speed of your hard drive.

In order to check the surface of the disk, you need to return to the Control tab and click Surface Test.

After this, the Hard Disk Surface Testing window will appear, in which there are symbols: blue square - not yet tested, green - excellent, red (already bad) - at least one bad sector.

The scanning time will again depend on the volume and speed hard disk or flash drive.
In custody
Today we discussed in detail the topic of checking a hard drive or how to check a hard drive for errors and bad sectors. To do this, we used four methods: standard means Windows, useful Victoria, HDDScan utility and cool Ashampoo program HDD Control 2.
Now let's watch a short video tutorial on how to check your hard drive.
Checking the hard drive | website
Perhaps you have questions related to checking hard disk. You can ask them below in the comments to this article, and also use the form with me.
Thank you for reading me on
It would seem that what could be more reliable in terms of storing valuable information than electronic device in the form of a traditional storage device (HDD)? Perhaps you, dear user, will think about a “newly made receiver” - a solid-state hard drive. However, despite the high technology of the latter, the risk of data loss still remains high. However, when the user knows how to check the functionality of a hard drive, and at the same time periodically monitors its working condition, the degree of reliability and comfortable use of any hard drive increases significantly. If you want to understand how to put all this into practice, find out what you should be wary of and how to avoid unforeseen operational situations, then we invite you to read the material in this article. Believe me, a few minutes of reading will ultimately turn into some kind of life experience that will help you avoid many mistakes in the future, including data loss.
What makes a hard drive work: a structural introduction
The mechanical type of drive, and this article will focus specifically on such hard drives, is a storage device that consists of several main parts:
- The hermetic block is the enclosure frame of the HDD.
- The printed circuit board is (usually green, located at the bottom of the device).
- The head block is a mechanical module through which the process of reading and writing data to the hard drive occurs.
- A magnetically coated disk (damn) is the area of the HDD on which information is stored.
- An electric spindle drive is a device that causes the plates to rotate at a given speed.
It is worth noting that, depending on the modification of the hard drive, the number of read heads and magnetic disks may be different. Of course, the more storage components in the device, the higher the capacitive values of the HDD.
How good is your hard drive?
Follow the instructions below and you will get a practical answer to your question: “How to check the functionality of a hard drive?” So:

- Download and install the Victoria utility on your computer.
- Run the specified software with administrator rights.
- After opening the program's working window, activate the Smart tab.
- Next, click on the Get Smart button.
- If the value GOOD is displayed in the adjacent checkbox, then you can breathe easy - your hard drive is in perfect order!
However, in order to perform a full test of your media, you must use the TEST tab. After you use the Start button to launch this utility, you will need to wait for the test process to complete. It is worth noting that the presence of red and blue sectors is not a good sign at all; this kind of graphical indicators indicate that the storage area has damaged or failed sectors. However, the program we are considering for checking the health of the hard drive also has some recovery tools.
Digital hard drive repair - how is it?
Upon completion of the test analysis process (using the Victoria utility), check the Remap item and restart the test with the same Start key. The program will “try” to correct all detected errors and restore bad sectors.

By the way, depending on the physical capacity of your drive, the duration of the running process also varies. It may well turn out that it will take a lot of time. Therefore, be patient and wait - miracles do happen, and you will have time to see this more than once!
Simple and effective to use “Windows restorer”: a standard method of “treating” HDD
There is no access to the Internet, and you are not able to install the above-mentioned software, but the difficult question “how to check the functionality of your hard drive” is waiting to be resolved? No problem! Follow these simple guidelines:

- Go to the Start menu.
- Then left-click on “This PC”.
- Point the marker at the desired hard drive partition and click right button manipulator.
- Select "Properties" from the drop-down list.
- Go to the "Service" tab.
- Activate the "Check" button.
- Before starting the “Restoring your hard drive” process, check the two boxes in the next window.
In some cases, for example when you want to analyze the state system partition(C:), you will need to reboot the OS. The subsequent recovery steps will be displayed on the monitor screen as command lines and changing digital values - be sure to wait for the running verification process to complete!

Summing up
Well, now you know how to check the functionality of your hard drive. However, we should not forget that timely maintenance of the hard drive has a positive effect on the long-term operational life of this product. Defragment your HDD once every two weeks, clean your hard drive of digital junk, and don’t forget about the general process of optimizing your OS. That's all. Correct operation of your drive and many years of service!