Mail server kerio. Kerio Connect - enterprise-grade email. Key Features and Functions
Lyrical digression. This article is of no use to any gurus and pros, well, they don’t work with kerio. I think it will be useful for beginners in system administration, step-by-step manuals There's always not enough. Well, I also wanted to show you how to set up Kerio Mailserver as a full-fledged mail server, working through mx records, using users from Active Directory, connecting Outlook via MAPI, etc., because very often KMS is used as a simple POP3/SMTP server, when in fact it can easily be Exchange competition in small companies.
Task: install a mail server in your organization based on Kerio MailServer (KMS), ensure the receipt and sending of mail in the organization, employee access to mail inside and outside the organization.
What you need before installing the mail server:
- Availability of a registered domain name of the second (or at least third 🙂) level, in our case this is testcompany.ru.
- If you work through MX records, you will need access to edit these records. Usually a hoster or name registrar provides such a service.
- The actual server that meets the requirements: http://www.kerio.com/mailserver/requirements.
Installing Kerio MailServer
So we have an Active Directory domain, let's say testcompany.local, there is a domain controller dc01, there is a separate server for KMS, with installed Windows Server 2003 (or 2008), server name mail. If there is no domain, in principle everything will be similar, only a little simpler, since you will not need to configure a connection to AD.
We start the installation of Kerio MailServer, in the first steps Next, Next, etc. are everywhere. I usually choose English language(because the translation is lame, to be honest) and the installation type is Custom, but this is not necessary.
In the Administrative Account installation step, we specify the name of the mail server administrator account and, since it will be created in local base KMS, I advise you to give it a name different from the name of the domain administrator, for example kmsadmin. This will allow the domain administrator to have normal, full-fledged mail. If the names match, this will not work.
The next step, (Email Domain) is very important, there we indicate the name of our email domain ( testcompany.ru):

At the Internet Hostname step, we indicate the external name of the mail server (the one that appears in mx records, see below), in our case mail.testcompany.ru(our server will be identified under this name when establishing SMTP sessions). You can then check this using the HELO/EHLO commands, for example.

Next, in step Store installations Directory we indicate the path to the mail storage; it makes sense to place it on a separate physical disk/array to increase performance. If there are a lot of users and they work intensively with mail, then it is very desirable that this array be on SAS/SCSI disks.

As a result, when we log into the KMS > Configuration > Domains console, we get something similar to this:

That's it, the installation is complete, Kerio MailServer is ready to go. But there is one important point that I must warn you about. In Configuration > SMTP Server > Relay Control tab the selector is selected by default Allow Relay only for and the checkbox is checked Users authenticated through SMTP server for outgoing mail. There is also another point Users from IP address group and there is a great desire to use it and allow relay from your local network. This should not be done, because if you check this box, then the presence or absence of a checkbox in the second item, Users authenticated through SMTP server for outgoing mail, will no longer have any meaning, oddly enough, apparently this is what the KMS developers intended. And after that, any unauthenticated client from your network (including viruses and network worms) will be able to send spam from your network without any problems and your server will very quickly be blacklisted. Therefore, I strongly advise not to check the box in the Users from IP address group item and leave the default settings:

It’s worth mentioning here that if you use clients on your local network that use the SMTP protocol to send mail, you will need to check the “SMTP server requires authentication” checkbox, otherwise they will not be able to send mail.
All settings in other items are quite functional by default and you should change them only if you are aware of what you are doing.
Creating Users
There are three ways to create users in Kerio MailServer:
- In the local Kerio MailServer database.
- Connect users from Active Directory (so-called mapping).
- Import users from Active Directory.
The first method is usually used if you do not have a domain, in which case you have no other options other than using a local (Internal) KMS database.
The second method is logical to use if you have a domain structure.
In the third method, accounts are imported from the Active Directory domain and users are created based on them in the local KMS database (as in the first option).
Creating users in the local Kerio MailServer database
To create a user when using a local database, you just need to go to the KMS console in Domain Setting > Users and add a user by clicking on the Add... > Create local user button.
The second method is more complicated; it requires setting up automatic mapping of users from AD.
Mapping users from Active Directory
To configure KMS to work with Active Directory users, you must first install Kerio Active Directory Extensions on the domain controller. If there are several controllers, then it is not necessary to install them on all of them, only on those to which Kerio MailServer will connect (in fact, in KMS you can only specify two at most). After installing them, go to the KMS > Configuration > Domains > Directory Service tab and enter the data we need there:

Hostname— the name of the domain controller (the one on which Kerio Active Directory Extensions were installed).
Username— domain user name for connecting to the AD database (regular user rights are sufficient, but... if you want to add users from the KMS console, you will have to add this account to the Account Operator group at a minimum). I recommend creating a special user for the connection (for example, kms_service) and checking the “Password never expires” and “User cannot change password” checkboxes so that at one point your connection to Active Directory does not fail.
Password— password of this user.
Secondary (backup) directory server— we register the backup domain controller here, if it exists, of course. Don't forget to install Kerio Active Directory Extensions on it too.
Active Directory Domain Name— at this point, check the box and write the name of the local domain, testcompany.local in our case, since our mail domain name is different from the Active Directory domain.
Click the Test Connection button and make sure everything is OK. If not, it means you entered something incorrectly, check everything again.
To check that everything is functioning normally, on the domain controller go to the Active Directory snap-in, select a user (created before installing KMS), click right click mouse on it, select Kerio MailServer Tasks and create Mailbox:

We go back to KMS > Domain Setting > Users and make sure that our newly created user is present in the console.
In general, you should create a user immediately with a mailbox, but if it was not created immediately for some reason, you can create it either from Active Directory using Kerio MailServer Tasks, or if the kms_service account is included in the Account Operators or Domain Admins group in AD, then this can be done directly from the KMS console. KMS > Domain Setting > Users > Add... > Activate Active Directory user. Similarly, you can assign an email address to groups.
Practical advice: immediately create a distribution group that will include all users of the company; it is convenient to use for sending out any announcements to all employees of the company.
Importing users
If for some reason you need to import AD users into the local KMS database, then this is done in this way - go to KMS > Domain Setting > Users > Import button > Import from directore service:
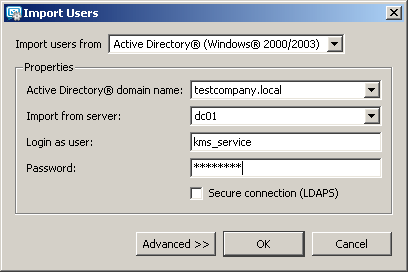
The name of the domain, controller, and user to connect to AD are the same as in the previous paragraph when mapping users from Active Directory. As a result, KMS prompts us to select users to import, select the ones we need and click OK:

That's it, users have been created. As a result, in KMS > Domain Setting > Users you get something like this:

e.popova and kmsadmin - users created in the local KMS database
i.petrov, p.ivanov and v.pupkin - users connected from Active Directory
n.sidorova - user imported from AD
Please note that the properties of users imported from AD are set to Kerberos 5 authentication by default, i.e. When a user logs into their mailbox, they are authenticated using AD. Naturally, you can change the authentication method to another - Internal or Windows NT domain (due to the fact that Windows NT is very outdated, this method is not discussed in this article). This cannot be done for users connected using the second method.
Setting up MX records
What are these records? An MX record is a special record on DNS servers, which for a given domain (testcompany.ru in our case) indicates the mail server to which email intended for addresses in this domain should be sent.
Access to editing these records is located where you actually purchased this name, most likely from the hoster or, say, from a name registrar, for example nic.ru.
Go to the control panel of the testcompany.ru zone. If you already had a company website there, for example, then you will see that there are already A-records there that point to the IP address of this site. We also need to create an A record that will point to our server. Actually, this record will be needed in order to use it in an MX record and so that it points to the web interface of our server.
Therefore, we introduce a new entry:
mail.testcompany.ru type A IP address 88.88.yyy.xxx
where 88.88.yyy.xxx is your external IP address given to you by your ISP. Often you don’t need to enter the entire mail.testcompany.ru, just mail is enough.
@ type MX mail.testcompany.ru. priority 10
@ means the domain testcompany.ru itself. Different name registrars enter these records slightly differently, but the meaning is this: for the testcompany.ru domain we create an mx record pointing to the mail.testcompany.ru A record. That's it, the records are created, after some time (up to two days, usually less) they are replicated to all DNS servers on the Internet and will be available. Therefore, it is advisable to do this point first, even though it comes fourth in my list.
We check using nslookup (how to use this command - http://support.microsoft.com/kb/200525/), it should be something like this:
C:\Documents and Settings\Admin>nslookup
Address: 192.168.1.10> set q=a
> mail.testcompany.ru
Address: 192.168.1.10Non-authoritative answer:
Name: mail.testcompany.ru
Address: 88.88.yyy.xxx> set q=mx
> testcompany.ru
Server: dc01.testcompany.local
Address: 192.168.1.10Non-authoritative answer:
testcompany.ru MX preference = 10, mail exchanger = mail.testcompany.rutestcompany.ru nameserver = ns2.zzz.ru
testcompany.ru nameserver = ns1.zzz.ru
mail.testcompany.ru internet address = 88.88.yyy.xxx
>
where 192.168.1.10 is the address of the domain controller dc01.
You will also need to create PTR record for your external IP address. It is needed to ensure that emails from your server are not considered spam (many mail servers have PTR checking). PTR records are usually created by a provider that provides you static IP address, there is usually no access to editing PTR records. Therefore, we write a letter to the provider with the following content:
Please create a PTR record for the address 88.88.yyy.xxx corresponding to the domain mail.testcompany.ru
You can check whether the entry was created or not, again via nslookup, something like this:
C:\Documents and Settings\Admin>nslookup
Default Server: dc01.testcompany.local
Address: 192.168.1.10> set q=ptr
> 88.88.yyy.xxx
Server: dc01.testcompany.local
Address: 192.168.1.10Non-authoritative answer:
xxx.yyy.88.88.in-addr.arpa name = mail.testcompany.ru
>
That's it, everything is fine with the records, now you need to map (or publish) SMTP and HTTP ports (as well as HTTPS, POP3, IMAP, etc., if you are going to give outside access to these services) on your corporate firewall. You also need to open the SMTP port to the outside from the mail server. For example, in Kerio Winroute Firewall it will look like this:
where 192.168.1.12 is the IP address of the mail server.
To quickly check outside, use telnet:
telnet mail.testcompany.ru 25
which should output:
220 mail.testcompany.ru Kerio MailServer 6.7.3 ESMTP ready
Client setup:
We check the web interface, on some workstation on the local network or on the server itself in the browser line we type the name of our mail server:
http://mail/ (or http://mail.testcompany.ru/ if you are trying outside)
We should get to the KMS web interface login page:

Then everything is standard, enter the username and password of the user with the existing mailbox, log in and are surprised that everything works :) You can also try logging in via HTTPS; by default, KMS itself creates a certificate during installation, so in this case everything should work.
First you need to install on workstation Kerio Outlook Connector (with offline caching). You can do this manually, or you can install the MSI package through group policies.
After installing Kerio Outlook Connector, launch Outlook, if there were no accounts, the wizard will start, if there were, you will need to start it manually from the menu Tools > Account Settings > Create...
On the Account Settings page, click Yes, of course, then on the page Automatic setup account, check the box “Manually configure server settings or additional server types” (since we don’t have Exchange :) Next, on the Select an email service page, select Other and Kerio Mailserver (KOC Offline Edition):

Server name - mail.testcompany.local
Account name - p.ivanov
Password - the password for this account in AD and check the Save password box.

Click the Detect button, the correct information about the user should be displayed. Next OK, OK, Done and go to Outlook. On this initial setup Outlook is finished, the user can send and receive mail.
To check, send several test letters within the organization and to some external addresses, as well as back :) If everything was done correctly, then the mail should function without problems.
Corrections and additions are accepted.
|
|
Universal secure mail serverSecure mail Virus protection Spam protection Integrated Web Clients Collaboration Convenient control Easy migration from Microsoft Exchange Directory management Scalability |
The use of email has become commonplace in many activities, including business. In order to create an effective and secure structure for the exchange of official information, it would be rational to buy a personal corporate server for storing and forwarding mail - Kerio Connect Server. The Kerio brand specializes in creating functional, but at the same time, simple and intuitive communication systems for the average user.
Kerio Connect Server is a modern example of an email server application that can be individually configured to suit the business needs of a specific organization. Unlike publicly available user category programs, this provides significant opportunities for deep and flexible administration. The developers made sure that their product complies high requirements consumers to modern information solutions, was distinguished by reliability, stability and productivity.
Kerio Connect is not just a client-server email system that provides the user with access to a personal mailbox and stores valuable service information on a dedicated server. Kerio Connect is its own autonomous type structure, with the help of which you can log into corporate mail from anywhere in the world, without worrying about the safety of your data.
The system administrator can independently specify the level of access of each user group to postal service, address book, calendars, task lists and service folders.
Application area of Kerio Connect Server
The development company has been specializing in creating software corporate class, while focusing on consumers from the small and medium-sized business segment.
In this market share for a long time the monopoly belonged to the package solution, which was quite demanding in terms of hardware. Administering such email systems was challenging. technical problem for qualified specialists.
 The Kerio Connect Server package has become a profitable compromise solution, providing the user with wide functionality for creating a mail server, while having a flexible configuration system and an intuitive interface for operation.
Mastering virtualization technology has become the main focus of modern developments by Kerio, software Connect Server, current version 6 with a flexible configuration system, is ideal for integration into the functionality of virtual machines.
Such server systems represent a leased segment of individual physical equipment resources. The client is allocated computing power and memory storage space for autonomous use. Virtualization technology is an opportunity for relatively little money to create for the needs of a company information space with the possibility of independent and in-depth administration. Postal service Kerio Connect fits perfectly into this concept of rational savings.
The brand's software does not require significant operating costs, saves resources, has a simple and convenient deployment system and supports many modern mobile platforms.
Kerio Connect corporate email functionality
 This software product is distinguished by its versatility and wide range of capabilities for solving a variety of communication and service tasks. It can be divided into several modules:
- Kerio Connect Mail is a convenient mechanism for business email correspondence with a modern search system and effective filters for sorting letters, reliable protection anti-spam, notification mechanism and many other functional innovations and settings that make it easier to work with addresses and attached files;
- The calendar allows you to quickly create a structure of corporate events and reminders with the ability to provide access to information to any number of employees, partners or clients, as well as create a mechanism for personal mailing for a specific date and time;
- The contacts module allows you to quickly and conveniently create new address positions, combine them into groups, edit lists and provide access to them to other users.
Advantages of using Kerio Connect mail server
One of the significant advantages of the software from this developer is its multiplatform nature. Kerio Connect Server works effectively in combination with any application for three major operating systems: Windows, Linux and Mac, and also supports portability from one operating system to another. In addition, the system provides functionality for implementing remote access to a corporate email service with mobile devices or via the web interface.
Kerio Technologies, present on the market for more than 15 years, produces unique software solutions in area computer security, which provide protection for companies’ internal networks from external attacks, and also creates systems for electronic communications. Its products are aimed at medium and small businesses, but can also be used by large companies. In addition to the flagship product - firewall Kerio Control - the company is actively developing a cross-platform email server, Kerio Connect.
The Kerio Connect mail server was released in 2001 and was called Kerio MailServer. A new name - Kerio Connect - was given to this server in 2010, when Kerio Mailserver 6.7 was officially replaced by Kerio Connect 7.0. The Kerio Connect mail server is positioned as an excellent solution and alternative to the Microsoft Exchange mail server. Let us remind you that Microsoft Exchange is a powerful product aimed primarily at large companies. This solution is not suitable for the needs of small and medium-sized enterprises due to complex administration, high costs for equipment and subsequent support. The Kerio Connect mail server was originally created to work in medium and small businesses. It has very low requirements for the hardware platform, is easy to install and quite simple to administer. In addition to these undoubted advantages, Kerio Connect has perhaps the most important advantage - a low total cost of ownership, which products such as Microsoft Exchange and Windows Small Business Server cannot compete with. It is worth noting that the Kerio Connect mail server is quite popular among network administrators and is used in the servers of small companies all over the world. Since its inception, Kerio Connect has been constantly modernized, many useful options have been added to it. In this article we will look at its main functions and capabilities, but first we will talk about the cross-platform nature of this product.
Kerio quickly realized the possibilities of virtualization and took the path of maximum integration with virtual environments, which are now actively developing thanks to the emergence of multi-core processors and significant progress in the IT field. All new Kerio products are now available for popular virtualization environments based on VMware products. This makes it possible to deploy this software on any platform and migrate the product without reinstalling it on a new hardware platform. This approach offers company network administrators the opportunity to more wide selection equipment when building a network infrastructure. Note that, unlike Kerio Control, which is produced only in the form of a version for virtualization systems and a version for installation on bare equipment, the Kerio Connect mail server is also supplied as Windows application, Linux and Mac OS. This allows you to install it on existing servers within the company on Windows based. The latest version of Kerio Connect 8.1.2 is available in two versions for virtualization systems: Virtual Appliance VMX and Virtual Appliance OVF. There is also a version for operating systems: Windows (32- and 64-bit versions are supported), for Mac OS X and Linux based on Debian and RPM packages (Red Hat, CentOS, SUSE, Debian, Ubuntu (32- and 64-bit versions are supported version)). The version for virtualization systems uses the SMP version with standard set functionality, but with an OS that does not require additional lengthy setup and maintenance. It can be easily installed on a dedicated virtual server without requiring installation of an operating system. We also note that the OVF version of this software, in principle, can be installed on other virtualization systems. This approach allows a more flexible approach to the implementation of a company’s network and abandons the use of solutions that often cannot be upgraded in hardware due to significant costs or severely limited capabilities. In addition, the Kerio Connect mail server can be integrated with Microsoft Active Directory and Apple Open Directory directory services using additional extensions. Thus, the administrator does not need to create new users in Kerio Connect, but can use the existing organization structure. Kerio Connect mail server can be integrated into most small and medium-sized corporate networks regardless of their structure.
Since the Kerio Connect mail server can be installed on different platforms, we will look at two typical installation methods: for the Windows platform and as a virtual VMware machines. Kerio Connect mail server for Windows is delivered as a separate application, which is subsequently installed as a Windows service. The installation process is practically no different from normal installation programs. It should be noted that when downloading the installer from the official Kerio website, you must correctly select the type of operating system - 32 or 64 bits. The installer takes up a little less than 200 MB, but after installation the volume of the installed server will be larger - about 800 MB. It should be noted that the volume of email messages is now increasing every day, so more space needs to be allocated for messages, message archive and backups. Path to the storage directory and also to backups and archived messages can be changed later in the admin panel. During the installation process, a system administrator password will be determined, which will be needed to initial setup mail server. Further setting of mail server parameters is carried out through the administrator panel, which can be called through a browser or using an icon in the taskbar.
Kerio Connect can also be installed by initializing a virtual machine on the virtualization server. This method involves two installation options: possible automatic download the latest version of Kerio Connect from the manufacturer’s website through the VMware VA Marketplace or connecting a VMware virtual machine image. In both cases, all steps to deploy Kerio Connect are the same as when installing any operating system. Linux systems, but there are few installation steps here. Initializing the Kerio Connect virtual machine allows you to skip the main installation stage, and the administrator is only required to determine the initial parameters of the virtual machine: the number of processors, network adapters, volume random access memory and the size of the disk subsystem. Minimum Requirements for the operation of the mail server are very modest, so it is quite possible to run it even with a not very productive configuration. IN basic version virtual machine Kerio Connect has minimal parameters, however, the network adapter must be specified in the machine properties, since a working network connection is required for further administration.
After installing Kerio Connect on the virtualization server and after successful initialization, the administrator will have access to basic setup network configuration via the management console (Fig. 1). Default network adapters connected to Kerio Connect attempt to obtain IP addresses using DHCP. If obtaining IP addresses was successful, the administrator can connect to Kerio Connect via the local network by entering the IP address displayed in the management console. The basic management console allows you to configure network settings adapters, reset server parameters, reboot or turn off Kerio Connect. It should be noted that, if necessary, you can exit to a full-fledged bash command shell of the operating system by pressing the combination Alt keys+ F2-F3. To log into the system, you will need to enter the root login and the “kerio” password, which will be prompted to change immediately after successful login. Further configuration of parameters occurs through the web administration console over an SSL encrypted channel.
Rice. 1. Management console
The administration console allows you to manage all mail server settings. Compared with previous versions, based on version 7 of Kerio Connect, the design of this control panel has undergone significant changes. Thus, the first page of the control panel has a tiled, customizable interface (“Dashboard”), to which you can add or remove the necessary elements for quickly diagnosing the status of Kerio Connect. This is very convenient because the administrator immediately sees the system status, the amount of space occupied by messages, details regarding the status antivirus program and its bases, etc.
As for other management tabs, in Kerio Connect version 8, most of them have remained virtually unchanged, except for those added to manage new ones functionality. The administration panel is divided into four main menus, in which several subsections are available to the administrator. The main menus are Dashboard (“Status”), “Accounts”, “Configuration” and “Protocols”. The protocols collect all the necessary diagnostic information in the form of log files, which have several standard sections. In the Status menu, the administrator will find statistics, information about active connections, and message queues. This information is updated in real time and serves to quickly diagnose the status of the mail server. The “Accounts” menu involves setting up mail server users. Naturally, the number of active users depends on the purchased license. The Kerio Connect mail server supports both a built-in user database stored inside the server and the ability to connect to Active Directory and Open Directory directory servers. In this case, you can use both the directory service and the database at the same time local users if their names do not overlap. The Kerio Connect server supports the creation of a multi-domain configuration, which allows you to keep on one physical server several different domains that can be attached to different external addresses. The entire procedure for creating a domain is quite simple, and the settings themselves are individual for each of them. For example, for each domain you can set your own directory service, which allows you to integrate Kerio Connect into large organizations with complex network infrastructure. Users can be grouped into separate groups, included in mailing lists, and the mail server's global contact list provides convenient way View contact information for all users on your mail server using a collaboration client such as Microsoft Outlook. Large organizations using Kerio Connect's global contact list experience increased efficiency daily work, since Kerio Connect can synchronize in real time with Microsoft Active Directory, Apple Open Directory, which provides users with the ability to quickly exchange email messages and information in a large corporate network.

Rice. 2. Control panel
The “Configuration” menu contains all the main settings of the mail server, divided into sections. Here you can not only configure the parameters of Kerio Connect services (POP, IMAP, SMTP, HTTP, LDAP), but also have options for backup, archiving, SSL certification and remote collection of mail from other mail servers. In addition, a separate anti-spam section contains advanced settings for multi-level anti-spam protection, both using integrated intelligent technologies and by connecting blacklists. The Kerio Connect mail server, just like the Kerio Control firewall, uses the SOPHOS antivirus, which automatically updates its databases and quickly protects server users from attachments containing viruses. By default, Kerio Connect already includes all possible filters for dangerous attachments, but if necessary, the administrator can independently configure custom rules for attachments. Kerio Connect mail server also has an improved anti-spam gateway that is optimized to work with multi-processor servers. It increases operating speed thanks to parallel multi-threaded processing several emails. In addition, Kerio's multi-layered anti-spam protection uses an innovative self-learning method for the Bayesian filter to significantly speed up the generation of the heuristic database, making mail server anti-spam protection even more effective.
The Kerio Connect mail server not only allows you to use various programs for working with mail through common communication protocols, but also has its own web interface for managing mail, accessible to every user (Fig. 3). IN new version Kerio Connect 8 received this interface not only new design, but also some new features based on the HTML 5 standard: the ability to add attachments by simply dragging a file into an email message, a full-fledged calendar with a schedule of events and meetings. In addition, the new interface includes a function automatic notification about events using notification windows, address auto-completion when entering and a number of other useful and convenient functions. Note that the new interface requires the latest versions of popular browsers, and if the user logs in with old version browser, he will be offered the previous interface for working with mail. Available to users full text search by mail and the ability to create notes and then send them to various recipients. In general, the new interface has become more convenient and clearer than the previous one, and a number of functions allow you to work with it as with a regular email client.

Rice. 3. Access to mail via web interface
In addition, the Kerio Connect mail server has been supporting mobile mail clients for quite some time. New versions periodically add support for smartphone models based on Android based, iOS and other popular phone platforms. On this moment the server works with more than a hundred smartphones, including the latest models of popular brands Apple, Blackberry 10, HTC, Nokia, Sony Ericsson, Palm, Motorola, LG and Samsung. Combined with a huge list of contacts, mobile client support allows employees of organizations using their Cell phones for working with email, receiving full access to contact information (names, positions, email and postal addresses, telephone numbers) and use wireless communication to interact with colleagues. IN latest versions Kerio Connect also now supports mailing instant messages via the XMPP protocol.
One cannot fail to note the support for CalDAV, CardDAV, IMAP technology, which significantly expands the capabilities of working with personal and shared calendars of employees using the operating system. Mac system and Android. Thanks to new capabilities in working with the IMAP protocol, you can effectively exchange data with any mail servers, which allows you to seamlessly implement this server into already established corporate networks.
Special separate migration utilities are available for administrators - Kerio Exchange Migration Tool, Kerio IMAP Migration Tool and Kerio CommuniGate Migration Tool. These utilities make it much easier to migrate emails, folders, accounts, calendars, and other data from IMAP and Exchange servers. The Kerio IMAP Migration Tool utility works on all supported servers Windows platforms, Mac OS X and Linux. And the Kerio Exchange Migration Tool utility only supports Windows operating systems.
In conclusion, Kerio Connect is an excellent collaboration and messaging solution. This server combines mobile email, calendaring and scheduling capabilities with security features such as multi-layered anti-spam protection, flexible dual virus protection, attachment filtering and archiving. The product is translated into 16 different languages of the world and supports working with them.
To synchronize mail, contacts, calendar there is special application – Kerio Connect Sync, but we will not install it for various reasons.
To work with email, we will set up a connection using the IMAP protocol, which is the operating Android system supports natively.
IMAP configuration
To configure IMAP, follow these steps:
As an example, let's assume that your email address is master@site and your Kerio Connect server is located at mail.site
These values should be replaced with your Kerio Connect server's own email address and location.
1.On the Home screen, tap the Tools button, and then tap the Mail icon.
2.Enter your entire email address (for example, master@site), and in the second field enter the password associated with your account Email.

3. Click the "Default Settings" button and select "IMAP".
Username – Enter your email address (for example, master@site ). If there is one mail domain on the server, then only the name before the “@” icon is enough - master.
Password. Enter the password associated with your email account.
IMAP server – enter the name of the incoming mail server: mail.site
Port. Port number: 993
4. On the Settings screen outgoing server» enter the following data in the fields:
SMTP – server – enter the name of the outgoing mail server. For us, this is the same server as for incoming: mail.site
Port. Port number: 465
Security Type – Select SSL/TLS (Accept all certificates)

Click the “Finish” button. All!
It should be noted that it will only work if the necessary ports are open on the firewall, in our case these are 993 and 465 tcp.
Setting up mail on Android to connect to Kerio Connect via IMAP.