Batch processing in photoshop. Photos processing tips eliminate skin defects
Hi guys. In touch, Vasily Blinov and this article we will talk about the program for editing video. Those whoever have never worked with video edits and did not try to mount the videos, this article may seem a bit complicated, but useful. I will try, as usual, explain to simple words.
I understand that everyone has different tasks, someone needs to professionally learn how to work with video editing programs to make a video for YouTube and make money on it, and someone needs to simply mount a short video from photos to a friend for a birthday.
Therefore, today we will analyze all kinds of such programs for mounting and processing video, let's see which of them are the best and where to start a novice video editor. We find out what free programs are and where to download them. Also affect applications for mobile devices, Lid, who wants to learn how to mount right from the phone.
What program I use and why?
A small background, as I chose the program. When I just came, I needed a simple program for shooting video tutorials and minor installation (pruning superfluous). Lessons I did clean for myself and my customers.
Here I came to the help of the advice of a friend Camtasia Studio and Camtasia Recorder. In general, a pretty good tool with which I worked for the first time. Then I decided to change the program for writing video from the screen.
The reason was in more advanced features and capabilities. Immediately I thought that you need to immediately learn to work in a more professional video editor. Why waste time for busting lungs simple programs. According to surveys of the friends engaged in video editing, Top 3 is revealed to the popularity of the program to a computer with a Windows system:
- Premiere pro.
- EDIUS PRO.
For some reason, the choice fell immediately on Vegas, but, having started working with him, a number of problems revealed. It does not support the format of the video files in which I write down, then you need to put a number of any additional codecs, then there is a sound slotchron, it is necessary to convert to another format, and the quality is lost when conversion. In general, in a week I went to the software to all known aDOBE., on their program for installation Premiere Pro.
On the this moment She satisfies all my needs, it has long been used to work with her, the only thing - the computer is needed a little more powerful.
If you are new to, but configured to work with video processing constantly, then I advise you to choose a professional program immediately, learn and get used to it. The principle of operation for all programs is almost the same, interface and functions, we can say similar.
Work in them, with limitless information on the Internet, I think will be able to learn any. Most the best way Learning is to look for a solution when the problem occurs. What does it mean?
Take and immediately begin to mount, and if something does not work out to Yandex or Google with your problem. The main thing is to ask the question correctly in the search. I studied, I found answers to all questions, and no need to sit, studying step-by-step courses With a bunch of unnecessary information, before starting to mount.
Only with gradual practice will be the growth and effects of various learn how to do, and the installation will become more interesting.
Accordingly, all good programs are not free. I understand that the majority, especially just beginners, will pay for them will be difficult and meaningless, since you are not sure whether you will do on it or not.
I do not advise, of course, look for cracked versions of programs and download them through some torrent. But, it seems to me that everyone did it at first, then, when you enjoy all the time, you buy.
Best video installation programs

- One of the leaders among the installation and editing programs in the world. With it, you can make installation of any complexity, add different effects, animation, music, text and more. Supports all video formats and works with the latest XDCAM, XDCAM EX, P2, AVCHD and RED. Allows you to display ready-made video in any format, including Blu-ray, SWF and others.
Interface: Russian.
Trial period: 30 days.
- video editor, which is also widely used among authors and creators of various short video and movies. Until March 2016 was developed famous brand Sony, now part of the products acquired the company Magix, which has and develops its range of video edits.
Interface: Russian.
Trial period: 30 days.
EDIUS PRO.

EDIUS Pro - Professional Mounting Program, fast speed Processing and rendering of rollers. Supports all known video file formats that can be glued in the program among themselves. It is often used among the creators of music clips, TV shows, television shows and short films. Mounting video in 4K, 3D and HD.
Interface: English.
Trial period: 30 days.
For MacBook (OS X)
- cool video editor for operating system OS X from Apple. It works only under this OS. Very convenient and easy to use, intuitive interface. In combination with powerful computers It works incredibly quickly. Most Apple's owners prefer to use this program.
Interface: Russian.
Trial period: 30 days.
Good Mounting Programs
- highly good program For mounting, claims to get into the top. Works for Microsoft Windows. XP / Vista / 7/8/10, separate ruler for Mac. Supports any popular formats: AVI, MOV, MP4, MP3, WMA and many others. Allows you to make digitization with video tapes and TV tuners. Contains various effects and filters.
Interface: Russian.
Trial period: 30 days.
- Another professional installation program, with the help of which known films in the field of fiction, such as Transformers, Iron Man, "Return Superman", "Avatar" are mounted. A huge number of special effects and tools for their creation. For home use and easy editing, it is better to take something easier.
Interface: English.
Trial period: 30 days.
Video editing
Video editing - Light and convenient program for quick video mount. It has a simple primitive interface. There are no professional features, all installation takes place in 5 steps: loading video files, scoring frames, overlaying transitions and effects, add sound track And the withdrawal of the finished video.
Interface: Russian.
Trial period: 10 days with restriction of functions.
- Professional video editor, which has a large number of effects in his arsenal. Prost and convenient to use, the functionality is no worse than others, intuitive in management. More than 2 thousand transitions and effects for video and audio. Support all popular formats.
Interface: Russian.
Trial period: 30 days.
Corel videostudio pro.
Corel videostudio pro. - An excellent editor from Corel, which develops various software. Capture, edit, create HD quality material or immediately publish it on YouTube, Vimeo or Facebook. For beginners, the interface will seem complicated, but here is provided free access To the training lessons for 6 weeks.
Interface: Russian.
Trial period: 30 days.
Camtasia Studio.
Camtasia Studio. - The simplest tool for recording and editing video tutorials. It is not much difficult to figure it out. Works with almost all formats. Record, cut, superimpose transitions, music, screensavers and more.
Interface: Russian.
Trial period: 30 days.

- As was written above, Magix has bought the Vegas program from the Sony, but it also has its own line of video processing programs. Simple and not bad video editor MAGIX is often used to improve the quality of recording, eliminate flicker, etc.
Interface: Russian.
Trial period: 30 days.
Free video edits
Free programs for editing video have few features and many of them are no longer supported by the developers.
VideoOpad Video Editor
VideoOpad Video Editor — free programBut has enough functions for mounting. Supports all popular formats, has a database of transitions and cool effects. The interface is fairly simple and convenient for beginner. Fast download ready video Right on YouTube.
Interface: English.
— standard application From Microsoft, which was supported before Windows 8, then ceased to update, but it can be downloaded for free on the official website and install it. Very simple, time-tested program, understand how to make installation in it, everyone will be able. I remember even at the school on Windows XP mounted rollers in it.
Interface: Russian.
- Another one of the top free programs for creating videos from recorded video. Excellent copes with trimming, broken down, scaling, adding transitions, effects, filters, music. Supports most popular input and output formats. Provides users a fairly fast work.
Interface: English.
- The average program, calculated more for beginners. Simple interface and conventional functions. It works not only with MPEG formats, but also AVI, WMV, MP4, VOB. Available functions for setting up sharpness, contrast and normalization of sound.
Interface: English.
- Simple editor for nonlinear mounting. Provides many opportunities that are in most other free applications Unavailable. Provides high-quality processing and video optimization. Superimposed digital signature With free use of the program.
Interface: English.
- This video editor allows you to make a capture from the desktop, write a voice, making video files and audio. It has the ability to display video in HD and UHD resolution. Contains a large number of built-in filters and transitions.
Interface: Russian.

- Free program with standard functionality, allowing you to easily cut, trim the downloaded video file, add an audio track, titers, images. A fully portable program does not require installation, easily copied and transferred to another device.
Interface: Russian.
- Good free program for editing video. In it, you can make a video from photos, images, video and audio files. Various tools are available to improve the quality of the available entries. Supports popular formats and it is possible to convert video from one format to another.
Interface: English.
Services for editing video online
- Life2Film.
- Standard Youtube video editor
- ONLINE VIDEO-CUTTER
- Magisto.
- Cool Editor
- Stupeflix.
Mounting Applications Video for Android
- Androvid.
- Magisto.
- Fxguru.
- FilmoRago.
- Vivavideo pro.
- PowerDirector.
- Wevideo.
- Kinemaster
Applications for iPhone (iOS)
- iMovie.
- SPLICE
- Magisto.
Conclusion
In this article I listed all the most best programs and applications that you may need for mounting and processing video. I recommend that if you are customized to make video conntor creating constantly, choose a professional program immediately.
A little later we will try to record basic lessons for you in the most popular programs: How to create and configure project, basic installation functions, setting rendering, etc.
If you have any questions left, or you cannot decide what to choose, then write in the comments. Today, everything, I wish you all success and good luck.
Action automation means in photoshop allow you to significantly reduce the time spent on the execution of the same type of operations. One of these means is batch processing of images (photos).
The meaning of batch processing is the record of actions to a special folder (action), and then apply this action to an unlimited number of photos. That is, we once manually produce processing, and the rest of the pictures are processed by the program automatically.
Batch processing makes sense to apply in cases where it is necessary, for example, to resize photos, raise or reduce illumination, produce the same color correction.
So, let's start batch processing.
First you need to place the original pictures in one folder. For a lesson, three photos were prepared. I called the folder « Batch processing» And placed it on the desktop.

If you notice, the subfolder is present in this folder. "Ready photo". It will save the results of processing.
Immediately it is worth noting that in this lesson we will only learn to the process, so there will be no many operations with the photo. The main thing is to understand the principle, and then you already decide what processing to produce. The procedure will always be the same.
And one moment. In the program settings, you need to disable the warnings about the mismatch of the color profile, otherwise, each time you open the photo you will have to press the button. OK.
Go to the menu "Editing - Color Settings" And remove the dwarf shown in the screenshot.


Now you can start ...
After analyzing the pictures, it becomes clear that they are all a little darkened. Therefore, we will be illuminated and toned a little.
Open the first shot.
Then we call the palette "Operations" on the menu "Window".

In the palette, you must click on the folder icon, give a new set some name and click OK.

Then create a new operation, also somehow call it and press the button "Write".

To begin with, change the size of the image. Let's say we need pictures of no more than 550 pixels width.
Go to the menu "Image - image size". We change the width to the desired and click OK.


As you can see, changes occurred in the operations palette. Our action is successfully recorded.

For clarification and toning we use "Curvions". They are called by a combination of keys Ctrl + M..
In the window that opens, we put the current on the curve and pull in the direction of clarification until the desired result is achieved.

Then go to the red channel and correct the color slightly. For example, like this:

At the end of the process, click OK.
When recording Action, there is one an important rule: If you use tools, corrective layers and other program functions, where the values \u200b\u200bof different settings are changing "on the fly", that is, without the need to press the OK button, then these values \u200b\u200bmust be prescribed manually and press the Enter key. If this rule does not observe, then Photoshop will record everything intermediate valueswhile you pull, for example, the slider.
We continue. Suppose that all actions we have already completed. Now you need to save the photo in the format you need.
Press the key combination Ctrl + SHIFT + S, Select the format and place to save. I chose the folder "Ready photo". Zhmem. "Save".

The last step will be closing the image. Do not forget to do it, otherwise all 100,500 photos will remain open in the editor. Nightmare…

From preserving the source refer to.
Let's take a look at the operations palette. We check whether all actions recorded correctly. If everything is in order, then click on the button "Stop".

Action is ready.
Now we need to apply it to all photos in the folder, and automatically.
Go to the menu "File - Automation - Batch Processing".

In the Function window, select our set and operation (the last created) are automatically prescribed), we prescribe the path to the folder with the source and the path to the folder to which you want to save the finished pictures.

After pressing the button "OK" Processing will begin. The time spent on the process directly depends on the number of photos and the complexity of operations.

Use the automation provided to you by the photoshop program and save a lot of time on the processing of your pictures.
Reading articles about Photoshop, I am often surprised at how many authors complicate the decision in essence of simple processing tasks. This suffer from these "monumental" writers, for example Dan Margulis. But he is fortunately - his task is to write about all the subtleties and nuances of the processing process, consider it from all angles and parties. Although it is this feature of the filing of the material in his books pushes many readers.
In fact, the roots of such ways to "increase sharpness in 40 actions" grow from very simple things - people who write these lessons have never worked with a large volume of photos. That is, as a rule, they have a pair of photographs and they are ready in the process of their processing to kill the evening-another. But when you have permanent orders, and from every photo shoot you need to seriously treat several dozen frames - you begin to think about the simpler and comfortable methods Processing.
We will talk about them today and talk. I will tell you about five simple, but very effective PHOTOSHOP tools that I constantly use in my work.
Before processing photos in Photoshop, I always first work with frames in the RAW converter. It is there that I spend the main color correction and primary processing of photos. In fact, I create a "skeleton" processing, and in Photoshop I already work with the details of the photo.
So, we worked with a photo in the RAW converter and open it in Photoshop. Photoshop meets us with a huge number of tools for processing all occasions. But we will talk about the easiest and most effective of them.

Main function Dodge Tool / Burn Tool - Lightening / darkening of individual sections of the image. In fact, you can "draw" the blackout or vice versa - lighten the snapshot. It is very simple, try: I'm sure you will rate this tool. Dodge / Burn Tool has only two, but very important settings.
Range - Selection of the Application Area
You can use this tool for dark (Shadows), light (Highlights) or neutral (Midtones) photos of the photo. For example, you need to illuminate the dark seabling sites (when processing portrait), and light leave not touched. In this case, we set the Shadows mode in the Dodge Tool, and it will only lighten the dark sections of the places that we apply it.
Exposure - impact force
It is very important to properly expose the effects of exposure. Many people experimenting with photoshop, try Dodge / Burn 100%. And, the dimming image, get black "holes", and clarifying - solid rebar. Of course, getting such a result, they no longer return to this tool. But Dodge / Burn is a thin tool. If you work on shadows or lights - try the use of 7-10% use, if with neutral sections - 10-20%. For each case, the power of the impact is selected separately, but, having worked with this tool, you will begin to feel exactly what power is needed in each case.
Using
Dodge / Burn has a lot of ways to use:
- Lighten the iris eye
Simply apply the Dodge Tool on the eye iris - this is the easiest way to clarify it. Thus, you emphasize the attention of the viewer on the eye of the model.
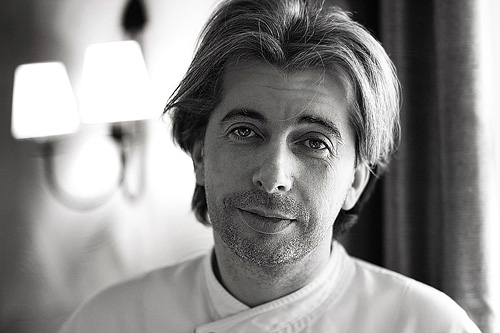
On all these portraits, I lasted the eye iris in order to draw the attention of the viewer to the eyes and add psychologism into a frame.

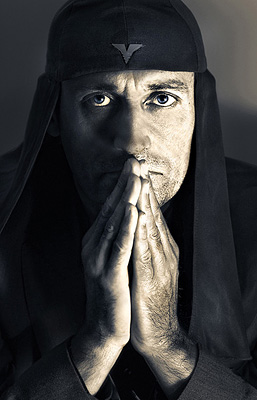
- Darken face shape lines on male portrait
Cheekbones, chin line, nose line, eyebrows - any facial lines, if they are a little darkened, get a larger volume and contrast. The man in the photo will look more tough and volveva.
I use this technique when processing almost all men's b / w portraits. For the color, this technique is not always suitable, since "crushes" colors, but on a b / w clipper works just perfectly.

On the female portrait it is necessary to use this technique very carefully, as the woman will decorate only the focusing of those facial lines that give her femininity. Otherwise you get a portrait of a threshable creature.
- Lighten the area of \u200b\u200bthe opposite light
Constorm Light in itself is a wonderful thing. But if you with the help of Dodge Tool will strengthen its effect - the picture will become even better. Especially great it looks at concert photos, when musicians light a good context light.

- Whiten your teeth to your models
It is using Dodge Tool that is easier and more efficient to whiten the teeth in the photo. A little later, I will definitely write a separate lesson about the correct bleaching of the teeth with the help of Dogde Tool.
2. Clone Stamp.
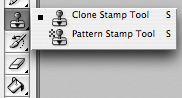
In Photoshop, there are several tools for retouching images, and each of them is good. But the "stamp" is the most universal tool in application.
Its function is to take a certain portion of the image and copy it. Thus, we can, for example, breed wrinkles - just "replacing" their sections of smooth skin. To do this, click Alt and choose the area from where the picture will be taken, and then, just clicking on the desired areas of the image, we will copy it to them.
In the settings of the stamp it is important to pay attention to two parameters:
Mode.
These are the modes in which the stamp will work. For example, in Darken mode, the stamp will "replace" only brighter zones than the selected area. In fact - you can darken the light zones of the image, because of the mode name - Darken. And, compliance, in Lighten mode, the stamp will only work on the darkest image zones, lightening them.
Clone Stamp has many modes of operation - experiment with them, I am sure you will get interesting results.
To describe the work of each regime, in my opinion, it does not make sense - in Photoshop for all tools, there are essentially alone and the same principles of operation of modes, only slightly changing under the specifics of a particular tool.
OPACITY means opacity. Simply put, the smaller you put the percentage in this setting, the more transparent will be "work" of the stamp. For example, at 100%, the stamp will completely replace the selected area, and at 50% - it will be translucent. For retouching the face, as a rule, 10-30% is used, otherwise the trail is too clearly visible.
Using Clone Stamp
- Retouch
Retouching in all its manifestations is the main purpose of the stamp. First of all, the stamp is used for the retouching of the skin - to remove wrinkles, bruises under the eyes, swelling and other wonderful creations of mother nature.

You can also breed, for example, an undesirable object in the frame. If, of course, he does not take half of the photo.
It is very convenient to use a stamp to eliminate small crossings. For example, your model at the tip of the nose is a small speck of reboot. We take a stamp, put the Darken mode and a couple of clicks darke it this spot.
3. History Brush.

Histori Brush is a time machine for processing photos. You can take any stage of processing and tassel draw from it according to your image.
History Brush is a huge opportunity. I have already written in detail about the work of this tool in a separate article. In it, you will find a detailed lesson for the use of Histori Brush and find out how to increase the sharpness only in the images you need.
Of course, an increase in sharpness is not the only area of \u200b\u200bits use. In future articles, I will tell you how to work with the History Brush to work with color in the photo.
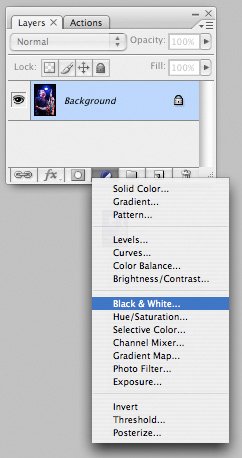
4. Black & White
The Black & White tool is in the Image-\u003e Adjustments tab. Or you can simply create an ADJUSTMENT LAYER (corrective layer) in the photo.
The main feature of the Black & White tool is "Right" translation of the color image in h / b. Correct because you can change the black and white display of each of the colors. Thus, you can get a beautiful and "delicious" Ch / B picture.
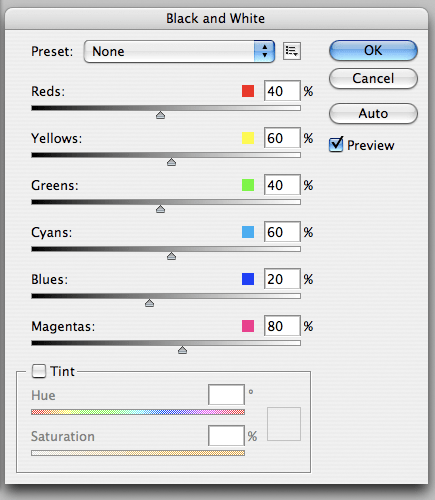
But on this functional B & W is not limited.
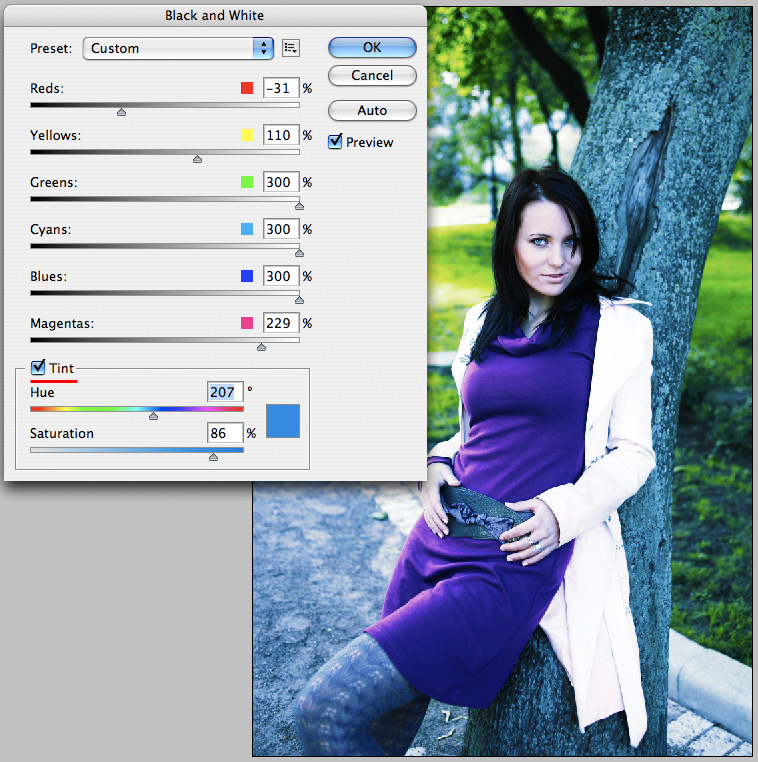
With this tool, you can get a very interesting and color picture. Apply to our picture B & W, and then turn on the Overlay layer mode.
Now, manipulating B & W control levers and layer transparency, we can get a very interesting picture. For greater clarity, I put a rather high opacity layer with B & W - 62% and turned to the maximum lever GREENS, CYANS, BLUES and MAGENTAS.
As we can see, the picture has become immediately rich and more contrast (click on the picture to enlarge).

And now pay attention to the tick Tint. Turning it on, we can tint the image into the color you need.
Using
B & W use options both when working with color and when processing b / b - mass.
In one of the following articles, I, on the example of the processing of several photos, will tell about all the main nuances of the work with Black & White.
5. Shadow / Highlights

Shadow / Highlights is also in the Image-\u003e Adjustments tab (there, by the way, there are many interesting tools, I advise you to experiment with everyone)
This tool is created to darken the cross areas and pull the light from the shadows. In addition to the most apparent application - to eliminate the reversals and defhensions, S / H perfectly works well for creating a feeling of greater depth of picture. We can add dark halftones into bright areas, and in dark - light. Thus, the picture will become more voluminous and deep.
For example, in this photo with the help of S / H, I added a puppy's wool volume and the picture immediately became more interesting.

In fact, Shadow / Highlights is a completely indispensable tool for any serious processing. Almost any photo can be done better if you correctly apply S / H.
I want to tell about all the settings of S / H and its functionality, but this is really the topic for a separate article. In the future, I will definitely return to the topic of Shadow / Highlights, but for now just try experimenting - try different options for settings and look at the result. In my experience, this method is the most effective for the development of new things.
As we see, all these tools are very easy to use, but at the same time - amazingly effective. Try to experiment with them and you will feel how many possibilities they give when processing.
I think it is worth making a series of articles about ordinary, but very effective tools in Photoshop. And in the next article I will talk about the tools for serious work with color in the photo.
Inspired by the next ingenious idea and need to make it in life with the camera? If you are just starting your way in the photography - do not hurry! To begin with, examine the foundations of this art. In the article we will tell, with what problems beginner photographers are most often faced. You will also learn how to process photos in the "Photomaster" editor and get rid of most defects.
Error number 1. Wrong frame layout
After examining the rules for building a frame composition, you will know that the location of the shooting object strictly in the middle will make any photo of the boring and inanimate. To get a dynamic and interesting snapshot mentally divide the future frame on the 9-pieces. Place everything important next to the lines or at points of intersections:
Have you already taken a photo, forgetting about the rules of the composition? Not yet lost! Our "Photomaster" will quickly correct the situation. Use the crop function. Turn on the grid, and then configure the size and position of the frame on top of the snapshot. Click "Apply" and all changes will be saved.

Error number 2. The horizon is littered
You can even see this defect with an unarmed look. The horizon line in the photo does not go parallel to the lower and upper limits of the frame, and goes up or down:

To correct the horizon, go to the "Composition"\u003e "Geometry" section. Check the ticks next to the "Crop automatically" and "Show Mesh". On the "Rotate" scale, align the photo. If necessary, adjust the "Vertical" and "horizontal" parameters.

Error number 3. Problems with lighting
Shot against the sun, unattached camera, disabled flash in the dark ... All this leads to one - to problems with the exposure. The photo becomes too grooved or dark:

Photo processing will help solve the problem. In the "Photomaster" and adjust the tone of the photo. Move the runner to the right on the "Exposition" scale for clarification of the photo, left - for dimming. If necessary, adjust the dark and light colors in the picture, as well as the shadows and excessively crossed areas.

Error number 4. Effect of red eyes
A similar defect arises due to the use of the outbreak. But you can try in advance to prevent its appearance in the photo: To do this, ask the "model" not to look directly into the lens when shooting.

You can get rid of red eyes using a corrector. You will find it in the "Retouch" section. Adjust the brush and highlight one of the problem pupils. Digit saturation and experiment with the tone. Then, similarly edit the second eye and appreciate the result in the preview window.

Error number 5. Lubricated photo
If the photographer during shooting hurry to press the descent button, the camera will not have time to focus. When viewing a photo from the PC screen, you will notice that the snapshot has become vague:

The problem can be corrected in the editor in several ways. For example, if the adjustments requires the whole photo, then in the "Improvements" section, go to the "Sharpness" tab and select the optimal parameters for the image, adjusting the force, the radius and threshold increases sharpness.

If you need to improve only a fragment, then use the adjusting brush (retouch\u003e corrector). Select the area you want to correct. Then click on the "Sharpness" button and adjust the clarity of the site.
Error number 6. Unnecessary items in the frame
Imprinted the landscape, but the shadow got into the frame? Portrait photos spoiled acne, peeling and redness on the skin? Do not rush to remove pictures! Use the "stamp" tool. With him you can remove all the extra elements, and much more. For example, in this photo we got rid of the shadows:

Configure the brush settings and highlight the item in the photo you want to disguise. Then specify the place from which the editor must copy the pixels to fill the selected area. Ready!

Error number 7. Geometric distortion of photos
Another problem with which beginner photographers are often found. Similar defects arise due to the shooting of objects, buildings or people from the lower or upper angle, and sometimes simply because of the lens error. This leads to the emergence of "falling buildings", distortions of figures and other indifference consequences.

Alas, not all geometric distortion can be corrected. But it is always worth trying! In the "Photomaster" program, go to the "Composition"\u003e Geometry menu. Turn on the grid and try to align the photo using the Distsiscy scales, "horizontal", "vertical".

Let's summarize
We disassemble the most popular errors that begin beginner photographers, which means that you can avoid them. If unsuccessful frames still find you surprise - not trouble! After all, you know how to handle photos. Install on the PC "Photo Master" and say goodbye to bad pictures forever!
In 1C there are many configuration objects that are somehow connected with the registration - that is, they allow you to lead - reference books, documents, registers, and so on. However, how to be when you need to create a program in 1C, which is not related to account, but is required for the service needs of the programmer or to facilitate the user's work?
Excellent example - group processing of documents. This is a tool that allows you to spend / change / print not one document, but immediately a lot, by the selected list. Agree - very convenient.
To implement in 1C tools to facilitate the operation of the user or administrator of the 1C database, there is a special configuration object - processing 1C. Processing 1C may be part of the configuration or distribute as separate files (Then the processing is called external processing 1C).
Processing 1C allows you to develop your own tools for both programming 1C and for configuring or control 1C. Thanks to this, there are hundreds of typical treatments on the Internet (developed in the company 1C) and thousands of amateur handlers on the Internet.
It's time to try to make 1C processing yourself. Details further.
What is 1C processing and how they are used
Small joining. Who is already familiar with the handlers 1c - can skip this item.
So, processing is a tool written by a programmer. She does not know how to do anything independently and does not save data to the 1C database, as opposed to the document - which is stored in the database and can independently be recorded and carried out, without additional programming. The 1C processing functions are entirely dependent on the programmer that wrote it.
According to the processing functionality, 1C can be divided into three types:
- Auxiliary machining 1C configuration
Each typical configuration has many treatments. They are used as additional interface forms (desktop user, configuration review), as part of the configuration functional (initial remnants, initial database filling, closing a month). - Objects (classes)
Who knows other programming languages \u200b\u200bis already familiar with the concept of an object. This is a class that has a set of "variables" and "functions" at its disposal. Its charm consists of self-sufficiency - that is, in one class everything is collected, which is necessary to perform its functions.In 1C classes, you can create using Processing 1C: "Variables" - Details of Processing 1C, "Functions" - functions in the 1c processing module (Mark exports for public functions). Convenience consists in creating an instance of this class and in its movement between configurations.
A good example will serve 1C printing (optional printed forms), which you can find in typical configurations in the Additional Printed Forms directory. They always have a public print () function () and standardized use.
Please note that of course, such "classes" are not directly related to data directly - they are required to be transmitted or read in the "constructor".
- Additional user and administrator tools
There are many universal tools for use usually by the database administrator that are not attached to a specific configuration. Such tools are often not included in the typical delivery of the configuration and distributed separately (usually on ITS discs). In addition to typical - programmers on the Internet lay out the mass of their own tools.An example can be brought: Processing 1C work with shopping equipment, 1C task console (displays a list of tasks running on schedule), 1C query console (allows you to perform any requests without programming), etc.
Where are 1c processing
So, there are machining 1C built into the configuration and external processing 1C.
Built-in 1c processing are used by a configuration programmer, situationally, that is, they can be or displayed in the user menu (part in the service menu), or open programmatically from other 1C objects (for example, from a reference form).
Anyway, under the administrator's rights, you can open a list of the processes embedded in configurations and any of them if it is possible to open (that is, if it has a screen form and the programmer did not put the discovery lock). To do this, in the Tolstaya Client, use the operation / processing menu, in thin client Use the All Function / Processing menus. If you do not know how to find these menus -.

The configurator built into the 1c processing configuration is in the processing branch.

External processing 1C opens in the configurator and in the enterprise using the File / Open menu.
Safety. Pay attention to . The 1C processing module is automatically performed when opening the 1c processing in the enterprise mode. Therefore, if you open the processing written by the attacker - it can be done automatically without any questions.
How to make 1C processing yourself
So, proceed to the most interesting - algorithm for creating 1C processing yourself from scratch.
