How to take a picture of the desktop on a laptop. How to make a screenshot on a computer: all possible ways. Using "Scissors"
Screen Shot, literally translates as a snapshot or photo of the screen. This frame captures what's in this moment Located on the screen of your computer or laptop.
Why can he need? For example, if you want to write step-by-step instructions For something related to a computer or laptop. Often to make a screenshot is necessary when contacting the support service of any Internet service. Also in case of problems with softwareIt is often necessary to contact developers, and it is much more convenient to work with screenshots, rather than listen to the explanation "on the fingers." Cut a frame from your favorite movie? Not a problem, creating a screenshot will help in this case.
In general, the photo desktop can be needed in some cases and make it easier than it seems. There are several publicly available ways, you can choose the most suitable for your complexity and convenience. Ways to create screenshots are divided depending on the complexity and operating systeminstalled on your computer or laptop.
How to make a screenshot on windows?
The first way.
To take a picture of the screen image, do the following:
- Press the "Print Screen" button on the keyboard, it can also be called "PRNTSCRN". This key is located above the INSERT button, as a rule. The screenshot is made and is in the clipboard.
- Now, to "get this" screenshot from the clipboard, we need to open the photo editor Paint. To do this, go to the "Start" menu - "Software" - "Standard" and open Paint. When the editor opens, click on the keyboard the keyboard key "Ctrl" + V ", the image must appear in the editor. After that, you need to save it at a convenient place for you in the format you need. If you plan to transmit an image via the Internet, it is better to save in the "PNG" format. To save, go to the "File" menu - "Save As".
The second way to create a desktop screenshot for Windows 10 (7, 8).
If you are the happy owner of Windows 7 or later, to create a photo of the screen, you can use the "Scissors" tool. All you need, it is to start this program in the Start menu - "All Programs" - "Standard". In order to make a screenshot of the screen, select the desired plot with the mouse. After that, it is necessary to keep the selected fragment. This method is very convenient if you need to make a screenshot of not the entire desktop, but only a certain part of it.
The third way to save the screenshot of the screen for Windows.
How to remove the screenshot from the screen if you have Linux or Mac OS X?
Yes, today we can say that the Windows operating system is the most common. However, you should not forget about Linux users and the Mac OS X family systems from Apple. Although there are ways to create a screenshot look like in all OS, they have some features.
In Linux, for example, you also need to press the "Print Screen" key and the system will immediately offer the way to save the picture. In Mac OS X to save screenshots, there is a special widget, which is called Screenshot Plus, it is very convenient and allows you to make all kinds of screenshots.
Users face a problem when you want to take a screen shot. The novice conquerors of the computer and the Internet immediately rush to the camera to take a picture of the monitor, and then upload a photo to the computer. Of course, it is possible to do so, but there are more simple waysallowing you to make screen screen. Similar screenshots will be better than pictures taken on the camera.
It does not matter for what reason it was necessary to take a screen shot. Before making a screenshot, you need to deal with ways. In fact, there are 3 ways to take pictures of the screen, namely:
- Standard means.
- Built-in program.
- Specialized applications.
Standard means
Many novice users are interested in the question, is it possible to make a screenshot of the screen without using any programs? In fact, there is such a way. To take a picture, just press the PRTSCR button. After clicking on this button, the snapshot will be copied to the buffer. It should be noted that a snapshot of the entire screen is made in this way.

Sometimes there are cases when you need to make the skin of the active window. Using the keyboard, you must press the ALT + PRTSCR key combination. After that, the snapshot will also be saved to the buffer.

To remove the image from the buffer, users are recommended to create an image on the desktop (or in another convenient place). If you wish, you can simply run the Paint program.
If an image has been created, it needs to be changed. Need to click on it right-click Mice, and then choose the "Change" item. If a graphic editor was launched, you don't need to do anything.

In the next step, you need to extract the screen screen screen from the buffer. To do this, it is enough to press the combination of the Ctrl + V buttons. The same is possible to do through context menu. On the empty place of the editor, click on the right mouse button, and then select the "Paste" item.

When the image is extracted from the buffer, the user remains only to save the document.
Built-in scissors program
Sometimes users are interested in how to still make a screenshot of the screen. Starting with the operating room windows systems Vista, the developers added such a program as "scissors".
To start the program, you need to enter the Start menu, and then select "Programs". In the discontinued submenu, it is recommended to find the "Standard" section. It is there that the program "Scissors" is located, allowing to make a screenshot of the screen.
In the form that opens, you must click on the "Create" button. Before starting work, it is recommended to configure the program, as it is sometimes necessary to make a screenshot with secretions.

When the monitor screen changes the color, the user will need to select the desired screen area using the manipulator. To do this, set the cursor to a certain place, and then climbing the left mouse button, move it to the side.
After the left mouse button is released, the simplest graphic editor opens. If you wish, the image can be signed or highlight the area. This uses such components as a feather and a marker.

When screen screen on the computer is edited, it will be possible to save it. To do this, click on the icon, in the form of a floppy disk. In the window that opens, you can set the file name, as well as select the place of placement.
This creates the creation of the screenshot. The result is possible to look in the saved image.
Specialized programs
Advanced users rarely use standard methods Creating a picture from the screen. This is due to the limited functional. It is recommended to install a specialized software that allows not only to create a screenshot on a computer, but also work with it by selecting the desired items by signing them or by setting the necessary form.
On the Internet it is possible to find tens of free and paid programsCorrect with the task. Most of the users prefers to use:
- Screenshoter;
- Joxi;
Each program is interesting because it can make a screenshot in its own way.
Screenshoter
- PRTSCR - snapshot area of \u200b\u200bthe screen;
- LALT + PRTSCR - Active window snapshot;
- SHIFT + PRTSCR - snapshot of the entire screen.

It is important to note that users can choose how to save the image. Snapshots can be saved on the computer or place on the Internet, receiving a link on them. It is also possible to select the image preservation format and its quality.

The last "stroke" in the setting is to enable the drawing mode. Thanks to this mode, you can highlight areas on the screen, write text and draw arrows.

The application is simple, but convenient, so all users will be cope with it.
Joxi.
The use of built-in functions for the screenshot existing in the system is not enough. Many users stop at JOXI. The main advantage of the program is the ability to save all shots in the cloud. Thanks to this, you can not be afraid that the image is lost.
In addition to saving a snapshot on the Internet, users can edit a snapshot, adding inscriptions, arrows, as well as blur areas of the picture. It is very convenient, as it is not necessary to use additional graphics editors.
As it is easy to make a screenshot, the developers added the ability to publish it in social networks. Of course, a similar function is performed only at the request of the user.
Sometimes users need to work well on the image, as it is not enough to make a screenshot. To not use several programs, it is recommended to pay attention to the Shotnes screenshot.
The program has rich functionals. In addition to the usual image, it allows you to use:
- Inscriptions;
- Arrows;
- Blur;
- Trimming;
- Change of transparency background;
- Layer overlay.

Thanks to the components described above, you can make a wonderful screenshot with detailed description. It is best to do similar snapshots for the learning material. Having understood with how to take a screen shot, the user can send the finished image on both the computer and the cloud.
Conclusion
Users are constantly interested in how to make screenshots of the desktop and the program window. Since there are several ways, it is recommended to study all the means in detail. It should be taken into account for what purposes the picture will be taken. If just to show your desktop, then enough and built-in money. If the screenshot is made for the site or educational material, it is recommended to use specialized programs.
How to make a screenshot
Screenshot is an image that shows exactly what the user sees on the monitor.
The word screen is a brief form of the English word screenshot (Screenshot) is graphic image any part of the active screen.
Screenshot or screenshot in our time is an integral part of working with personal computer or mobile technology. The goal of the program is to help the user analyze certain actions. Mainly applies screen in such cases:
- problems with the work of the computer;
- online courses on any subject;
- presentations for the application of programs;
- use in the report scientific work, essay, etc. As a confirmation of the correctness of actions, etc.
Increasingly, teachers, and employers request screenshots to confirm the individuality of the work, the correctness and sequence of its execution. Special attention is paid to the screen shot when working remotely, where it will be necessary to confirm the parameters of the tasks performed, uniqueness, nausea, the need to directly use screenshots in writing texts, etc.

Variety of image methods
Everything moves forward and work with screenshots does not stand still. To date, several embodiments are provided: software and built-in operating system.
If you need to constantly work with screenshots, it is better to do it with special programs. We list the most popular.
- Faststone Capture. - Works with any version of Windows, you can configure the active keys, with which you can retire with the screenshot, choosing any area. Non-additive when choosing the editor, there is an opportunity to add arrows, inscriptions, etc.

- Snagit. - program with scrolling, i.e. The possibility of preserving two-page and more screenshots. It is possible to configure hot keys (even one), saving files every second with the title specified by the user in the parameters. It is extremely convenient if you have to take screenshots quite often, for example, when creating an essay or a report with a phased solution, problems, etc.

- Green Sheot. - A simple and fairly convenient program that allows you to quickly take a screen shot, and also work with a screen by changing the form, size or add the necessary text. Supports all photographic formats.

- Fraps - It is possible to use active keys, used when creating screenshots in games, because It is possible to capture frames in three-dimensional applications.
- Clip2net - Popular in that it quickly makes screenshots on the Internet, while the reference is provided.

- Joxi. – popular program, fast working with file sharing over the Internet. It is possible to discharge necessary region and graphic edits. A screen shot is saved on the server, and a link to the screen appears in the exchange buffer.
Important! Make sure to download programs from the official site, it will avoid viruses and malicious programs.
If you do not need to constantly take a screen shot, you can use the built-in utilities service:
- using the PRTSCN keys;
- when using "scissors".
How to make a desktop screen in a simple way
The fastest and easiest way is to use the built-in utility.
Using the PRTSCN keys
- click on the keyboard simultaneously the PRTSCN and ALT key;
- we go into the Paint program or another graphic editor, press the "Paste" key and the screen will appear on the screen.

Using "Scissors"
We go to the "Start" menu → "Standard" → "Scissors".

Select the necessary area for the screenshot, then it remains only to save the picture in the PNG format to the required folder. Everything, the file is ready for shipment.

Important! Singing the screenshot to foreign users, make sure that there is no personal or confidential information on the screen.
As can be seen from the article, the options for the screenshot of the documents are provided for many and for of different types Work. Everyone has the right to choose the most suitable for himself!
Video - How to make a desktop screen?
What, but the proven folk wisdom is also not age as quickly, as our smartphones and laptops come out of fashion. "It is better to see 1 time than 100 times to hear".
Tried to someone through correspondence to explain how to set up Wi-Fi Router? Then, probably, you see what would be better, and the truth, a person saw 1 time, than 100 times heard or read 100 messages! That's why many are asked how to make a screenshot on a computer.
A pair of word theory
The word screenshot exactly passed into Russian from international English. It means the exact image of the user screen, the screen shot. In everyday life, the abbreviated version of this concept is "screen".
How to make a screenshot on windows
Actually, here are the main groups of solutions:
- standard Windows;
- online services that allow you to make screen screen on a computer;
- special programs.
Method 1. Screenshot on Windows tools of the system.
If you look at the top left part of the keyboard, you can find the button there. PRTScr. The name of this button comes from English PRINT SCREEN. - Print screen. Previously, by clicking on this button, the printer printed the active screen. Now, when we press this button, the image of the screen enters the clipboard. It remains only to insert an image into some kind of program from which it can be saved.
Honestly, sow, on a laptop, this button can be anywhere, on the right side of the keyboard. Sometimes, as on the example below, so that this button will work the button to start with it. FN. (Functions - it is usually located with the bottom left side next to the button Ctrl) and not releasing it to press the button with the inscription PRTScr.

To action: Press PRTScr, go to the Paint program, it is in any Windows operating system and click "Paste".
You can go to Paint through the Start menu → All programs → Standard → Paint.
Start menu depending on windows version Differs, in the screenshot below shows how to go to Paint B, because I use this operating system.

In the Paint program you need to click "Paste" And our screen snapshot turns out here. If necessary, it can be edited by means of the program or simply save through the button. "File" and then "Save" or t..

IMPORTANT. When you press the PRTSCR key to the clipboard, the screenshot of the entire computer screen is copied. Pressing the ALT + PRTSCR combination is copied active (selected) window. If you use a combination of Win + PRTSCR The entire screen image is stored in the C: \\ Users \\ user name \\ Pictures \\ Screenshots \\. It is easy to find from the "Computer" menu. In the column on the left, click the "Images" menu item and then select the "Screenshots" folder.
So to make a screenshot on Windows tools Systems need to press pRTSCR key, go to any image editing program, such as Paint and click "Paste".
Method 2. How to make a screen on a computer using online service
It happens that the screenshot needs to edit and often it is convenient to do it with some kind of site than installed program. For example, take 2 such services. They are united general principle how to make a screenshot of the screen. Press the button PRTScr (If you do not know where it, look just above the first way). We go to the site and click Ctrl + V..

And, as we are advised, click Ctrl + V..

We see that the screenshot was inserted into the site window. If you need to save it, then click on it, it opens in the new browser contribution.

Congratulations! The image is saved on the computer.
So to make a screenshot on a computer using online service You need to press the PRTSCR, or ALT + PRSCR key, go to the service that we chose, press Ctrl + V to insert the image and save it to the computer.
Method 3. How to make a screen on a computer using special programs
It is worth saying that programs that allow you to draw a computer screen screenshot is actually a huge set. If you look at the SoftPortal service, on request "Screenshot" 171 Appendix is \u200b\u200bissued.

Itself, each of them has its pros and cons, but often such programs people enjoy the habit. Once installed, sorted out and that's it. There are especially powerful, even paid applications that allow you to quickly not only create a screenshot, but also edit it. For example, you can add arrows, frames and other effects.
One of the worthy and free options, JOXI program.
You can download from the official site joxi.ru.
After installation in the taskbar, the icon of this program appears. The first time you run it, in the lower right corner the ability to choose, you want to take a snapshot of the entire screen, a fragment or other options. In the subsequent, after clicking on the icon, you can select the screen area that you want to save and after the selection program looks like this:

Pay attention to the blue icon in the upper right corner. By clicking on the small arrow to the right, you can choose:

Conclusions of our "screenshot production"
If you make a resume, there are 3 main solutions that allow you to make a screen on a computer
- Use Windows tools;
- Online services;
- Special programs.
Here, as they say, whom that in the soul and for what purposes. Try, experiment.
You can often find screenshots of the entire desktop, separate windows or even arbitrary screen areas. Most often, such screenshots are postponed in the setup instructions or when the Council is asked to solve the problems with the computer. In order to make a similar picture, no need to additional programs, you can only do the keyboard and standard meanswhich are available in any version of the Windows operating system. This is what this instruction will be devoted, here we will tell you how to make a screenshot on a computer using the keyboard.
How to take a snapshot of the entire screen using the keyboard
Make a screenshot (Screenshot, a photo of the monitor screen) of the entire desktop is quite simple. To do this, just click on the PRT SCRN key. As a rule, this key is in the upper right side of the keyboard, next to the keys as Scroll Lock and Pause Break. After clicking on the PRINT screen key, a screenshot of the screen will be made and placed in the clipboard. In other words, the screen snapshot will be copied and ready to insert into a program that can work with images.
In order to get a screenshot in the form finished clip It must be saved. To do this will suit any graphic editor. However, the easiest way to use the usual Paint, which is in any version of Windows. In order to start PAINT, open the Start menu and enter "Paint" or use the list of installed programs.

After opening paint program Insert the screenshot from the clipboard using the Ctrl-V keys on the keyboard or use the "Insert" button on the toolbar.


After saving, you will receive a screen shot as a file with expansion PNG.. In the future, this file can be edited in any graphic editor, upload to the site or forward by mail.
How to take a picture of a separate window using the keyboard
If, many know about how to take a snapshot of the entire screen, then the next way to obtain screenshots most users do not even suspect. The fact is that Windows can take pictures of only one separate window. This method allows you to quickly make a screenshot of the desired window using the keyboard and not to edit the resulting image, trying to cut off unnecessary parts from it.
In order to make a screenshot of a separate window You must open the window you need and make sure it is actively. That is, the window must be at the very top among all open windows. So that the window becomes active enough to simply click on it with the mouse. After that you need to use the ALT-PRINT SCREEN key combination on your keyboard.
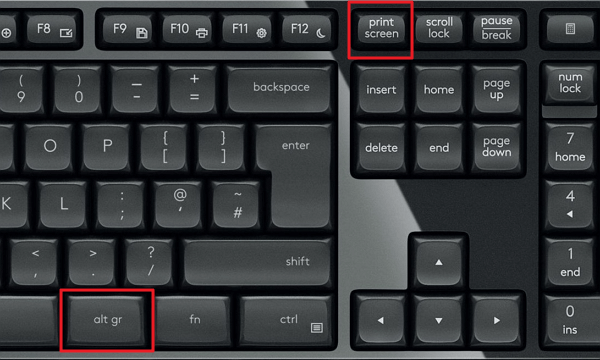
Pressing keys Alt. And Print Screen You get a snapshot of only one active window.
As in the previous case, the resulting image is automatically copied to the clipboard and to save it you must open a graphic editor (for example, the same Paint), insert an image and save it as a file.
How to take a snapshot of an arbitrary area of \u200b\u200bthe screen
In order to make the screenshot of an arbitrary screen area with one keyboard no longer do. In this case, it is necessary to use the program to create screenshots "Scissors". This program It is part of Windows 7/10 and you can run it using the Start menu.
To start the "Scissors" open the "Start" menu and go to " All Programs - Standard - Scissors"Either just use the search.

"Scissors" is very convenient applicationwhich allows you to make screenshots of any part of the screen, add comments and notes to the screenshot, as well as immediately save the result in the form of pictures in PNG, GIF and JPG formats. Using the "scissors" you will not need to keep screenshots with using paint. or other graphic Editor, It can be done directly from the program.

After starting the "Scissors" program, you will be prompted to select the screen area from which you want to take a picture can be done using a mouse. After the screen is needed, it will be highlighted, it will be copied to the window where you can carry out the basic editing of the resulting image.

Tools are available in this program:
- Feather - With it, you can add handwritten notes directly on the captured screen;
- The marker is a tool for allocating important elements in the picture;
- Elastic - tool for removing inscriptions made using pen and marker tools;
- Send Fragment - sending the captured picture e-mail;
- Copy - copy the result from the clipboard;
- Create a fragment - tool for creating a new picture;
After you have completed work, you can save the screen snapshot as a file, to do this, use the "Save" button on the toolbar or open the menu " File - Save as».

After saving the picture is ready for use in other programs or sending over the network.
Professional programs for screenshots
Despite the fact that Windows 7 and Windows 10 allow you to take screenshots using the keyboard and without use third-party programsIf you need to regularly make screenshots, it is better to install a specialized software. Such programs can significantly simplify the process and save you a lot of time. We described several such applications in the article ".
One of best programs This kind is Picpick. This program has many functions and it is completely free for home use. You can download it can be downloaded.

Picpick allows you to:
- Create screenshots of the entire screen immediately, separate window, selected area, individual elements, or all the windows with scrolling.
- Edit the resulting images, add shapes, inscriptions, filters, effects, and other objects to them.
- Publish the obtained images in popular web services, send to messengers or email, transfer to other programs.
- You can independently select the keyboard combinations on the keyboard to be used to remove screenshots.
- Work with multiple pictures on different tabs.
- Automate the process of obtaining pictures, their processing and sending.