Recuva won't start. Instructions on how to recover data in the internal memory of an Android phone. Causes of the problem and their solution
Recuva - very useful application, with which you can recover files and folders that have been permanently deleted.
If you accidentally formatted a flash drive, or you needed deleted files after emptying the recycle bin, do not despair - Recuva will help you return everything to its place. The program has high functionality and ease of searching for missing data. Let's figure out how to use this program.
1. The first step is to go to the developer’s website and download the program. You can choose both free and commercial versions. To recover data from a flash drive, a free one will be enough.

2. Install the program following the installer's prompts.

3. Open the program and start using it.
How to recover deleted files using Recuva
When launched, Recuva gives the user the ability to configure search options for the required data.
1. In the first window, select the data type, also known as the format - images, videos, music, archives, Email, Word documents and Excel or files of all types at once. Click on “Next”

2. In the next window, you can select the location of the files - on a memory card or other removable media, in documents, the trash can, or a specific location on the disk. If you don't know where to look for the file, select "I'm not sure."

3. Recuva is now ready to search. Before starting it, you can activate the advanced search function, but this will take more time. It is recommended to use this function in cases where the search did not produce results. Click “Start”.

4. Before us is a list of found data. A green circle next to the name means that the file is ready to be restored, a yellow circle means that the file is damaged, and a red circle means that the file cannot be restored. Place a check mark next to it the desired file and click “Recover”.

5. Select the folder on your hard drive where you want to save the data.

Modern smartphones and tablets are used to store information and process information no less often than computers. Accordingly, the problem of accidental data loss is no less relevant here: valuable photographs, videos, important documents - sometimes the loss is irreplaceable.
Just like when recovering lost data on a computer, the key to successfully recovering deleted files on Android is to exclude further writing to the media. Simply put, as soon as you discover that the files you need have been erased, you need to immediately remove the memory card or completely turn off your smartphone. These precautions prevent memory cells from being overwritten.
Using a computer
The easiest way to recover files deleted on an Android device is from your computer. They will help you do this special programs type Recuva or 7-Data Android Recovery. But to take advantage of their capabilities, you first need to enable USB debugging on your phone or tablet - this is necessary so that the device is detected in the system as removable drive.
Enable debugging:
If there is no "For Developers" section, follow these steps:
- Open Settings.
- Scroll down the menu to the About Phone section.
- Find the item “Build number” and tap on it 7 times. As you click, a notification will appear telling you how many more times you need to click to become a developer.
After enabling debugging, the smartphone connected to the computer will be detected as external storage, from which you can recover almost any deleted data.
7-Data Android Recovery
7-Data Android Recovery, like Recuva, works without root rights, restoring files deleted from storage media. The only unpleasant thing is that you have to pay to use the 7-Data software.

Save the found data to your computer, not to your phone's memory. When the recovery is complete, simply transfer the files to your smartphone.
Recuva
The Recuva utility allows you to recover data from any media, incl. With microSD cards And internal memory smartphone. The procedure is no different from the recovery algorithm via 7-Data Android Recovery:

After scanning, you will receive a report of the data found that can be recovered. Next to each file there is a circle, the color of which you need to pay attention to:
- Green – information can be restored without problems.
- Yellow – file may be damaged.
- Red – data cannot be returned.
All you have to do is select the files and click “Recover” to get back the lost information. 
The EaseUS Mobisaver and Undelete for Root Users programs work in a similar way, however, they require root access to work, so it is better to first try to solve the problem with using Recuva and 7-Data.
Using Applications
If it is not possible to recover files on Android via a PC, you will have to resort to help special applications. The main disadvantage of this method is the need to obtain root rights - without them, the application will not gain access to memory.
As an example, let's look Undeleter program, which can recover files from an external flash card and internal memory. Sorry, no purchase full version Only the image return function is available, but if you are satisfied with the application, then a small financial investment should not be a problem. 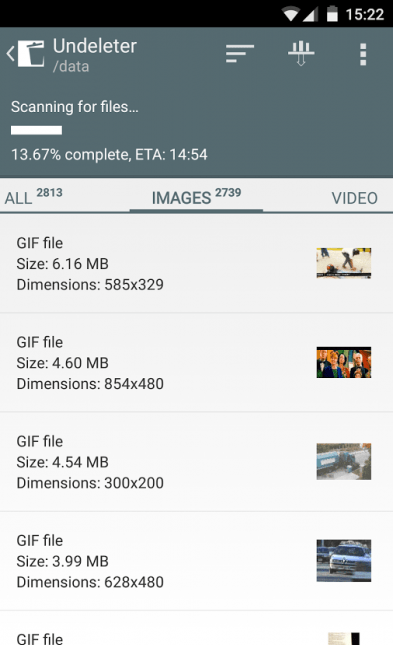
The application interface is friendly to novice users. You need to specify the folder in which the deleted data was stored, after which the memory scan will start. As a result, the program will issue a full report containing files that can be recovered from the phone.
It is often easier to prevent a problem than to deal with the consequences later. Removal important information is definitely one of those unpleasant situations that is best avoided. That's why:

Let's take the Dumpster application as an example. After installing it, you specify what types of files are sent to the Trash and how long they will be stored there. If necessary, you do the same as with the Recycle Bin on your computer - empty it or restore accidentally deleted files.
Surely every user has at least once encountered a situation when unnecessary file was deleted permanently, and later turned out to be necessary, or was erased accidentally - for example, when system failure. What to do in such cases? One of the simplest and most accessible aids to restore earlier deleted files is the Recuva program, which is very easy to use.
Recuva - what is the program and what is it for?
Recuva is a program for restoring permanently erased files from the British software developer Piriform, known to Russian users for the CCleaner and Defraggler utilities. It is produced in three versions:
- Standart - designed to work on PCs, laptops, netbooks and all-in-one computers;
- Portable - does not require installation on a computer, as it is used to work with removable media information.
- Professional - version with automatic update, designed for in-depth recovery of damaged or lost files on PCs and virtual disks.
There are many resources on the RuNet from which this program can be easily downloaded, but the download files they offer may well contain viruses, so in the absence of a reliable antivirus program, it is better to download Recuva from the “native” siteStandard and Portable are available for download for free. The Professional version costs 800 rubles. It is also sold as a set of four professional versions of the company’s products: , Defragler, Speccy and Recuva for 1,190 rubles.
Advantages and disadvantages
According to numerous ratings from ordinary users and professional magazines, this program has been the leader among utilities for recovering deleted files for several years now.
However, like any program, it has its advantages and disadvantages.
- The advantages of the product include:
- Russified, intuitive interface;
- availability of a fully functioning free version;
- interaction with any types of information storage devices - from hard drives to memory cards;
- the ability to manually select places to search for lost files;
- search for system and hidden files;
- the ability to restore the structure of previously erased folders and archives; work with most of the most common formats, types and types of information: text documents
- , tables, presentations, photographic materials, audio and video files, folders, archives, etc.;
the ability to manually set the degree of depth for file recovery and the level of reliability of information deletion.
- The disadvantages of the product include:
- duration of work - from several hours even with a simplified search;
 the ability to restore only those files whose condition was rated as excellent after data search - if their quality is average or worse, then they cannot be restored.
 In practice, the vast majority of files do not lose their quality when deleted The program can restore different types files, but only if they are erased in a standard way , when moving and then emptying the Recycle Bin or formatting the disk. If you have previously used any other utility for permanent deletion
files, then Recuva will not be able to recover them.
How to use the program - features and functions
Recuva is a utility that every technology user will need at least once, since no one is immune from accidental file deletion or system failures. How to work with this program?

Installation
After launch, the program will automatically prompt you to select the type of files that need to be recovered. To improve the quality of your search, it is recommended to check the in-depth analysis box.
 How better program will analyze the disk, the more deleted files it will find
 Upon completion of the search, the program will display a list of files that have been erased but can still be restored. The color of the circles next to the file name indicates the likelihood of success. Green ones have the maximum chances, red ones have the minimum ones.
 Most files, as a rule, are completely recoverable
 You need to check the boxes for the files that you want to return from “oblivion” and click the corresponding button in the lower right corner.
On the right side of the screen, to make selection easier, there is a “Summary” tab, which contains detailed information about erased files.
 In many cases, it makes sense to listen to program recommendations
 Please note that regardless of the type of drive from which data will be recovered, the procedure for using the program is the same.
What media does it work with?
In addition to hard drives on computers, laptops, netbooks and all-in-one PCs, Recuva can be used to check the following types of drives:
- memory cards;
- flash drives;
- digital players;
- smartphones;
- tablets;
- mobile phones;
- cameras;
- video cameras, etc.
This program will not be installed on any platform - for Android, for example, its analogue, Undeleter, is suitable.
Possible problems
Recuva is not only easy to install, but also easy to manage. It does not require additional knowledge. However, Recuva does not guarantee the recovery of any previously erased file, even if it was highlighted green, - this is its main problem. You can try to solve this difficulty using the Professional version or other utilities for recovering permanently deleted files.
 “Partially recovered” files cannot be opened in the future
 The second common problem is that the program may not “see” the connected equipment: flash drive, phone, video camera, etc. First, it is recommended to disconnect the device from the computer and try to connect it again. If this does not help, you should update the device drivers. To do this, go to the “My Computer” tab, select the device, click on it right click mouse and select “Properties”. Go to the equipment tab and click on the “Properties” button.
 If the program “does not see” the equipment, instead of the message “the device is working normally” there will be a message about the problem, and reinstalling the drivers can solve it
 The inability to recover after secondary deletion is the only problem that cannot be solved. If files were erased from the drive and then written to it new information or some other files were deleted a second time, then the utility will not be able to restore the originally erased ones - it simply will not find them.
The Recuva program is not overloaded with unnecessary functionality and unnecessary details. Having installed it, even a child will be able to figure out how to use the wizard of this utility. It helps to quickly recover permanently deleted files from any storage media.
Very often data is deleted not from the SD card, but from the internal one Android memory. In this situation, not a single file recovery program for Android helps. That is, users not only lose valuable data, but are also limited in recovery methods.
This method of recovering data from internal memory Android phone cannot be called very simple. But it works and has been successfully tested by me. The described recovery method was proposed by the user Wartickler on the forum.xda-developers.com and supplemented by a very useful article on Habrahabr (most up-to-date information quoted from there. Thanks to the author for the presentation).
Who will benefit from this guide on how to recover data from your phone? File deletion scripts
It turns out that it is possible to deeply scan Android internal memory. Everything you need to recover data from your phone:
- download free utilities recovery
- carefully read the data recovery instructions
- repeat the steps described in it on Android.
Difficulty in restoring from the phone's internal memory
Android internal memory is not connected as a disk, as is the case with an external SD card, which you can always connect to your computer. External memory allows you to use data recovery tools that scan deleted files and help return them to a working state.
Usually operating system simply removes the link pointer in the index, which indicates that the file exists with such and such a name and it is located at this location on the hard drive / in memory. There are effective tools for data deletion; they overwrite the deleted file in several cycles, preventing recovery in this way.
The catch is that data recovery programs need the actual disk to deeply scan photos that were accidentally deleted. New phone models often do not support external SD cards, which are very easy to mount as disks using a card reader. This complicates Android recovery slightly: the internal memory is mounted as MTP/PTP, which is not considered a mounted drive and is therefore not recognized by data recovery applications. However, we can solve this problem.
Stages of restoring internal memory
I have a phone Samsung Galaxy Nexus Toro. I believe the recovery method is suitable for any android phone with internal memory. We will also need Windows 7 or higher to:
- Execute backup partition of the phone's internal memory to the computer as a single massive file in RAW format,
- Convert RAW file to virtual hard disk,
- Mount virtual HDD as a disk in Disk Manager,
- Scan the mounted virtual hard disk,
- Find deleted files, recover data from an Android phone using the Recuva recovery program
Checklist of necessary tools for data recovery
- Android phone with root access
- Installed BusyBox (a set of Linux console utilities)
- Installed linux environment for Windows - Cygwin on pv and util-linux from the repository. You need to open the Cygwin application at least once to ensure that the /bin folder is created. In addition, I made a folder in to place the exported file in .raw format,
- Netcat Unix utility (download the zip file and extract nc.exe into ),
- ADB drivers (make sure adb.exe is in the Windows environment path),
- USB debugging must be enabled on the device.
- VHD tool from the mighty Microsoft. Place the VhdTool.exe file in .
- Piriform Recuva or your favorite data recovery tool (Recuva finds only the most well-known file types: images, videos, etc. To recover more exotic file types on Android, use more specialized programs)
Install BusyBox on your phone and provide root access
We will need a copy of the phone's internal memory partition; making it is not so easy. You will need a set of BusyBox unix utilities and root access to perform operations with these applications.
You can download BusyBox and KingoRoot from our website or directly to 4pda (registration is required to download files). We install the utilities in the following sequence: KingoRoot, then BusyBox.
The KingoRoot root manager is easy to install: turn on the Internet on your phone and run the installer. It "roots" the phone - that is, it turns on full access To Android system. Next we install BusyBox. We leave the default path as the installation directory.
Install KingoRoot on your phone
Recover from Android internal memory. We connect the phone to the PC in ADB mode
Connect the turned on phone to the computer in ADB mode. The easiest way to do this is to download adb drivers for your phone model and install them on your computer. It is advisable to restart your PC after this.
On the phone, enable debugging mode (Options - Developer options - check the box " USB Debugging"). If there is no such section, go to the About the device section, click on the "Build number" line 7 times.
We connect the phone to the computer via a USB cable. If a request for debugging mode appears on the phone, we agree.
Making a raw copy of a partition from your phone
The recovery method from the phone's internal memory is based on complaints from people who have problems following the guide. I advise you to restore full block memory instead of the data section. I call it mmcblk0. Check if your disk name is different from mine. Determine which block or section you want to return. I needed to restore the partition with user data: /dev/block/mmcblk0p12.
Open your Cygwin console (assuming BusyBox is installed at ) although it may be . Run the following commands in the console:
Adb forward tcp:5555 tcp:5555 adb shell /system/bin/busybox nc -l -p 5555 -e /system/bin/busybox dd if=/dev/block/mmcblk0p12
Open another Cygwin terminal and type:
Adb forward tcp:5555 tcp:5555 cd /nexus nc 127.0.0.1 5555 | pv -i 0.5 > mmcblk0p12.raw
Brew a mug of coffee. Copying internal memory of 32 GB takes about 3 hours.
Converting the internal memory image into readable RAW
We need to convert the raw file to a virtual partition hard drive. The VhdTool.exe utility simply places the VHD footer at the end of the raw file. Open command line Windows, go to and run the command:
VhdTool.exe /convert mmcblk0p12.raw
Mounting an internal memory image in Windows
Now you need to mount the VHD image in Windows OS. Go to Computer Management (Start - Computer - Management). Go to Disk Management.
Menu Action - Attach virtual hard disk.
Please indicate as source
Right-click the name to the left of the unallocated space and select Initialize Disk. Select GPT.
Right button on Unallocated File Space - Create Simple Volume.
A window will appear asking you to format the disk. DO NOT agree to format the drive at this point. Restoring files after formatting is not always possible!
Right-click on the RAW space and select Format... Specify the file system type as FAT32. Set the allocation block size to "Default". Make sure the Quick Format option is checked. You don't want to rewrite the whole new disk zeros (0) and destroy the data. A quick format means that Windows will try to destroy the index for the disk by creating a new index. Without this option the operating room Windows system will wipe the disk with zeros (0), destroying your data. Click OK.
A window will appear informing you that formatting this partition will delete all data on it. This would be doubly true if you didn't actually check the option quick formatting. Double check that you actually checked the box and click OK.
Recovering files from an Android internal memory image using Recuva
Open the Piriform Recuva application. In the recovery wizard, click Next. Select "Other" and "Next". Click the "In a specific location" button and enter: K:\ (assuming K is the drive letter of the mounted drive...). Click "Next". Select the Deep Scan option. This is the magic option that finds files that have been deleted... but aren't actually deleted. Click the "Run" button to scan the disk.
The application can scan deleted files for about an hour in Deep Scan mode. Brew two more mugs of coffee!
After Rekuva displays the scan results, you can select files to recover using the checkboxes. Click the "Recover..." button and specify the location where you want to save the data from your phone.
Recovering data from your phone using Recuva
Question answer
I have a GALAXY 3 NOTE phone. Accidentally erased recorded voice recordings on Call recorder. I heard that there is free program recovery. Help if you know how to find it.
Answer. If the audio files were stored on an SD card, almost any file recovery application on Android and PC will do. Among the popular ones is Tenorshare Data Recovery, among the universal ones we recommend downloading Recuva. If the files were stored in the internal memory of the phone, then things are more complicated. Try a program for Android called Undeleter Pro or follow these instructions to recover from internal memory.
Should I download the program to my computer or to my smartphone itself? I started downloading the program to my smartphone and it says “not enough space,” although there is enough internal memory. Will Renee Undeleter help you recover photos from your phone's internal memory? There was no memory card.
Answer. First, do not copy files to where you are going to restore from. Android data. Secondly, Renee Undeleter will not recover files in your situation. Try Recuva or choose another photo recovery program if unsuccessful.
I moved my important photos to the running game folder "Android/data/com.supercell.clashofclans". Then when I went to the folder on my phone, the photos disappeared. Will I be able to restore my photos to internal memory? SAMSUNG phone GALAXY J2 OC ANDROID 5.1.1?
Answer. Yes, if you follow all the steps as described in the instructions. The main thing is to determine which disk the photos were on and make a raw copy of this particular partition. Recuva should recover photos from internal memory if the recovery status is yellow or green.
Tell me how to understand whether the block recovery process is in progress? Everything seemed to be going fine, but after typing all the commands in the terminal, a couple of lines with zeros appeared in the second window, a *.raw file was created in the nexus folder with a size of 0 bytes, and that was the end of it. However, after some time, on drive E: (in my case, Cygwin was installed from there), a file with a name of something like vhd with a size of 499 MB was discovered (it restored a 12 GB block), but the most interesting thing was that a virtual disk was created with the only one empty file recovery.txt! Something went wrong?
Answer. Everything is correct, the vhd is mounted, and after a quick format there should be no files on it at all. Now you need to launch Rekuva and specify this disk to search for files on it. If the snapshot of Android's internal memory was taken correctly, the files should appear in the list of found files during a deep scan.
If the raw file is not suitable for recovery, try another way to create a snapshot of the internal memory - by creating an FTP server when the phone is used as a USB modem. The process is described in the above-mentioned article on Habrahabr (link at the top of this article).
I have samsung tablet GT-P7510. Android 4.0.4. I did everything as in your post. I have a Samsung folder. A vhdtool file appeared in it - 184KB and a raw file, but it was 0KB. I can’t try the second method with FTP, because... There is no USB-Modem option.
Answer. Try downloading netcat 64-bit version. When entering commands in the console, use nc64 instead of nc.
If it doesn’t help, here are some more instructions for restoring from internal memory.
Files disappear from the flash drive and internal memory of Android. I don’t clean my phone of debris because I’m not sure that the information is in the folder correctly! Tell me the reason and programs for recovering lost files from the internal memory of Android! The information on your site is purely for the computer!
Answer. There are no high-quality programs for recovering from the phone’s internal memory. Gaining access to the system is not so easy. This article provides a working method for recovering files from Android internal memory.
The problem is this: the tablet froze, we restored some photos in service center, but the huts were reflashed and seemed to have formatted the internal memory. I tried to restore it with programs, but the tablet connects as an MTP, and not as a flash drive, and it is impossible to scan. Is it possible to recover data from internal memory on Android by copying an image of the memory and its partitions?
Answer. Yes, the process is described in detail above. Using an ftp server, you can make an exact image of a memory card in the form of a raw file and mount it on your computer, then use any program (in this case Recuva) to restore photos from the image of the phone’s internal memory.
Updates have arrived for xiaomi redmi 3 special. Updated, installed - everything works. But the videos and photos saved on the phone’s internal memory disappeared. The most interesting thing is that the total phone memory shows 25 Gb, but it should be 32. Perhaps the lost files are there. I searched all the folders, but found nothing. How to recover deleted files in the internal memory of the phone, where to look for them?
Answer. Photos and videos are stored in the DCIM/Camera folder. If you did not use an external SD card to save, it means that the multimedia files were located in the internal memory, therefore, that’s where you need to look for them.
The photo folder may have been overwritten during the mobile device update process. By the way, part of the phone's memory is occupied system files, so this does not indicate that the files you need are stored hidden.
Try searching for files with DiskDigger for Android; if that doesn’t help, make an image of the phone’s internal memory, then scan the connected disk with Reucva on your computer.
I decided to delete the unsuccessful photo, but accidentally deleted some of the other necessary photos. The photos were on the memory of the phone itself. When connecting to a computer, the phone does not show up as separate disk. Therefore, as I understand it, I won’t be able to restore the files with a simple program, since they were on the phone itself, in the internal memory. What program can I use to restore them? For me, some simple option is better, because I hardly understand this. If possible, with a description of actions and steps.
Answer. Simple methods There is no way to restore your phone's internal memory. As a rule, resuscitation programs for Android work only with external memory or require root to access the phone’s memory, while searching far and wide in all areas of the internal memory. Accordingly, the only possible way– make an image of the phone’s memory, at the next stage you can use any program. It is important that you do not operate the phone until this point, otherwise the files may be overwritten.
I am tormented by the question: is it possible to recover photos from the phone’s memory itself, and not from a memory card. I really need photos from the Camera folder. When I myself try to recover deleted photos through the programs that you recommended, some unnecessary photos from Telegram, someone’s avatars, but not photos from the camera are recovered at all. Is it possible to restore them?
Answer. Indeed, although developers claim that their programs will recover files in all areas of memory, in fact most of the data is ignored during scanning - either there are not enough rights, or the program simply does not know how to do it. If you have enough experience, take a snapshot of the device’s internal memory according to our instructions. The process takes a lot of time, but there is a chance that among other garbage you will find exactly the photos you need. In addition, it is absolutely free way recovery, so you can experiment in your free time.
1. Bought new phone (ZTE Blade X3), wanted to move the memory card from the old phone, but forgot to turn off the new phone before doing so. All the photos from the phone’s internal memory disappeared somewhere, but those that were on the memory card remained. There is only one question: how to recover photos from the phone’s internal memory?
2. Accidentally deleted a folder with photos in the internal memory of the phone. As a result, the photos remained in the Android Gallery, but in black and gray, with the inscription “file deleted or damaged.” Is there any way I can restore the photo?
Answer. First, check whether the photos have been copied to the memory card (they may be hidden), check for errors using the chkdsk utility (Windows).
If there are no photos, you can quickly follow the DiskDigger program or take a snapshot of the phone’s internal memory and then, using PhotoRec or Recuva, return the photos.
Trying to return a lost album from the Gallery, I downloaded two Android photo recovery programs. Some of the photos were returned, but not the most valuable ones. How can I try again with minimal risk? I want to try to return the missing photos, is this realistic in the current situation? The photos were stored in the Android's internal memory.
Answer. By repeatedly scanning your phone's internal memory, you do not risk anything. But the longer you use your phone after deleting photos, the lower the chances of recovering them. Any program uses internal memory for its work and can write files to free space. In your case, it is better to take a snapshot of the phone’s internal memory and conduct experiments with it in reading mode.
I want to use your method of restoring Android internal memory, but I don’t have enough space on my C drive - only 17GB, and the partition of the phone takes up 53GB. Is it possible to somehow have a folder on drive D for virtual disk create? Telephone Xiaomi Redmi Note 4x.
- The next problem happened. Images from the camera were saved in the Camera folder on the SD card. When trying to transfer other image folders from internal memory to external memory, the Camera folder was automatically duplicated. I deleted one of the Camera folders, as a result of which the second folder was also deleted. Can you tell me if it is possible to restore these images? The transfer was carried out using a computer, maybe the images remained in the PC’s memory? Information is very important.
- There was little memory left on the phone, since all the photos were saved in the internal memory. I found a way - I reset everything from the phone to the PC, while deleting everything from the internal memory. And when I transferred the folder with files to the flash drive, the necessary photos were not there. I tried all recovery programs - nothing worked.
Answer. Check all storage locations for images - hard drive, internal memory and SD card. Most likely, nothing was saved on the hard drive because it did not act as an intermediary (i.e., no files were copied to it).
In the future, we advise you to copy files and delete them only after checking them on the recipient. Copying via ctrl + x is quite unsafe: there are many cases where files were simply lost along the way this way.
my son deleted the photo from the phone (from the internal memory of the device). However, there is no flash card on the phone. How can I restore photo and video materials? I tried it through some programs - some of the photos were restored, but I noticed that these were photos that were once sent to my friends. Is it possible to restore the rest - the ones that I photographed myself? They are very dear to me
Answer. It is possible that the recovery programs you use do not scan those areas of memory from which programs were deleted. If photos are truly important, take the time to recover photos from a copy of your internal memory. We described this method in detail above.
[How to recover a deleted photo from internal memory?]
The phone's internal storage was full, so I deleted the data from the cache. After that, I realized that all my photos and videos were deleted! No backup was performed. I've tried apps to recover deleted photos, but I can't get the photos back. I deleted the files on 5/23/2018 around 10:53 am. What can I do to get the photo back?
Answer. If there is no space left in the internal memory, the data may have been overwritten many times. Therefore, the chances of recovering the photo are minimal. Check if the files you are looking for are on the memory card: suddenly Android camera I wrote files there due to lack of free space in the internal memory.
If you are using mobile device Samsung and backup has been enabled, please check your cloud backup files. It's also a good idea to check your Google Photos albums to see if there are any photos there.
how to recover deleted files? Android and what to do if recuva program can't see the phone? and got the best answer
Answer from Dmitry[guru]
Titanium Backup PRO - link
Titanium Backup is the only one of its kind, the most intelligent and powerful program for saving and restoring application data on Android OS. Working with the program significantly saves time in many cases. For example, if you lose important data after formatting system partition, after flashing your animal, etc. Using the program does not cause any difficulties thanks to the intuitive interface and support for the Russian language.
If you need to create backup copy all applications available on your Android phone or tablet, including system programs, save all WiFi settings And mobile networks and then restore your phone or tablet to the initial state, no program will cope with this task better than Titanium Backup.
Platform: android 1.5+
Interface languages: Russian and others
Answer from Hetman Software[guru]
Try Hetman Partition Recovery: link
The program recovers data hard drives and any other storage media controlled by file FAT systems, NTFS, regardless of the reason for their loss. Including after formatting.
Answer from 3 answers[guru]
Hello! Here is a selection of topics with answers to your question: how to recover deleted files? Android and what to do if the recuva program does not see the phone?