VirtualBox Installing and configuring a program. Creating and configuring a virtual machine in VirtualBox. Setting the hardware of the virtual machine
We discussed how to install VirtualBox virtual machine to your computer. About why the virtual car needs and what they happen, you can read. In this article we will learn how to create and configure our first virtual machine.
So, we run VirtualBox with a shortcut on the desktop, and we see the welcome window of the program:
To create a new virtual machine, press the button on the left above "Create" (or the combination of the "Ctrl" keys + "n").

The name of the virtual machine can set any, in the "Type" field, select the type of operating system that you plan to install on the virtual machine (Windows, Linux, Mac, etc.), and select the version of the operating system in the field below, depending on Selected type. Since Windows 7 is already installed on my computer, and suppose I want to look and test Windows 8.1. In this case, I will set the name "Win8.1", select the "Microsoft Windows" type, and the version "Windows 8.1 (32 Bit)".


In the screenshot, it is clear below that only 16 GB (16384 MB) of RAM (RAM) is seen. In order to correctly choose the parameters you need, just look at the official Microsoft website minimum system requirements For this operating system:

From here it is seen that for the operating room installed by us windows systems 8.1 (32 Bit) It is necessary at least 1 GB of RAM. I usually put it with a reserve, so I will install 3 GB (3072 MB) of RAM:

You can set the range convenient to you (only preferably not the entire resource of your computer), and click "Forward".
Next, we are invited to create a virtual hard disk for our virtual machine, or choose already available. Since we did not create such discs earlier, then we leave the average menu item "Create a new virtual hard drive" and click "Create":


Disk Type Leave the one that is offered by default (VDI).

Then select the file name under which we will have a virtual hard disk, its location and size. I will leave the name "Win8.1", and set the size of 40 GB, as shown in the figure below:

You can set your own parameters (just make sure that in the place where you create your virtual hard disk file, there is enough free space), and click the "Create" button. A window for creating a virtual hard disk appears, it is necessary to wait for its completion:

As a result, if everything is done correctly, you get a ready-made virtual machine. She looks like this:

Please note that on top of the left, next to the "Create" button, two more "Set" and "Run" are active. Press the "Configure" button to generate an additional settings of the newly created virtual machine.

We also need to configure the lowest menu item "Common Folders" so that you can alternative way Share files between your main computer and virtual machine.

Click on the right top folder icon with a plus game and select a folder that will be common on your computer and a virtual machine. I will create a Shared folder on the disk K and put a tick so that it automatically loads when you start the virtual machine.

On the this moment Our virtual machine is a clean computer without an installed operating system. It can be installed on a virtual machine in several ways, the easiest of them - if you have a disk with a model of a virtual system, or a regular CD with an operating system, it is enough to go to the "Configure" menu item in the main window of the virtual machine, then go in the "Media" tab, select a blank virtual CD-ROM drive, and specify the path to the disk image with the operating system you plan to install, or simply specify any CD / DVD drive on your computer in which you insert your CD with the operating system.

After that, press the button as a green arrow "Run", and if everything is done correctly, the installation of the operating system that is on your CD or image will begin.
Sometimes, when starting a virtual machine, E_FAIL error (0x80004005) may appear. About how to solve the problem with this error when you start VirtualBox, you can read in.
Record navigationThe virtual machine is used to simulate the operation of the operating system (Windows, Linux or Mac) on one physical machine. In other words, you can deploy several virtual machines on your computer, which will work as a full operating system, while staying on your computer \\ laptop and use resources (processor, RAM, hDD) Your computer \\ laptop. At home, conditions, virtual machines are very convenient for various testing and building a small network. In organizations, virtual machines are used to separate server resources and install multiple operating systems (depends on server configuration and requirements for virtual machines). In this article, I will describe work with the most popular program for deploying virtual machines for home use.
VirtualBox is a very good virtualization product for enterprises and home use. Not only is the VirtualBox extremely many functions, it is also the only professional solution that is in open source-free access on GNU General Public License (GPL) version 2 and plus everything in Russian.
First of all you need to download last version Distribution VirtualBox.
.
After that, launch the installer file. In the welcome window, click "Next"
After that, the choice of installation components and the path will be proposed, I recommend to leave everything as it is and click "Next".
In the next window, it will be proposed to install VirualBox shortcuts, you can leave everything as it is and click "Next".
The following window warns that during installation there may be a network, if you download anything during installation, you can click "Next"Otherwise, finish the download, and then continue the installation of VIRAALBOX. 
In the next window, click "INSTALL"
During installation, windows will appear about the USB controller, network services and network adapters, Press "Install".
At the end of the installation, click "FINISH"
After installing VirtualBox, proceed to creating a virtual machine, but to begin to change the language of the interface, unless of course it does not suit you. To do this, in the VirtualBox panel click "File- Preferences ..."
In the settings window, choose "Language" and choose in the right column necessary settings panel language in this case Russian, Press "OK".
Now proceed to install the virtual machine. From above on the panel click "Create"
In the window Create a virtual machine Enter the name that will be displayed in VirtualBox, select the type and version of the operating system installed. 
Then you specify the number of RAM secrelable memory for this virtual machine, in the future this value can be easily changed. 
Because we create a new virtual machine in the next window choose "Create new virtual hard disk".
Then specify the type of file that will serve hard disk for a new virtual machine, I recommend left VDI.
After that choose the storage format, I recommend left Dynamic Virtual Hard Drive.
Specify the size of the hard disk, the default is the smallest size, if this is not enough for you, determine how much space is required. 
Run the created machine, for this choose it and on top of the VirtualBox panel press "Run".

When starting, a window will appear in which you need to select the drive of your drive in which installation diskor specify the ISO image of the operating system and click "Proceed" After that, familiar to all installation of the operating system on the virtual machine will begin.

If, after installing the operating system, you need to change the parameters of the virtual machine, you must select it and in the VirtualBox console and click "Settings".

On the menu System You can change the number of RAM allocated for a virtual machine, determine the load order when turned on.

In Mason CPU Specify the number of processors allocated for a virtual machine, as well as the processor load limit. 
In the Network menu, you can define the number of network adapters and connection type.
In mode "NAT"The guest network interface is assigned by default IPv4 address from the range of 10.0.x.0 / 24, where x denotes the specific address of the NAT interface, determined by the formula +2. Thus, X will be equal to 2 if there is only one active NAT interface. In this case, the guest operating system receives an IP address 10.0.2.15, a network gateway is assigned to the address 10.0.2.2, the name server (DNS) is assigned the address 10.0.2.3.
In connection type "Network Bridge" The virtual machine works as well as all other computers on the network. In this case, the adapter acts as a bridge between virtual and physical networks. From the external network, there is an opportunity to directly connect to the guest operating system.
When connected type "Virtual host adapter" Guests can interact with each other, as well as with a computer on which a virtual machine is installed. In this mode, the host adapter uses its own, specifically for this designed device called Vboxnet0. They also create an subnet and assigned to IP addresses with network cards of guest operating systems. Guests of the Guest OS cannot interact with devices located in the external network, as they are not connected to it through the physical interface. The "Virtual Host Adapter" mode provides a limited set of services that are useful for creating private networks under VirtualBox for its guest OS. 
On the menu Common folders You can connect a folder for easier file sharing with virtual machines. To do this, click on the button Add shared folder (Right folder with a plus) and specify the path and name of the shared folder. 
I hope this article helped you in installing and setting up VirtualBox.
When you select a virtual machine from the list in the Manager window, you will see a summary of the settings of this virtual computer.
By clicking the " Settings»On the toolbar at the top, you will see a detailed window in which you can configure many properties of the selected virtual machine. But be careful: despite the fact that after installing the guest operating system, you can change all the virtual machine settings, some changes can interfere with the correct operation of the guest operating system if it is done after installation.
Note: Button " Settings"Disabled when a virtual machine is in" running" or " saved"Condition. It is simply because in the settings dialog box you can change the basic characteristics of the virtual computer created for your guest operating system, and this operating system may not cope very well when, for example, half of its memory will leave her from under his feet. As a result, if the button " Settings"Disabled, first turn off the current virtual machine, and then you can perform the desired settings.
VirtualBox provides many parameters that can be changed for a virtual machine. More options available with interface command line VirtualBox.
General settings

In the window " Settings" In chapter " General»You can configure the most fundamental aspects of a virtual machine, such as memory and necessary hardware. There are four tabs: " Maintenance», « Additionally», « Description"And" Encryption».
Tab "Main"
On the tab " Maintenance" categories " General»You can find the following settings:
This is the name with which the virtual machine is displayed in the list of virtual machines in the main window. Under this name, VirtualBox also saves the virtual machine configuration files. By changing the name, VirtualBox also renames these files. As a result, you can only use those characters that are allowed in the file names of your host operating system.
Please note that within VirtualBox uses unique identifiers (UUID) to identify virtual machines. You can display them using VBoxManage.
Operating system / version
A typeguest operating system, which is installed (or will) in a virtual machine. This is the same parameter that was specified in the "New Virtual Machine" wizard, as described in the "" section.
While the default settings for the newly created virtual machine depend on the selected type of operating system, the further modification of the type does not affect the virtual machine settings; This is the value that the settings in this panel are purely information and decorative.
Tab "Advanced"
Folder for pictures
By default, VirtualBox saves data snapshot Together with other data configurations VirtualBox. With this parameter, you can specify any other folder for each virtual machine.
Common clipboard
Here you can choose whether there should be shared access to the buffer of the guest operating system with your host. If you choose " Bidirectional"The VirtualBox will always make sure that both clippers of the exchange contain the same data. If you choose " From the main to the guest officer" or " From the guest in the main OS"The VirtualBox will copy the exchange buffer data only in one direction.
To share the clipboard, install VirtualBox guest add-ons. Otherwise, this setting has no effect.
The overall clipboard is disabled by default. This parameter can be changed at any time using the menu item " Common clipboard" on the menu " Devices»Virtual machine.
Drag and Drop function (dragging)
This parameter allows you to enable drag and drop support: Select an object (for example, a file) from a host or a guest and directly copy or open it on a guest or host machine. Several drag and drop modes for each virtual machine allow you to limit access in any direction.
Guest add-ons must be installed for dragging onto the guest computer.
Note: By default, dragging is disabled. This parameter can be changed at any time using the menu item " Drag and Drop." on the menu " Devices»Virtual machine.
Tab "Description"
Here you can, if you want, enter any description of your virtual machine. This does not affect the functionality of the computer, but you can find this space useful to mark such things as the configuration of the virtual machine and softwarewhich was installed in her.
To insert a string break into the description text field, click Shift + Enter..
Tab "Encryption"
If you are tick, this virtual machine will be encrypted. You need to choose an algorithm that will be encrypted virtual machine discs, as well as enter, and then confirm the encryption password.
System settings

Group " System»Combines various parameters associated with the main equipment, which is represented by a virtual machine.
Note: Since the Microsoft Windows activation mechanism is sensitive to changes in hardware, if you change the Windows equipment settings for the guests, some of these changes may initiate a request for activation in Microsoft.
Tab "Motherboard"
On the tab " Motherboard»You can affect virtual equipment that is usually located on a real computer motherboard.
Main memory
This option sets the RAM volume, which is allocated and transmitted by a virtual machine when it starts. The specified amount of memory at the time of operation of the virtual machine will be closed from physical computer and transmitted virtual. Consequently, at the time of work of the virtual machine, your main computer has a number of RAM to decrease by this magnitude. This is the same parameter that was specified in the "New Virtual Machine" wizard, as described above in the "" section.
Changing the memory should not cause problems in the guest car, of course, if you do not set too small value at which it will not be loaded.
Order order
This parameter determines the order in which the guest operating system will try to load from various virtual boot devices. Similarly, configuring a BIOS of a real PC, VirtualBox can inform the guest OS that it starts with a virtual diskette, a virtual CD / DVD drive, a virtual hard disk (each of them is determined by other VM settings), network or any of them.
If you choose " Net", The virtual machine will try to upload from the network through the PXE mechanism to be configured.
Chipset
Here you can choose which chipset will be presented by a virtual machine. Prior to VirtualBox 4.0 PIIX3 was the only available option. For modern guest operating systems, such as Mac OS X, this old chipset is no longer supported. As a result, VirtualBox 4.0 introduced an emulation of a more modern ICH9 chipset, which supports PCI Express, three PCI tires, PCI-to-PCI bridges and interrupt signals (MSI). This allows modern operating systems to address more PCI devices and no longer requires IRQ exchange. Using the ICH9 chipset, you can also set up to 36 network cards (up to 8 network adapters with PIIX3). Please note that support for ICH9 is experimental and is not recommended for guest operating systems that do not require it.
Cursor manipulator
By default, virtual index devices for the ancient guests are traditional pS / 2 mouse. If this parameter is set to uSB tablet, VirtualBox informs the virtual machine that the device uSB tablet present, and transmits the mouse events to the virtual machine using this device. Third setting - USB Multi-Touch Tabletwhich is suitable for the latest Windows guests.
The use of a virtual USB tablet has the advantage that motions are communicated in absolute coordinates (instead of relative position changes), which allows VirtualBox to broadcast the mouse events over the VM window in the tablet event without the need to "capture" the mouse in the guest system as described in the "" section. This makes the use of VM less tedious, even if guest add-ons are not installed.
Enable APIC I / O APIC
Extended programmable interrupt controllers (APICs) are the latest HP86 hardware function, which in recent years has replaced the programmable interrupt controllers of the old type (pos). With APIC I / O, operating systems can use more than 16 interrupt requests (IRQ) and, therefore, avoid exchanging IRQ to increase reliability.
Note: Including I / O APIC required for 64-bit guest operating systems, especially Windows Vista.; It is also necessary if you want to use more than one virtual processor on a virtual machine.
However, software support for APIC I / O was unreliable with some operating systems other than Windows. In addition, the use of an APC I / O APC slightly increases virtualization overhead and, therefore, slightly slows down the guest OS.
A warning: All Windows operating systems, starting with Windows 2000, establish different cores depending on whether APIC I / O is available. As in the case of ACPI, APIC I / O APEC should not be disconnected after installation of the Windows guest OS. The inclusion of it after installation will not have any effect.
Enable EFI
This allows you to use Extensible Firmware Interface (EFI), which replaces the outdated BIOS and can be useful for some advanced use options.
Clock in the UTC system
If the tick is standing, the clock of your host will appear on the time of the worldwide coordination scale (UTC), otherwise the local host time will be displayed. Unix-like systems usually adhere to UTC systems.
If the checkbox is set, VirtualBox will inform the guest system time in UTC format instead of a local (host) time. This affects the work of Virtual Watch Real Time (RTC) and can be useful for UNIX-like guest operating systems that usually expect hardware clocks will be installed on UTC.
In addition, you can disable the Advanced Configuration and Power Interface (ACPI), which VirtualBox represents the default guest operating system. ACPI is the current sectoral standard that allows operating systems to recognize equipment, customize motherboards and other devices and manage them. Since all modern PCs contain this feature, and Windows and Linux supported it for many years, it is also enabled by default in VirtualBox. It can only be disabled on the command line.
A warning: All Windows operating systems starting with Windows 2000, set different kernels, depending on whether ACPI is available, so ACPI cannot be disabled after installing the Windows guest OS. The inclusion of it after installation will not have any effect.
Tab "Processor"
On the tab " CPU»You can specify how many virtual processor cores should see guest operating systems. Starting from version 3.0, VirtualBox supports symmetrical multiprocessing (SMP) and can represent up to 32 virtual processor cores for each virtual machine.
However, you should not customize virtual machines for the use of more processor cores than you have physically (real nuclei, without hyperpotions).
On this tab you can also install " CPU loading limit" This parameter limits the time spent the host processor to emulate the virtual processor. The default value is 100% means that there are no restrictions. The 50% parameter implies that one virtual processor can use up to 50% of one central processor. Please note that the time limit of virtual processors can cause problems with guests.
In addition, the parameter " Enable PAE / NX"Determines whether the possibilities of the PAE and NX central processor will be on the virtual machine. PAE means "extension of the physical address". Usually, if it is turned on and maintained by the operating system, then even a 32-bit X86 processor can access more than 4 GB of RAM. This was made possible by adding another 4 bits to the memory address, so that with 36 bits you can use up to 64 GB. Some operating systems (for example, Ubuntu Server) require support for PAE from CPU and cannot work in a virtual machine without it.
If you use a 32-bit Kali Linux image, turn on the PAE / Nx or the KALI image will not load, since the default version of the kernel used by Kali for i386 ("686-PAE") is compiled in this way that requires support for the "extension of the physical address" ( PAE) in CPU.
With virtual machines working on modern server operating systems, VirtualBox also supports the hot connection of the CPU.
Tab "Acceleration"
On this page you can determine if VirtualBox should use hardware virtualization extensions that your host processor can support. This applies to most processors built after 2006.
You can choose for each virtual machine individually, whether VirtualBox need to use software virtualization or equipment.
In most cases, the default settings will be excellent; VirtualBox will choose reasonable default values \u200b\u200bdepending on the operating system you selected when creating a virtual machine. However, in some situations you can change these pre-configured default values.
If your host processor supports invested pajing functions (AMD-V) or EPT (Intel VT-X), you can expect a significant increase in productivity by incorporating invested paging in addition to hardware virtualization.
Starting with version 5.0, VirtualBox provides paratage interfaces to improve the accuracy and performance of guest operating systems.
Display (display settings)

Screen Tab
Video memory size
This sets the memory size provided by a virtual video card available to the guest in MB. As in the main memory, the specified amount will be highlighted from the host residency memory. Based on the number of video memory, higher resolutions and depth of color can be available.
GUI will show a warning if the volume of the video memory is too small to switch the virtual machine into full screen mode. The minimum value depends on the number of virtual monitors, the screen resolution and the depth of the host display, as well as from the activation of the 3D acceleration and accelerate 2D video. Rough estimation: (color depth / 8) x vertical pixels x horizontal pixels x number screens \u003d number bytes. As described above, additional memory may be required for any activated display acceleration setting.
Number of monitors
With this VirtualBox parameter can provide more than one virtual virtual machine monitor. If the guest operating system (for example, Windows) supports several connected monitors, VirtualBox can pretend that there are several virtual monitors. Up to 8 such virtual monitors is supported.
The output of multiple monitors will be displayed on the host in several VM windows that work side by side.
However B. full-screenand screen Integration Mode Available physical monitors connected to the host will be used. As a result, it will take at least as many physical monitors to work in full-screen mode and the mode of integration of the screen with several monitors as you have the most configured virtual monitors, or VirtualBox will report an error. You can configure the connection between the guest and host monitors using the viewing menu by pressing the combination "Host" + "Home"When you are in full screen or screen integration mode.
Turn on 3D acceleration
If guest add-ons are installed on the virtual machine, you can choose here if the guest must support the accelerated 3D graphics.
Enable 2D video acceleration
If guest add-ons are installed on a virtual machine with Microsoft Windows, you can choose here if the guest must support the accelerated 2D graph.
Tab "Remote Access"
Remote display
On the tab " Remote access"If VirtualBox Virtual Display Expansion (VRDE) is set, you can enable the VRDP server built into VirtualBox. This allows you to remotely connect to the console of the virtual machine using any standard RDP viewer, such as mstsc.exe.which comes with Microsoft Windows. In Linux and Solaris systems, you can use the standard program. rdesktop.open source.
Tab "Capture Video"
On the tab " Capture video»You can enable video capture for this virtual machine. Please note that this feature can also be enabled / disabled while performing a virtual machine.
Media settings
On the real PC, the so-called "storage controllers" are connected physical disks to the rest of the computer. Similarly, VirtualBox provides virtual virtual machine controllers to a virtual machine. Under each controller displays virtual devices ( hard drives, CD / DVD or floppy drives) connected to the controller.
Note: If you used the master " Create a virtual machine»To create a car, you will usually see something like the following:

Depending on the type of guest operating system, which you selected when creating a virtual machine, a typical layout of storage devices in the new virtual machine is as follows:
- You will see the controller IDEto which a virtual CD / DVD drive is connected (to the port " secondary master»IDE controller).
- You will also see the controller. SATA.which is a more advanced storage controller type to increase the bandwidth of the hard disk to which virtual hard drives are attached. Initially, you will usually have one such virtual disk, but maybe more than one, each of which is submitted by the disk image file (in this case, the VDI file).
If you have created your virtual machine with more old version VirtualBox, the default storage layout may differ. Then you can only have an IDE controller to which CD / DVD drive and hard drives are connected. It can also be applied if you have chosen an older type of operating system when creating a virtual machine. Since older operating systems do not support SATA without additional drivers, VirtualBox will ensure that such devices are not present initially.
VirtualBox also provides a flexible controller, which is special: You can not add to it devices other than floppy drives. Virtual floppy drives, such as virtual CD / DVD drives, can be connected either to drive disks (if any), or to the disk image, which in this case should be in the RAW format.
You can freely change these attachments. For example, if you want to copy some files from another created virtual diskYou can connect this disc as the second hard disk. You can also add a second virtual CD / DVD-drive or change where these items are attached. The following parameters are available:
- To add other virtual hard disk or CD / DVD or floppy disk drive, select the storage controller to which it must be added (IDE, SATA, SCSI, SAS, Floppy Disk Controller), and then click " add disc"Low on wood. Then you can choose " Add CD / DVD device" or " Add hard drive" (If you are clicked on the flexible disk controller, you can add a flexible disc drive.) Alternatively, click right-click Mouse storage controller and select the menu item there.
On the right side of the window you can set the following:
- You can then choose to which slot of the controller device is connected virtual disk. IDE controllers have four slots that are traditionally called " main master », « primary subordinate», « secondary master"And" secondary subordinate" On the contrary, SATA and SCSI controllers offer up to 30 slots to which virtual devices can be connected.
- You can choose which image file to use.
- For virtual hard drives to the right, a button with a drop-down list appears, offering or select a virtual hard disk file using a standard file dialog, or create a new hard disk (image file) that will open the master " Create new Disc ", Which was described in the" "section.
- For virtual CD / DVDs, image files will usually be in standard ISO format. Most often you will choose this option when installing the operating system from the ISO file that you received from the Internet. For example, most Linux distributions are available in this way.
The following additional options are available for virtual CD / DVD drives:
- If you select " Host drive», physical device The host computer will be connected to the virtual machine so that the guest operating system can read and write to your physical device. This, for example, is useful if you want to install Windows from a real setting CD. In this case, select your host disc from the drop-down list.
If you want to write (burn) CDs or DVDs using the main disk, you also need to enable the option " Passthrough».
- If you choose " Remove disk from a virtual disk", VirtualBox will present an empty CD / DVD to the guest in which the media was not inserted.
- To delete attachment, Select it and click on the " delete»At the bottom (or right-click it and select the menu item).
Removable media (CD / DVD and floppy disks) are subject to change during guest operation. Since at this time the dialog box " Settings"Not available, you can also access these settings from the menu" Devices»In the window of your virtual machine.
Sound settings

Section " Audio" in the window " Settings»The virtual machine determines whether the virtual machine will see the connected sound card And if the sounds should be heard in the main system.
If the sound is enabled for the guest, you can select the Intel AC controller emulation, the Intel HD Audio controller or SoundBlaster 16 card. In any case, you can choose which VirtualBox audio driver will be used on the host.
On the Linux host, depending on the configuration of your host, you can also choose between OSS, ALSA or PulseAudio subsystem. In newer Linux distributions, the Pulseaudio subsystem is preferable.
Since the Solaris hosts in VirtualBox 5.0 support only the OSS - SOLARIS AUDIO audio system is no longer supported by Solaris hosts.
Settings Network

Section " Net" in the window " Settings»The virtual machine allows you to configure how VirtualBox represents virtual network cards for your virtual machine and how they work.
When you first create a virtual machine, the default VirtualBox includes one virtual network card and selects it for it " Broadcast network addresses "(NAT). Thus, the guest can connect to the outside world using the host network, and external world It can be connected to services on the guest computer you made visible outside the virtual machine.
This default setting is good for, probably 95% of VirtualBox users. Nevertheless, VirtualBox is extremely flexible in how it can virtualize the network. It supports many virtual network cards on a virtual machine, the first four of which can be detailed in the "Manager" window. Additional network cards can be configured on the command line using VBoxManage.
Introduction to network modes
Each of eight network adapters can be configured separately to work in one of the following modes:
Not connected
In this mode, VirtualBox reports the guest that there is a network card, but there is no connection - as if the Ethernet cable is not inserted into the map. Thus, you can "pull out" the Ethernet virtual cable and disrupt the connection, which can be useful to inform the guest operating system on the inability to connect to the network and ensure reconfiguration.
Network Address Broadcast (NAT)
If you only want to view web pages, download files and view email inside the guest, then this default mode will be enough for you, and you can safely skip the remaining part of this section. Note that when using sharing windows files There are certain limitations.
Network Nat.
Nat Nat is a new NAT version embedded in VirtualBox 4.3. Network Address Translation Service (NAT) Works similarly to a home router, grouping systems that use it on the network, and does not allow systems outside this network to directly access systems inside it, but allows systems inside to interact with each other and with systems outside using TCP and UDP via IPv4 and IPv6.
Network Bridge
It is for more complex network tasks, such as network modeling and running servers in the guest system. When enabled, VirtualBox connects to one of the installed network cards and communicates directly by network packets, bypassing network stack Your operating system.
Internal network
This can be used to create another network based on software that is visible for selected virtual machines, but not for applications running on the host or in the external world.
Virtual host adapter
This can be used to create a network containing a host and a set of virtual machines, without the need for a physical network interface. Instead, the host creates a virtual network interface (similar to the LOOPBACK interface), which provides interaction between virtual machines and the host.
Universal Driver
Rarely used modes use the same shared network interface, allowing the user to choose a driver that can be enabled in VirtualBox or distributed in the extension package.
At the moment there are potentially two available under-modes:
UDP tunnel
This can be used for direct, simple and transparent interaction of virtual machines operating on different computers, with existing network infrastructure.
VDE network (virtual distributed Ethernet)
This parameter can be used to connect to the Virtual Distributed Ethernet switch on Linux or FreeBSD host. At the moment it requires compilation of VirtualBox from sources, as Oracle packages do not include it.
The following table shows short review The most important network modes:
| VM ↔ Host. | VM1 ↔ VM2. | VM → Internet | Vm ← Internet | |
|---|---|---|---|---|
| Virtual host adapter | + | + | - | - |
| Internal network | - | + | - | - |
| Network Bridge | + | + | + | + |
| Network Address Broadcast (NAT) | - | - | + | Forwarding ports |
| Network Nat. | - | + | + | Forwarding ports |
COM ports (serial ports)
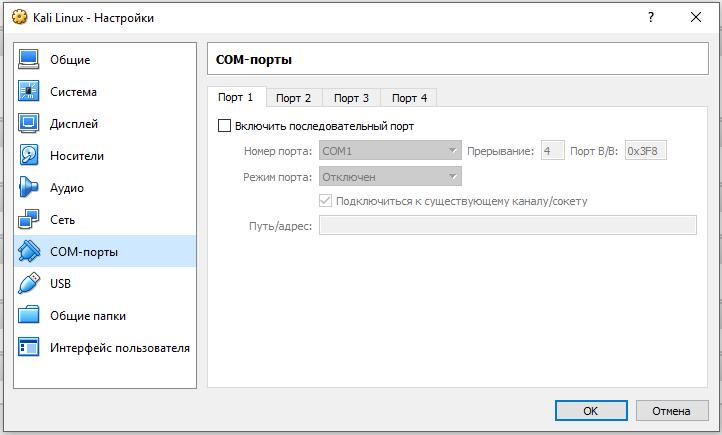
VirtualBox. simple way Fully supports virtual serial ports on a virtual machine.
USB settings
USB support

Section " USB" in the window " Settings»The virtual machine allows you to configure the complex USB support VirtualBox.
VirtualBox allows virtual machines to directly access USB devices on your host. For this, VirtualBox represents a guest operating system with a virtual USB controller. As soon as the guest system begins to use the USB device, it will not be available on the host.
Note:
- Be careful with USB devices that are currently used on the host! For example, if you allow your guest when you activate it to connect to the USB hard disk, which is currently installed on the host, then this disc will be disconnected from the host without proper disconnection. This can lead to data loss.
- The Solaris hosts have several well-known restrictions on USB support.
In addition to the guest access permission to your local USB devices, VirtualBox allows you even to your subscribers to connect to remote USB devices using VirtualBox Remote Desktop Extension (VRDE).
In the dialog box Settings»You can first configure whether USB is available in the guest system, and then select USB support level: OHCI for USB 1.1, EHCI (which will also turn on OHCI) for USB 2.0 or XHCI for the entire USB speed.
Note: XHCI and EHCI controllers are supplied as a VirtualBox extension package, which should be installed separately. Additional information See "".
When USB support is enabled for a virtual machine, you can determine in detail which devices will be automatically connected to the guest. To do this, you can create so-called "filters" by specifying certain properties of the USB device. USB devices with an appropriate filter will be automatically transmitted by the guest after they are connected to the host. USB devices without an appropriate filter can be handed to a guest, for example, using the menu Devices / USB devices.
Click on the button " + »Right from the window" USB devices filters"Creates new filter. You can give a filter name (for reference to it later) and specify the filter criteria. The more criteria you will specify, the more accurate devices will be selected. For example, if you specify only the identifier of the 46D provider, all devices created by Logitech will be available to the guest. On the other hand, if you fill in all fields, the filter will be applied only to a specific device model from a particular supplier, and not to other devices of the same type with another version and serial number.

The following criteria are available in the USB filter properties:
- Identifier supplier and product. Each supplier of USB products has an identification number, unique worldwide, "Supplier identifier. Similarly, each row of products is assigned the number "Product Identifier". Both numbers are usually written in hexadecimal form (that is, they consist of numbers 0-9 and the letters A-F), and the colon separates the supplier from the product identifier. For example, 046D: C016 means Logitech as a supplier and M-UV69A Optical Wheel Mouse.
In addition, you can also specify " Manufacturer"And" Product" by the name.
To list all USB devices connected to your machine with the appropriate identifiers of suppliers and products, you can use the following command:
Vboxmanage List USBHOST.
In Windows, you can also see all USB devices connected to your system in device manager. In Linux you can use the command lsusb..
- Serial number. Although the identifiers of suppliers and products are already sufficiently specific to identifying USB devices, if you have two identical devices of one brand and product line, you will also need serial numbers for their correct filtration.
- Remote. This parameter indicates whether the device will be only local or remote (only via VRDP) or any other.
On the Windows host you need to disable and connect the USB device again to use it after creating a filter for it.
For example, you can create a new USB filter and specify the identifier of the supplier 046D (Logitech, Inc), the manufacturer's index 1 and "not deleted". Then any USB guest systems created by Logitech, Inc with the manufacturer 1 index will be visible to the guest system.
Several filters can choose one device - for example, a filter that selects all Logitech devices, and the one that selects a specific webcam.
You can deactivate Filters without removing them by clicking the checkbox next to the filter name.
Common folders
Shared folders allow you to easily exchange data between the virtual machine and your host. This feature requires the VirtualBox guest add-ons on a virtual machine. It will be described in more detail in the part dedicated to guest additions, in the "" section.
User interface

Section " User interface»Allows you to change some aspects of the user interface of this virtual machine.
Link menu
This widget allows you to disable specific menus (click on the menu item to release it), some entries of the menu (uncheck the checkbox in the item to shut down) and the menu bar fully (uncheck the right check box).
Mini Tulbar
In full screen or screen integration, the VirtualBox screen can display a small toolbar containing some items that are usually available in the virtual machine menu bar. This toolbar boils down to a small gray line while you do not press it with the mouse. Using the toolbar, you can return from the full screen or screen integration mode, perform the control of the machine or turn on certain devices. If you do not want to see the toolbar, disconnect this option.
The second setup allows you to display the toolbar at the top of the screen, and not show it down.
Bar status
This widget allows you to disable certain icons in the status bar (uncheck the flag from the icon to turn it off) to change the icons in places (for this drag the icon) and completely disable the status bar (uncheck the left checkbox).
Using the free VirtualBox program, you can create a virtual machine on your computer with another guest operating system. VirtualBox virtualization program creates virtual machines in which you can install different operating systems: Windows, Linux, Mac OS X, etc.
In the Boxing Virtual on your computer, as it were, a virtual computer with another (or other) operating system, which will not affect the main OS installed on your computer. With this program, you can simultaneously work in two different operating systems, such as Windows and Linux Mint, or Windows 10 and Windows 8.1.
In such a virtual operating system, different steps will be performed: learn to work in a new OS, test new windows version, Try in the work of unfamiliar programs, run outdated applications that no longer work in your system, etc. You can do with a virtual (guest) operating system anything, without any risk for the main system.
To do this, you will not need to create new partitions on your hard disk, and install another OS. All that is needed to create a virtual machine will make the VirtualBox program.
You can read more about installing the VirtualBox program and package add-ons here. Next, we will look at the process of creating a virtual machine and its setting. The VirtualBox program is completely Russified.
Creating a virtual machine in VirtualBox
To start the process of creating a virtual machine, in the main window of the VirtualBox program, click on the "Create" button.
In the "Specify Name and OS Type" window, you will need to enter the name of the new virtual machine, then select the type and version of the operating system. The created virtual machine will be identified by this name, so I recommend doing understandable names.
In this case, on my real computer installed Windows 10, and I want to install on the Windows 7 virtual machine. In order to avoid confusion between the versions (you can set several identical systems of different issues), I gave a guest system a detailed understandable name.

You can install a virtual machine in expert mode (all settings will be grouped in several windows), or in detailed modewhich we now consider.
The VirtualBox program recommends the minimum amount of RAM for this virtual machine. You can choose the necessary amount of memory. Here it is necessary to adhere to this recommendation: it is impossible to exceed the size of the allocated memory, which is marked on the scale of green, as a result, not to have problems, with the work of the virtual machine being created.
Virtual memory is part of the physical memory of your computer, which will be used in the virtual machine. Virtual memory is allocated from the order of the main (host) operating system for the operation of the guest operating system on the virtual machine. Dedicated RAM will be used only when this virtual machine is working.
On my computer is 8 GB of RAM, so I can select the virtual machine half of the volume - 4 GB. You can choose your size of the RAM, moving the cursor on the scale, or enter the memory size in the digital value in MB. In the future, if necessary, you can change the amount of allocated RAM in the settings of this virtual machine.

In the next step, you will need to create a virtual hard disk, as the virtual machine will not be able to work without such a hard disk. Virtual hard disk is a special type file that is stored in the file system OS of your computer.
In this window, three options are offered to choose from:
- Do not connect a virtual hard disk - you can connect a virtual hard disk after creating a virtual machine
- Create a new hard drive - a new virtual hard disk will be created.
- Use an existing virtual hard drive - a previously created virtual hard disk will be connected to the virtual machine.

In the next window, you will need to select the type of virtual hard disk. You can choose the following disk formats (virtual containers):
- VDI (VirtualBox Disk Image) - VirtualBox disk format
- VMDK (VIRTUAL MACHINE DISK) - VMWare disk format
- VHD (Virtual Hard Disk) - Microsoft disk format
- HDD (Parallels Hard Disk) - Parallels disk format
- QED (QMU Enhanced Disk) - Format for QEMU / KVM
- QCOW (QCEM Copy-On-Write) - Format for QEMU (QCOW2)
If you will only use the VirtualBox program to create and run virtual machines, then you can leave the default selection: VDI format. The disks of this format will be opened in the Virtual Boxing Program.
VMDK format will be suitable if you use virtual machine vmware. Player, or VMware Workstation. Having created a virtual machine in VirtualBox by selecting the VMDK virtual disk type, you can continue to run this virtual machine with an installed operating system, not only in VirtualBox, but also in another VMware production program.
After selecting the disk type, click on the "Next" button.

A dynamic hard disk file will take a small place on the physical hard drive of your computer. As data fills it, it will increase in size to the maximum volume.
The fixed hard disk file will immediately take the entire volume of the virtual hard disk.

In a new window, you will need to specify the name and size of the virtual hard disk file.
The field for the name will need to write the name of the virtual hard disk. I always point out clear names for virtual machines so that I have the opportunity to easily distinguish the files of virtual containers from each other.
By default, all the virtual machine files will be saved in the user profile on the disk "with" of your actual computer. I recommend to proceed differently: Create in another (not system) section of your computer disk special folder (I have it called Virtual Machines), in which you can store virtual machine files.
If the virtual machine files are stored in the user profile on system disk, In the case of reinstalling the operating system, previously created virtual machines will be lost. You will need to re-create a virtual machine, and then install the operating system there.
Files stored on another partition of a hard disk, or on another hard disk, in the case of reinstalling the system will be saved. After installing the virtualization program (VirtualBox or VMware), you will only need to connect and run previously created virtual machines with operating systems.
To select a virtual machine storage folder, use the icon with the folder button. In the Explorer window, select the disk and folder for storing the virtual machine data.
Then on the scale, specify the volume of the virtual hard disk in megabytes. To do this, drag the slider to the desired location corresponding to your needs. After selecting the settings, click on the "Create" button.

The virtual machine is created. You will then see the main window "Oracle VM VirtualBox Manager" with a newly created virtual machine. On the right side of the window you can familiarize yourself with some parameters of the virtual machine.

Now it will be necessary to make additional settings before installing the operating system to the virtual machine.
Virtual Machine Settings in VirtualBox
In the main VirtualBox window, select the virtual machine (if there are several of them), and then click on the "Configure" button to log in to the settings of this particular virtual machine.
In the "General" section, in the "Advanced" tab, you will need to select the storage folder for the snapshots of the system (very useful feature). By default, the snapshots of the system will be saved in the SNAPSHOST folder in the user profile on the system disk "C". You can create a folder with the same name in the place where you store the files of this virtual machine, in order not to lose pictures when reinstalling the system.
It will also be necessary to select a common clipboard in order to exchange data between the main real operating system, and the guest virtual OS. Selection is offered several options:
- Disable - default setting
- From the main to the guest OS - you can move information from the main system to the virtual OS
- From the guest in the main OS - you can move data from the virtual OS to the main system
- Bidirectional - data can be exchanged in both directions
It makes sense to choose a bidirectional shared clipboard for the greatest convenience when working.

In the "System" section, in the Motherboard tab, you can configure the order of downloading the virtual machine. Use the up and down arrow buttons to select the virtual machine boot sequence. It makes sense to make an optical disk with the first boot device, from a flexible disk it will be possible to remove a tick due to the irrelevance of this method.
When choosing the first boot device optical disk, system loading can occur, as from a real drive of your computer, where the bootable dVD disk With the operating system, and from the disk image, for example, in ISO format, which is physically located somewhere on the disk of your computer.
After applying new settings, do not forget to click on the "OK" button.

In the Processor tab, you can enable additional kernels, if the processor of your computer is multi-core.
In the "Display" section, in the "Screen" tab, you can select the volume of the video memory that the virtual machine will use. Here you can turn on 2D (necessary) and 3D (optional) acceleration.

In the Video Capture tab, you can enable the video capture feature in the virtual machine.
In the "Media" section, you will need to select a virtual drive. Here the virtual disk file is already displayed, but it is almost empty, since the operating system has not yet been installed. Therefore, to install the system will need to choose ISO file Image of the operating system.

Click on "Empty", on the right side of the window opposite item " Optical drive»Press the button with the image of the disk, and then in the context menu, select" Select an optical disk image ... ". Using the conductor, find the desired image of the operating system on your computer.

In the "Audio", "Network", "COM ports", "USB" sections, you can leave the default settings, largely these settings depend on the hardware of your computer.
In the "Shared Folders" section, there is nothing yet, since the guest system has not yet been established. For functioning common folders You need to install additions for the guest OS (VirtualBox Guest Additions). Read more about installing the system into a virtual machine, and you can read about installing add-ons here.
If necessary, you can change the settings for a specific virtual machine to others. For each virtual machine, all settings are individual.
Deleting a virtual machine in VirtualBox
To remove a virtual machine, in the Main Window, the Boxing Virtual will need to enter the Machine menu, and then select the Delete Context menu item.

After deleting, all files and virtual machine data will be deleted from your computer.
Conclusions Articles
IN free program VirtualBox can be created new, or connect a ready-made virtual machine, apply the necessary settings for more convenient use of a virtual machine.
VirtualBox is intuitively understandable to use the program. If you are not interested in the theory and you want to immediately proceed to practice, refer to the instructions for using VirtualBox to install and run operating systems in a virtual computer:
- Installing Linux to a virtual computer (on the example of Linux MINT)
In this cycle of articles, the possibilities of VirtualBox are considered in detail, and a detailed description of its options is given. This material is recommended you if you want to thoroughly understand VirtualBox, and also if you have any problems or questions that you cannot solve yourself.
What is virtualization and its usefulness
VirtualBox is a program that allows you to run multiple operating systems simultaneously on one computer. Among these operating systems can be Linux, Windows, Mac and others. VirtualBox itself also works on various systems (is cross-platform).
This means that with the help of VirtualBox, for example, in Windows, you can, without reloading the computer and even without installing another OS software onto a real computer, boot into Linux, work with any Linux applications as if you have the Linux operating system installed. You can, for example, run other versions of Windows to check the settings and programs that you do not want to run in your main operating system.
Virtualization (launching operating systems inside virtual computers using VirtualBox) has a number of useful features:
- simultaneous launch of several operating systems - you can get acquainted with the new OS without turning off your main system;
- the separation of real and virtual computers - when working in a virtual OS, it is not necessary to fear erase the bootloader, losing files or in any way to harm your main operating system, since the virtual system is completely dedicated from your main system. Whatever errors you do not perform in a virtual computer, your main OS will always be untouched. For this reason, the virtual computer is suitable for various tests, including capable OS; For example, in a virtual computer, you can analyze malware (viruses) without fear of the main system;
- easy to install software - if you are in Windows and you need to work with a program that runs only in Linux, then instead of tedious tasks in an attempt to start a program on someone else's OS, you can easily deploy the Linux virtual machine and work with the desired program from there. Or vice versa, being in Linux you can create a Windows virtual machine to work with Windows programs without having to try to run them in Linux;
- the ability to roll back the changes - you do not need to be afraid to do anything wrong in a virtual computer, as you can make any number of "snapshots" at any time and, if desired, return to any of them;
- consolidation of infrastructure - Virtualization can significantly reduce the cost of iron and electricity; Today, most of the time computers use only part of their potential opportunities during their work and on average. system resources It is low. A large number of hardware resources, as well as electricity spent invested. Therefore, instead of launching a large number of physical computers used only partially, you can pack a lot of virtual machines into several powerful hosts and balance the loads between them.
VirtualBox concepts
When we are talking On virtualization (as well as to understand further information), it is useful to get acquainted with the terminology, especially the following terms will be found:
Host operating system (host system).
This is an operating system of the physical computer on which VirtualBox was installed. There are VirtualBox versions for Windows, Mac OS X, Linux and Solaris.
Guest operating system (Guest OS).
This is an operating system that works inside the virtual machine. Theoretically VirtualBox can run any X86 operating system (DOS, Windows, OS / 2, FreeBSD, OpenBSD).
Virtual machine (VM).
This is a special environment that VirtualBox creates for your guest operating system during its work. In other words, you run the guest operating system "in" a virtual machine. Usually the VM will be displayed as a window on your computer desktop, but depending on which of the various VirtualBox interfaces you use, it can be displayed in full screen or remotely on another computer.
In an abstract form, inside VirtualBox thinks about VM as a set of parameters that determine its behavior. They include hardware settings (how much memory should have a virtual machine, which VirtualBox hard drives should virtualize, through which container files, which disks are mounted, etc.), as well as status information (among them can be: virtual machine in Present is launched, saved, about its pictures, etc.). These parameters are reflected in the VirtualBox Manager window, as well as in the VboxManage command prompt program. In other words, the virtual machine is also what you can see in the settings dialog box.
Guest add-ons.
This applies to special software packages that are supplied with VirtualBox, but are designed to install inside a virtual machine to improve the performance of the guest OS and add additional functions.
Installing VirtualBox in Windows
To download VirtualBox, go to the official website https://www.virtualbox.org/wiki/downloads. Click the link " Windows Hosts. »To start downloading the installation file. Run the file by double click - the installation process is similar to any other programs in Windows.
You can choose which components it is recommended to install all VirtualBox components for full support for all options:
Messages to install unsigned drivers can appear - agree to their installation. So that the program worked correctly, agree to all the inquiries of the installer.
The following warning reports that network connections will be reset, i.e. You temporarily disconnect from the network. We agree, connect to the Internet to resume automatically literally across a second.

Installing VirtualBox in Linux
In Linux VirtualBox can be set in several ways:
- from the standard repository
- binary file downloaded from the official site
- from the VirtualBox repository added to the sources of applications (only for Debian distributions based on Distributions)
Installing VirtualBox in Debian and Derivatives (Ubuntu, Linux Mint, Kali Linux)
For Debian and Derivatives (Ubuntu, Linux Mint, Kali Linux), you can install VirtualBox from standard repositories:
Sudo Apt Install VirtualBox VirtualBox-QT Linux-Headers - "$ (Uname -R)" DKMS VDE2 VirtualBox-Guest-Additions-ISO VDE2-Cryptcab
Installing VirtualBox in Arch Linux and Derivatives (Blackarch and others)
For in Arch Linux and Derivatives (Blackarch and others), you can install VirtualBox from standard repositories:
Sudo Pacman -s VirtualBox Linux-Headers VirtualBox-Host-Dkms VirtualBox-Guest-ISO
Installation information to other distributions, as well as additional details, you will find on the appropriate page: https://www.virtualbox.org/wiki/linux_downloads
Installing Extensions Package (Extension Packs) VirtualBox
To expand functionality basic package VirtualBox can be downloaded additional packages Extensions. Currently, Oracle provides one extension package.
VirtualBox extension package adds the following functions.
- Virtual uSB device 2.0 (EHCI)
- USB 3.0 virtual device (XHCI)
- Support Protocol Remote Table VirtualBox (VRDP)
- Moving host webcam
- Intel PXE Boot Rom
- Experimental PCI Transmission Support on Linux Hosts Hostats
- Disk image encryption algorithm AES
VirtualBox extension packages have an extension in the file name .vbox-extpack. To install the extension, just double click on the package file and the assistant will appear, which will take you along the installation steps.
To view the extension packages currently installed, open the main VirtualBox Manager (Main program window), in the menu " File»Select" Settings" In the window that opens, go to the tab " Plugins", There you will see the current extension currently and can delete the package or add a new one:

Package Extensions For the latest version you can find on the download page.
If you are using the latest version of VirtualBox, then the extension package you can find software - select the folder with your version number and download, then start the double click file with the extension .vbox-extpack.
Running VirtualBox.
In Windows VirtualBox, you can run from the menu or from a shortcut on the desktop.

In Linux you also find VirtualBox in the menu,
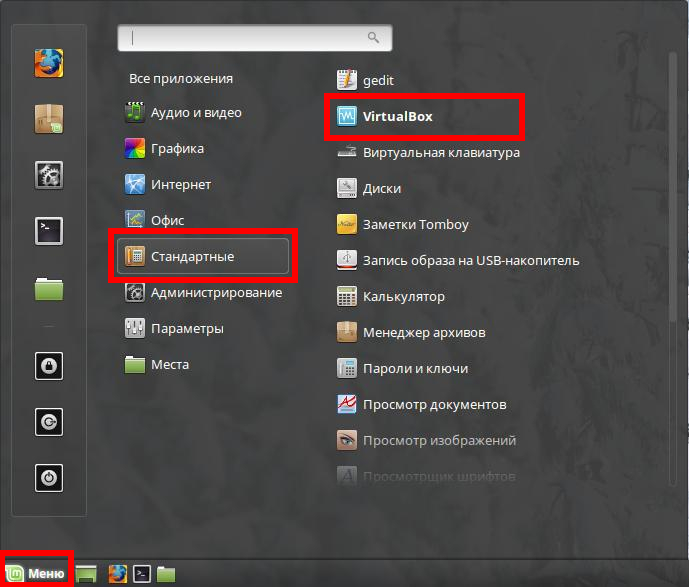
or you can type the command in the terminal:
VirtualBox.
The following window opens:

Or if you have already created virtual machines:
