Engineering menu on Android - we understand the details. How to expand Android off menu How to replace the standard phone off menu
Android in its standard form looks poor. Yes, all the necessary functions seem to eat, and turn on the point of interest of the battery is still impossible. There is a beautiful load animation, but a sense of it is zero. Support for how it was not and not. And now what is the next caste, tomorrow's night assembly of which will definitely illuminate? No, we will do everything, having only root. Read on and find out how to change the Android interface.
Preparatory steps
To fulfill the many styles described in the article, you need root and dependent on it. In the standard version it will be 100% correctly working only in AOSP firmware, but even glitches can meet. Problems with XPosed modules can often occur in stock firmware With modifications from the manufacturer, but for them there is a special version of XPosed: for Touchwiz, for MIUI, for firmware based on Android 5.0+. HTC owners can set an official assembly, but almost always requires S-OFF.
Got root, installed Xposed? Then we went.
1. Change the download animation
 The loading animation is stored in the /Systemation/media/Bootanimation.zip file. Internally, there is a text document Desc.txt, it shows the frame change frequency, horizontal resolution and verticals and so on. There are also the images themselves (frames), which change with the frequency specified in Desc.txt. The order and rules for playing animation from folders are also spelled out in this file.
All you need to do is to get an archive from the device using a root file manager, unpack and replace images, without forgetting them to pre-press them in the desired resolution. Next, it is enough to pack the archive without compression and return to the place. But, of course, it is easier to take a ready-made archive. Online hboot.co.uk. Such is full.
On the other hand, look at the animation, though it is interesting, but no sense. But see which services are running, it is useful. The easiest option is to install a LiveBoot that displays Logcat and Dmesg, that is, Android messages and the Linux kernel.
2. Add your sounds to the standard set.
Sounds can be thrown out in one of the folders in / System / Media / Audio. Alarms - melodies for alarm clock;
Notifications - sounds for notifications;
Ringtones - ringtones;
UI - System Sounds, such as low battery charge, camera focus, selection of interface elements. Some applications can refer to them by default, therefore, they can be replaced with their own.
Why lay melodies in the system section? First, the files are able to withstand a common reset to the factory settings; Secondly, the sounds from special folders can be put on the signal (the sound of the alarm clock, the bell, obtaining SMS) in almost any application.
3. Change fonts
In the utility of these actions, I am very and very doubtful because the standard Android font is almost perfect. But taste and color ...
You can use a special application to install fonts. For example, Hifont allows without root to change fonts in sAMSUNG firmware, HTC, Motorola, Lenovo, Huawei, Nokia X. And if there is root, then in all other devices. You can how to use the fonts in the application directory and add your own.
But where to take them? There are three options:
- fonts, extended from different firmware Android devices, can be found in the post at 4pda;
- on the 4pda, there is a good collection of fonts created by users, in the next post;
- collection on XDA.
Install fonts can and without using a special application. We take from the archive files.ttf, throw them with replacing in / System / Fonts / (ROOT) and reboot the device.
4. Change icons
 Icons can be changed using special Appendix̆, for example Unicon - Icon Themer. After installation, you must activate the application in the XPosed settings (it will notify you). Next, reboot your smartphone and open the application. It remains to click on the download themes from Google Play and choose the icon package, install it and restart the smartphone. But it should be borne in mind that the icons do not change in some launchers, such as Google start.
5. We add support to
 Before installing the topic, HKThemeManager will show the entire list of applications to which the topic will be applied. We remove the ticks from those that are not needed, click on the "Apply theme" and reboot the device.
There is an alternative installation option to the Layers Manager application. It works in any firmware on Android 5.0+ due to the emergence of the RRO resource reassignment mechanism. The base the app is enormous and is located on Play Market. To see her, it is enough to dial in the search for Layers Theme.
Keep in mind that the application does not work on firmware based on CyanogenMod: the local engine and RRO conflict.
6. Turn Android 5.x + in Android N
This will help us the Android N-IFY module. After installation, the following chips from Android N will appear:
- the notice panel design will be changed. The quick settings panel will appear;
- in the settings under some items there will be interesting inscriptions.
- For example, under Wi-Fi it will be written the name of the current access point, under the battery, the remaining time of operation and the charge of the battery in percentage;
- the "On Phone" menu will change easter bag;
- will appear fast switch Between the last two launched applications using double clicking on the "Recent" button.
Android N-Ify and useful settings through which you can not only disable, but also configure individual changes made.

7. Improve the status bar
For me, the status string in the stock of Android is the most unfinished thing. Fortunately, using Xposed you can change a lot and make it more comfortable.
8. We change the battery indicator
Battery Home Icon Sets the battery indicator instead of the "Home" button. Moreover, this indicator is well configured: you can change colors, turn on / disable percentage show, charging animation, and so on.
XBatteryThemer - Setting the battery icon. There are many different topics of both ordinary and very extraordinary.
9. We bring the speed of the Internet connection
Network Speed \u200b\u200bIndicator - Network speed indicator. Able to show the speed of mobile networks, Wi-Fi, Bluetooth, Ethernet. All is configured from units of measurement and speed threshold to color and font size. You can also add the number of Internet traffic using DataUSAGE to the status bar. The data is shown the same as in the "Data Transfer" settings section.
10. Display a real signal level
Sometimes you need to know how well the Internet catches in different parts of the room, as the position of the smartphone affects the signal reception level, or simply must compare the reception level of your smartphone and other models. This will help Netstrength. The module is able to display the signal level of the cellular network in decibels to the milliwatite (DBM or DBM). This unit of measure is negative, and the more closer to zero, the better the reception. You can also enable ASU display (Arbitrary Strength Unit - signal / noise ratio in the pilot channel). It is calculated by the formula asu \u003d (DBM + 113) / 2.
By the way, the module knows how to show the reception level of Wi-Fi in DBM, MBPS (Mbps - Megabit per second) and percent.
11. Follow the download process
Statusbar Download Progress is one of the most useful modules XPosed. It displays the download process from the Play Market or file from the Internet as a thin white strip over the status bar. Immediately I recommend to activate the "God's Mode", thanks to which progress will be displayed for any applications that have an execution indicator. In the settings, you can put the display above the status bar or under the string.
Once upon a time, 5 years ago the popularity with operating devices were rapidly recruited android system. There was a good time, the world came out of the crisis, there was a lot of interesting things and on each device there was a menu button.
Two years later, the Android guys reported that the "Menu" button on the case of the device is now no longer fashionable and can be without it. Since then, each of us (the guild of the developers) knows how to call the menu on the overwhelming majority android devices.
To whom it will seem terrible accordion, let it, but last week we spent 2 hours of our lives to explain to the user. It was impossible to put up with this, so below I give a description of how to call the menu function on android devices.
This is how the mechanical menu buttons look like most common devices:
Moreover, in most cases, one short touch is enough to call the menu function. However, often the menu call can be added to the button to select the running applications. She looks like this:

In this case, the menu will open only with a debt (the so-called Long Click)! I.e not just jerked with your finger, and pinched and held. Many say after that Wow!
Tablet owners, I advise you to pay attention to the work area, it is there most often the buttons are, including the menu.

And it's not always the right to right as possible, but this button looks like this.
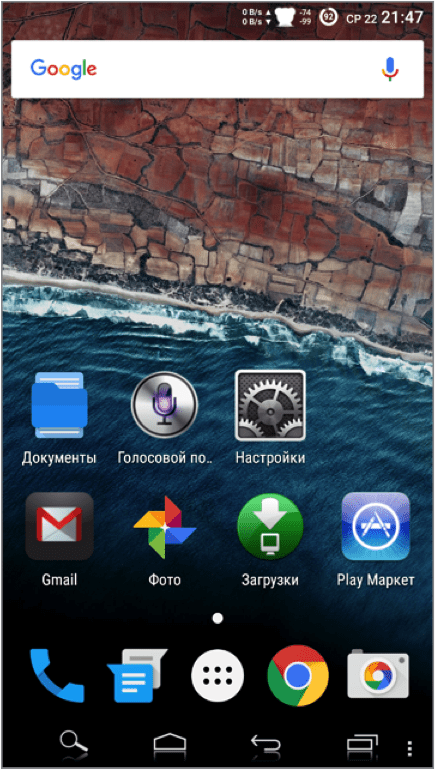
On fresh android versions OS The menu button looks like this.
Android supports multiple menu types. First - there is a separate button on the phone Menu. (In old phones), pressing which causes the menu. In the new devices, the separate button was removed, replacing the menu icon in the form of three points in the vertical orientation. The second type is the context menu that appears when you press and hold the finger on the screen in the desired place (you can also click and hold the center button on the phone). Context menu In turn, may have a submenu. Today we will get acquainted with the first type of menu. This article will consider working with the menu on new devices under android management 4.0 and higher.
In the template Empty Activity No menu, so we will create it yourself. This will help you understand the principle of work and get a general idea of \u200b\u200bthe project. Measure the names of classes, methods and code for processing the selection of menu items optionally. In other menu templates, the menu will be built in and you can immediately use it.
Create a new project based on Empty Activity And run it. No menu is not yet.
Create several string resources in the file rES / VALUES / STRINGS.XMLthat will be responsible for the menu items:
Now create new folder menu. in folder rES. rES., | New | Directory.). Next, create a file in the created folder menu_main.xml. - the name indicates that the menu refers to the main activity MainActivity. (right mouse click on folder menu. | New | MENU RESOURCE FILE). If you create an application with multiple screens, each activity will have a separate menu with your own settings. While open the file menu_main.xml. And add your code to the resulting template:
Open file. MainActivity.. Now in it only one method onCreate (). Add a new method onCreateOptionsMenu (). It is this method that is responsible for the appearance of the menu in activity. Choose in Studios Menu Code. | And in the following window, start entering the name of the method according to the first letters. Can be administered according to the first capital letters, i.e. OCOM ( o.n. C.reate. O.ption M.eNU) to quickly find the desired string. Press the button OK. And get the workpiece.
@Override Public Boolean OnCreateOptionSmenu (Menu Menu) (Return Super.oncreateOptionsMenu (Menu);)
Add a method into the workpiece that takes data from the menu resources and converts them to menu items on the screen.
@Override Public Boolean OnCreateOptionSmenu (Menu Menu) (GETMENUINFLATER (). INFLATE (R.MENU.MENU_MAIN, MENU); RETURN TRUE;)
In the method iNFLATE () You specify the menu resource ( R.Menu.Menu_Main.) and class object Menu..
In English "inflate" is translated as inflated, i.e. According to Android developers, we, as it were, inflation to the data object, for example, the menu. But in fact, the word "inflate" comes from the phrase in Flat. - in the apartment. There is an old tradition to launch the first cat in the apartment, which explores all the catches of the house and declares her agreement to live in it. So we launch the data from the XML file to the Menuinflater object.
Run the project. Now on the right side of the title you will see the icon of three points built in vertical line. Click on the icon to see the menu item Settings.

How not hard to guess, element item. Responsible for a separate menu item. Add three more items on the same principle by changing the identifier and text for the menu:
Run the project and try calling the menu again. You will see three new items.

Parameters id and title Do not need explanations. Parameter orderIncategory. Allows you to set your own menu items. Suppose you created five menu items, but have not yet been determined with the order of their output on the screen. In order not to move the entire code blocks for the menu items in the desired order, you can use this parameter.
And finally, an important attribute app: ShowasAction Defines the behavior of the menu in ActionBar.. Value never means that the menu item should not be displayed in the title, but only in the pop-up menu, i.e. Being in three points. If you set the value always, Item Settings Immediately appears in the title of your application. Also available values iFROOMS., wITHTEXT. and collapseActionView.. Try yourself. For example, iFROOM. Displays the menu item if the place allows. If there are many items, they will only interfere. As a rule, in this embodiment, a very short word or icon is displayed for frequent operations to avoid unnecessary clicks for three points.
Pay attention to the attribute app: ShowasActionwhich refers to the space names xMLNS: App \u003d "http://schemas.android.com/apk/res-auto". There was a time when such a space named did not exist and the attribute was used in projects android: ShowasAction From the standard namespace. If the studio will swear to an error, then edit the code.
While the menu items do not fulfill useful work. Any click on the item simply closes the menu without visible consequences. We have not yet written the code for handling clicks.
Select menu items
We learned how to create a menu. But while it is useless, since the menu items do not respond to our press. To handle clicks of menu items, is another method onOptionSItemSelected (). We add the method according to the same principle as for the previous example. We get the workpiece.
@Override Public Boolean OnoPtionSemSelected (Return Super.OptionSemSelected (Item);)
Parameter item. responsible for the menu item. You should get the menu identifier through the method getItemid () And specify code for it. Since usually the menu consists of several items, it is convenient to use designs if / else or switch. To display information, we use the text tag. Add a component to the activity screen TextView.. You can use available TextView. With the inscription "Hello World!", just give him an identifier.
Add code to the workpiece for the selected menu item:
@Override Public Boolean OnoPtionSemSelected (Menuitem Item) (// We receive the identifier of the selected menu item Int ID \u003d item.getItemid (); TextView InfotextView \u003d (TextView) FindViewByid (R.ID.TextView); // Operations for the selected Switch menu item ( id) (case r.id.action_cat1: infotextView.settext ("You chose a cat!"); Return True; case r.id.action_cat2: infotextView.settext ("You chose a cat!"); Return True; Case R. ID.Action_cat3: infotextView.SetText ("You have chosen a kitten!"); Return True; Default: Return Super.OptionSItemSelected (Item);))
Run the application, call the menu and select any menu item. A message should appear in the text box.

There is an alternative way through XML, similar to the processing of clicking the button (starting with Android 3.0). You can add an attribute android: OnClick. in the menu resources, and you do not need to use the method call onOptionSItemSelected (). With help android: OnClick. You can point out the necessary method When selecting the menu item. Add this attribute to the item Settings
Now in the activity code, we will write the following:
// attribute at the Settings menu item is set android: onClick \u003d "onSettingsMenuClick" public void onSettingsMenuClick (MenuItem item) (TextView infoTextView \u003d (TextView) findViewById (R.id.textView); infoTextView.setText ( "You have chosen the item Settings, better would have chosen a cat ");)
Switches
The appearance of the menu items can be changed in view of the switches. To do this, add an item group. With an attribute android: Checkablebehavior \u003d "Single":

I don't see much sense in this mode. And we will not consider it.
DESIGN mode
In Android Studio 2.2, a graphical mode of constructing a menu is similar to the toolbar to add new components to the screen. The panel menu consists of four elements: Menu Item., Search Item., Menu., Group..

The principle is the same, choose the desired item and drag it on the screen in the menu area. If you have studied manual menu creation, then this method Will not cause you difficulty. With it, you can quickly draw the menu structure, and then reform manually.
So, let's create a simple menu for the Android application. Create a new project. Let's call him MyMenu, click Next. Choose Empty Activity. Click Finish.
The Android Studio system will prepare us a new project, let's go to Gradle Scrolls. In Build Gradle, add a new implementation. We will need a package
implementation "com.android.support:design:26.0.0-beta1"
At least in my project. Click synchronize the project.
Menu items
We turn to the RES folder and create a new Andriod resource folder in it with a resource type - Menu. In it, let's create a new resource menu file. The name of the file is assigned as the name of the folder - MENU.
On our main menu by dragging, add Menuitem in the amount of 3 pieces.
In the strings.xml file you will write a new name for menu items by creating additional string values \u200b\u200bfor them.
Let Item1 be item 1, Item2 item 2, and Item3 let it be out.
In the menu.xml text version, you assign names from Strings.xml for our items. Also for each Item we will add, Android: ID named Action1, Action2, Action3,
to interact with these items. Action number 1 will be responsible for something, some kind of reaction, pressing the Action 2 item, respectively, will be responsible for other action, Action 3 will be responsible for output from the application.
In the MainActivity file, write several functions to work with the menu:
onCreateOptionsMenu @Override public boolean onCreateOptionsMenu (Menu menu) (getMenuInflater () inflate (R.menu.menu, menu);. return true;) onOptionsItemSelected @Override public boolean onOptionsItemSelected (MenuItem item) (int id \u003d item.getItemId (); SWITCH (ID) (Case R.ID.Action1: Txt.SetText (R.String.Item1); RETURN TRUE; Case R.ID.Action2: Txt.SetText (R.String.Item2); Return True; Case R. ID.Action3: Txt.setText (R.String.Item3); finish (); Return True;) Return Super.OptionSItemSelected (Item);)
We will declare the TEXTVIEW TXT type variable and connect it with the TextView element, in OnCreate through
tXT \u003d (TextView) FindViewByid (R.ID.TXT),
in the Activity_Main.xml layout, adding it
android: id \u003d "@ + id / txt"
to display text.
Start our application in the emulator. As you can see, the menu items appear, when you click on the value item 1 or 2, the text changes to paragraph 1 or paragraph 2, when you press the output button, the output appears and the application closes.
Layout menu
It seems, everything is fine. However, as always in Android Studio is given The menu will work only on the emulator, and therefore will add a small code to the styles.xml file, and before it in AndroidManifest.xml will change
android: Theme \u003d "@ STYLE / APPTHEME"
android: Theme \u003d "@ Style / AppTheme.noactionBar"
which says that a new style without ActionBar. Also in the MainActivity OnCreate we will make the Toolbar variable with Toolbar. We define it through Toolbar \u003d (Toolbar) FindViewByid (R.ID.Toolbar), and connect SETSupportactionBar support (Toolbar).
In the ACTIVITY_MAIN.XML layout in front of the textView add the following code:
Connect these widgets to import our application.
import android.support.v7.widget.toolbar;
Click Alt + Enter, and we will add, the import of our application will be updated. Perhaps you have to do several times to connect the widget. Click Save.
Now we can run our application in the emulator. Everything looks likewise, but without this code, our application cannot be installed on a real device. Let's make a signed application.
First month of learning. Consider working from the menu deeper. There will be considered both old devices for Android 2.3 and new phones on Android 4.0.
Options Menu (Options Menu)
The menu meets the class android.View.Menu.. Each activity is associated with one menu object. Menu itself contains menu items (class android.View.Menuitem.) and submenu (class android.View.submenu.).
When pressing the button Menu. On old phones, a set of menu items attached to activity. The menu may contain icons. Such a menu may contain six items (usually). If there are more than six items, an extended menu is used - in this case, item appears instead of the sixth item Options (More). When you click this item, an extended menu with the list of points that did not fit in the main part of the option selection menu are displayed.
When the menu opens for the first time, Android causes a method onCreateOptionsMenu ()transmitting object as a parameter Menu.. Menu can be created as resources in the XML file or use the method add ().
In a standard project, when choosing a conventional template there is already a blank for the menu from one item Settings And the method call for the menu (you already know about it).
Creating a menu using resources
Consider work from the menu through the resources. To create the menu, resources are used to be stored in an XML file. The file itself must be in the folder rES / MENU / Your project. The menu consists of the following items: