How to make symbols in Photoshop. Are there in Photoshop CS6 glyphs? What you will create
The "Glyph" panel serves to insert the signs of punctuation, pastry and substitution symbols, currency symbols, numbers, special characters, as well as glyphs from other languages \u200b\u200binto text in Photoshop.
To call the panel, select Text\u003e Panels\u003e Glife or window\u003e Glife.
Glife panel
A. Recently used glyph slots | B. Font Family Choice | C. Choosing an inscription | D. Font category selection | E. Glife slots | F. Skill | G. Scale regulator | H. Zooming | I. Glife Reducing | J. Increase glyphs |
- To change the glyph in the active text layer, follow these steps.
- Choose the place of the glife inserts using the text tool.
- Double-click the glyph in the glyph panel.
- The glyph panel supports Latin, Greek and Cyrillic alphabet. Limited support for Hebrew, Arab and other complex written writings, such as Indian.
- For each font, the glyphs are ordered by different categories, such as "Basic Latin", "Extended Latina A", "Extended Latin B", "Figures", "Currencies", "Symbols" and many others.
- Glyphs are also ordered by what Opentype functions they support, for example: "Alternatives", "Ornaments", "Extended Ligatures", "Numerals", "Rannels", "Style Sets", "Monoshyry Figures", "ordinal numbers" and a lot others.

A. Font category | B. Scenario | C. OpectivePe functions
- The glyph panel automatically finds alternatives for the first selected symbol in the text fragment.
- Slots of glyphs with a solid black rectangle in the lower right corner indicate that there are options for this particular glife. These options can be viewed in the pop-up menu. To open it, click and hold the slot or click it while holding the alt key or option. Drag the mouse pointer to the glyph version and release it to insert it into the active layer.
Glife slot with a solid black rectangle in the lower right corner

Glife options

Information about glyph
- The slider at the bottom of the dialog box allows you to increase or decrease the size of the glyphs on the panel.
- The font menu is a detailed menu containing the same items that on the "Symbol" and "parameters" panel. However, the search for fonts is not supported.
- When several fonts are in the selected area on the text layer, on the "Symbol" panels, "Parameters" and "Glyphs" panels are not displayed.
- You can work with the "Glife" panel and without initializing the text layer.
As the glyphs add to the document, they are automatically entered into the string of recently used glyphs, which is at the top of the "Glife" panel. Row of recently used glyphs:
- it may contain up to 25 different characters. If the limit is exceeded in 25 characters, new glyphs are added to the left, and the previous ones are removed on the right.
- contains the same characters. Symbols do not change when the program starts at different times.
- keeps the markings of the glife and does not take into account its design in the "Parameters" panels, "symbol" and "glyphs".
- specifies the size of the point, color and other glyph values \u200b\u200baccording to similar values \u200b\u200bin the "Symbol" and "parameters" panels.
04.07.2016 27.01.2018
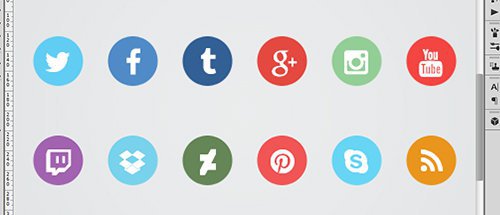
In this lesson, you will learn how to create flat flat icons of social networks.
What you will create:
Create flat icons We will start with the background, then add effects icons to give them originality, then draw long shadows. To repeat the lesson you will need Photoshop CS3 or later.
Resources:
- Font 1 - http://fontawesome.io/cheatsheet/
- Font 2 - http://fontawesome.io/
Step 1
Create a new file (Ctrl + N) Size 500 × 400 pixels.

Create a new group (Ctrl + G) And name it "background."

Step 2.
Fill in the background color # e7E9EA. via tool Pouring (Bucket Tool).
Step 3.
To add more effects to the background, we will add a gradient. Click on the icon Adjusting layer (Adjustment Layer) and select Gradient (Gradient.), use the following settings:

Layer overlay mode soft light (Soft. Light) | Opacity: 25%
Step 4.
Create a new group and name it "SYMBOLS".

Step 5.
Before you start work, we need to configure the menu Rulers and Grid (Rulers and Grids). Go to the menu View line (VIEW.- Rulers.) and View-show-mesh (VIEW.— Show.— Grids.) . Here are my settings for Lines and nets (they can be discovered by going to EDIT-PREFERENCE (Edit-Preference):

To create Guide lineYou just need to click and drag it from the ruler. To create a vertical guide, drag the vertical line and vice versa. That's how I divided the canvas (each icon is equal 50 × 50 pixels and the distance between each icon 25 pixels):

Step 6.
In this lesson, we work with the Awesome font, you can add custom icons for your site. As a rule, this is done by placement CSS font On your site, but since we work with Photoshop, we need to copy each icon you want to use from the crib. Go to the page, select the icon you would like to draw. I used icons for the following ( social networks) sites: twitter; Facebook; Tumblr; Google+; Instagram; YouTube; Twitch; Dropbox; DeviantArt; Pinterest; Skype; Feed.
Step 7.
After you found a badge that would like to use, copy it ( Highlight it then click right-click Mice-copy)

Then return to Photoshop and select tool Text (TEXT. Tool) On the toolbar. Change the font settings, as shown in Figure:

Now insert the icon you just copied. ( Right-click-insert)

Step 8.
Repeat the previous step until you insert all the icons you would like to use.
Step 9.
Create a new group and rename it to "Icon BG", place the group below the Symbols group.

Step 10.
Create new layer And place it in the group created in the previous step. I renamed the layer in Icon BG.

Step 11.
Using tool Rectangle with rounded corners (Rectangular Circle Shape Tool) (located on the toolbar below tool Text Tool) I created the icon background,
That's all the colors that I used:
Twitter: # 6BD1F4.;
Facebook: # 5A93CB;
Tumblr: # 3C6A9c.;
Google +: # e44940.;
Instagram: # 9bd29d.;
YouTube: # f4504C.;
Twitch: # a96DB6.;
Dropbox: # 81d5ed;
Deviantart: # 6E8E61;
Pinterest: # f25F5F.;
Skype: # 67D5F4.;
Feed: # e9951d.;

You can use these colors, and you can use colors at your discretion - so work will acquire originality.
If you do not like how rectangles look like with rounded edges, you can choose another form, for example, a square or a circle. To make the perfect circle or square, do not forget to hold sHIFT key At the time of their creation.
Step 12.
If you are satisfied with the result at this stage, you can go further, but if you want to give your abilities icons, let's continue to improve. Let's start by S. style shadow layer (Drop Shadow). Open the Symbols group, select one of the icons and click the icon FX.-Then (FX-Drop Shadow)

Step 13.
Repeat the previous step with the rest of the icons. In order to make your work much easier, click right-click on Layer-Copy Style Style (-Copy Layer Style). Then select the remaining layers with icons, click right-click-insert Layer Style (-Paste Layer Style).
Step 14.
Now add an internal shadow to the background of each icon. Open the group "Icons BG", choose a layer with icon, click on the icon FX.-Nontrase shadow (FX-Inner Shadow.) . Use the following parameters:

Step 15.
Create a new layer and name it "GLOSS EFFECT". Change the color of the foreground on # ffffff.; and with help rectangular Region Tool (Rectangular Marquee Tool) Create several rectangles, half smaller than the size of the icons (approximately 50 × 25 pixels). Do it for all icons.

Then change soft light overlay mode (Soft Ligh),reduce opacity (OPACITY) layer to 20% , but fill (Fill) before 80% .

Step 16.
Disconnect the visibility of the "Gloss Effect" layer. Create a new layer and name it "Long Shadow". This step is a little more complicated than the other effects. Place the new layer below the "GLOSS EFFECT" layer.

Step 17.
Take polygonal Lasso Tool (Polygonal Lasso Tool) And start creating a rectangular shadow, touching the edges of the icons only on the right side, then make a diagonal line until it reaches the bottom right edge of the icon background, make a straight line until it reaches the background center, then connect the lines. In the image you can consider more clearly how to draw a long shadow.

Step 18.
Last step! Reduce opacity (OPACITY) layer with shadow to 10% , I. pouring (FilL) before 0% .

Now click on the FX icon and select Overlay colors (Color Overlay). Use the following parameters:

Now select Overlay gradient (Gradient. Overlay) And use these settings:

Final results:


Basics of working with Text Text Tools in Photoshop: Control Panel, Settings, Functions and Features.
There is a group on the toolbar under the button with the letter "T". Open it in any way:
- pressing on the black lower right corner of the icons;
- pushing on the right mouse button icon
You can activate the text by pressing the T (Russian E) key on the keyboard. And no matter what layout of the keyboard in this moment. With a keyboard key Shift Pressing The "T" keys several times will alternately activate all four tools of this group.
Fig.1. Text Tool Group
Everything is intuitive here.
- Horizontal - to create usual recording in a horizontal position.
- Vertical - there is an inscription from top to bottom.
- and 4. Create fast masks With horizontal and vertical selection.
More often than others use horizontal direction.
Control Panel Text Tools Text
For active tool The upper control panel takes this kind:
Fig.2. Top Tool Control Panel Text
IN versions Photoshop. CS6 Entered the Font menu containing multiple settings options. This will be in another article. Now consider settings to the top control panel.
Attention! All settings of the top panel for tools text in photoshop is better set to the inscription set. But it will be possible and later to make changes, after selecting the text or part of it, which you want to change.
- Over the number 1 Fig.2 – saving parameters. Very convenient feature to save settings set (The name of the font, its size, etc.), if it periodically comes back or before the text layer is ripping.
Click on the small arrow to open the window. Select "New set of parameters for the tool. The second window opens, where you can specify the name of the parameter. Click OK. The editor remembers the settings.

Fig.3. Saving text parameters in Photoshop
The list appears new line. For clarity, in the previous step, the name "Example of a new saving" was introduced.

Fig.4. Saved parameters
Now to set on the panel all the values \u200b\u200bthat were when saved, you need to click on this line.
To remove the string, press it with the right mouse button and select deletion.
- Over the number 2 Fig.2 - changing the orientation of the text. Pressing the button with the letter T and arroders - the direction of the inscription changes from the horizontal to vertical and back. Do not forget that the text layer should be active in the layer palette.
- Over the number 3 Fig.2 - headset font. Pressing the arrow button opens the entire list of fonts available on the computer. You can choose from the list you need or enter it into the window manually, then press ENTER.
- Over the number 4 Fig.2 - starting font. The arrow button opens the list of styles that support the selected font. If the button is inactive, then the selected font supports only one proposed style.
- Over the button 5 Fig.2 - font size, he is Kehal. The drop-down list offers options from 6 to 72 pixes. Any content can be entered into the window manually, then press ENTER. It is enough to enter only the numbers, and the letters "PT" will supply the editor automatically.
You can select the size like this: Test the cursor to the left of the window when it takes the form of a finger with the arms, clamping the left mouse and drag to the right to increase the size or left to reduce. In the window, the digital value will change. As soon as release the mouse, the size of the text will change.
- Over the number 6 Fig.2 - starting font. Pressing this button opens a list of styles that support the selected font: italic, bold, bold ... Not all fonts support full list Styles, so there may be a different number of options. If the button is not active, then the selected font supports only one proposed style.
- Over the number 7 Fig.2 - leveling text One of the parties or in the center. Run buttons just like in Document Word.. Settings are in the paragraph panel. Read about it below.
- Over the number 8 Fig.2 - color selection. The window shows the color to be applied to the text. You can change it by clicking on this window and in the opened palette, select any other. If the text is already entered, it must be predetermined.
- Over the number 9 Fig.2 - deformation of text. Click on this button, then open the styles and we have different deformation options. Experiment.

Fig.5. Deformation of text
- Over the number 10 fig.2 - opens / closes panel symbol, paragraph. About this in more detail.
Panel symbol, paragraph
The panels and paragraph panels are open in the photoshop button on the top control panel or on the right pane. If they did not turn out to be on the right pane, turn on the menu path the window - select a symbol or paragraph. The corresponding icons appear on the right panel. If they are selected both, two icons of the same group will appear, but when you open any of them in the window there will be two tabs for convenient switching between these panels.
Attention! The panel symbol, when working with the text tools, the text has a priority over the paragraph panel.

Fig.6. Panel symbol, paragraph
Panel Symbol
Some of the settings of this tab duplicate the functions of the upper control panel and they have already been said. Let's not repeat. The values \u200b\u200bin them will be exhibited the same that you specified in the top panel - the font, its size, etc.
The rest are indicated in Figure 6 above:
- Line spacing. Determines the interval between rows.
- Curning for editing distance between two characters. For example, from the whole text, only two characters need to bring closer or distinguished from each other. We put the cursor between them, open the list and select the desired option, or insert it into the window manually.
- The intersomymbol interval for setting the distance between text symbols.
- Scale vertically to increase / decrease the height of characters is set as a percentage. The number in the window manually is entered. The% sign can not be put, Photoshop will supply it automatically as soon as you press ENTER.
- The horizontal scale stretches / squeezes the line. As well as the previous parameter is entered as a percentage.
- Baseline displacement. A convenient feature with the introduction of mathematical formulas and other designations with Nadhexa and the Redendex. It allows you to raise / lower part of the line or word. Previously, this part needs to be allocated. The value in the window manually is entered. Similar features give the following line - pseudo-paratro.
- Pseudo-Parameters. The font settings in this line are visible visual - fat font, italics, text in capital, etc.
- Ligatures, that is, the characters that are triggered by a merger of several letters or signs, that is, to combine them in one sign. Used very rarely. Only those that support the selected font will be active.
- Opens a list of languages \u200b\u200bto check spelling.
Panel paragraph
Setting the parameters of paragraphs, such as indentation, transfer, etc.

Fig.7. Panel paragraph
In the first line, three first buttons are duplicated from the top control panel. They already mentioned. The remaining buttons are most likely inactive. The next three buttons of this line are designed to align the bottom line of the text, and the last is aligned across the width.
In the second block, three windows where the indents can be set in pixels from the right or left edges and the indent of the first string.
The third block indicates indents before or after paragraph
The next block includes / disable the automatic lifting line.
Toolbar, as a rule, the most active panel used. This panel appears on the left side of the screen when you start photoshop. At any time, a tool is allocated with the program. To facilitate working with the palette, I am a list of basic instruments in Russian and english. You can also read in detail how every tool works and how they are formed into groups.
List of instruments in Russian and English
Often there is a need to quickly translate the terms of the toolbar into Russian. Here I brought together the Russian and English names of the toolbar commands. Also indicated I. hot keyWith which you can activate the tool. 
Little black triangle in the lower right corner of the instrument icon indicates the presence of the tool submenu. If you bring the cursor to the tool, the pop-up tip will appear with the name of the instrument and its functional key on keyboard. 
All tools on the tool palette logically can be combined into five large groups. These are "allocation" groups, "cropping", "retouching", "coloring", "drawing and text". Let's look at each group more. This is a set of tools for the CS3 version of the photoshop program.
1. SELECT TOOLS "SELECTION TOOLS)
This group contains tools to highlight areas of various forms, moving the selected area, quick and accurate selection of irregular shape regions.
A group of tools "area" (marquee) is used to highlight rectangular, oval regions, areas from one line and one column.
The "Move" tool (Move) moves selected areas, layers and guides.
Lasso (LASSO) tools (Lasso) is used to create a polygonal (with direct edges) and "magnetic" (tied) selection areas.
Tool " Fast allocation"(Quick Selection) allows you to quickly" draw "a dedicated area using an adjustable round brush tip.
The "Magic Wand" tool (Magic Wand) highlights areas painted in a similar way.
2. Crop and Slice Tools Tool Group (Crop and Slice Tools)
Here are collected tools for truncating the image and creating fragments.
The "Frame" tool (CROP) truncates the image.
Tool "Colding" (Slice) creates fragments.
The Slice Select allocates fragments tool.
3. Retouching Tools (Retouching Tools)
With these tools, you can detect defects on the image, erase and restore the image, adjust sharpness and blur, tone and saturation.
The "Spot Healing Brush" tool (Spot Healing Brush) removes stains and objects.
The "Restoring Brush" tool (Healing Brush) eliminates the image defects, painting them with samples or patterns.
The "Patch" tool (PATCH) eliminates defects in the selected image area using the sample or pattern.
The Red Eye tool (Red Eye) removes red highlights caused by flash photographing.
The "Stamp" tool (Clone Stamp) is used to draw using a sample image.
The "Patter Stamp" tool (Pattern Stamp) is used to draw with a part of the image as a pattern.
The "Eraser" tool (Eraser) is erased by pixels and restores parts of the image to the state at the time of last saving. In more detail about the tool "Eraser" can be found in post "".
The "background eraser" tool (Background Eraser) by dragging erases the image area to transparency.
The "Magic Eraser" tool (Magic Eraser) with one click erases monotonously painted areas of the image to transparency.
Tool "Blur" (Blur) softens clear edges of the image.
The "Sharpen" tool (Sharpen) makes a sharper soft edge of the image.
The "Finger" tool (SMUDGE) flashes the data in the image.
The "Lighter" tool (Dodge) brightens the image areas.
Tool "Dimmer" (BURN) makes darker areas of the image.
The Sponge (Sponge) tool changes color saturation in the area.
4. Tools group "Coloring" (Painting Tools)
Here are gathered all kinds of tools for coloring, color replacement, image stylization.
The "brush" tool (Brush) inflicts brush strokes. In more detail about the "Brush" tool, you can read in the post "".
Pencil tool (Pencil) draws lines with clear edges.
The Color Replacement Replacement tool replaces the selected color to others.
History Brush draws a copy of the selected state or snapshot in the current image window.
The "Archive Artistic Brush" tool (ART History Brush) draws stylized strokes that imitate various artistic styles using the selected state or a snapshot.
Tools "Gradient" (gradient) create straight, radial, cone-shaped, mirror and rhombid transitions between colors.
The "Pill" tool (Paint Bucket) fills in the primary color of the area painted in a similar way.
5. Drawing tools group and text (Drawing and Type Tools)
This group contains tools to highlight a circuit, text printing, creating arbitrary figures.
The "Path Selection" tool highlights the shapes or segments, displaying the nodal points, direction line and direction point.
Tool "Text" (Type) creates text on the image. More information about tools for working with text can be found in post "".
Tool "Text-mask" (Type Mask) creates areas of selection in the form of text.
Pen tool group (PEN) allows you to draw contours with smooth edges.
The "Shape" tool group and the "line" tool are drawing figures and lines on the usual layer or layer-figure.
The "Arbitrary Figure" (CUSTOM SHAPE) creates custom figures selected from the list of registered figures.
what happens in the end
In this lesson, we will create a set of icons in Photoshop. A set of icons must have the same background and one topic. For training we will create icons with sun, snowflake and RSS icon. Let's start.
1. Preparation of the workspace
Step 1
Let's start with the creation of a new document with a size of 350 px by 350 px. Click on the white square near the setup Content background (Background Contents) to select a new color background of the workspace.
Step 2.
In the dialog box Color palette (Color Picker) Select the gray background of the workspace (# E0E0E2).

Step 3.
It is always good when the work from the very beginning is structured. Create a group of layers and name it "The sun"(SUN). There will be all layers related to the creation of an icon with the Sun.

2. Create a foundation
Step 1
Using tools "Rectangle with rounded corners"(Rounded Rectangle Tool) Draw a rectangle with dimensions of 83 px × 64 px and set the radius of 8 px. For more accurate results, use the panel. Properties(Properties). Here you can simply enter the exact dimensions.

Step 2.
Hold SHIFT, and then draw another rectangle with rounded corners. This new figure will be added to the previous one. Install its size 36 px × 36 px with a radius of 3 px.

Step 3.
Press CTRL + T to transform the figure, and then press and drag beyond the limits of the limit frame to rotate it by 45 °.

Step 4.
Make sure the figure is in the center of the previous rectangle. In CC 2014, you can check the position of the shape by dragging it and attaching it to the guide in the center of the previous figure.

Step 5.
Press ENTER to save the result. You may find that in the confirmation dialog box you are informed that the figure will turn into an ordinary circuit. This means that you will no longer edit it using the "Properties" panel. Just click "Yes"(Yes).

Step 6.
Place the figure as shown in the figure below.

Here is the result on a scale of 100%.

Step 7.
Draw a similar shape on top of the previous one, which is 1 px less. You can do it, duplicating the figure, and then changing her points or simply creating a new figure.

Step 8.
Set the color # 57adf8.

Step 9.
Double-click on the figure, and then apply Stroke (Stroke) and Overlay gradient (Gradient Overlay) using the following settings.

For a gradient, use the following colors. To open the gradient editor and change the gradient settings, click the preview window of the gradient.

Step 10.
Reduce level fill (Fill) up to 11%. The contents of the layer will be transparent and remain unchanged.

Here is the result.

3. Shaden.
Step 1
Create a new layer under the basis. Activate tool "Brush" (Brush Tool) (B) and then drew the shadow under the icon.

Step 2.
Still using the tool "Brush" (Brush Tool) (B), add a stronger shadow right under the tip of the icons.

Step 3.
Clicking Ctrl, click smaller in size to highlight a smaller figure. Create a new layer and use white color over the selected area. Make sure you use a soft brush Rigidity (Hardness) -0%.

Step 4.
When you finish, remove the selection (Ctrl + D) and reduce opacity(OPACITY) layer.


Step 5.
Create a new layer and highlight the smaller base of the icon. Fill out the selection with a gradient from white to black. Change overlay mode(Blend Mode) layer on Overlapping (Overlay) and then reduce it opacity (OPACITY).


Step 6.
Add one more layer. Create a large elliptic selection at the bottom of the icon, and then press Ctrl on the base layer to cross it. Fill out the selection with a gradient from white to black. Change mixing mode (Blend Mode) layer on "Screen" Screen and reduce it opacity (OPACITY).


This is the result of 100%.

Step 7.
Clicking Ctrl, click on the miniature of the base layer. Create a new layer from above, then select Editing\u003e Stroke (Edit\u003e Stroke). Install light blue color and width (Width) 1 px.

Below you can see the difference before and after adding the stroke inside the icon.


Step 8.
Add a mask to a layer with a stroke. Fill it with black to hide all contours. Spend on some sites of the line white to show them. Thus, now we have the edge of the icon.

In the image below, you can consider the edge allocation in detail.

Step 9.
Add a corrective layer Color balance (Color Balance) above icons. We use it to change the background color.

To simplify the layers management, let's change the layer name on Color change (Color Changer).

Step 10.
Fill the appliant layer mask black. Highlight the icon base, and then fill it with white. Thus, the correction layer only affects the icon. Drag the sliders to change the color.


Step 11.
Duplicate all layers of the base icons and change the parameters in the adjusting layer Color balance (Color Balance) separately.

4. Add icons to icons
Step 1
For our first icon, we add the sun icon. Start with drawing a yellow circle.

Step 2.
Apply layer styles Inner shadow(Inner Shadow) and Inner glowInner Glow using the following settings. Use color # 7B6708 and install both overlay modes Multiplication(Multiply).


Step 3.
Use the brightest yellow color in the center of the sun.


Step 4.
Add the ellipse of a brighter yellow color in top Sun.


Step 5.
Draw a thin, light figure on the upper right side of the Sun to highlight it. Remove unnecessary with a soft elasty to give naturalness.


Step 6.

Step 7.
Highlight both vector figures and then duplicate them: Ctrl + C, and then Ctrl + V. Turn new figures by 45 °.

Step 8.
Continue to duplicate and rotate the figures until we have enough rays.

Step 9.
Apply Inner shadow (Inner Shadow) with color # B48F0B and External glow (Outer Glow) with color # F9DC7E.


Step 10.
Hide the sun by pressing the eye icon near the layer. Draw more yellow trianglesAs shown below.

Add a circular figure to the center of triangles and set the trajectory mode Subtract the front figure (Subtract).

We finished, so let's return the outbreak and shape of the sun.


Step 12.
To get a realistic sun, we need to draw a blurred yellow round shape behind the sun. You can do it manually using a soft brush, or first draw a circle, and then soften it using the filter Gaussian blur (Gaussian Blur).