Victoria 3.5 hard disk check. Victoria HDD - How to cure broken sectors? Checking disk on broken sectors
Hard drives, as well as any other piece of personal computer or laptop, can break, damage or fail. Sometimes in such cases can help the restoration of the hard drive using special programs. They allow you to carefully test the disk and eliminate the detected minor failures.
One of these Victoria HDD programs, which is completely free and is freely available on the worldwide network. Thanks to its own simple interface And wide opportunities, anyone, even unprepared, the user will understand how to use the Victoria HDD program.
Victoria program for testing hard disk works on all Windows, including all latest versions, regardless of the platform.
Functional modes
The Victoria HDD program to check the hard disk can be used in several modes:
- API (using Windows tools).
- Offline mode through ports.
The first mode is considered the main one. Its main advantage is the convenience and ease of use and understanding. Thanks to this, it is available to users of almost any level of knowledge. In turn, the autonomous regime is most often used by experts. With it, the results are more accurate, and the diagnosis is carefully. In addition, it has a wider range of funds.
Program functionality
According to the information presented on the official website, the Victoria program is capable of:
- speed up the computer;
- restore the stability of work as an operating system as a whole and individual components.
In order to obtain the expected results, the utility:
- replaces defective sectors with reserve;
- eliminates bied sectors;
- repair damaged places.
Applying the program under consideration, you can not only improve the performance of the drive, but also increase its life.
Systems check
Naturally, you can use to scan standard operating system tools, and Windows itself will replace the spoiled sectors.

Such a process is launched by initiating the test of a separate volume located on the drive. However, there are devices here:
- the information received is not detailed enough;
- working with an active partition occurs exclusively in mode command line DOS;
- it is impossible to choose the method for eliminating detected problems.
That is why check and reanimate hDD yet better program Victoria. The main language of the Utility Interface Utility. However, without any difficult difficulties, it can be found in Russian, which will greatly facilitate the use. It is better to download the most new version, as it has all the functions that are needed in the work and minimum errors.
Download and start
As you already understood, it is enough to enter the phrase "Download Victoria" in the search bar. Then select the site, which is desirable to pre-check for reliability, and pump off the utility to your PC. Install Victoria program will not need. After the injection is complete, simply unpack the resulting archive, go to the resulting folder and detect only one file inside it: "VCR447.exe".

For convenience, you can make it a shortcut on the screen of your PC.

On computers with Windows version 7, 8 or higher, the launch must be performed only on the name of the administrator. It is easiest to do this by right-clicking on the shortcut and select the "Start from the administrator" item in the menu that opens.

Before you see before you open program Victoria, on the screen one after another, there will be such windows:
Unknown Error:


Do not worry because of this. It is only an appeal to specialists who are engaged in the repair of computers. It reports that there is no driver to work with ports. Just press "OK", and Victoria starts.
Start check
To get into graphic interface Utilities, go to the "Standart" tab. In its right part will be visible hard drivessystem available. You must choose the one that needs to be checked, even if it is the only one.

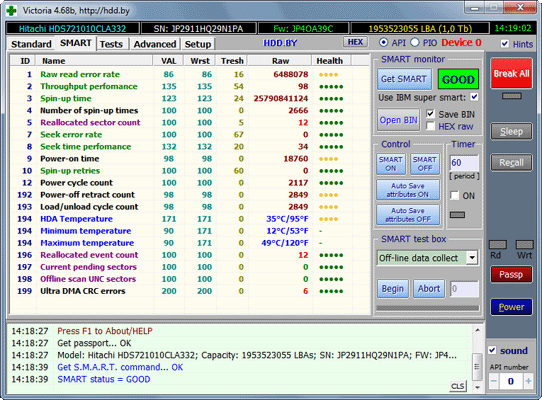
Then you need to go to the "Smart" tab and click the GET SMART button. In the opened table, you will see 242 Winchester parameters that are saved from the first hour of its operation.

Still pay attention to the fifth paragraph in the Health column:
- green circles everything is fine;
- yellow coloring is malfunctions;
- red sector faulty.
The RAW column displays how many storage sectors suffered.
Test Test

By scanning the device, the program makes an assessment of the tested sectors and displays the plots on the schedule where any problems are found, marking them with rectangles of different colors. You ask, what do the colors mean?
Deciphering the color of the cluster designation depends on its condition:
- gray - sectors are well read;
- green response is a little longer, but they are still considered normal;
- the orange reading of the sector is very long. It is they who slow down the work of the whole disk and although they still work, but will soon be out of order. They should be no more than 50.
- red sectors - damaged. Not read, recovery is not subject to. If such sectors are found, it is worth planning the replacement of the hard drive;
- blue with a cross - attempts to read the sectors become the cause of failures. The data in them will not be able to restore. These sectors need to be overwhelmed so that the hard drive stops "communicating" in the future. For this, the Remap function is used.

Specifications will be applied to sectors noted by checkmarks.
Modes of work
The Victoria program can work in four different modes:
- Ignore is a simple diagnosis of winechester without carrying out "repair" works;
- Remap defective areas are replaced with backup;
- Restore Restoration of Sector Sectors software method;
- Erase rewriting of defective sectors by the method low-level formatting. However, after applying this feature, all data is deleted.

Use the last Erase item only when the "Remap" and "Restore" modes did not give the expected effect. Before starting it, it is recommended to save all the necessary information to other media.
Reserve sectors
On each hard disk OS highlights a certain area as a reserve. Most often, such a role is given to the slowest part, occupying about 8% of the total volume and located closer to the center of Winchester. If broken sectors begin to appear, the system moves their data to this backup area. This happens if you are testing a hard drive on errors with standard Windows tools or use other software.
Diagnostics
Deciding with the regime, and noting the desired options, press "START". Running program for the first time, you should not touch the default settings. Then there will be simply checking the hard disk, without performing any actions to correct the damage detected.

If you exactly performed all the actions described in our review, but nothing happened, you may not have chosen your drive on the Standart tab.
Behind the diagnostic process you can watch on the screen. IN previous versions The utilities tested sectors were output as a grid, but this is too loaded the processor if the test was subjected to a high volume.

As a result, starting with version 4.47, the developers began to use the display for this purpose in the form of a graph. It will arise on the screen of your monitor, after a few minutes after the diagnosis is launched.

If this is not necessary for you, then this option can be canceled by removing the mark from the Grid item.

The hard disk testing process may take quite a long time. This directly depends on the volume of the hard drive and the number of information stored on it.
Buttons
After the start of the test, the "Start" button disappears and the "STOP" replaces it to stop the process. In addition to these buttons, there are also the PAUSE buttons, to suspend the scan, and the "Continue" button to run from the position on which it was stopped.

Before checking the hard disk, it is recommended to turn off all running programs. If you ignore this advice, the indicators will not be completely accurate. Moreover, the number of orange sectors will increase significantly due to the fact that their part will use running utilities.
Can the Victoria program save a hard drive?
Using the Victoria program, it is possible to replace approximately 8% of damaged sectors, eliminate errors and improper operation of the volume sectors if this happens due to system failures. Eliminate the physical flaws of Victoria will not be able.

But, nevertheless, the treatment of a hard disk through the utility under consideration will make it possible to significantly increase its service life. But, subsequent, it is better to use such a cured hard drive only as an extra. The operating system must be installed on a fully operating accumulator, without defects.
Of course, there are other utilities that perform similar work, such as HDD REGERENATOR, or MHDD. True, the first possesses quite limited capabilities, and the second almost duplicate Victoria, but it starts only in the MS-DOS environment.
Good day, dear blog readers Website. In today's article, we will talk about the software, for testing hard drives, namely about Victoria. The Victoria HDD program is created to test a variety of drives - it can conventional flash drives, external hard drives, conventional HDDs, rAID arrays And other devices.
In addition to testing, the application has another important feature, which is called "Hiding the defects of the HDD surface." In this material I will tell you how to use this program and I will describe its basic functions. If you decide to take advantage of the Victoria HDD, you are probably an advanced user, but I will still describe each step in detail. Newcomers This article will be especially instructive.
For windows users 7 x64 (or versions above)! Since the project was abandoned by the developer, official version It does not work with modern 64-bit operating systems. Users did not want to lose this excellent program and independently made version of Victoria HDD, which starts on modern systems - Download it from here.
IMPORTANT! Running in Windows 7 and above is carried out only on behalf of the administrator, no matter what type account you're using. The Victoria HDD window is divided into several tabs, I will return to them a little later.
The developer of the program is Sergey Kazan. The program is distributed free of charge. You can download it from the official site.
http://hdd-911.com/index.php?option\u003dcom_docman&itemid\u003d31
So, you have successfully downloaded the program and installed it on your computer.
You will also see two switches: "PIO" and "API", they change the operation mode of the application with a test drive. "PIO" mode will be available only if it is supported by the chipset motherboard. If your computer was bought in the last five years, then you can not worry about it. And now I will describe each control element in the program menu:
- Standart. If you look at the right part of the program window, you will see a list of devices that are connected to a computer. Not only USB drives and hard drives are listed here, but also various readers, memory cards and other other devices. With this application, they can be fully tested. To choose the desired device To check, you need to click on the left mouse button.
Well, on the left side of the DRIVE ATA Passport, information about the component is indicated. The "Seek Acoustic & Bad'er" button activates the test, imitates the damaged sectors on the drive, and also allows you to change the "AAM" (disk settings).
- S.M.A.R.T. Button to display all characteristics. It is worth saying right away that USB drives do not work with it. The remaining buttons are responsible for reading attributes, their saving and monitoring.
- Advanced. Selecting this section, you can see the contents of the sector, which is set in the "sec" field. The "MBR ON / OF" buttons are responsible for turning on and off the recognition in the Windows system.
Test tab in Victoria HDD
About the main tab should be described in more detail, since we will work with it. We need the "Start LBA" windows and, accordingly, "END LBA" - they start testing in a specific section area. By default, the program is always checking the drive. The "PAUSE" button stops the work, while you can restore it. After that, the "Continue" button appears.
It is also worth highlight the following buttons in this tab:
1. Timeout - here is the time followed, after which the program will automatically go to test the next sector.
2. Restore - an attempt to sweep the data and recording, the function does not work if the hard disk volume exceeds 80 GB.
3. Break All - Button cancels all the commands that were set before.
4. IGNOR - skip error messages that gives the application.
5. Sleep - stop disk operation.
6. Erase - the program goes into operation mode with damaged components.
The main functions and buttons I described, now you can go to test testing. Prepare a defective HDD disk.
IMPORTANT! If you can open it in any way, it is better to try to save important data from it, since here you just learn to work with the program.
We carry out the test disc: detailed instructions For Victoria HDD.
Unpack the archive and run a file with extension.exe, as shown in the screenshot below:

Running the program, you need to select the hard drive that you plan to check for damaged sectors. For example, I took my old disk "Samsung", the volume of which is 640 GB. There are no on it important informationSo you can do everything you need. This screenshot indicates in detail what you need to pay attention to when selecting a disk:

First of all, you need to get acquainted with the "Smart" status, which I described. To do this, click on the button called "GET SMART".

There are several parameters for which you need to pay attention to the transition to the next step:
- Had Temperature - here must be everything clear and without a translator. We see the temperature of our carrier. It is safe to work with a disk only when its temperature does not exceed 40 degrees. If the indicator is higher, the resource hard work The disk will noticeably decrease.
- Status - here should be exhibited "Good" for Victoria HDD.
- ReallyOCATED SECTOR COUNT - This item indicates the number of operations to transfer damaged hard disk sectors. If the indicator is not zero, then the disc automatically detected the bad sectors and performed the replacement to the backup.
Now the test, the sequence of actions is shown here. Press the "Start" button only setting all the necessary parameters:

You can select the final and start sector, so as not to spend time on checking all partitions of the hard disk. By default, the application starts checking the entire disk. Next, it is worth choosing a test mode - it can be "write" (write check, carefully, since the data will be overwritten), "verify" (verification), "Read" (programs will only read the data, these data will not be changed).
Another important section of the Victoria HDD program is the program action when a faulty sector is detected, which is called "BAD". Here you can select "Restore" (Restore), "Ignore" (ignore), "Remap" (Replace the broken sector on a good good). Now we spend the test, and not repair, so we leave the IGNore button, the rest of the methods can be started independently when you decorate the repair or not.
In our case, you do not need to change anything, since we spend a simple test. We press "START" - the sectors will appear on the screen, which have already been checking, also displays the percentage of the work of the Victoria HDD program.

Check can go long, especially on hard disks with large volume. Let us sum up and study the result, we will see many sectors of different colors, you need to figure it out:
— Orange . In this color, sectors are marked, which will soon be able to become bits, that is, not readable. If they are too much, then you should immediately buy a new disk.
— Red (ERR [X]). Bad sectors, the computer cannot display their contents. The computer places information there, but it cannot open it. This is another reason why files cannot be opened. Red sectors need to be limited so that the computer does not work with them.
— Green. The sector works fine.
If there are many orange and red sectors on the screen, then you need to save the information sooner. Bought sectors quickly apply, after which the hard disk becomes not working. On this, I hope my instruction will help you to test your removable drives.
I suggest your attention to watch video about Victoria HDD:
Therefore, today, the Victoria HDD program uses an even greater demand among many specialists based on the repair of computer equipment. And what programs besides Victoria HDD do you know dear friends? Maybe suggest anything newer in the comment?
Good day.
In today's article, I want to touch the heart of the computer - a hard disk (by the way, many call the processor, but I personally do not think. If the processor burns, buy a new one and there are no problems if the Winchester burned down - then not to restore information in 99% of cases).
When do you need to check the hard disk on the performance and dialing sector? This is done, firstly, when they buy a new hard drive, and secondly, with the unstable work of the computer: you have strange noises (); When accessing some file - the computer freezes; long copying information from one partition of the hard disk to another; Loss of files and folders, etc.
In this article, I would like to tell on simple languageHow to check the hard disk on the Bada, on its performance evaluation in the future, to disassemble the typical questions of users.
So, let's begin…
Update from 12/07/2015. Not so long ago, an article appeared on the blog about the restoration of broken sectors (Treatment of BAD Blocks) by the HDAT2 program - (I think the link will be relevant for this article). The main difference from MHDD and Victoria is the support of almost any disks with interfaces: ATA / ATAPI / SATA, SSD, SCSI and USB.
1. What do we need?
Before starting to the testing operation, in cases where the hard disk does not behave stably, I recommend copying all important files from the disk to other media: flash drives, external HDD. etc. ().
1) Need a special program for testing and restoring the hard disk performance. There are a lot of such programs, I recommend using one of the most popular - Victoria. Below are download links.
2) Next, we will seem the multicolored window of the program: go to the "Standard" tab. The upper right part shows hard drives and CD-ROMs that are installed in the system. Choose your hard drive you want to test. Then press the "Passport" button. If everything goes well - you will see how your hard disk model is determined. See the picture below.
If the hard disk controller works in aHCI mode (Native SATA), Smart Attributes may not be obtained, with the issuance of the message "GET S.R.A.R.T. Command ... Error Reading S.M.A.R.T! ". The impossibility of receiving SMART data also speaks the red-directed "Non ATA" inscription when initializing the media, the controller of which does not allow the use of the ATA interface commands, including the SMART attribute request.
In this case, you need to go to the BIOS and in the Config tab - \u003e\u003e Serial ATA (SATA) - \u003e\u003e SATA Controller Mode Option - \u003e\u003e Edit with AHCI on Compatibility. After testing the Victoria program, change the setting as it was before.
More specifically how to change the ACHI on the IDE (COMPATILITY) - you can read in another article:
4) Now go to the tab "Test" and press the "Start" button. In the main window, on the left, rectangles will be shown, painted in different colors. Best of all, if they are all gray.
Attention should be focused on red and blue rectangles (the so-called BAD sector, about them at the very bottom). Especially bad if there are many blue rectangles on the disk, in this case it is recommended to check the disk check again, only with the "Remap" checkbox. In this case, the Victoria program will hide the found failed sectors. Thus, the restoration of hard drives, which began to behave not stably.
By the way, after such a recovery, the hard disk does not always work for a long time. If he has already begun "raw", then hope for the program - I personally would not. With the presence of a large number of blue and red rectangles - it's time to think about a new hard disk. By the way, on the new Winchester blue blocks are not allowed at all! Experienced users call the BED sectors (it means bad, not readable). Such non-reading sectors may occur both in the manufacture of a hard disk and when it works. All the same Winchester is a mechanical device.
When working magnetic discs In the hard drive housing, they rotate quickly, and the reading heads are moved above them. When you push, impact the device or software error, it can occur so that the heads will be hurt or fall on the surface. Thus, almost certainly, the BED sector will appear.
In general, it is not scary and there are such sectors on many disks. File system The disk is able to isolate such sectors from file copy / read operations. Over time, the number of BED sectors may increase. But, as a rule, a hard disk is more likely to be disretened for other reasons before the BED sector will "kill" him. Also, the BED sector can be isolated using special programs, one of which we used in this article. After such a procedure - usually, the hard disk begins to work more stable and better, however, as far as this stability is enough - unknown ...
Best…
More than 25 improvements.
Click to view the list of new version changes.
What's new in version 4.73 :
- ! Found that with some unfavorable combination of parameters in the settings file ( vcr40.ini.) Condure the port numbers. Corrected.
- Made a window turn with Smart on the wholen.: in the menu right-button Mouse Point " Full Screen." or Ctrl + A.. This is still a temporary solution at a request, before the emergence of a common full-screen interface.
- Supplemented and improved Smart for SSD Kingston .
- Adaptation of the program To USB Winchesters, whose USB bridge converts the standard 512-byte logic sector in 4096-byte. At the same time, about 20 seats were fixed in the code, and also a displayed display in the passport of drives with non-standard logical sector size.
- The numbering sectors in the recording, displaying large sectors in the Hex editor to work correctly. Time, scan percent, maximum block size, and even timings are adjusted under the sectors of non-standard sizes.
- Now, with the unsuccessful remap, read, write, erasing the block and Refresh'E through the API - the program displays the system windows message about this situation in the log (since it is generated in kernel32.dll, then goes immediately to windows Language - do not be surprised). Thus, it is possible, for example, to distinguish the physical defect of the drive from the access prohibition due to the non-shut off MBR.
- A USB-drive A-Data, "NOBILITY NH92", on which the program could not get SMART. It turned out inside the idiotic USB-bridge MA6116, which flows into a stupor from 16-byte SCSI commands. I had to make the possibility of manual inclusion of compatibility mode - Talka OLD USB / SAS Mode on the tab Setup.. Test the program with a daw and without it. Most new devices should work in any condition.
- ! He eliminated the unfounded, because of which, when receiving a passport / Smart during the scan, the "Timeout" error occurred.
- ! The glitch is eliminated when the disk is already selected on the passport tab, the passport is read ... and on the tab Advanced The partition table does not allow to read until the passport is not received again.
- ! Error eliminated, due to which, when reading with Rempe, the program stopped after finding a defect (manifested only in PIO).
- ! The error is eliminated, due to which when the scan is stopped after a defect, the pop-up menu sometimes disappeared.
- ! Fixed lowest in the HDD / SMS SSD Spindle / Outpitation Stop procedure. It turned out that on one of the USB bridges the native SCSI command does not work. Added procedure for trying to feed the ATA command instead of SCSI via USB, and everything has become normal.
- ! Error has also been eliminated, due to which the program received some SSD for HDD during the "shaft stop".
- ! Eliminated the reason why the error could be ccess Violation ' On quick PC when closing the main window.
- Made to prevent the output of the window of the program outside the screen when starting.
- " neve.r »The timeout parameter is again, as you need, means infinite waiting time. In addition to function Refresh.where it means "update each block".
- Returned the vertical scroll bar into the scan grid. At the request.
- Returned the memorization of Galka Grid. On the tab Tests.
- Made the ability to disable the display of CHS-parameters in the passport due to their obsolescence.
- Added display of parameters Smart Command Transport (SCT) In the passport of the drive.
- On the Advanced tab, you can now copy to the number clipboard from the table Sections of the MBR, as well as the range of addresses of the section decompose into the scan of the surface.
- When installing the HPA checkbox 'LBA / MB' Now the conversion of some values \u200b\u200bto others immediately (earlier it had to move the slider).
- There were rare complaints that version 4.72 stopped working with IDE screws on some computers. Perhaps due to the change of the method of filing commands, but there is a chance that "fault" by setting the daw ' 'On the tab Setup. (Its impact also changed in version 4.72). I could not see this glitch with my own eyes. But just in case, the DFP_SEND_DRIVE_COMMAND method returned, leaving more modern IOCTL_ATA_PASS_THROOUGH.
- At the request from the forum implemented an "American dream": in the input / output fields large numbers Added the possibility of them display with separator thousand . For example: 1'953'525'167. Function disabled on the tab Setup. - Galka " Thouusand separator ». The VCR40.ini file appeared key Separator Char.After which in quotes, you can specify the separator sign: point, apostrophe or space. One field is left without separators, due to lack of space. After the "Victoria" transition to the new interface - it will be everywhere.
- The Power-Up in Standby Feature Set Device Spin-Up has been added to the EXT passport procedure. . This allows you to start and test hard drive with a disabled shaft promotion, for example, from some DVRs. It works only in PIO.
- Starting from version 4.73, the program comes without a packer of an EXE file (according to the IT officers, some antiviruses swear on it), so the file size is about 2 MB (it was ~ 700 KB). It is normal, and does not affect the quality of work.
- ! Fixed other minor errors and minor changes are made to algorithms.
- Added Function "Refresh" in Skan Surface
via API: reading, and when a slow segment is detected - entry into the same place. Previously, the program was the code that responds only to the read error. Now it works on a timeout specified by the user or automatically. If the timeout switch is set to the "NEVER" position - absolutely all blocks will be overwritten. The "Restore" function in Pio mode is saved.
Attention! The function is new and still raw. Before using it, save all the important data from the media on which you will experience it. The drive with slow sections is usually faulty, and may die suddenly, just from reading or writing.
When using Refresh under Windows newer than XP - should be turned off on the MBR drive in accordance with the answer - Added support graphic more windows . Instead of Win95 style - now your favorite topic. I had to remake the interface slightly - remove the frames, replacing them in the panel.
- Made work through API with AAM under Windows 7 and above . Now really You can adjust the HDD noise level on new systems if the hard drive is supported.
- Super-Smart began working on HDD IBM / HGST under Windows 7 and above .
- Added Support Super-Smart HDD Toshiba 3.5 " . While tested only on the HDWD120 model, but should also work on DT01, MG0, MD0, MC0, and the like.
- The opportunity to set the way to the log indicating the letter of the disk. For example, the program can start from the virtual disk- "resuscitation", and the logs are left in a reliable place.
- There was an opportunity to test removable drives (USB and CD / DVD) without administrator rights - By choosing them as logic disks. Check for now managed only under Windows 7.
- It is possible to work in PIO without administrator rights, unless of course driver porttalk.sys Already installed, and verification of rights - disabled forcibly. To do this, in VCR40.ini there is a hidden key AdminrightSignore..
- Added the ability to choose a logical process as an object of research. In the list of API devices. To do this, on the Setup tab, turn off the "Ignore HDD" daw.
- The passport of the API drive is complemented by a "logical passport" . This is something transitional between iron and software. The option is activated when removing the "Ignore HDD" checkbox on the SETUP tab.
- Added a carrier descriptor to a passport for non-ATA devices. For more objective data with freelance situations.
- Added button instant copy of the current sector as the start-up to the surface scan.
- Reverse "fast" scan adapted to SSD.
- ! Defined the undelated, due to which the speed of 1/2 graphic was displayed on the "fast" scan for the last block.
- ! Deflected the undelated: when the SMART (or passport) is obtained during the surface scan, the timings defining the colors of the grid rectangles were reset.
- Improved the type of "complete" graphics on small ranges due to a more advanced interpolation algorithm.
- In the drop-down log menu, items are added to "Set [Number] as an initial / final LBA". The number is taken from the string to which the cursor is guided.
- The same menu is added to the surface scan schedule. The number is taken from the coordinates of the graph where the mouse cursor is induced. Thus, you can quickly set the boundaries of defective areas for further treatment attempts.
- Added the ability to turn off the recalibration of the HDD before the surface of the surface (on the Setup tab of the Galka Recall HDD Before Scan"). It may be necessary if HDD has defects at the initial addresses.
- Added the ability to normal operation of the program under Windows 10 on some laptops with built-in SSD. The problem is that Windows sometimes does not allow scanning the surface if the program is running with the default recording. Now removal of the tank " Only Non-Destructive Functions"Disables the record completely at the Handler level. True, at the same time, the submission of teams into drives will stop working, and they will also have to forget about the full passport. But it is still better than nothing !)
- ! Fixed "Overflow Error" when scanning discs with annomally high speed (for example, Verify on some SSD is only crooked, which gives a false speed above 2000 MB / s)
- ! Fixed a bug, due to which the indicator of the current LBA was displayed 0 when stopping a reversing surface scan.
- Galka Grid. On the tab Tests. Now it is not remembered in the settings. And then there were complaints - users forgot to return, and subsequently surprised where to share the familiar "rectangles."
- The clock is dismantled from the top panel, the serial number section is expanded, splitters (movable separators) are introduced between sections. This is preparation for moving to a more modern adaptive interface.
- Instead of animation, the backlight is made of the root of the bookmark on which the active process comes. Will not like it - I will return back as it was.
- ! Fixed division by 0 when attempting random reading on card reader without a map.
- ! Finally fixed terrible glitch Because of which in the list of API disks the last item could not click without scrolling.
- It is possible to set the block size other than 256 sectors for virtual and non-standard drives.
- Optimization in the compiler is disabled to reduce the number of glitches. Because of this, the file size grew slightly, but improved the stability of the program.
- Caught electronic book PocketBook 301.which in the Cardrider mode gives an empty passport, but without any error. After that, the "Victoria" added verification of this situation and replacing the passport on the Windows API function so that at least the size is displayed and the possibility of testing the built-in and external memory books. It is possible that it will improve work with other non-standard storage devices.
- Hit player Jagga BOOM. On Rockchip. With it, no version of the 2018 version works - it hangs and flies. It turned out, the player does not like an attempt to access a full passport via USB. I had to change the algorithm for the bustling of functions. However, at the same time, the e-book has ceased normally :) I had to add the dawk of the switch between the new and old size commands. It is now called " Don't Get SCSI 25H"And located on the site of the remote daw" Dont Get Drive Type". The result - by default everything works with the player, and with a book. But the book size displays the wrong - for it and you need to install a checkbox in Setup.. In order to avoid problems, its memorization is disabled.
- Screenshots now fold into a separate SCR folder, the drive letter of which can be set in Setup., or by default it is created in the directory with the program.
- At the request of the forum users http://forum.ru-board.com added another 2 options for the end of the surface scan:
« Save Screenshot"- At the end of the scan, a snapshot of the TEST tab is taken as a PNG-picture.
« 3 SS + Shutdown"- At the end of the scan, snapshots of the Tests, Smart tabs are taken, and then the computer is turned off. - Asked to make an output to the SSD passport number of recorded data. In Smart, many SSDs have an attribute 241, which, depending on the model, may contain the number of recorded sectors or gigabytes. The automatic child is made of the desired value according to the following SSD types:
ADATA, Corsair, Datex, Intel, Kingston, Lite-on, LMT, Ocz Vector, Ocz Vertex 3, Ocz Vertex 2, Ocz Vertex450, Plextor, PNY, Samsung, Sandisk, Transcend 2.5, WD.
For those drives that automatically incorrectly determine the method (the program displays unrealistic or small values), a manual switch in the VCR40.ini file is provided:
Total WR Method \u003d 0
0 - automatically by the SSD family / model. 1 - ignore the model and interpret as gigabytes. 2 - Interpret as sectors. - Mechanical check method (SEEK / Verify / READ) is no longer remembered in the settings. Instead, an automatic setting was made to the best method when receiving a passport and manual control in the current session is left.
- An experimentally removed vertical scrolling bar from the surface scan.
What's new in version 4.71 b. SSD. (12 Dec 2018) :
- Added removal of screenshots - "hot" key combination Ctrl + S.. Because of this, the executable file has grown to 37 kb. I recommend checking for compatibility with minimalist windows versions PE - Suddenly need additional system libraries?
- Added the presence of the presence of a PCIE interface (SSD with PCIE to SATA).
- Added definition of storage form factor. Displays under the passport window.
- Added a separate line of SSD functions to a passport, in particular Sanitize and Crypto SCRAMBLE. There is also moved and trim. In fact, their more, but not yet decided how to place them rationally. These functions may occur on modern HDD.
- The HEX editors have been added to the menu (right-click), which you can switch the font size.
- ! Fixed a bug due to which the block size of the unit remained 256 sectors on SSD OCZ VERTEX. This was the cause of an extraordinary update of the program.
- Supplement certificate for F1. Frequent information between update outputs will be published on the site.
- I tried to remove the unnecessary switch number of the API device from the lower right angle of the form. If he needs someone, I will return. I have never come in handy in 12 years.
- A small adaptation of the interface to XP and 7, the right edge of the form seems to look better.
- Removed vertical scroll bar in Helpe, because It turned out to be buggy. You can scrolling the mouse wheel and PageP / PageDown keys.
- Changed the porttalk.sys driver installation algorithm. Now the driver is checked system folder Windows, and if not, then it is installed on 32-bit systems. Recycled driver error messages are removed extra. Outcome - PIO mode should be guaranteed to earn on x32 without additional action from the user.
- Added fast surface test (like in HD TUNE). Now you can get an idea of \u200b\u200bthe drive of any volume in 2-3 minutes. Accordingly, a new button has been added. Quick. Under the ex-button START, and the Start button is slightly reduced, and renamed SCAN. In order to know which test was running - the scan mode indicator is added under the button.
- The end of the accidental reading is now occurring not only in time, but at the end of the construction of the graph, if the Grid is turned off.
- At the request, I returned the opportunity to use the PC speaker as a sound indicator. As before, it works only on x86.
- An accidental closure of the user program is prevented during operations.
- Now in the log is written not only the number of the BAD sector, but also the volume of the disk in front of it.
- At the end of the scan, the address of the last block is also written to the log.
- Added new SMART attributes for SSD.
- Added SATA3 detect and future SATA4 in passport.
- Fixed a bug due to which when verified big drives In the API mode, the chart has a step, a multiple 2TB (a modern 16-byte SCSI command is applied, which has no restrictions on addressing\u003e 32 bits).
- Fixed and completed the display of the graph with a reversing and random scan of the surface.
- Fixed a lot illogical in the display and behavior of the scan graph in different modes.
- Fixed a bug due to which the sector size was sometimes determined optical disksthat prevented the reading sectors in the Hex-Viewer and issued "Error # 57"
- The block 2048 of the sectors is now installed automatically, starting with 400GB (it was from 1TB)
- Improved program operation When loading the graph from the file: The test boundaries are displayed, the mouse runs correctly.
- Typical situation: After experiments with a block size on one drive - forgot to manually return the "Auto Block Size" checkbox on the tab Test. This can lead to incorrect results on another disk. Now when changing the disk, this item returns to the "AUTO" position.
- Increased font in the Hex-Viewer caused by F8.
- Improved scan indication. With the help of the timer, I tried to make it uniform and independent of the speed of the drive. It also should now slow down the system, and as a result - to increase the speed and accuracy of testing. But since this is for the first time, there are some unfinished, disposable in the future. What is it all? The expansion of the speed limit of the scan of\u003e 3000 MB / s is preparing (now - only 655 MB / s), and possible bottlenecks are gradually eliminated in algorithms.
- When testing the surface in PIO mode - removed the "Reset HDD" checkbox near the navigation buttons, otherwise the ATA protocol rushes and an unplanned HDD response delay occurred.
- They asked to return as it was "non-updating" column widths in Smart. Now, when you click on the "Get Smart" button, the columns are updated, and when you press an alternative button - F9, remain unfounded.
- The color of the gray panel on the right is made more neutral. This is temporary. Probably, I will soon give the interface to the unity of the style.
- The colors of the passport and the log are made paler.
- Optimized code, the size of the executable file has become less.
- Reference system redone C.HTML on RTF format. It should be beautiful and not depend on the IE browser version.
- Text files attached to the program are now also in RTF. Do not open them in MS Word for editing - they will be swollen several times! Use MS WordPad.
2019 - the program is alive and has become even better!
Several years have passed since the beginning of the resumption of the Victoria project: free programintended for diagnosis, research, speed testing and minor repair of hard drives (HDD), SSD drives, memory cards, as well as any other drives in operating system Windows.
During this time, Victoria has been significantly improved, adapted to modern conditions, acquired a variety of new features. But even more new ideas have emerged to be implemented.
I, Sergey Kazansky, being the author of the project, thank everyone to whom the program was interesting, who used it, provided and gave valuable advice on its improvement.
The further development of the project is expected - follow the news.
Please Donate to Bitcoin Address: []
Donation Of. [] BTC. Received. Thank you.
Testing the state of the surface of any drives

The program built into the powerful HDD surface scanner, which allows you to dig a drive for failed sections floating defects and interface errors. Victoria is able to test most of the disks at the limiting speed, regardless of their type. Scanner Feature - Application of Special Algorithms automatic setting Times and block size, which makes it possible to effectively check both slow and fast discs.
Fast surface testing. Any volume - in 3 minutes

The schedule is built in 188 points evenly distributed over the test volume of the drive. The result is visually and in numbers is identical to the full 4-hour scanning, besides finding defects. It is to study obviously serviceable drives to measure the main parameters: speeds at the beginning and end, access time, behavior with different sizes of the unit, and also for comparison different devices by technical characteristics. Graphs can be saved to files and download back to the program.
Support external drives with USB interface
 Made a passport and sm.a.r.t.-parameters HDD and SSD via USB, which allows you to learn everything about hard drives hidden in USB boxes. In version 4.71b, 80% of USB-SATA models are supported, and this indicator will increase.
Added cache management via USB, Smart tests via USB. AUTOMATIC ACOISTIC Management (AAM) works on USB drives: software Management The level of acoustic noise due to changes in the speed of moving heads.
Superior passport drive
 HDD passport is information that characterizes the HDD / SSD family and its individual features. It includes the name of the manufacturer, the model name, serial number, microcode version, logical parameters (geometry), interface parameters and much more.
Victoria is able to show the drive passport hidden in a USB case, and thus determine the type of drive installed inside it.
Superior SM.A.R.T.-monitor with USB HDD and SSD support
 Failure monitoring and prediction technology (Self Monitoring, Analysis and Reporting Technology, Abbreviated S.M.A.R.T.) There are consisting of modern HDD and SSD drives.
Victoria analyzes Smart data, and displays the condition of each attribute, which clearly shows how well the hard drive "feels". The transition of the graphics in the Red Zone says that the drive has exhausted its resource. In 2018, new attributes characteristic of SSD discs were added to the program.
Drive mode with drive through the controller ports
 In addition to working through the Windows API, the program has PIO mode: access to the test IDE / SATA drive directly through ports, bypass Windows and BIOS.
The PIO-mode is intended for use on professional purposes, and requires special knowledge. Also, this mode is used for particularly accurate measurements of device characteristics and in the presence of faults of the test drive.
Building graphs with full sectors scanning
 The graphic method is very visual, and complements the main mode.
The Victoria program uses averaging schedule construction method. In a working HDD, the schedule is a smoothly falling down a line on which the steps are usually visible.
SSD has an ideal schedule - straight line. The presence of velocity failures indicates the wear of memory chips or the features of the SSD controller.
Installing passwords for USB interface drives
 All modern HDD and SSD support the so-called "security features", among which is the ability to install passwords to protect data access. However, the placement of the drive in a USB container usually makes these functions inaccessible to most devices.
Victoria, working with a drive through a USB bridge, has much less restrictions compared to utilities from HDD manufacturers.
Erasing information without the possibility of its recovery
 "The personal data operator should ensure the destruction (erasing) or depleting personal data on machine carriers when they are transmitted between users, in third-party organization for repair or disposal" (from the Order of the FSTEC No. 21).
Victoria has the ability to clean the media from information on the maximum speed for this speed drive.
System requirements:

- Operational windows system 2000 / XP / 8/10 x32.
Z966883737601.
E754428860093
X536043292174.
Qiwi-wallet:
+375292674259
Bitcoin:
1Prd71ajvnvu9fdkgubep4givspccd3r.
The assembled funds will go to engineering research, and will allow the Victoria program even better.
Program support includes articles, documentation, review most frequent questions And the answers to them. These materials will be gradually created and added to the "" section, available in the main menu of the site, as well as when clicking on this picture. Voluntary donations to the program - contribute to the development of its technical support.
When placing a program archive or any part of it on the Internet - required an active link to the http site: // Site
Hi friends! I often, when writing an article about errors, I mention the possible non-help of the hard disk. As well, I give recommendations to check our HDD on damaged sectors and generally its integrity. Far goes wrong, here is an example of an article in which I mentioned this.
I want to introduce you to immediately, with our main hero of today's article, a program for testing and verification hard disk for errors called " Victoria." Why this utility? Yes, even because it is very simple and understandable, and also, has long proved its effectiveness and quality of work. Even in his practice, I have already identified a very large number of faulty discs with the help of it, and sometimes even it turned out to restore.
The program itself is designed to check the hard disk with iDE interface or SATA, errors and damage. With itself, it represents a utility that is fully ready for the in-depth, and most importantly quick evaluation of the technical condition of the HDD is a disk.
How to check the hard disk for errors using Voctoria
I carry out the test of HDD Victoria using boot disk « Sonyape Live CD." You can download it as an ISO image. But also, you can use any other Live CD disc, just my preferences stopped at Sonyape.
By downloading the archive, unpack it in any place on your computer, and. When you finish with the recording, insert the disk into the CD drive and when the next reboot is rebooting.
Also, there is separate file. « .exe"You can safely run and check the disk for errors in the working Windows's. But to be honest, I can not guarantee 100 percent of the effectiveness of this method of verification. But you can try to get acquainted.
So, getting a disk and booting it from it in the Sonyape Live CD menu. You can have a list of tools that you can use. Of course, most of them will suit the system administrators and masters of computer equipment, but among them is the Victoria itself, which will need today.
Going down the arrow for a couple of lines below, mark " HDD Victoria 3.5.2 DOS disk check"And confirm the choice of key" ENTER" The screen will start loading the utility.

Interface appears before you launched program. Since we will only check the disk on the presence of errors, I will not tell all the possibilities of the program. Only here, I want to immediately pay attention to the fact that by clicking F1»You will open the help window where you can find a description of each button in this utility.

To start work, click " F2."What will launch automatic search and defining hard disk on computers. If a message appears that the disk will not find, in this case, we use an alternative way by pressing the " R" The left will appear with a port selection.
So, if your HDD is connected to SATA then, respectively, choose " EXT PCI ATA \\ SATA", If, through the IDE loop, we try each of the remaining four options. The same option is suitable in cases where there are several hard drives on the computer. Definition and select the port of arroges and key " ENTER».

If a faithful port was selected, a request will appear with the question, which channel will be used. We choose the one where in the field " Drive.»The name of the hard disk is specified. For example, I have this first, respectively, I put " 1 "And I confirm the choice, after which the notification will appear at the bottom of the window. Done».

Now it clicks " F4." A small HDD scan settings window opens. In the first paragraph, leave " Start LBA: 0", Which means starting checking from the very beginning of the disk. The second line " End LBA: 6986216»Indicates the final stage of the check, also leave the specified default value.

IN next line You can also leave " Linear check", That will allow you to quickly and at the same time, accurate diagnostics of the disk state. Here in the fourth paragraph instead Ignore Bad Blocks.»Exhibiting" BB Advanced Remap"Since with this value when detecting damaged blocks and errors, an attempt will be made to correct them, and not just to skip how it was indicated in the previous mode.

To start scanning, setting all the settings as I recommended, click " ENTER" The process itself can take about an hour, depending on hard speed disk.

Having finished checking the hard disk for errors, you can see a report on the number of good and defective blocks. All that is painted in gray and green is normal. What is displayed in orange colors means that damage will appear on the disk faulty blocks. But the last color is red that stains " bad.»Blocks, in other words, shows the number of defects on the disk. With a large number, it can be said that the disc begins fails or no longer works.
I also note that with 1-5 troubles " remap"Sometimes it copes and he can restore them. To end the check, you need to restart the computer and pull out the disk.
How to check the hard disk for errors with Victoria in the loaded Live CD
I will describe the second version of the disc scanning, in case the DOS version could not find or define installed HDD. on PC. This time, downloading from the disk, choose the first line " Sysadmin sonyape disk 05/15/2010" Windows XP and desktop boot will begin.
On the desktop we find the icon Victoria 4.46b B and run it. A window will open to the program interface, which differs from the DOS version. By default, the tab opens the tab " Standart."Which gives a full description of the selected hard disk. The main difference of this version of the program is that hard drives it is determined automatically, and the entire list of disks can be viewed on the left side.

So, by selecting the HDD that will be checked, click on the tab " Test" The Testing window appears similar to the DOS version. Before starting check, I recommend noting " Remap", That will fix errors in case of detection. And click the button " Start.»To start checking.

As for the error report, it is similar to the one that I described earlier, all that gray and green good, orange, red and blue is bad. To complete the scan, close the window and restart the computer in the standard mode.
In conclusion, I want to say that it is possible with the help of this utility you will not always be able to restore the working capacity of the hard disk. But in one I am sure that in checking the hard disk for errors and in the diagnosis of its technical state of Victoria, 100 percent will help you.
How to check the hard disk for errors