How to install windows xp from disk. Installing Windows XP is a BIOS installation process. Operating system releases
Preparing the distribution disk is the first step in installing Windows XP. If you already have such a disc on hand, you can skip this step, but if you downloaded an ISO system image from the Internet, you will need it using special programs(Nero Burning ROM, UltraISO and similar) burn it to CD or DVD.
The Windows XP Boot ISO is a pre-built system image containing full set installation data. It does not require any preliminary preparation, but is transferred to the CD unchanged.
Let's consider the process of burning Windows distribution kit to DVD using UltraISO as an example.
- Run the application.
- Press the keyboard shortcut "Ctrl" + "O" and open the ISO- windows image that you have prepared for transferring to disc.
- Click on the "Burn CD Image" icon in the toolbar at the top or press the F7 key.

- Insert a blank or rewritable DVD into your optical drive.
- Make sure the distribution you need is selected in the Burn Image window. Check the “Check” option if you want the disc quality to be checked after burning. Please select suitable speed records. Even if your laser drive can write at maximum speed, we recommend choosing medium or low. This will ensure good readability of your disk by any, including old drives.
- A rewritable disc must first be erased by clicking on the button of the same name, and you can immediately start writing to a blank disc by clicking “Burn”.

After 20 - 30 minutes, depending on the speed of the drive, the preparation of the installation disc will be completed. You can move on to the next step.
How to install Windows XP from disc in the traditional way
Traditional installation is a normal system installation process that requires active user input. Most often, the installation of Windows XP is carried out in the traditional way.
At this stage, we have already prepared everything you need. In order to install Windows from a disk, we only need the disk itself and a computer with optical drive, on which the system will be installed. If there is no drive, you can use an external one that connects to the USB port.

BIOS setup
To boot a computer from a CD or DVD, you need to set the first boot device CD-ROM drive. To do this, enter the settings menu by pressing the dedicated key (Del, F2 - F12, etc.) immediately after starting the computer. Which one - you can read at the bottom of the splash screen motherboard(displayed on the screen almost immediately after turning on the PC).
Once in the settings, go to the “Boot” or “ Advanced BIOS Features ”- in older versions of Award BIOS. Use the arrow keys to select the laser drive from the list of devices. In our example, it is designated as CD-ROM Drive, but sometimes only hardware models are listed in this list.

After selection desired device press F10 (exit option BIOS menu with saving the settings).
Boot from disk and installation process of Windows XP
- Place laser disc into the drive and restart the PC. System installation starts with booting Windows files XP in the computer's RAM.

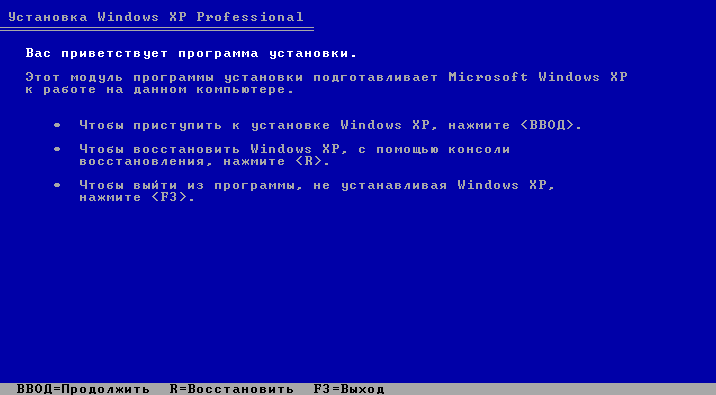
- Then Windows will greet you and offer to continue with the installation, exit the program, or restore itself using the Recovery Console. The second and third points do not suit us.
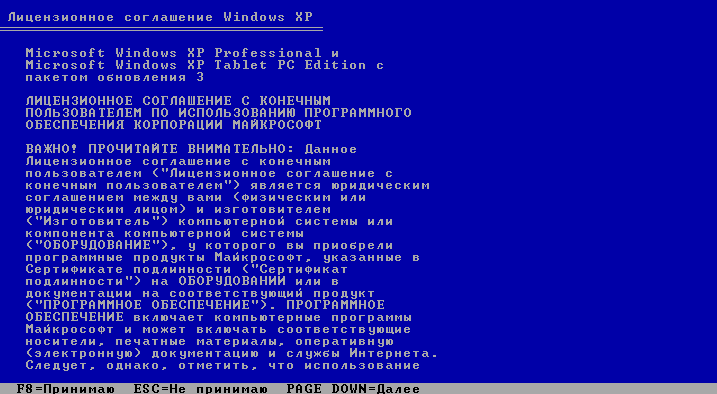
- Pressing Enter will continue the installation. The next step will be prompted to accept the Microsoft licensing agreement for using Windows XP.
- Next is the choice of hard disk space for system partition... Let's press "C", which means "Create section".

- Let's determine the size of the future drive C. In our example, it is the maximum, but you can set any size, preferably at least 10 Gb.

- Now let's look at the list of sections hard disk and agree to press Enter to install Windows in one of them.

- Let's format new section in NTFS (quick formatting is fine for us).

- And let's wait while the installer copies the distribution files to disk.

- After copying is complete, the computer will restart.

- The next boot of Windows XP will no longer be done from a CD or DVD, but from a hard drive. This means that the system bootloader has been successfully created and is working correctly.

- From now on, our participation will be required again. Here we will have to specify the default system language, our location and additional languages, if needed (although language packs can be installed later).

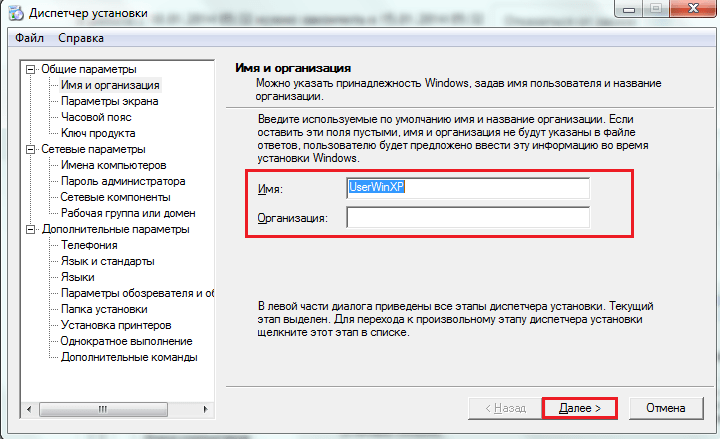
- Next - your name and organization. The name is required, the organization can be skipped.

- Entering the serial number of the Windows distribution kit during the installation process is voluntary. You can always enter it later.

- You also need to enter your computer name and administrator password now. The name will be prompted by default, but you can change it. The password can be left blank.

- The date, time and time zone are also set at this stage.

- We will not assign special network parameters, let them remain with us by default.
- Name working group let it remain as it is. You can always change it after installation.

- This completes the installation. Next, the screen will be configured and one or more user accounts will be created, the first of which will be assigned by the computer administrator. You will also be prompted to activate Windows XP right now.

But now almost everything is really. There are only a few settings left - and the system is ready to go.
Automatic installation of Windows XP
Create an answer file using Windows
Agree, to install the system for about an hour without leaving the computer and constantly clicking "Next", anyone will get bored. To simplify this work for those who have to do this often and for a long time, they came up with a way to install Windows without user intervention. To do this, a script is created in advance - an answer file that contains all the information that the installer needs.
It's time for us to figure out how to create such scenarios. The Windows XP distribution includes a utility Setupmgr.exe which is in the archive deploy.cab stored in the SUPPORTTOOLS folder on the installation disc. Let's extract this utility from disk and run it.
- The Installation Manager wizard will help us create the answer file. With its help, we can either create a new or modify an existing script. Since we do not have any blanks, we will select “Create”.

- We will leave the installation type by default - “automatic installation”.

- The product version is Windows XP Professional.

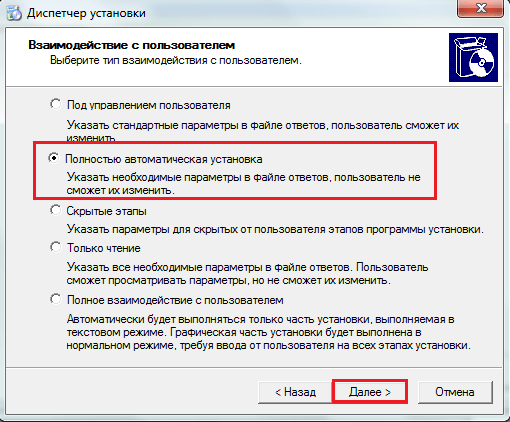
- User Interaction - “Fully Automatic Installation” (unless we plan to change the parameters in the answer file).
- Next, select “Install from CD”.

- Let's accept the license agreement and move on to filling out the same forms and fields that we filled out when we installed Windows from disk. First window: “Name and Organization”.
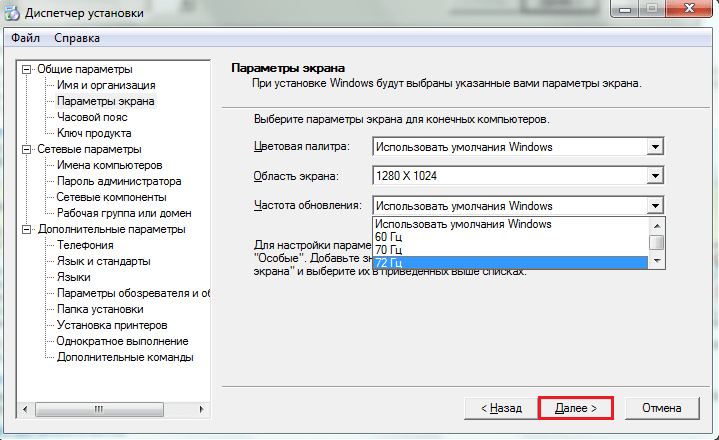
- Screen options. They can be left as default (use the Windows defaults).
- Timezone.

- Serial number (required!). Without introducing serial number here, you will not be able to continue building the answer file and installing the system.

- The names of the computers on which the unattended installation of Windows XP will be performed using this scenario.

- And also: the administrator password, network components, the name of the workgroup or domain where this PC will enter, telephone code countries and cities, locales, language support, primary Internet parameters Explorer, the Windows installation folder, printers and a number of other settings - in separate windows of the program.
Upon completion of the wizard, a file will be created unattend.txt- this is our script, thanks to which we can install Windows XP completely automatically.
If you will be installing from a CD, you will need to rename unattend.txt to winnt.sif.
After you create a response file, you can add your own commands to it, which you can learn more about in this article.
That's probably all. As you can see, there is nothing difficult in installing Windows XP in a script without your own active participation. It remains to save the resulting file in the i386 folder of the distribution disk - in the same place as winnt32.exe - the Windows installer.
If your PC is equipped with a floppy disk drive, you can place the answer file in the root directory of the floppy disk and insert it into your computer during system setup. In this case, the installer will have priority to execute the script from the floppy disk, even if there is another one on the CD, in the i386 folder.
Automation of installation by alternative means
Windows native toolkit isn't the only one-click installation tool. There are third-party applications for this, for example, Advanced Windows Unattended Installer... Create scripts with this simple and free software much faster and easier than Windows tools... The only drawback of Advanced Windows Unattended Installer is the lack of a Russian-language interface.
To use this tool to create a disk that allows you to automatically install on Windows computer XP, you only need to do three steps:
- Copy the contents of the Windows distribution to separate folder or mount its ISO image to a virtual drive.
Enough convenient option when booting Windows XP onto a device, it is the use of a special flash drive. The WinToFlash program will help you here. When it starts up for the first time, you must agree with the user agreement and click OK. Next, the main application window is displayed, which looks like this.
Since the program has been fully translated into Russian, the process of working with it is greatly simplified. For creating bootable flash drive you must use a wizard. It assumes support at all stages. this process... There is another approach to the implementation of the task. To do this, open the "Advanced Mode" tab and click on "Transfer Windows XP Setup to a Drive". Select the appropriate drive if not specified. After that, the button "Create" is pressed.

Now you need to set the location of the Windows XP files. There are various options - they can be located on a hard disk, CD or as an image. The last point deserves a separate consideration. In the presence of ISO image, you should open it with any archiver followed by unpacking. 
The next step is to specify which USB flash drive should become bootable. Be sure to take into account the fact that this will entail the deletion of all data without the possibility of their recovery in the future. It is recommended that you save important information to the HDD... The conversion process itself takes some time and you just need to wait.
As you can see from the written manual, creating a bootable Windows flash drives XP using WinToFlash presents no problem. The application provides two main modes for performing this task. The wizard accompanies the user and is the classic approach. Advanced mode allows you to set certain parameters. For example, this can include the choice of the type of bootloader, specify the correction of some errors, and more. If this does not tell you anything, but you do not need to use the extended mode.
You can download the program on the official website of the developer //wintoflash.com/home/ru/
Creating a bootable USB drive using - WinSetupFromUSB
The WinSetupFromUSB program is quite popular when creating bootable USB drives. It is freeware and offers a simple process for getting things done. This application provides the ability to use for a wide range of purposes. 
The process should be considered in more detail:
- The USB flash drive must be inserted into USB port device and run the program.
- It is required to indicate the path to the flash drive. If it is the only connected storage device, it will already be set by default. When the location is specified, Bootice is pressed.
- A special Bootice window is displayed, where you need to click "Perform format". There will be several items to choose from, among which you need to specify USB-HDD mode (Single Partition). A formatting message is displayed and must be confirmed. As in the previous case, it is recommended to save all important references beforehand.
- When the formatting is over, you need to click "Process MBR", where you select the item "GRuB for DOS" and click the "Install / Config" button. When the process completes, Bootice can be closed.
- Now you need to specify where the operating room files will come from Windows systems XP. As with the previous method, there are several approaches, but the principle of operation remains the same. When the location is specified, the "Go" button is pressed and waits until the task is completed.
The main advantage of WinSetupFromUSB is its in-depth approach that allows for a lot of functionality. The program is great for advanced users.
Preparing the hard drive during Windows XP installation
Before you begin the process of installing Windows XP on your computer's hard drive, you need to prepare it. It should be understood that installing multiple operating systems on one logical disk is impossible, since in this case none of the systems will be able to work correctly. Therefore, before starting the installation, it is necessary to format the HDD partition on which we will install.
We start from the previously created bootable USB flash drive, 
After that, the monitor will display the message “ Installing Windows XP Professional ". During this time, the process of loading the drivers that are necessary for the OS installation program to work occurs. 
After that, a window appears, which offers to choose one of several options for continuing work. We need to start installing Windows XP, so press the Enter key and agree with the first point.

We read the license agreement from Microsoft and agree with it by pressing the F8 key. 
After that, we see a window in which we are invited to restore previous version Windows. You will see this message only if one of the versions of Windows XP is already installed on your computer. In any case, we recommend not performing a system restore, but proceeding with the installation new version, since only this option is able to solve all problems and ensure stable and reliable operation of the computer. To do this, press the Esc key. 
The installer now shows us a list of logical partitions on the hard drive. It is recommended to install the new version of Windows XP on the same partition in which it was previously installed old version, as a rule, this is drive C. Select this section and press the Enter key. 
Now we have to choose the type of file system that will be created on the logical disk after formatting. For modern computers, in most cases, it is best suited file system NTFS, so we select the item "Format the partition in NTFS system"And press the Enter key. 
After that, the installation program will display a window with a warning that all information from this partition of the hard disk will be deleted during formatting. If all important information you moved it to other sections in advance - feel free to press the F key.
The formatting process begins, which may take quite a while. long time, depending on the size of the logical disk. 
Once the formatting process is complete, the installer will automatically begin copying the Windows XP files to your computer. 
After that, it will be executed automatic reboot computer. The system will boot from the computer's hard drive and start the Windows XP graphical installation process.
Windows XP installation process - main step
This section will directly answer the question "How to install Windows XP". This information is absolutely identical both for the process of installing Windows XP from a CD, and for installing Windows XP from a USB flash drive on a laptop. The Collecting Information, Dynamic Updating, and Preparing to Install phases are all taking place without our participation. After that, we are asked to configure the language, regional standards for displaying numbers and currencies. To do this, click on the "Configure" button in the "Location" section. In the drop-down menu, select your country and click OK. After that, again click on the "Configure" button, but this time in the "Language" section. In the first drop-down menu, we can select the language that will be used by default when the computer boots. Below you can add input languages by clicking on the "Add" button (by default, two languages are available, Russian and English). If you click on the "Keyboard Options" button, we will get to the menu, in which you can set the key to disable the mode Caps lock and also change the keyboard shortcut to switch keyboard layouts. Finishing language settings click "Next" and go to the next window. 
Here we are asked to enter our own name and the name of the organization. Enter absolutely any data and click "Next". 
Now you need to enter the 25-digit license key to your Windows copies... This key is on the box if you are using a licensed copy. In the case of pirated products, it must be in text file... Introduce given key, check the correctness of the entry and click the "Next" button.

After that, a window appears for setting the computer name and password of a user with administrator rights. If you work on a home computer, you yourself choose a name that will be assigned to your PC in the future. home network... If you are working on a corporate computer, check it with your network administrator. Remember or write down the administrator password that you set in the same window, as it will be required every time you start Windows. 
In the next window, we are given the opportunity to customize the date and time. We choose desired settings and click "Next".

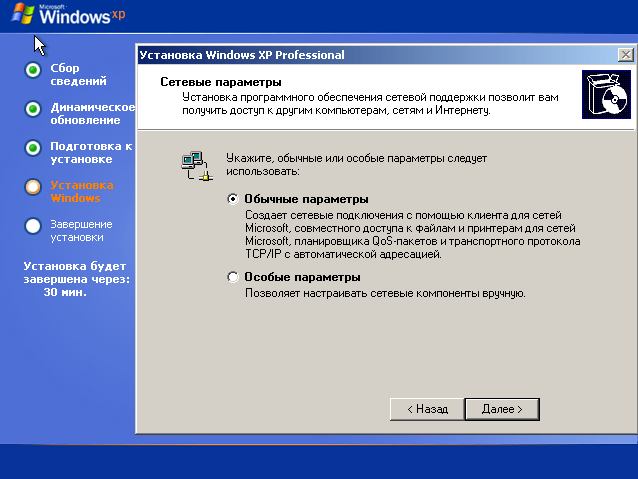
After that, go to the "Network Settings" window. It is best to skip the local network setup at this stage and perform it later, after the installation is complete. To do this, select the item " Common parameters"click the" Next "button. 
We leave the working group unchanged "WORKGROUP" and click on. 
After that, copying starts. system files to your computer hard drive. Wait for the installation process to complete, after which the first Windows startup XP. If automatic monitor setup starts at this time, wait until it finishes and click OK. 
In this window, left-click on "OK" 
After that, we will see an animated Windows XP welcome window. 
After that, a window appears with a request to turn on the automatic Windows updates... From experience, it should be noted that it is better automatic update leave disabled. And update the system manually.

Next, we will be asked to configure the Internet connection and activate a copy of the OS. This step can be skipped for now. 
Are you ready to register with Microsoft? To this question we answer "No, some other time" and click on.

The next window prompts you to enter the name of your account, as well as the names of other users who will also work on this computer. Note that accounts named Administrator and Guest were created during OS installation. 
This completes the installation of Windows XP, click the "Finish" button and enjoy a clean operating system.

Reinstallation of the operating system allows you to correct accumulated operating errors, reformat hard drives, completely clear the registry. We recommend that you reinstall Windows XP every six months.
Step 1. When you turn on the computer, enter the BIOS and set your floppy drive to be the first boot device with priority.

On a note! You can boot from the floppy drive in another way: during the procedure "POST ”enter the boot menu and select yourCD-ROM orDVDROM.
Step 2. During installation, you will be prompted to load specific drivers for SCSI or RAID devices. These drivers are used to server systems, so for home computer this item can be skipped.
Step 3. Read the End User License Agreement (EULA). Press F8 to confirm consent. In case of failure (ESC), the installation will be aborted.

On a note! The agreement has several points that few people pay attention to. For example, according to the specified document, you have the right to copy installation disk no more than two times for each paid license. Thus, you can avoid various legal proceedings associated with the use of unlicensed copies of distributions!
Step 4. Check out the volume of your hard drive. To install to the selected partition, use the “Enter” key and go to step 7. If you want to change the number of volumes, go to step 5.

Step 5. Create the required number of logical partitions (volumes) of the hard disk by pressing the "C" key. Specify the size of the new volume.

Step 6. Specify the logical drive where you want to install XP.

Step 7. Check the option you want formatting hard disk.

Important! It is preferable to choose full formatting, and not fast, since it checks for bad sectors. Please note that when installingXP the volume selected for installation is completely cleared!
Step 8. Wait until the process of formatting the partition is finished.

Step 9. Wait until the process of copying system files is completed.

Step 10. To continue, a reboot is required, as a rule, it occurs in automatic mode.

Step 11. After downloading, the system installation process begins directly.

Step 12. At the request of the installer, configure the regional parameters you need.

It is advisable to specify the default layout that you use most often. You can also change it later, in an already installed system.

Step 13. Setting up the ownership of programs is necessary for the subsequent display in Windows XP of the name of the copyright holder of this licensed copy.

Step 14. Enter the key when prompted by the installer. As a rule, stickers with license keys are located on the computer case, or on the original boxes for installation discs.

Step 15. Create and enter a computer name (required parameter), as well as a password for the "Administrator" account (this parameter is optional, but it is better to specify).
On a note! If your computer is not on a workgroup or domain network, you can specify any name. Otherwise, it is worth using the name in Latin, while making sure that it does not coincide with the previous one, otherwise problems may arise when connecting to a domain controller or another computer.

Step 16. Specify the date and time settings.
On a note! When installing older versionsXP may experience a problem with time zones. Currently, winter and summer time has been canceled, but these transitions remain in the system. To avoid them without installing additional updates, specify your time zone for another country (for example, instead of Moscow, specify Istanbul).

Step 17. Network parameters are set in the following way: if your computer must have a static IP, check the "Custom parameters" option. If you select "Common options" network address Your computer, gateway and DNS server will be assigned automatically.

Step 18. Specify the domain or network group your computer belongs to. The default is Workgroup.
Important! If you need to connect to a domain, then it is better to specify it immediately during installation - this will allow you to quickly receive all operating system updates, security settings and standard settings workstation.

Step 19. Wait for the installation to complete.

Step 20. At the request of the computer, give the system consent to automatic tuning screen parameters.

Step 21 Select the desired option in the Screen Resolution Wizard.

Step 22. Perform the final setting of the operating system according to the instructions.

Step 23. Select the desired system update option.
Important! Technical supportWindowsXP was discontinued in 2014, so there are currently no updates, with the exception of particularly important ones, for example, protection against ransomware viruses.

Step 24 Upon request, register your copy of Windows with Microsoft. In fact given opportunity opens access to all system updates.

Step 25. Specify computer users.
On a note! Users need to be specified even if your machine is in a domain, since these records only apply to a specific workplace.

Step 26 Complete the installation wizard.

Step 27. After the end of the Windows installation process, you need to update the drivers for all devices.

Conclusion
We have covered the main points of OS installation, but do not forget about the difference between installation on a "stand-alone" machine, and a station in the domain. Try to update your system drivers as often as possible to maintain stable operation.
Video - Installing Windows XP
It usually takes up to 2 hours to install Windows XP. Installation can be done from disk and from a flash drive. If you want to install Windows XP from a flash drive, you
So, to install from disk, insert it into your floppy drive and restart your PC. You will need to put in the bios boot from the floppy drive, or call the boot menu, (Boot menu is a function that allows you to choose from which device to boot the computer. (Floppy drive, HDD (hard disk), portable hard drive, flash drive, etc.) On each PC, the boot menu call may differ, so press the f8, f9 keys in turn , f10, f11, f12) unless disabled in bios.
You can find out how to enter bios, turn on the boot menu or set the computer to boot from a floppy drive or flash drive
If you write everything in one article on how to enable the boot menu or install boot from various devices, it will turn out to be very extensive, so I just made links. If a person can do all this, this information is useless to him.
Installation starts.
After the PC has seen and spun the disc, you will see Press any key to boot from CD press the space bar. If you missed this message, restart your computer and start over.
Please select automatic installation Windows. The mouse does not work during installation. Use the keyboard. After loading the system files, the following window will appear:

Then choose fast format NTFS

Formatting will begin, then copying new files, and after completion, the computer should restart.
Now you need to boot not from the disk that is in the drive, but from the hard disk. When the Press any key to boot from CD entry appears again, ignore it. And if you set the boot from the HDD after the floppy drive in bios, then it should start loading windows as when turning on the PC normally, then a window like this will appear:

Also, a little further, windows may appear with the requirement to enter a license key, computer name and password, etc. (V different versions XP everything is different) We enter all this and wait for the installation to complete. After the installation is complete, the PC will reboot, again you need to boot from the HDD and you will see the desktop after a while:

After installing Windows.
Next, you need to install the drivers for correct Windows work if they haven't installed themselves. In order to see if all the drivers are in place, click the Start menu and right click click on my computer and select Management. A window will appear where we press Device Manager.

As you can see in the picture above, I have not all drivers installed. If you have disks with drivers that come with your computer / laptop, put firewood from them. When there are no such disks, I use a wonderful Driver program Pack Solution.

Download it from the Internet, then run it and check the Expert mode checkbox on the left in the column. If there is no column, click the Expand button at the top right. Select the drivers you need to install, scroll down the list and there will be an Install button. After installation, restart your computer. Also, you can additionally look at the "" section and choose what you need there. Almost all articles describe in detail how to install firewood.
Windows XP installation is complete.
Below you can watch a video detailing the installation of Windows XP from a disk. Good luck!
In this article, you will learn how to reinstall Windows XP yourself. The material is designed for users who will install Windows on a computer or laptop for the first time. As scary as it sounds, reinstalling Windows is easy. In Windows times 95 and 98 to an inexperienced person, the procedure for reinstalling the operating system could seem like a mystical rite. The person who was invited to do this was definitely called a programmer, and was considered a guru in the computer field.
For their part, such gurus, inflating their worth, in every possible way intimidated their clients with terrible computer terms and stories about viruses and burned out computers. In this guide, you will make sure that this is not at all the case and that installing or reinstalling Windows on your laptop or computer is very simple and accessible to almost anyone who knows how to use a computer mouse.
I will make a small reservation. This article will show you how to install Windows XP yourself using a DVD or CD. If your computer or laptop does not have a DVD drive, then you will need to install Windows with USB stick or from a memory card, I will talk about this in another lesson.
Before you start reinstalling Windows XP, read the entire article to the end, and if you have a printer, then print it.
Reinstall Windows XP consists of several stages:
- Preparing your computer for installing Windows XP;
- Preparing an installation disk with Windows XP;
- Customization Computer BIOS to download from DVD disc a;
Now let's go through all the stages in detail.
1. Preparing to install Windows XP
Before reinstalling Windows, you need to do a little preparation.
First, you need to copy all the valuable information from the disk " WITH:". Of course you know better, but still I will tell you where to look. Places, where on the disk." C:"may be your useful information not so much, usually it is " Desktop" and " My documents". It is also worth looking into the root of the disk." WITH:"sometimes people are in a hurry or simply out of ignorance, save files there. Copy all the files you need to another disk (for example,“ D:”), DVD or USB stick.
For the future, keep in mind that it is best to store information not on the same partition of the disk on which the system is installed, and, of course, create backups.
If you have just purchased a computer or are sure that there is no valuable information in it, then naturally you can not bother
Another point that should be considered before installing Windows is drivers for network card... If after installation it turns out that your Windows distribution did not have drivers for your network card, or for some reason they did not install correctly, then you will find yourself without drivers and without the Internet. So download in advance fresh drivers at least for a network card.
2. Preparing an installation disk with Windows XP
For those who already have a Windows XP installation disc, you can skip this step. If you do not have such a disc, then you need to record it or purchase it. Those who want to download Windows on the Internet, look for clean MSDN builds.
This will protect yourself from possible mistakes in the operation of the installed system.
Installation discs with Windows XP on the Internet are usually distributed in the form of disc images in the format " .iso". I will not say where to download because it is not entirely legal to contribute to their distribution. I can advise, before downloading the image, read the release comments, problem disks are usually quickly identified in the form of a bunch of angry reviews.
After the image has been downloaded, you need to burn it to a DVD disc, and you can proceed with the installation.
3. Configuring the computer BIOS to boot from disk
To install Windows, it is not enough just to insert the disk into the drive, you also need to make sure that the computer starts to boot from this disk when it is turned on. This is done in the BIOS. There is a BIOS in almost any computer or laptop, it stores all sorts of important settings, one of these settings is the boot order of devices. This setting is us in this moment and interested.
In order to get into the BIOS, you need to press a certain key on the keyboard immediately when you turn on the computer. Usually, when booting, the screen says what exactly you need to press to get into the BIOS menu. Most often it is the Delete, Esc, or F2 key. You will find out what you have entered by seeing the BIOS menu in front of you.
The most common options are:


If the attempt is unsuccessful, then restart your computer and try again. Below are tables with possible options entrance to BIOS.
| BIOS manufacturer | Keys |
| ALR Advanced Logic Research, Inc. | F2, Ctrl + Alt + Esc |
| AMD (Advanced Micro Devices, Inc.) BIOS | F1 |
| AMI (American Megatrends, Inc.) BIOS | Del |
| Award BIOS | Ctrl + Alt + Esc, Del |
| DTK (Datatech Enterprises Co.) BIOS | Esc |
| Phoenix BIOS | Ctrl + Alt + Esc, Ctrl + Alt + S, Ctrl + Alt + Ins |
| PC manufacturer | Keys |
| Acer | F1, F2, Ctrl + Alt + Esc |
| AST | Ctrl + Alt + Esc, Ctrl + Alt + Del |
| Compaq | F10 |
| CompUSA | Del |
| Cybermax | Esc |
| Dell 400 | F3, F1 |
| Dell Dimension | F2, Del |
| Dell Inspiron | F2 |
| Dell Latitude | Fn + F1 |
| Dell Latitude | F2 |
| Dell optiplex | Del, F2 |
| Dell Precision | F2 |
| eMachine | Del |
| Gateway | F1, F2 |
| HP | F1, F2 |
| IBM | F1 |
| IBM E-pro Laptop | F2 |
| IBM PS / 2 | Ctrl + Alt + Ins then Ctrl + Alt + Del |
| IBM Thinkpad | from Windows: Programs> Thinkpad CFG |
| Intel Tangent | Del |
| Micron | F1, F2, or Del |
| Packard bell | F1, F2, Del |
| Sony VAIO | F2, F3 |
| Tiger | Del |
| Toshiba | Esc, F1 |
After you have logged out to BIOS you need to find the option responsible for the boot order of devices. As a rule, these settings need to be searched for in the menu, the name of which contains the word BOOT, of course, there are other options, but as they say - "He who seeks, he will always find."
To make it easier to find, I will give a few examples of how it looks live:


The choice of the device to boot first usually occurs using the arrow keys on the keyboard, but there are other ways to navigate the menu. BIOS, so if you can't figure it out, then you can see the help, which, as a rule, is in BIOS in sight.
Select your CD / DVD drive as the first boot device and exit BIOS with saving all changes. To do this, use the item " Save and Exit Setup". The computer will restart and we, thus, got to the next stage, for the sake of which, in fact, everything was started.
If the disc is recorded correctly and in BIOS the settings are set, right, we will see such an inscription in front of us "Press any key to boot from CD or DVD"which means Press any key to boot from CD or DVD.
It looks like this:

Press any key
If you do not have such an inscription, then perhaps you did something of the above written wrong. In this case, check again BIOS whether the boot from disk setting has been preserved if BIOS everything is installed correctly, then most likely your disk is not bootable and you will have to look for another installation disk or download another Windows XP image.
At this point I will make a small reservation. You may come across an installation Windows disk XP, on which, in addition to Windows itself, additional utilities are recorded, in which case, to start the installation, you will need to select the desired item in the menu of your disk. It is also worth noting that on some discs, most of the operations described below will be performed automatically, without your participation. Do not worry about this, all these settings can be changed, if desired, after the installation of Windows is complete.
The installation of Windows XP will begin, we are waiting for the initial download of the files

Since we are planning installing windows then press the button " Enter" on keyboard

We read " License agreement Windows XP". To scroll down, use the" Page Down". To agree and continue the installation, click" F8"

Consider the option of installing on a clean hard drive.
Press the key " WITH"

Now you need to specify the size of the created partition in megabytes, for example, if you need a partition ~ 20 gigabytes, then you need to drive 20000

If the size of the first partition specified by you in the previous paragraph will be less than the volume of the disk, then you will have " Unaligned area", which can also be turned into a partition. Thus, the system will have two disks" WITH:" and " D:"

We set the size of the second disk, if you are not going to create the third partition, then indicate the maximum possible size.

Now, after creating partitions, you need to select the partition on which Windows will be installed, if you have no special preferences, I highly recommend choosing a disk " WITH:"

Before starting the installation, the selected partition needs to be formatted, you just need to decide how. Choose item " Format partition in NTFS system"why exactly him, the answer to this question is a whole topic for a separate article.

Now the process will proceed without our participation, after the first reboot, you can set it to BIOS the first boot device is your hard disk ( HDD), how to do it is described above in paragraph


language and regional standards... Here again we will need our participation, make the necessary settings and press " Further"...

Here we will be asked to introduce ourselves

We drive in a 25-character product key, which can be taken on a license sticker, or in documents, depending on which Windows version bought by you. As I said above, the Windows XP installation may not have all the dialogs discussed here, it depends on your installation disk.

We indicate the name of the computer, basically this name is needed for identification on the network. We either do not specify the administrator password at all or we remember it well.